
ChuckD
-
Posts
914 -
Joined
-
Last visited
-
Days Won
9
Reputation Activity
-

 ChuckD reacted to Tolga ULGUR in ***Finished*** 1/32 Revell (ex Dragon) Bf 110G-2 with AIMS conversion
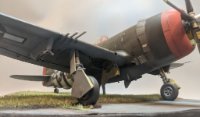
On the last working day of the year, the two-wheeled postman brought a small package. This was the AIMS spare parts I had been waiting for weeks.
So, I took the Bf 110 G2, which had been resting for a while, to the workbench to finish it.
Two separate rocket launchers were glued together, painted and installed.
Now very close to the finish line.
-
ChuckD reacted to coogrfan in Mitsuo Fuchida Nakajima Kate Pearl Harbor attack markings?
The photos are identified here: https://japanese-aviation.forumotion.com/t21-41-ceylon-raid-april-5-1942
The info regarding the painting of Akagi's Kankos can be found here: https://japanese-aviation.forumotion.com/t48-14-pearl-harbor-raid-training-time
The owner of this webpage has utilized a number of sources, including the research of the late David Aiken.
-
ChuckD reacted to coogrfan in Mitsuo Fuchida Nakajima Kate Pearl Harbor attack markings?
An interesting discussion on this subject: https://www.britmodeller.com/forums/index.php?/topic/235046576-a-couple-of-question-about-b5n2-fuchidas-color-scheme/
-
ChuckD reacted to LSP_Kevin in A Birdcage in Turtle Bay - An F4U-1 Diorama
Fantastic work on those figures, Chuck!
Kev
-

-
 ChuckD got a reaction from Greg W in A Birdcage in Turtle Bay - An F4U-1 Diorama
Back with another minor update. Priming the guys showed things turned out pretty well. Just gotta fix Lt. Ray's hands and pick out a head for the crew chief and I can start getting some paint going.
These pics are pre-cleanup on the seams and to illustrate how things look under primer. Barring the seam on the pilot's legs, it's rough to tell what's sculpted and what was original. More to follow tomorrow.
I had a couple sharp edges to clean up on the crew chief, but overall he was pretty clean.
-
 ChuckD got a reaction from HB252 in A Birdcage in Turtle Bay - An F4U-1 Diorama
Back with another minor update. Priming the guys showed things turned out pretty well. Just gotta fix Lt. Ray's hands and pick out a head for the crew chief and I can start getting some paint going.
These pics are pre-cleanup on the seams and to illustrate how things look under primer. Barring the seam on the pilot's legs, it's rough to tell what's sculpted and what was original. More to follow tomorrow.
I had a couple sharp edges to clean up on the crew chief, but overall he was pretty clean.
-
 ChuckD got a reaction from mc65 in A Birdcage in Turtle Bay - An F4U-1 Diorama
Back with another minor update. Priming the guys showed things turned out pretty well. Just gotta fix Lt. Ray's hands and pick out a head for the crew chief and I can start getting some paint going.
These pics are pre-cleanup on the seams and to illustrate how things look under primer. Barring the seam on the pilot's legs, it's rough to tell what's sculpted and what was original. More to follow tomorrow.
I had a couple sharp edges to clean up on the crew chief, but overall he was pretty clean.
-
ChuckD got a reaction from Greg W in A Birdcage in Turtle Bay - An F4U-1 Diorama
Thanks, Thierry. It looks like the most of the Airfix and Verlinden stuff is out of production. Not rare necessarily, but catch-as-catch-can on ebay and the sorts. Thank you to you and @mc65 for the lead. Regarding the academic figure and posable mannequins, in David Parker's book "Crew School," which is all about sculpting figures in our scales, he has exactly the thing I'm looking for. (Great book, by the way. Highly recommend.) However, it's a custom creation of his and I believe is/was 3D printed. I haven't pulled the trigger on a 3D printer yet (yet another skill for my brain to try to build and keep sharp), but stuff like this pushes me ever closer. Ugh. I can't find any references on Preiser's site regarding the multipose figures (google is coming up short too). Do you have any links?
Anyway, today was a productive day at the bench, and I'm more or less done with the sculpting, I think.
First, an unexpected detour back to the pilot as I decided to address what, to my eyes, was the most glaring inaccuracy... his boots. As mentioned above, the figure was intended for the ETO and would be considered a bit overdressed for the PTO. So, I started by shaving off most of the lower legs.
This was to allow room to sculpt straight pant legs over the remaining material. Without removing that material, I suspect he would've looked like a man who never skipped leg day.
The general process for me is pretty straight forward. Wet down some Green Stuff and roll it fairly flat, then stick in position.
\
Then, using silicone brushes, spatulas, toothpicks, and just about anything else, start shaping folds and creases into the material.
Lastly, I use a sharpened toothpick to add a gap between the cuff and the figure. I had to pop the figure off the wine cork that I'd attached it to for painting and a bit got left over. So, that's not in-scale dog poo on his foot.
There will be a little bit of filling and sanding required at the meeting of the putty and the figure, but I think it'll turn out well. In the end, I'm pretty pleased with these results. The rest of the inaccuracies of this figure will have to be addressed via squinting.
And I finished up the crew chief as well. I added pockets to the front of his jacket, as in the source material, he's got something big and heavy in his right front pocket. I also added collar and the patch for his rank insignia. It's out of scale, sure, but I feel it gives it some visual interest. Once these cure overnight, I'll prime them and clean up any rough spots, then get them with a coat of paint.
I cleaned up the collar near the neck well a bit after this shot, so it's a lot cleaner now.
-
ChuckD got a reaction from Greg W in A Birdcage in Turtle Bay - An F4U-1 Diorama
Thank you, all. Much appreciated. @mc65, I wasn't aware of that Airfix set and will look into it. Figures add so much to a model and are almost a necessity for any diorama. However, it gets really frustrating trying to find ones that will fit the scenes in my head, so that's why I started sculpting a few things here and there. The problem for me is compounded by the fact that I tend to do a lot of Pacific settings which makes it that much harder to find figures that both physically fit and are clad in theater-correct attire. Take, for example, the figure I had to use for our intrepid pilot, Lt. Ray. The figure is designed for the ETO and thus, if you're really looking, you'll see he's wearing heavier gear than what would be found in the SW Pacific theater.
So, sadly, I'm left to either eschew perfection and accept a little artistic license, or sculpt the entire figure, clothes, headgear, harnesses, straps, equipment, and all from scratch. Maybe some day I'll have the wherewithal to do that, but not yet, so sanity dictates I choose the former option and not the latter. I offer my sincerest apologies to those who are offended by my lack of accuracy.
What I'd love - and might push me to start sculpting more - is a posable mannequin in 1/32 scale that I could use as the base frame for the figure. I've tried doing a base frame from wire before and it went poorly. So, if any of you out there have any leads for something like that, I'm all ears.
Anyway, I spent a little time at the bench today getting the arms done for the crew chief. I'm very happy with how they turned out. Tomorrow, I'll add pockets, arm patches, and take a swipe at the collar. This is my first time using Green Stuff vs ApoxieSculpt or Magic Sculpt. I am enjoying working with it as it is stickier (thus it doesn't slough off the wire frame if I push too hard) and it's a harder material once mixed, meaning that I can push hard while sculpting and already-completed details aren't destroyed elsewhere. As with any epoxy putty though, the build process is agonizingly long as it typically has to cure for many hours before you can progress to the next section.
-
ChuckD got a reaction from Greg W in A Birdcage in Turtle Bay - An F4U-1 Diorama
Thank you! I'm glad to know it wasn't operator error.
Anyway, good progress today.
After sifting through my spares bins, these were the two best candidates for the lower half of the crew chief. The left is the standing pilot figure from this Corsair kit. The right is a 1/35 scale Wehrmacht Nashorn gunner figure also from Tamiya. Curiously, they're identical in dimensions despite the difference in scale. In the end, I opted for the standing pilot figure and began scraping off details that I wouldn't need.
This is after getting the torso down to almost nothing and adding the wires for the arms. Front:
Back:
Here is the basic jacket sculpted with Green Stuff. The hands are from a 1/35 set of heads and hands from Hornet. Again, despite the "smaller" scale, they look a little large, but I'm hoping that will become less obvious after the arms are fully sculpted. I'll also be adding some pockets and such to the jacket once the base material cures.
The back is okay. After this photo, I went back and did a little more detailing, so it looks a little better. I'll bend the arms into the proper position before adding the sleeves and such.
I also filled the gaps in the pilot figure, including the gaps between the parachute and the figure itself. I suspect I'll have some cleanup to do once I can get some primer down, but so far, I'm happy with the results.
While waiting for the epoxy putty to cure, I decided to build the Anyz Models canopy rail.
Unfortunately, I hacked off the mounting brackets for the mirrors while I was removing the frame from the 3D printing supports, so I had to fabricate absolutely tiny new ones from wire. Not perfect, but if they all hold together until final assembly, I'll be very happy. Lastly, I took the time to mask all the clear parts as well, so I'm getting close.
I hope to finish up the figure sculpting tomorrow, then start the final prep for painting on those. After that, I'll start focusing on the groundwork.
-
 ChuckD got a reaction from Biggles87 in A Birdcage in Turtle Bay - An F4U-1 Diorama
Back with another minor update. Priming the guys showed things turned out pretty well. Just gotta fix Lt. Ray's hands and pick out a head for the crew chief and I can start getting some paint going.
These pics are pre-cleanup on the seams and to illustrate how things look under primer. Barring the seam on the pilot's legs, it's rough to tell what's sculpted and what was original. More to follow tomorrow.
I had a couple sharp edges to clean up on the crew chief, but overall he was pretty clean.
-
 ChuckD got a reaction from patricksparks in A Birdcage in Turtle Bay - An F4U-1 Diorama
Back with another minor update. Priming the guys showed things turned out pretty well. Just gotta fix Lt. Ray's hands and pick out a head for the crew chief and I can start getting some paint going.
These pics are pre-cleanup on the seams and to illustrate how things look under primer. Barring the seam on the pilot's legs, it's rough to tell what's sculpted and what was original. More to follow tomorrow.
I had a couple sharp edges to clean up on the crew chief, but overall he was pretty clean.
-
 ChuckD reacted to Hoss FL in A Birdcage in Turtle Bay - An F4U-1 Diorama
Just joining late -- stunning work so far. I love this kit and your diorama is going to be stellar.
-
 ChuckD got a reaction from Trak-Tor in A Birdcage in Turtle Bay - An F4U-1 Diorama
Thanks, Thierry. It looks like the most of the Airfix and Verlinden stuff is out of production. Not rare necessarily, but catch-as-catch-can on ebay and the sorts. Thank you to you and @mc65 for the lead. Regarding the academic figure and posable mannequins, in David Parker's book "Crew School," which is all about sculpting figures in our scales, he has exactly the thing I'm looking for. (Great book, by the way. Highly recommend.) However, it's a custom creation of his and I believe is/was 3D printed. I haven't pulled the trigger on a 3D printer yet (yet another skill for my brain to try to build and keep sharp), but stuff like this pushes me ever closer. Ugh. I can't find any references on Preiser's site regarding the multipose figures (google is coming up short too). Do you have any links?
Anyway, today was a productive day at the bench, and I'm more or less done with the sculpting, I think.
First, an unexpected detour back to the pilot as I decided to address what, to my eyes, was the most glaring inaccuracy... his boots. As mentioned above, the figure was intended for the ETO and would be considered a bit overdressed for the PTO. So, I started by shaving off most of the lower legs.
This was to allow room to sculpt straight pant legs over the remaining material. Without removing that material, I suspect he would've looked like a man who never skipped leg day.
The general process for me is pretty straight forward. Wet down some Green Stuff and roll it fairly flat, then stick in position.
\
Then, using silicone brushes, spatulas, toothpicks, and just about anything else, start shaping folds and creases into the material.
Lastly, I use a sharpened toothpick to add a gap between the cuff and the figure. I had to pop the figure off the wine cork that I'd attached it to for painting and a bit got left over. So, that's not in-scale dog poo on his foot.
There will be a little bit of filling and sanding required at the meeting of the putty and the figure, but I think it'll turn out well. In the end, I'm pretty pleased with these results. The rest of the inaccuracies of this figure will have to be addressed via squinting.
And I finished up the crew chief as well. I added pockets to the front of his jacket, as in the source material, he's got something big and heavy in his right front pocket. I also added collar and the patch for his rank insignia. It's out of scale, sure, but I feel it gives it some visual interest. Once these cure overnight, I'll prime them and clean up any rough spots, then get them with a coat of paint.
I cleaned up the collar near the neck well a bit after this shot, so it's a lot cleaner now.
-
 ChuckD got a reaction from TAG in A Birdcage in Turtle Bay - An F4U-1 Diorama
Thanks, Thierry. It looks like the most of the Airfix and Verlinden stuff is out of production. Not rare necessarily, but catch-as-catch-can on ebay and the sorts. Thank you to you and @mc65 for the lead. Regarding the academic figure and posable mannequins, in David Parker's book "Crew School," which is all about sculpting figures in our scales, he has exactly the thing I'm looking for. (Great book, by the way. Highly recommend.) However, it's a custom creation of his and I believe is/was 3D printed. I haven't pulled the trigger on a 3D printer yet (yet another skill for my brain to try to build and keep sharp), but stuff like this pushes me ever closer. Ugh. I can't find any references on Preiser's site regarding the multipose figures (google is coming up short too). Do you have any links?
Anyway, today was a productive day at the bench, and I'm more or less done with the sculpting, I think.
First, an unexpected detour back to the pilot as I decided to address what, to my eyes, was the most glaring inaccuracy... his boots. As mentioned above, the figure was intended for the ETO and would be considered a bit overdressed for the PTO. So, I started by shaving off most of the lower legs.
This was to allow room to sculpt straight pant legs over the remaining material. Without removing that material, I suspect he would've looked like a man who never skipped leg day.
The general process for me is pretty straight forward. Wet down some Green Stuff and roll it fairly flat, then stick in position.
\
Then, using silicone brushes, spatulas, toothpicks, and just about anything else, start shaping folds and creases into the material.
Lastly, I use a sharpened toothpick to add a gap between the cuff and the figure. I had to pop the figure off the wine cork that I'd attached it to for painting and a bit got left over. So, that's not in-scale dog poo on his foot.
There will be a little bit of filling and sanding required at the meeting of the putty and the figure, but I think it'll turn out well. In the end, I'm pretty pleased with these results. The rest of the inaccuracies of this figure will have to be addressed via squinting.
And I finished up the crew chief as well. I added pockets to the front of his jacket, as in the source material, he's got something big and heavy in his right front pocket. I also added collar and the patch for his rank insignia. It's out of scale, sure, but I feel it gives it some visual interest. Once these cure overnight, I'll prime them and clean up any rough spots, then get them with a coat of paint.
I cleaned up the collar near the neck well a bit after this shot, so it's a lot cleaner now.
-

 ChuckD got a reaction from coogrfan in Have any of you ...
Sweet merciful God, please don't connect that to the Internet.
-
 ChuckD got a reaction from TankBuster in A Birdcage in Turtle Bay - An F4U-1 Diorama
Thanks, Thierry. It looks like the most of the Airfix and Verlinden stuff is out of production. Not rare necessarily, but catch-as-catch-can on ebay and the sorts. Thank you to you and @mc65 for the lead. Regarding the academic figure and posable mannequins, in David Parker's book "Crew School," which is all about sculpting figures in our scales, he has exactly the thing I'm looking for. (Great book, by the way. Highly recommend.) However, it's a custom creation of his and I believe is/was 3D printed. I haven't pulled the trigger on a 3D printer yet (yet another skill for my brain to try to build and keep sharp), but stuff like this pushes me ever closer. Ugh. I can't find any references on Preiser's site regarding the multipose figures (google is coming up short too). Do you have any links?
Anyway, today was a productive day at the bench, and I'm more or less done with the sculpting, I think.
First, an unexpected detour back to the pilot as I decided to address what, to my eyes, was the most glaring inaccuracy... his boots. As mentioned above, the figure was intended for the ETO and would be considered a bit overdressed for the PTO. So, I started by shaving off most of the lower legs.
This was to allow room to sculpt straight pant legs over the remaining material. Without removing that material, I suspect he would've looked like a man who never skipped leg day.
The general process for me is pretty straight forward. Wet down some Green Stuff and roll it fairly flat, then stick in position.
\
Then, using silicone brushes, spatulas, toothpicks, and just about anything else, start shaping folds and creases into the material.
Lastly, I use a sharpened toothpick to add a gap between the cuff and the figure. I had to pop the figure off the wine cork that I'd attached it to for painting and a bit got left over. So, that's not in-scale dog poo on his foot.
There will be a little bit of filling and sanding required at the meeting of the putty and the figure, but I think it'll turn out well. In the end, I'm pretty pleased with these results. The rest of the inaccuracies of this figure will have to be addressed via squinting.
And I finished up the crew chief as well. I added pockets to the front of his jacket, as in the source material, he's got something big and heavy in his right front pocket. I also added collar and the patch for his rank insignia. It's out of scale, sure, but I feel it gives it some visual interest. Once these cure overnight, I'll prime them and clean up any rough spots, then get them with a coat of paint.
I cleaned up the collar near the neck well a bit after this shot, so it's a lot cleaner now.
-
 ChuckD got a reaction from Fanes in A Birdcage in Turtle Bay - An F4U-1 Diorama
Thank you, all. Much appreciated. @mc65, I wasn't aware of that Airfix set and will look into it. Figures add so much to a model and are almost a necessity for any diorama. However, it gets really frustrating trying to find ones that will fit the scenes in my head, so that's why I started sculpting a few things here and there. The problem for me is compounded by the fact that I tend to do a lot of Pacific settings which makes it that much harder to find figures that both physically fit and are clad in theater-correct attire. Take, for example, the figure I had to use for our intrepid pilot, Lt. Ray. The figure is designed for the ETO and thus, if you're really looking, you'll see he's wearing heavier gear than what would be found in the SW Pacific theater.
So, sadly, I'm left to either eschew perfection and accept a little artistic license, or sculpt the entire figure, clothes, headgear, harnesses, straps, equipment, and all from scratch. Maybe some day I'll have the wherewithal to do that, but not yet, so sanity dictates I choose the former option and not the latter. I offer my sincerest apologies to those who are offended by my lack of accuracy.
What I'd love - and might push me to start sculpting more - is a posable mannequin in 1/32 scale that I could use as the base frame for the figure. I've tried doing a base frame from wire before and it went poorly. So, if any of you out there have any leads for something like that, I'm all ears.
Anyway, I spent a little time at the bench today getting the arms done for the crew chief. I'm very happy with how they turned out. Tomorrow, I'll add pockets, arm patches, and take a swipe at the collar. This is my first time using Green Stuff vs ApoxieSculpt or Magic Sculpt. I am enjoying working with it as it is stickier (thus it doesn't slough off the wire frame if I push too hard) and it's a harder material once mixed, meaning that I can push hard while sculpting and already-completed details aren't destroyed elsewhere. As with any epoxy putty though, the build process is agonizingly long as it typically has to cure for many hours before you can progress to the next section.
-
ChuckD got a reaction from Fanes in A Birdcage in Turtle Bay - An F4U-1 Diorama
Thanks, Thierry. It looks like the most of the Airfix and Verlinden stuff is out of production. Not rare necessarily, but catch-as-catch-can on ebay and the sorts. Thank you to you and @mc65 for the lead. Regarding the academic figure and posable mannequins, in David Parker's book "Crew School," which is all about sculpting figures in our scales, he has exactly the thing I'm looking for. (Great book, by the way. Highly recommend.) However, it's a custom creation of his and I believe is/was 3D printed. I haven't pulled the trigger on a 3D printer yet (yet another skill for my brain to try to build and keep sharp), but stuff like this pushes me ever closer. Ugh. I can't find any references on Preiser's site regarding the multipose figures (google is coming up short too). Do you have any links?
Anyway, today was a productive day at the bench, and I'm more or less done with the sculpting, I think.
First, an unexpected detour back to the pilot as I decided to address what, to my eyes, was the most glaring inaccuracy... his boots. As mentioned above, the figure was intended for the ETO and would be considered a bit overdressed for the PTO. So, I started by shaving off most of the lower legs.
This was to allow room to sculpt straight pant legs over the remaining material. Without removing that material, I suspect he would've looked like a man who never skipped leg day.
The general process for me is pretty straight forward. Wet down some Green Stuff and roll it fairly flat, then stick in position.
\
Then, using silicone brushes, spatulas, toothpicks, and just about anything else, start shaping folds and creases into the material.
Lastly, I use a sharpened toothpick to add a gap between the cuff and the figure. I had to pop the figure off the wine cork that I'd attached it to for painting and a bit got left over. So, that's not in-scale dog poo on his foot.
There will be a little bit of filling and sanding required at the meeting of the putty and the figure, but I think it'll turn out well. In the end, I'm pretty pleased with these results. The rest of the inaccuracies of this figure will have to be addressed via squinting.
And I finished up the crew chief as well. I added pockets to the front of his jacket, as in the source material, he's got something big and heavy in his right front pocket. I also added collar and the patch for his rank insignia. It's out of scale, sure, but I feel it gives it some visual interest. Once these cure overnight, I'll prime them and clean up any rough spots, then get them with a coat of paint.
I cleaned up the collar near the neck well a bit after this shot, so it's a lot cleaner now.
-
 ChuckD got a reaction from Shoggz in A Birdcage in Turtle Bay - An F4U-1 Diorama
Thanks, Thierry. It looks like the most of the Airfix and Verlinden stuff is out of production. Not rare necessarily, but catch-as-catch-can on ebay and the sorts. Thank you to you and @mc65 for the lead. Regarding the academic figure and posable mannequins, in David Parker's book "Crew School," which is all about sculpting figures in our scales, he has exactly the thing I'm looking for. (Great book, by the way. Highly recommend.) However, it's a custom creation of his and I believe is/was 3D printed. I haven't pulled the trigger on a 3D printer yet (yet another skill for my brain to try to build and keep sharp), but stuff like this pushes me ever closer. Ugh. I can't find any references on Preiser's site regarding the multipose figures (google is coming up short too). Do you have any links?
Anyway, today was a productive day at the bench, and I'm more or less done with the sculpting, I think.
First, an unexpected detour back to the pilot as I decided to address what, to my eyes, was the most glaring inaccuracy... his boots. As mentioned above, the figure was intended for the ETO and would be considered a bit overdressed for the PTO. So, I started by shaving off most of the lower legs.
This was to allow room to sculpt straight pant legs over the remaining material. Without removing that material, I suspect he would've looked like a man who never skipped leg day.
The general process for me is pretty straight forward. Wet down some Green Stuff and roll it fairly flat, then stick in position.
\
Then, using silicone brushes, spatulas, toothpicks, and just about anything else, start shaping folds and creases into the material.
Lastly, I use a sharpened toothpick to add a gap between the cuff and the figure. I had to pop the figure off the wine cork that I'd attached it to for painting and a bit got left over. So, that's not in-scale dog poo on his foot.
There will be a little bit of filling and sanding required at the meeting of the putty and the figure, but I think it'll turn out well. In the end, I'm pretty pleased with these results. The rest of the inaccuracies of this figure will have to be addressed via squinting.
And I finished up the crew chief as well. I added pockets to the front of his jacket, as in the source material, he's got something big and heavy in his right front pocket. I also added collar and the patch for his rank insignia. It's out of scale, sure, but I feel it gives it some visual interest. Once these cure overnight, I'll prime them and clean up any rough spots, then get them with a coat of paint.
I cleaned up the collar near the neck well a bit after this shot, so it's a lot cleaner now.
-
ChuckD got a reaction from Biggles87 in A Birdcage in Turtle Bay - An F4U-1 Diorama
Thanks, Thierry. It looks like the most of the Airfix and Verlinden stuff is out of production. Not rare necessarily, but catch-as-catch-can on ebay and the sorts. Thank you to you and @mc65 for the lead. Regarding the academic figure and posable mannequins, in David Parker's book "Crew School," which is all about sculpting figures in our scales, he has exactly the thing I'm looking for. (Great book, by the way. Highly recommend.) However, it's a custom creation of his and I believe is/was 3D printed. I haven't pulled the trigger on a 3D printer yet (yet another skill for my brain to try to build and keep sharp), but stuff like this pushes me ever closer. Ugh. I can't find any references on Preiser's site regarding the multipose figures (google is coming up short too). Do you have any links?
Anyway, today was a productive day at the bench, and I'm more or less done with the sculpting, I think.
First, an unexpected detour back to the pilot as I decided to address what, to my eyes, was the most glaring inaccuracy... his boots. As mentioned above, the figure was intended for the ETO and would be considered a bit overdressed for the PTO. So, I started by shaving off most of the lower legs.
This was to allow room to sculpt straight pant legs over the remaining material. Without removing that material, I suspect he would've looked like a man who never skipped leg day.
The general process for me is pretty straight forward. Wet down some Green Stuff and roll it fairly flat, then stick in position.
\
Then, using silicone brushes, spatulas, toothpicks, and just about anything else, start shaping folds and creases into the material.
Lastly, I use a sharpened toothpick to add a gap between the cuff and the figure. I had to pop the figure off the wine cork that I'd attached it to for painting and a bit got left over. So, that's not in-scale dog poo on his foot.
There will be a little bit of filling and sanding required at the meeting of the putty and the figure, but I think it'll turn out well. In the end, I'm pretty pleased with these results. The rest of the inaccuracies of this figure will have to be addressed via squinting.
And I finished up the crew chief as well. I added pockets to the front of his jacket, as in the source material, he's got something big and heavy in his right front pocket. I also added collar and the patch for his rank insignia. It's out of scale, sure, but I feel it gives it some visual interest. Once these cure overnight, I'll prime them and clean up any rough spots, then get them with a coat of paint.
I cleaned up the collar near the neck well a bit after this shot, so it's a lot cleaner now.
-
 ChuckD got a reaction from scvrobeson in A Birdcage in Turtle Bay - An F4U-1 Diorama
Thanks, Thierry. It looks like the most of the Airfix and Verlinden stuff is out of production. Not rare necessarily, but catch-as-catch-can on ebay and the sorts. Thank you to you and @mc65 for the lead. Regarding the academic figure and posable mannequins, in David Parker's book "Crew School," which is all about sculpting figures in our scales, he has exactly the thing I'm looking for. (Great book, by the way. Highly recommend.) However, it's a custom creation of his and I believe is/was 3D printed. I haven't pulled the trigger on a 3D printer yet (yet another skill for my brain to try to build and keep sharp), but stuff like this pushes me ever closer. Ugh. I can't find any references on Preiser's site regarding the multipose figures (google is coming up short too). Do you have any links?
Anyway, today was a productive day at the bench, and I'm more or less done with the sculpting, I think.
First, an unexpected detour back to the pilot as I decided to address what, to my eyes, was the most glaring inaccuracy... his boots. As mentioned above, the figure was intended for the ETO and would be considered a bit overdressed for the PTO. So, I started by shaving off most of the lower legs.
This was to allow room to sculpt straight pant legs over the remaining material. Without removing that material, I suspect he would've looked like a man who never skipped leg day.
The general process for me is pretty straight forward. Wet down some Green Stuff and roll it fairly flat, then stick in position.
\
Then, using silicone brushes, spatulas, toothpicks, and just about anything else, start shaping folds and creases into the material.
Lastly, I use a sharpened toothpick to add a gap between the cuff and the figure. I had to pop the figure off the wine cork that I'd attached it to for painting and a bit got left over. So, that's not in-scale dog poo on his foot.
There will be a little bit of filling and sanding required at the meeting of the putty and the figure, but I think it'll turn out well. In the end, I'm pretty pleased with these results. The rest of the inaccuracies of this figure will have to be addressed via squinting.
And I finished up the crew chief as well. I added pockets to the front of his jacket, as in the source material, he's got something big and heavy in his right front pocket. I also added collar and the patch for his rank insignia. It's out of scale, sure, but I feel it gives it some visual interest. Once these cure overnight, I'll prime them and clean up any rough spots, then get them with a coat of paint.
I cleaned up the collar near the neck well a bit after this shot, so it's a lot cleaner now.
-
 ChuckD got a reaction from ARay87 in A Birdcage in Turtle Bay - An F4U-1 Diorama
Thanks, Thierry. It looks like the most of the Airfix and Verlinden stuff is out of production. Not rare necessarily, but catch-as-catch-can on ebay and the sorts. Thank you to you and @mc65 for the lead. Regarding the academic figure and posable mannequins, in David Parker's book "Crew School," which is all about sculpting figures in our scales, he has exactly the thing I'm looking for. (Great book, by the way. Highly recommend.) However, it's a custom creation of his and I believe is/was 3D printed. I haven't pulled the trigger on a 3D printer yet (yet another skill for my brain to try to build and keep sharp), but stuff like this pushes me ever closer. Ugh. I can't find any references on Preiser's site regarding the multipose figures (google is coming up short too). Do you have any links?
Anyway, today was a productive day at the bench, and I'm more or less done with the sculpting, I think.
First, an unexpected detour back to the pilot as I decided to address what, to my eyes, was the most glaring inaccuracy... his boots. As mentioned above, the figure was intended for the ETO and would be considered a bit overdressed for the PTO. So, I started by shaving off most of the lower legs.
This was to allow room to sculpt straight pant legs over the remaining material. Without removing that material, I suspect he would've looked like a man who never skipped leg day.
The general process for me is pretty straight forward. Wet down some Green Stuff and roll it fairly flat, then stick in position.
\
Then, using silicone brushes, spatulas, toothpicks, and just about anything else, start shaping folds and creases into the material.
Lastly, I use a sharpened toothpick to add a gap between the cuff and the figure. I had to pop the figure off the wine cork that I'd attached it to for painting and a bit got left over. So, that's not in-scale dog poo on his foot.
There will be a little bit of filling and sanding required at the meeting of the putty and the figure, but I think it'll turn out well. In the end, I'm pretty pleased with these results. The rest of the inaccuracies of this figure will have to be addressed via squinting.
And I finished up the crew chief as well. I added pockets to the front of his jacket, as in the source material, he's got something big and heavy in his right front pocket. I also added collar and the patch for his rank insignia. It's out of scale, sure, but I feel it gives it some visual interest. Once these cure overnight, I'll prime them and clean up any rough spots, then get them with a coat of paint.
I cleaned up the collar near the neck well a bit after this shot, so it's a lot cleaner now.
-
 ChuckD got a reaction from JeepsGunsTanks in A Birdcage in Turtle Bay - An F4U-1 Diorama
Thanks, Thierry. It looks like the most of the Airfix and Verlinden stuff is out of production. Not rare necessarily, but catch-as-catch-can on ebay and the sorts. Thank you to you and @mc65 for the lead. Regarding the academic figure and posable mannequins, in David Parker's book "Crew School," which is all about sculpting figures in our scales, he has exactly the thing I'm looking for. (Great book, by the way. Highly recommend.) However, it's a custom creation of his and I believe is/was 3D printed. I haven't pulled the trigger on a 3D printer yet (yet another skill for my brain to try to build and keep sharp), but stuff like this pushes me ever closer. Ugh. I can't find any references on Preiser's site regarding the multipose figures (google is coming up short too). Do you have any links?
Anyway, today was a productive day at the bench, and I'm more or less done with the sculpting, I think.
First, an unexpected detour back to the pilot as I decided to address what, to my eyes, was the most glaring inaccuracy... his boots. As mentioned above, the figure was intended for the ETO and would be considered a bit overdressed for the PTO. So, I started by shaving off most of the lower legs.
This was to allow room to sculpt straight pant legs over the remaining material. Without removing that material, I suspect he would've looked like a man who never skipped leg day.
The general process for me is pretty straight forward. Wet down some Green Stuff and roll it fairly flat, then stick in position.
\
Then, using silicone brushes, spatulas, toothpicks, and just about anything else, start shaping folds and creases into the material.
Lastly, I use a sharpened toothpick to add a gap between the cuff and the figure. I had to pop the figure off the wine cork that I'd attached it to for painting and a bit got left over. So, that's not in-scale dog poo on his foot.
There will be a little bit of filling and sanding required at the meeting of the putty and the figure, but I think it'll turn out well. In the end, I'm pretty pleased with these results. The rest of the inaccuracies of this figure will have to be addressed via squinting.
And I finished up the crew chief as well. I added pockets to the front of his jacket, as in the source material, he's got something big and heavy in his right front pocket. I also added collar and the patch for his rank insignia. It's out of scale, sure, but I feel it gives it some visual interest. Once these cure overnight, I'll prime them and clean up any rough spots, then get them with a coat of paint.
I cleaned up the collar near the neck well a bit after this shot, so it's a lot cleaner now.