
Dpgsbody55
-
Posts
2,327 -
Joined
-
Last visited
-
Days Won
2
Reputation Activity
-

 Dpgsbody55 reacted to MikeMaben in Thunderbolt ... edited pix
Got some more markings on, Serial on tail is a stencil, others are Alps printed.
Some ugly silvering , waiting for something in the mail. These pix look more green
than IRL..
This one has better color ...
Thanks for lookin' .
p.s. the squadron badge (rooster) and the numeral 5 are from an Eaglecals decal (excellent decals)
-
Dpgsbody55 reacted to MikeMaben in Thunderbolt ... edited pix
Got some markings on , feeling better about my progress.
Still some markings I'll need to make myself , stencils and/or decals.
Thanx for lookin'
-
Dpgsbody55 reacted to Furie in Yak-9T – René CHALLE – Régiment Normandie-Niemen – ICM 1/32
I corrected all the small assembly defects on my Yak 9 (micro mesh 800 => 12000) and then repainted with MRP-LPB black/primer.
The metal parts (front of the plane, cockpit area, engine cowl, the central part of the wing underneath, vertical and horizontal fixed tail) are treated in the usual way with white.
For the rear parts of the fuselage, which are canvas-covered, I applied white paint, but only lengthwise, using paint fillets.
For the rest of the wings, I also painted from front to back, using white paint and a brown-green paint to break up the monotony of the BB'ing.
Will it show once the camouflage shades are applied to my model?
That'll be a surprise for you and me!
-
Dpgsbody55 reacted to Furie in Yak-9T – René CHALLE – Régiment Normandie-Niemen – ICM 1/32
Well, a bit of work on the beast, nothing too impressive but necessary to have something well finished before painting.
I glued the 2 upper wings to each side of the fuselage, to make the joint as nice as possible, then glued the lower surface to the fuselage and to the 2 upper wings.
I also glued to the bottom of the 2 air intakes on the 2 wings, a grid made from a flour sieve (thanks Paolo for the tip).
The 2 horizontal tailplanes are also glued on, but I left out the 2 ailerons + vertical fin + 2 movable horizontal tailplanes.
Some engraving on the engine cowl and also some rivet lines, but not too much as the plane was quite smooth.
Note, but it won't surprise those who know me well, that I forgot to glue the cockpit floor once the wings and fuselage were glued together...
Big moment of solitude...
*sigh of weariness*
I had to unstick the bottom of the pilot seat and patiently managed to get the floor in place and glued...
A photo of 2 Border pencils for engraving structural lines, ordered from Ali Express.
Micromesh 12000 was applied all over the Yak, followed by a coat of MRP Dark Alu paint only at the panel junctions and on the wing fillet.
Next, an even coat of MRP black to start the BB'ing.
-
Dpgsbody55 reacted to Furie in Yak-9T – René CHALLE – Régiment Normandie-Niemen – ICM 1/32
Thank you for your comments and messages.
Well, this morning I applied a coat of MRP-LPB black, MRP's black primer.
No dilution, a final cleaning of the plane with Mr Color Leveling Thinner, the compressor pressure at maximum and I blow the whole model to remove any last dust that might still remain on the surface.
I lower the compressor pressure and start with the underside of the wings, then the top, the front of the fuselage.
I let it dry for a few minutes, then use a lint-free cloth to pick up the aircraft by the wings and continue with the back of the fuselage.
I'm always pleasantly surprised by MRP-LPB: this black primer is very easy to apply, has a particularly smooth, slightly satin finish, dries very quickly, provides excellent adhesion for the paint to come and, of course, highlights all the little flaws in the construction. And since I'm doing BB'ing, I won't have to paint over a layer of black paint.
I'm starting to see the shape of the plane with this black paint: it's very sleek with its beautiful wings, slim fuselage and cockpit set slightly aft.
The next step will be to remove all the small defects and then apply the white BB'ing.
See you soon and have a good Sunday, folks.
-
Dpgsbody55 reacted to Archimedes in Happy Birthday Peter!
@europapete
Happy Birthday buddy!
Many happy returns!
Kind regards,
Paul
-

-
-
Dpgsbody55 reacted to Archimedes in Happy birthday Michael Dpgsbody55
Happy Birthday Michael!
Kind regards,
Paul
-
-
Dpgsbody55 reacted to mozart in Happy birthday Michael Dpgsbody55
Hope you have a great day down there in Oz!
-
-

-
-
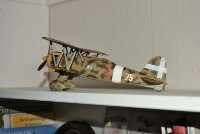
Dpgsbody55 reacted to mc65 in Fiat CR42 CN 1/32 ICM
damn how long!
the wait for the colors was long, and honestly I don't know how worth it it was: I wanted to try the MRPs, which are very airbrushable and already diluted, but not very opaque, with a thousand thousand shades that are difficult to manage, for me who have the eye denied with colors.
furthermore, once given they are absolutely not "revisable" like acrylics... with the latter if you are really not satisfied you arm yourself with Chante Clair and a toothbrush and start from scratch. with these NO. they cling to the styrene of the model (or to the primer, it's the same) with the same obstinacy as the old Humbrols.
However, they have a very high fineness of pigments, so even by applying several passes, thickness is not created.
okay, enough chatter, let's see what I've done? before seeing the colors in action, a small "technical" parenthesis: to connect the lights to the ground I found this solution. I stripped a wire from a phone charger cable and soldered it to a 1mm brass tube. the tube crosses the wheel from side to side, so that at the bottom I will have a hole in which a powered pin can provide the electrical contact, as well as stopping the aircraft at its base, while at the top I will have the flexible cable and in a position which will allow me - I hope - to be able to play on its length simply by rotating the wheel. the width of the landing gear leg will finally allow me to be able - if necessary - to stow the extra cable that I may not have been able to fit back into the fuselage through the lower wing.
a lot of talk for little substance, in short.
well, we were talking about the colors: the four samples on the left are MRP, the fifth on the right Lifecolor, while on the model there is a first layer of MRP sand. I think you can see clearly how none of the MRP "giallo mimetico" corresponds to the only Lifecolor proposed in the regia aeronautica's color set.
here on the right the Lifecolor and on the left the MRP closest to it... in the end I decided to mix two of the MRPs to obtain a more or less credible base, the one now on the model, but not yet saturated.
here it is after at least four (!) glazes.
For me, used to the building thicknesses of Lifecolor or the covering capacity of Tamiya, Gunze or AK, it was brutal, having to apply so many coats just to get a decent base. given that, in addition to being poor with colors, I am also incapable of managing camouflage like this freehand, so I traced the spots in pencil at least on the upper wing.
even the spots turned out to be a PITA a notable source of caltrops: both colors are a mix, and this is the third edition after several retouches, always with the remote help of my helpful friend, the color master.
paradoxically I am more satisfied with the stains on the lower wing, done in a haphazard manner without much study.
It's true that here the surfaces are tiny and therefore easier to manage. the spots on the fuselage are at least simpler, having a completely different pattern and documented by the photos.
here the problem lies in the fineness of these colors: each splash must be passed over at least three times to give it a minimum of consistency, which requires skills that I obviously don't have, unfortunately.
the nose is a completely separate matter, in period photos you can see a pattern of more or less horizontal lines, apparently darker than the blotches on the fuselage, which thickly and roughly cover the lower part of the engine cowl. in the upper area there is a color that could be black or dark blue grey, the two colors used by the regia for night fighters.
now it's drying well, then white for the band on the fuselage and the cross on the tail, and the transparent gloss in view of the decals, either from the box and custom created ad hoc for this little project.
see you soon, I hope!
cheers, Paolo
-
 Dpgsbody55 got a reaction from mc65 in Fiat CR42 CN 1/32 ICM
You say it's far from perfection, but it's still very convincing and I think the model will look great when it's done. Nice work.
Cheers,
Michael
-
 Dpgsbody55 got a reaction from BradG in Clostermann's LO-D by Airfix Spitfire Mk.IX
More work has been done around the engine and nose of the model. The cowling frames were airbrushed with cockpit green after the left side was thinned down using mostly files, but also 400 grit wet and dry paper. After doing this, it seemed to sit better on the model when trial fitting. Next, I needed to add some representation of the canvas insulators that were fitted to the outside of these frames, so I painted these on with some brushed on Mr Hobby H85 sail color. I started with what I thought would be the most difficult part which has two rows of insulators and to try and make it look half decent, I used bits of Tamiya tape cut into regular strips, but the horizontal piece of tape between top and bottom insulators was a mighty fine cutting of tape measured with Mk.1 eyeball.
The tape widths varied from 1.5mm to 4mm. This took a while to do, not very long to paint, and even less time to remove.
Here they are now fitted to the model. Jiggling three glue applied rear fitments into place was fun....
Overall, I'm pleased with the way these have turned out and the overall look of the engine. I've also added some further wire cabling to the engine to connect the hydraulic pump, tachometer drive and another bit which I'm unsure as to the function. Of course, I drilled all of the holes for the wire after all this was assembled and should have thought of this earlier. But no drill bits were harmed in the fitment of said wires.
Next, I've added the front of each wing fillet and the lower engine cowl. None of these were straight forward. Neither of the wing fillets were up to the normal standard of fit on this model needing some adjustment. The right side fitted kind of OK and with no gaps after a little adjustment with a file below the fuselage side and only a very minor gap to the wing. But the left needed further "assistance" and also needed a lot more Mr Surfacer 500 filler than the right side, as the lower picture shows. Next, the lower cowling went on after assembling the three components and some more Mr Surfacer. However, again, the lower cowling needed some adjustment as there appeared to be a slight twist where it mated to the lower wing. Again, a casting issue as one half of the cowling was cast thicker at the rear than the other half. Tape held the front end on while it dried in place
The good news is that the side cowlings line up well, but the bad news is that they appear to have no means of staying in place on their own.
The last parts to go on were the cannon barrels. After assembly and clean up, I drilled out the ends to a depth of about 5mm, then trial fitted these in place. If both wing halves mate perfectly at the barrel mounting, then they should fit fine, but I found the right side pointed upwards. A couple of seconds with a flat file fixed that, and both barrels are now firmly fixed in place, and even point in the right direction.
My next job will be to ponder the cowling fitment. Nothing retains the side cowls, and gravity makes a mockery of any attempt to keep them in place OOB. But they do fit, which is a good start. The top cowl needs a little persuasion to fit as it's a little narrow. It might be easily fixed except for interference from the engine itself. The hydraulic pump at the back of the right rocker cover sits a tad high which is my fault but easily fixed. More of a problem is the top ignition loom which sits a little too high. This I think is Mr Airfix's fault as I'm certain I've mounted it exactly right. The issue appears to me to be the length of the loom where it leaves the right magneto and heads up alongside the intercooler, sitting above this. Perhaps a little grinding of the top cowling may help. Not totally sure here. I just wish I'd already built one of these models before I started my first one....
One other issue I've run into is that while fitting the lower engine cowl, I stood the model on it's rudder to attach tape to hold the front of the cowl in place while gluing. While doing this, one of the elevator trim tabs flew off. I did find it eventually and put it back in place, this time gluing it to the elevator. I'm still scratching my head wondering why Airfix chose to make the trim tabs articulate, but not the elevators or rudder which are fixed. Unlike the ailerons. It's great that they provided separate parts for the tabs but they should have been glued into place while allowing the elevators and rudder articulate just like the ailerons. Someone had a few too "bevvies" the night before designing this parts of the model.
Once I've sorted the cowling issues out, I'll get the windscreen and canopy fitted, along with the last few remaining parts fitted before the paint stage starts. That's for next time which will be a few weeks away as I'm off to New Zealand to visit my son and see my not yet sighted grand daughter who turns one on Saturday coming. She's my first grand child and circumstances have conspired against me seeing her until now.
Cheers,
Michael
-
Dpgsbody55 got a reaction from BradG in Clostermann's LO-D by Airfix Spitfire Mk.IX
My engine is now in place, but unfortunately not all of the extra detail I wanted to add could be added because of fitment issues into the engine cradle. This was because I fitted part K13 to the engine firewall before before fitting the engine. Shot myself in the foot, there. . What I had hoped to add was some of the control rods and pivots around the supercharger, as I had with my Spitfire MkVIII. But that offending part, which (I think) feeds coolant to the intercooler got in the way during test fitting.
I did get a little more added, as shown in the following pictures; feed pipes from the water pump at the base of the engine as well as some pipe which goes between the carbie and the engine. At least it looks a bit better than it did but I won't make that mistake again if ever I do another of these, which I would like to. Where's that Mk.VIII, Mr Airfix???
Here it is in place, with nothing further added. I used an elastic band to hold the engine down into the engine cradle, as the front of the engine wanted to sit a little too high without some downward pressure.
Next, the oil tank goes on, as does the front part of the cowling mounting frames, along with the top half of part K13 and some more pipes.
After this, the carbie air intake was added. These next pictures were taken after it had dried in place. To get it into the proper place, the lower engine cowl was built up then placed into position and a knife blade inserted into the cowling intake to align the engine intake properly. The front of this wanted to sit a little high, and since you can see the carbie intake through the hole in the cowling, it needed adjustment.
Here it is now, at the time of writing. Progress has been slower than I'd like thanks to some very hot weather here again. Records have been smashed this February in my part of the world, and this state has had more than a dozen towns in the Mid West and Pilbara regions being the hottest place in the world on some days. Thankfully it looks like we're in for forecast high temps below forty degrees C in coming days. It'll only reach thirty nine... I'm presently working on the engine cowls and cowl mounting frames. The engine cowls have many ejector pin marks in them which I've filled with Mr Surfacer, along with the join in the propeller parts.
The engine cowl mounts are also receiving some attention. The holes for the dzus fasteners have all been drilled and then the frames test fitted. The right side fits well, but the left side is a bit more of a struggle. I think the main issue is that the left frame is cast thicker than the right frame, so I've started sanding this back.
Hopefully in the next week, I'll have these sorted, painted and fitted, as well as the engine cowlings. It's edging closer to the paint stage .
Cheers,
Michael
-
Dpgsbody55 got a reaction from BradG in Clostermann's LO-D by Airfix Spitfire Mk.IX
A little bit more progress on the model, with the engine bearer and firewall done.
It's best to do any work on the firewall before the engine bearer goes in place as access is much better. I've based this on pictures of other models and previous Spitfires I've done, plus what I can make out from pictures. It does improve the model a bit at least, but what Airfix provide as detail in this area is a little different to the Tamiya kit. Not quite finished here and I've outsmarted myself to a degree by adding part K13 above the curly pipe as this makes getting the engine in and out a little more difficult.
Next is the engine bearer itself.
I did have a little trouble with this. The large pipe on the left side I found quite difficult to manoeuver into place as it needs to go into the bearer then out again. Next, the instructions say to mount the right side pipe (part K75) which was a lot easier. These were allowed to dry before the canister at the back, with it's pipes cast as one piece, has to go through the gap on the right pipe, with one canister pipe (part K57) to go infront of the engine U shaped bearer, and one behind. Again, difficult to manoeuver into place, then the large right side pipe came adrift. Reattaching it, I realised it would be better if the instructions had you K57 in place before K75. Much less hassle.
Then the engine bearer was permanently attached and allowed to dry before adding more large copper pipework in the shape of part K53 which doesn't seem to connect to any part of the engine for some strange reason. It's imperative that the engine bearer is properly mounted as, if not, the engine cowlings won't fit. Thankfully Airfix have molded the parts so that this should be obvious. After that and once dry, the last of my extras were added.
The last detail added was a couple of decals to a tank and what looks like a filter canister. Shoulda done that earlier...
Here's the model now.
Next is a little more engine detail. Now that the engine bearer is in place, I can make sure that whatever I add will actually fit.
Cheers,
Michael
-
Dpgsbody55 got a reaction from BradG in Clostermann's LO-D by Airfix Spitfire Mk.IX
A bit of engine work for this update. The kit's engine is now done almost OOB except for the pipes along the engine's right side. These are cast on by Airfix, but I took them off and replaced them with wire. The basic engine I had done earlier and photo's of that are in the previous update. Here's the photos as it is now, right side first.
Top right view. Airfix provide all the ignition system including the leads for the spark plugs in the V. To fit these two pieces, I drilled out the plug holes with a 1mm drill and laid the first part in place and let it dry. This contains the spark plug run from the right magneto and all the plug leads to the right side of the V. This part of the plug lead run is split in half. The left side or top half contains the plug leads for the left side of the V and those leads were pushed into place and the plug lead run was glued carefully in place and allowed to dry. This method is effective, but needs plenty of clean up and paint touch up to look presentable. The plug wire runners were painted steel and the plug wires themselves were painted flat aluminium. The biggest criticism I'd make here is that the plug wire runner for the right side outer plugs is cast as part of the right magneto, whereas that should be attached to the left mag. The right magneto feeds the spark plugs in the V, and the left mag feeds the outer spark plugs. So that right side outer plug wire runner should go past the right mag, through the gap between the heads and intercooler.
Left side.
From the left rear, top view. There are what I think are temperature sensor wires cast into each inlet manifold and these I picked out in copper paint.
The engine goes together very easily. It compares well to the Tamiya Spitfire and has some better detail in some areas, but less in others. Six of one, half a dozen of the other, if that gets you a better comparison.
I want to add more detail if I can, but it's probably best I make sure this will fit with the rest of the engine bay. So my next step is to detail the firewall a bit, finish the engine cradle and glue it in place, then I can test fit my added detail to make sure it all works.
More on that in another update.
Cheers,
Michael
-
 Dpgsbody55 got a reaction from Gazzas in Galland, His E4... and Some Friends.
Great pictures, as is the model. Love the diorama. You've really captured a moment in time.
Cheers,
Michael
-

-
 Dpgsbody55 got a reaction from LSP_Kevin in Silver Wings Fokker D.XXI
Interesting choice. This will be good to watch .
Cheers,
Michael
-
-
Dpgsbody55 reacted to LSP_Kevin in Silver Wings Fokker D.XXI
After a bit of trawling through the stash, I've now settled on this kit for my entry into the Group Build:
Hopefully the connection to the GB theme is obvious! This is just a placeholder for now, as I'm trying not to start any new builds right now! I'm hoping to clear the bench enough to be able to kick this one off around mid-year, if not sooner.
In the meantime, if you'd like a closer look at the kit, Jeroen Peters reviewed it for us back in 2015:
https://www.largescaleplanes.com/reviews/review.php?rid=1498
Kev