

RichieB
-
Posts
212 -
Joined
-
Last visited
Content Type
Profiles
Forums
Events
Posts posted by RichieB
-
-
Many thanks chaps, hopefully I can get this one over the finish line soon!
Plus I have an idea that might enhance the lighting - more later when I've figured it out.
-
So with a long Bank Holiday weekend there was opportunity to progress and the incentive to finish this build is getting too much to ignore!
Not because I'm running out of mojo for his one (though it's been tested at times!) but I have many others that need some plastic love.
First up was a gloss coat courtesy of Tamiya X-22 which required a couple of coats to get a consistent shine and then on to the decals.
Needless to say there are no specific decals for this bird in 1/32 and I don't have the skills (or hardware) to create my own.
The scheme I'm doing eventually required 3 sets to get this scheme covered and even then there is not a lot of solid intel on what/where all the markings are!

All the Microscale markings went down fine though I had to do some fishing to find an AAR receptacle stencil that was close enough to the Revell scribings. A couple broke up as they were so old but I managed to rescue most.

I think some of the Microscale stencils are a little large but they are at least legible. Some of the positioning was contradicted by other sources so where I could I used Jake Melampy's and DACOs F-15 books to confirm but even still there is a bit of artistic license.
Next step is to seal them all with a gloss coat then tone down some of the black stencils which look a little stark and then add some weathering.
Definitely one small step but a giant leap in progress!
-
Thank you Maru, it's taken a lot of patience to get this far but the end game is tantalising close!
-
At last, the paint job is (mostly!) complete. Took a while and some extra touch ups but she's definitely looking blue with more than a hint of candy cane.

I've toned down some of the pre-shading so that it's a little less obvious.

Luckily with MRP paints you can control the depth of paint colour to give a nice patina effect.

The metallic areas are painted using various shades of Alclads including burnt metal and aluminium.
I also added some polished aluminium to the upper surface which often seems quite shiny and this is theoretically a relatively new aircraft.

Next up is a bit of a polish and a gloss coat before decal time!
-
Thanks for the comments chaps, much appreciated. I think I'll need to tone the contrast down a bit just to create a more subtle effect and remove any 'black' patches. The panel lines will have to be tackled in the weathering stage.
-
Many thanks gents, yes will have to lesson the effect of the panel lines. I think it is because the Revell kit has quite large panel lines which are difficult to cover-up with the MRP top coat and black shows up too well against a light colour. I'll try to tone it all down a little but am conscious that the stripes and other weathering will help add to the overall effect,
-
Happy Blue Year everyone! (see what I did there), hope 2022 is a good one for your modelling mojo, I might even finish this one this year!
Finally got the main camo scheme down. Not a difficult scheme as its just Air superiority blue overall, but I love this scheme - shame they didn't keep it.
I've used MRP lacquer paints which are superb and give a fair amount of control in terms of colouration.
Tried to keep as much of the pre-shading visible as I could but its a fine balance between adding too much top colour (looks toy-ish) or too little (looks a boneyard wreck).
Interesting how the black-basing panel lines come out quite distinctive. Might have to tone those down a bit.

Finished off the airbrake and elevators while I was at it.
Underneath had a darker pre-shade but judging from this photo I may need to add a little overspray of the AS Blue to blend it all in better.

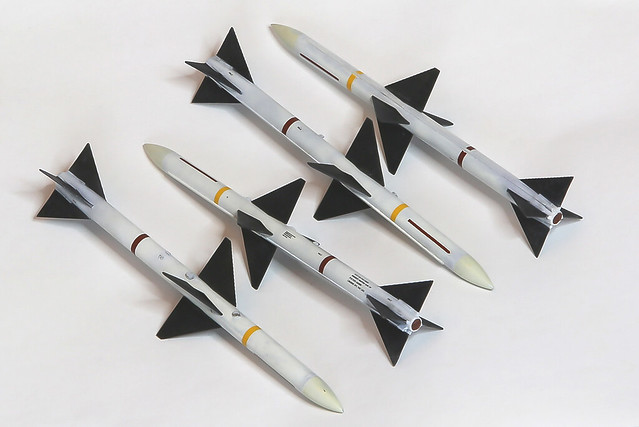
In other news, the AIM-7Fs have been painted up and decaled. They are the Eduard versions should come up quite nicely with a bit of weathering.
Not that these birds flew with many live weapons for real but it should look cool all tooled up.
Back to the spray shop for some touch-ups I guess but hopefully then onto the final stages of painting.
- easixpedro, Greg W, themongoose and 12 others
-
 15
15
-
-
With the pre-shading done it was time to load up the cockpit. Seats and pilots went in easily though it was a bit of a fiddle to then add the Oxy and G hoses and joysticks.
A few highlights were added with grey pencil and some shading with oils. The helmet markings are a bit of artistic license but based on the Sqn's tail fin markings.

The HUD was part of the Aires set but quite fiddly and I ended up cutting my own HUD glass from acetate sheets. I also had to lower them a tad as the Revell front canopy is a bit 'flatter' than the Tamiya one which this set is designed for.
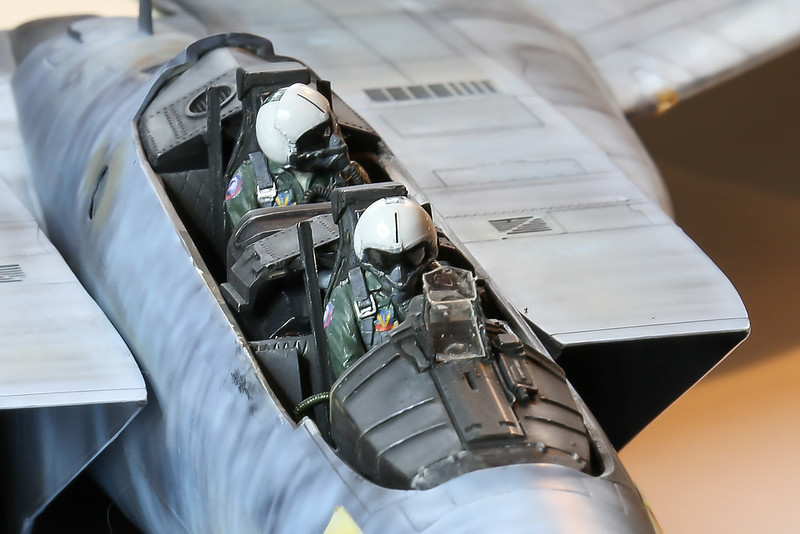
With the crew safely in it will be time to seal it up for the final coat of Air Superiority

The Canopy had some extra detail added in the form of grab handles, mirrors and a small compass. I also added a thin strip on the canopy rail to bulk up its appearance when closed.

Hopefully get to spend some time on it over the Xmas period - well that's the intent at least!
-
-
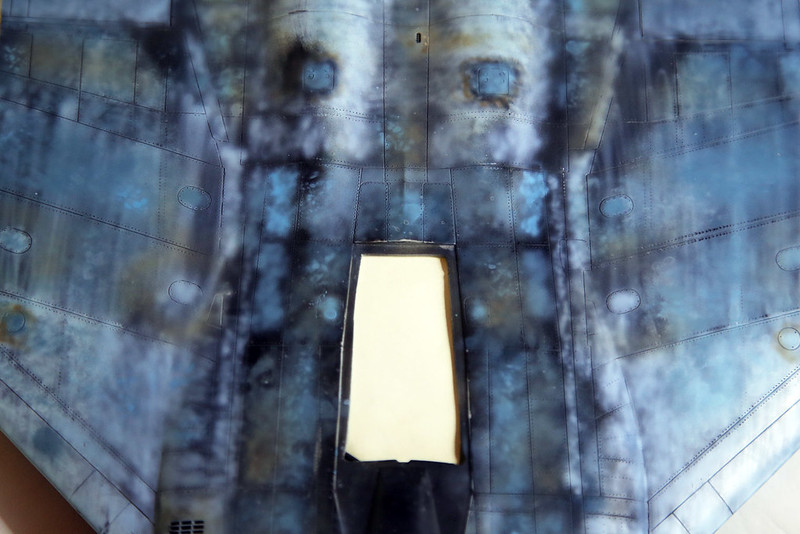
So ..... a little later than anticipated (!) we finally have some pre-shading.
The journey to get here took a little (OK, a lot) longer than expected mainly due to my ineptitude.
In completing the main assembly I found it difficult to get a good fit which resulted in lots (and lots) of filling, sanding, priming, checking, tutting, filling, sanding .... you get the picture. Mostly it took time to get a smooth finish.

One of the fins got knocked as well which added significantly to the repair work. Finally the number of areas that needed re-doing reduced until it was time for re-riveting (if you hadn't already guessed there's a lot or re-everything to this build).
Some lack of skill and over ambition on my part resulted in a selection of riveting errors which naturally provided another opportunity to practise my puttying and sanding skills again.

Once the final primer update was complete it was time to add some colour! As before, I used lighter and darker shades of blue with some spot touches of brown to add enough variation that will hopefully show through the top layer coat of Air Superiority Blue.

I used a mix of freehand and stencils to vary the patterns choosing lighter colours on exposed areas or particular panels, and darker tones in recesses or to add contrast. Mainly it was just artistic license to give some depth to the single tone colour scheme.
It now looks very heavily weathered which I guess is sort of the point. Just hope I don't cover it up too much when I overspray!
-
-
-
Superb finish, love it!
-
Has it really been that long!
Having got to the point of painting individual parts it was time to start joining them together. I always knew this would destroy some of the paintwork but it was never the finished article so I figured that it all added to the mix & match feel of the undercoats. A number of dry fits told me that the final assemblies would not be straight forward and so it proved. On a big bird such as this one it was not going to be easy to hide imperfections in the rather large wing and fuselage joins.
I had to mate the wings to the top fuselage first because of all the additional wiring in the wings. This join was helped with some additional tabs but even then there was a slight step to sand out and some gap filling to be done. I also had to re-scribe a number if the lines and sort out (as best i could) some very odd panel lines on the Revell kit.

Having got both wings in place, I then had to fix the fuselage halves together. Now the kit is designed to have the wings added afterwards, that and the rather large amount of electronics filling the fuselage made this process somewhat problematic. The exhaust area needed some additional 'blending' to ensure the non-kit exhausts were a good fit.
The fuselage halves didn't quite match in width which meant much fettling, filling and filing to get them to meet up in a clean manner. On the real jet the under wing join appears blended in so its probably quite a good thing that I had to do the same on this one!
After the hours of endless joy of blending the fuselage joins together, the fit of the cockpit section was surprisingly straightforward. I'd left the intakes off as i knew I'd need to work on the joins and that proved a sensible choice. CA glue was used throughout this process to provide strength and for its gap filling properties.

The upper surface join was made trickier by the main heat-exchanger vent that I had recreated earlier from scratch. Some extra plasticard was required to help generate the right profile where it rakes up to join the cockpit area.

Finally, the tails were also fitted as I knew they would be a real PITA trying to add after final painting had occurred. There is very little visible join on the real ac so this area required much work to remove any steps. Even after this stage I added a thin strip of plasticard and sanded it right down to help remove any signs of a join. The fuselage join around the slime light was also pretty tricky to blend together because of the mis-matched fuselage widths. Probably my fault for introducing so much extra stuff and not constructing it in strict order, but wheres the fun in that!

As you can see, the main parts are pretty much assembled now which just leaves a coat of primer on the worked areas, re-touch-ups, more primer etc etc. I'm pretty sure I will have put twice the amount of work I needed to on this model, if only I'd got it right the first time!
You may have noticed that the fin is actually the main colour as I decided to have a go at this even though I knew I'd have to rework some of it. This was so I could add the green fin flashes before final assembly and paint areas like the fin tops which would have been a bit tricky after assembly. Whilst it looks like I've obliterated the undercoat work I added previously, it looks far plainer in the photos than for real. But before I can paint all the ac I need to finish and close off the cockpit and canopy area (once I've finished all the rework of course! ).
-
Thanks for the great info Maru, now I've got the proper name for artistic licence, just hoping I don't manage to blend them all out with the final finish!
Inspirational build Blackbetty, I do like a good candy stripe and yours is spot on.
I'd have loved to have seen these for real Aircommando, grey is so .... well grey really.
-
Thanks Neo, it’s a little bit trial and error but the thin paint works well.
-
Well soon-ish! Still on my current build progress rate this is a giant leap.
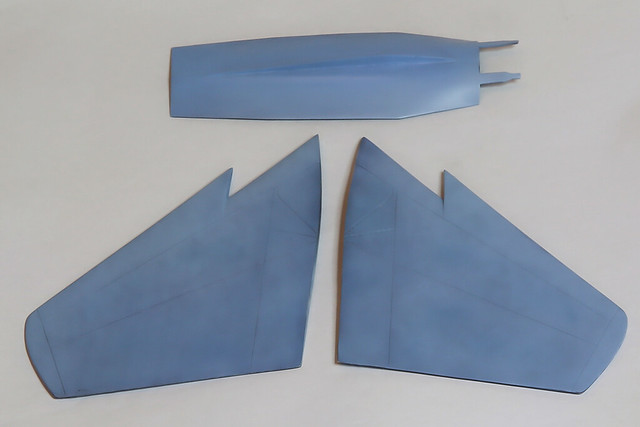
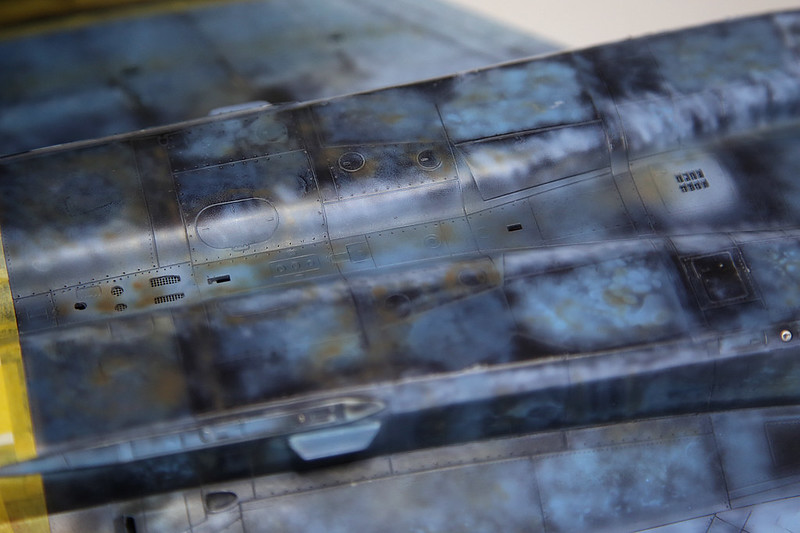
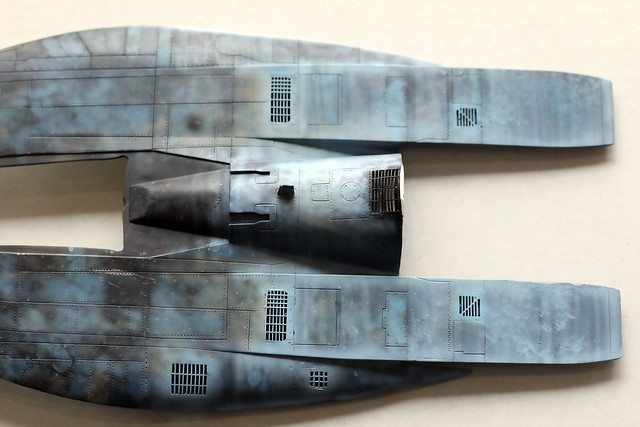
I've finally started to get some colour down on the main parts with a view to getting a patchy and subtle undertone of colour and shading to break up the monotone (although rather nice for an F-15) blue. I thought a lot about doing this before or after I'd glued the main assemblies together but in the end decided on before as my spray booth is not that big and they were easier to handle that way.

I used the same technique by layering gradually lighter shades of blue/grey through a mix of mottling and stencils, mostly to try and figure out whether one was better than the other! Jury is still out on that one. I used MRP paints as they spray very thin and allow this sort of layering without any noticeable paint creep.

Pylons I left a little darker as they are mostly hidden in shade under the wing and fuselage.

The back end just got a coat of Alclad aluminium and a bit of grey shading, again to test the effect. Most of this will be redone once its properly masked off.
A similar approach was taken on the top surface though again lighter shades have been used on the engine bays.

I also added some brown shades but no idea whether this will actually show up as a tonal variation! I suspect I will have to re-apply this colouring post top coat.
A big decision was whether to do the stripes now or later. As it was I decided to do them now as it was easier to mask and manipulate the parts in their unassembled state, this model is huge when you put it together!
Next job is to assemble these pre-painted sections. Any joints will get further pre-shading treatment add to the variety I've tried to create already. In some ways you don't need to worry too much as you can always overspray or lightly sand any 'odd' areas out and the effect will get blended in with a top coat anyway.
I think we're getting to the point where its time for main assembly and it starts to actually look like an F-15.
- johncrow, Greg W, themongoose and 6 others
-
9
-
Very quick update just to prove that progress is being made (slowly!).
After some picture scouring for Aim-7 colour schemes it became readily apparent that the Eduard Aim-7Es I'd got to replace the somewhat bland Revell ones would not be appropriate even for an early F-15 as they started with the Aim-7F model. Further research indicated that where very similar except for the cable conduit which now ran the length of the missile on one side only. To remedy this I sanded off the front lobes from the E and added a suitably sized thin strip of plasti-card. Voila, an Aim-7F!

As it happens this new configuration also works better for the missile launch brackets I'm having to add as this particular Revell kit doesn't have any.
More soon!
- johncrow, themongoose and Greg W
-
3
-
Glorious work, love it!
-
Happy New Year everyone!
Hope you're enjoying the festive period and able to find some time to keep your projects moving, like me!
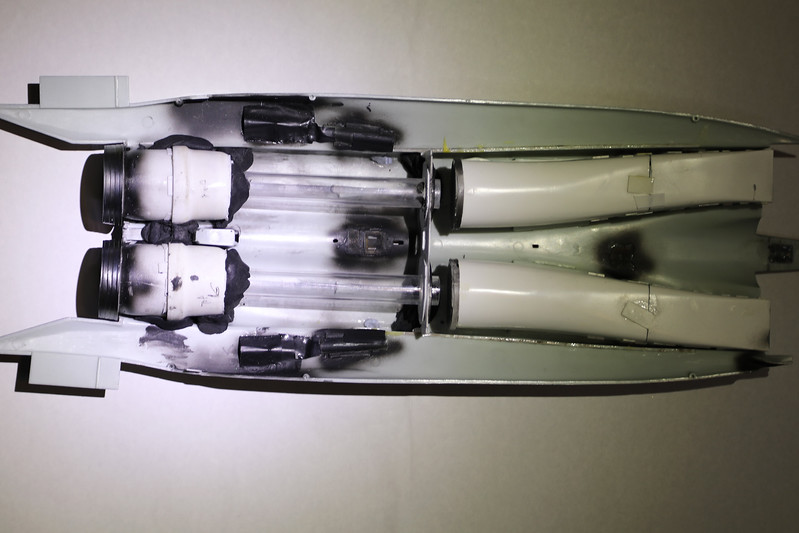
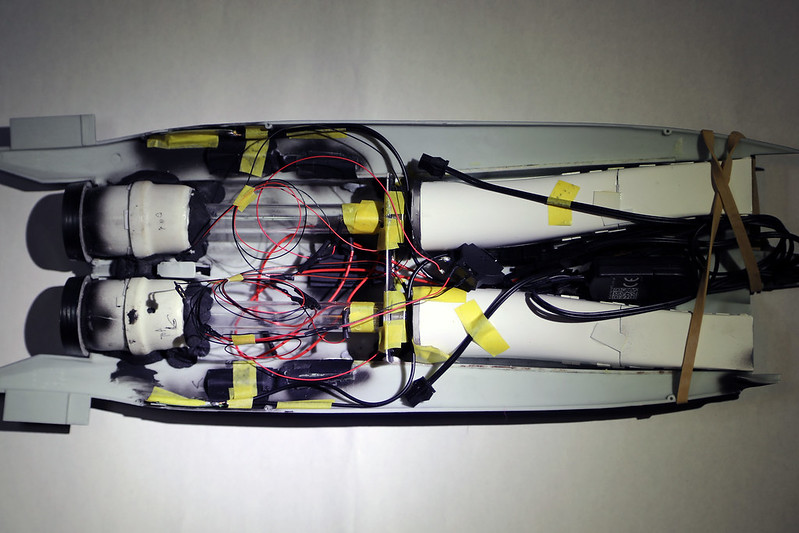
Finally, I've managed to complete enough sub-assemblies to start pulling this thing together. The exhausts caused the biggest headache as they had to line up with the tubes that will hold the acrylic rods and the bulkhead which I'd previously drilled out and copiously glued in place as this structure will take a lot of the load when this is put in its in-flight pose. The trickiest bit was getting the exhaust rings to sit flush top & bottom as I had to putty them in place to be secure enough. Normally you would add these at the end but with the in-flight mode this was not practical. In addition, I added the intakes trying to make sure that the front ends on the intakes fitted snuggly with the fuselage bottom otherwise the intake front ends will be difficult to fit.
Once the main structures were secure I added the wiring which has been split into 3 powered sections (electricians look away now!). The first set, between the intakes, is for the slime lights which require a high voltage hence the bulkier wires and connectors. The wiring between the exhaust tubes is that required for the remaining 9 LEDs. Luckily the F-15 is a big aircraft so lots of space to put them all.
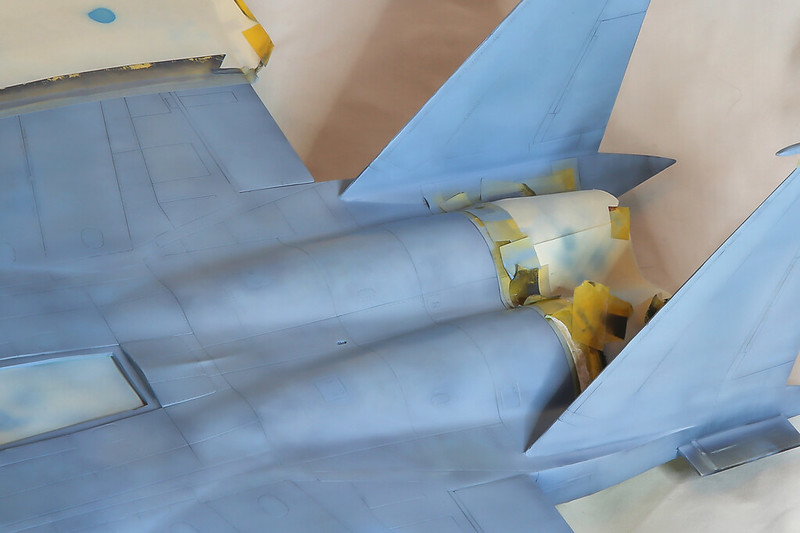
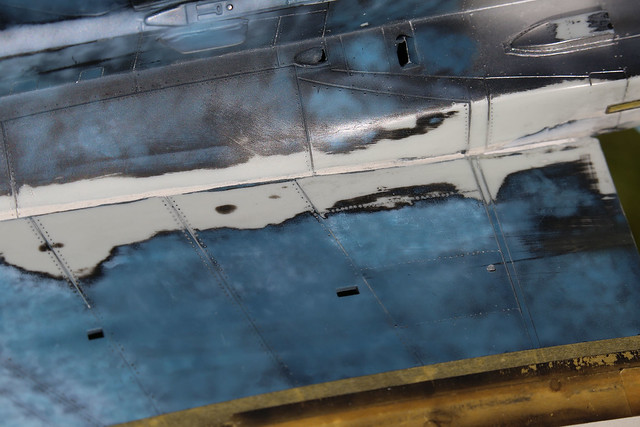
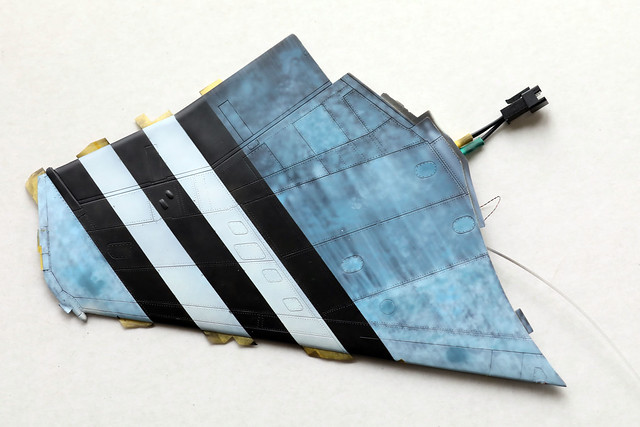
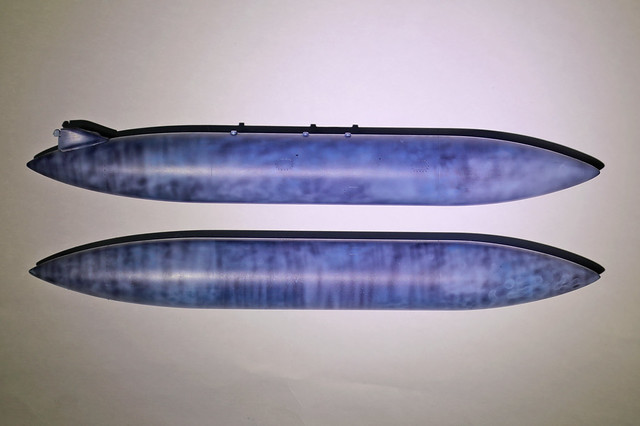
I've also been playing with the technique of black-basing using the tailplanes and drop tanks to practise. My plan is to use different lighter and darker shades of grey/blue to put down a varied mottle and the overspray with the primary Air Superiority Blue colour. The MRP paints I'm using for this work really well as they spray very thinly and you can keep going for a long time without the airbrush clogging up.

I'm using a mix of airbrush mottling and stencils to see what effect they have. I'll probably end up using both just for variety.
Its just nice to get some paint down on the main surfaces after what has seemed like ages!
-
Hi Geedubelyer and thanks for watching, this version of the exhaust nozzles has the turkey feathers still in place.
Good point though the original lip would have looked out of place (probably a scale 1.5 cm all round). However, I think I've left enough to give the impression of a small lip but we'll see!
Thanks Maru, I hope your patience will be rewarded (eventually)!
-
About time for an update...
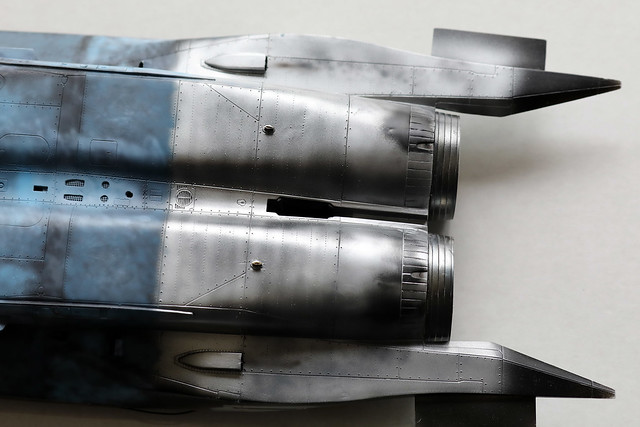
I've reassembled both intakes having cut them in half to making seam removing and painting easier and added the engine face at the rear. Have to say that bit worked out quite well and made the internal painting and a bit of light weathering (these were pretty new jets after all) pretty straightforward. Sorry the picture is not great, trying to find a depth of field where everything was in focus was the trickiest bit!

In test fitting the resin exhausts I found the Revell kit back-end to be a tad wide creating a small but noticeable step. My somewhat crude solution was just to file the back end down a bit and rescribe any lost detail. I've also been spraying primer as I go to make sure there aren't too many surface flaws and yes, I found quite a few!

The exhausts themselves are going to be sprayed a blend of Alclad metallics but first a bucketload of masking.
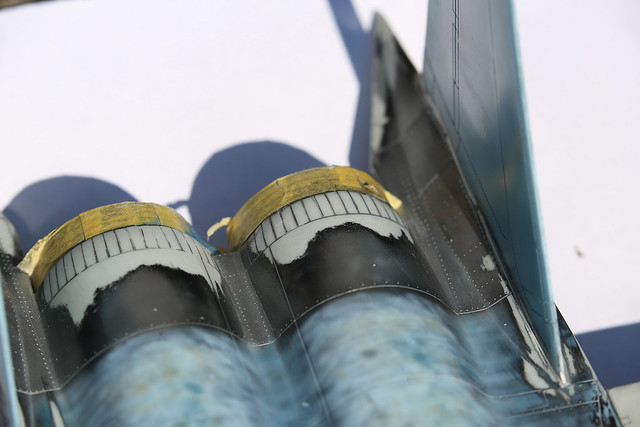
The exhaust internals where weathered using panel line wash and sand coloured filters to capture the slightly tinged ceramic look of the PW engines. I then added some soot pigment trying to mimic the images I'd seen the Jake melampy and DACO books. The bands on the outer rings are two shades of Alclad Aluminium tinged with some Tamiya weathering pads. The rear exhaust has a clear hollow rod attached which will assist in creating the in-flight mode. This will need careful reinforcing as a lot of weight will get transmitted through this rod.

(Very) Slowly coming together!
-
Thanks for the info Bruce, this kit didn't come with a canopy so I bought a cheap 'Bicentennial edition' which did and that one is clear luckily.
Of note, the bicentennial kit doesn't have any weapons or even the cradles for the sparrows!

1/32 Early F-15B Eagle - 58TTW
in Works in Progress
Posted · Edited by RichieB
Compared to the previously glacial pace of updates, this feels like warp speed!
OK its only panel washes which require less accuracy than most painting, but its still a step nearer the finish line.
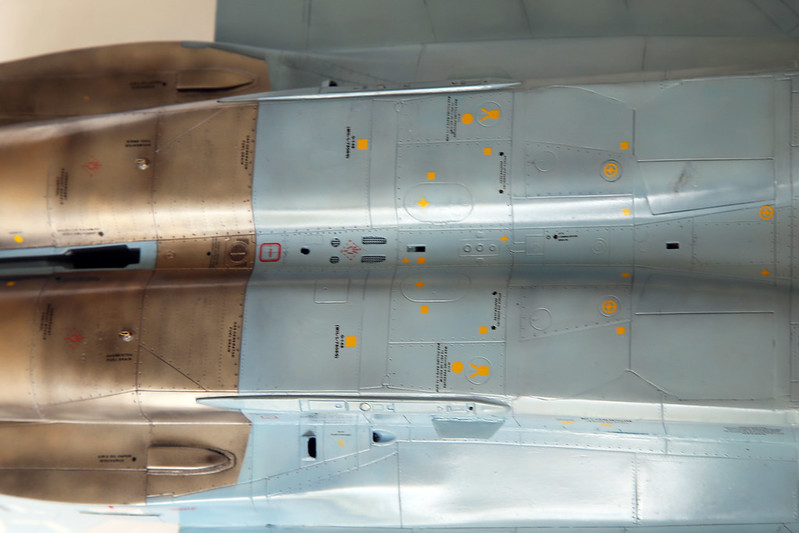
I ended up using about 4 different panel line washes, one of which I mixed to get a shade that dulled down the contrast of Revell's somewhat heavy handed panel lines. The depth of them is probably something I should have fixed earlier but who was to know that they would stand out as much even after coats of primer and paint! I only used dark washes on the moving parts ie ailerons and rudders or where a bit of high contrast was warranted. I am also somewhat proud of the fact that I managed to mask a blue border around the insignia on the wing. It took some doing and I must admit I bottled doing all of it again on the bottom wing!
Rear metal parts got a heavier wash as well but the rest of the model was a couple of lighter shades to try and avoid the 'made out of Lego' look. High contrast builds are eye-catching but they look a little too unrealistic for my taste. Each to their own though.
Underside got a similar treatment but went a bit darker at the rear where I will add some additional staining to help blend it in better. You can see what would have happened if I had done the entire aircraft in a darker panel line colour.
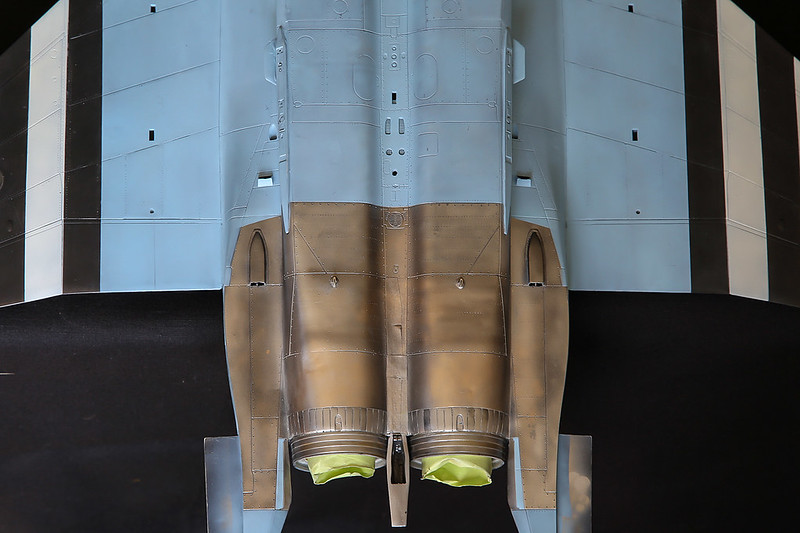
Engine nozzles were also finished with some pigments for the internal soot marks and Alclads for the petals - used a lot of masking tape on those!
And finally, the live Aim-7Fs (for a what-if load out) and the inert practice Aim-9Js are nearly ready.
Weathering next but I'll keep it pretty light even though the model probably needs a heavier application to blend out the panel lines further.
Might need to lie down for a bit after all this progress!