

KUROK
-
Posts
838 -
Joined
-
Last visited
Reputation Activity
-

 KUROK reacted to airscale in 1/18 Hawker Fury
hello again
thanks all for your kind comments
things have been hotting up in complexity in trying to fit the upper wing..
..first they needed completing, so these access hatches were added - not sure what they are for..
..also all the bracing wire mounts & doped patches were added to the underside..
..the ailerons had the mass balance weights and the control horns added..
..and the disc cam drives & control arm and were fully mounted in a neutral position..
..with the wings complete, I wanted to get to mounting the centre section - to do that all the stuff under the upper wings on top of the fuselage like aldis sight needed fabricating, including the windshield..
..this was quite tricky as the frame sits on a wooden former that is a neat fit to the fuselage.... I did this by covering the fuselage in aluminuim plumbers tape (like bare metal foil) and CA'd a rough frame to it so I could build up the shape with P38 filler and still be able to break it away later as none of it, including the CA really sticks to the foil..
..that was refined and the glazing added - very carefully - I hate doing transparencies as I have a track recordn of screwing them up..
..the aldis sight and gunsight parts were made and added to the upper fuselage..
..also the cabane struts, which I have to say was probably the hardest and most frustrating bit of modelling I have ever done - they look simple sat here in the pics, but this is days of work to get them right so the orientation of the upper wing is correct in 3 axis
..the centre section fits on posts in each strut and will be a real challenge to actually glue in place as I need about 12 hands to locate everything..
..there are also multiple rigging wires so things are starting to get exponentially harder
TTFN
Peter
-
KUROK reacted to Radub in Zoukei-mura Bf-109 & Fw-190 updates - New The Old Man blog n.113
Zoukei Mura never made any claims that they would only make "never kitted" or "never heard of" models. The overwhelming majority of modelers care a lot about iconic aircraft. The people working for ZM are modelers. These models were chosen by the President of Zoukei Mura because he likes them and he wants to add them to his collection. This is no different from the way in which the majority of people choose what they want to add to their collection. No one says "I will not add a Spitfire to my collection because someone else already built a model of a Spitfire". The difference is that Zoukei Mura makes these models in their own style. There may be other BF 109 or FW 190 on the market, but they are not like this.
Radu
-
KUROK reacted to aircare84 in Wingnut Wings LVG C.VI
Just finished my last build, a Wingnut Wings LVG C.VI from the 'Duelists' kit. This one took quite a while.
Added; scratchbuilt gunners seat as the kit offering was quite inaccurate, added pipes, levers, control rigging & Kits World seat belts to the cockpit.
Added spark plug wiring & wiring manifolds to the engine. Added Gaspatch Parabellum rear machine gun. Added gas cap to upper wing.
Used Aviattic lozenge decals & Uschi wood grain decals for the fuselage. Adding the rib tapes to the trailing edges was a pain.
Added rigging & used micro brass tubing for the turnbuckles.
Used oils for the wood finish inside the cockpit. Used oils & pastels for weathering, highlights, etc.
Thanks for looking & all comment welcome.
Larry
-
KUROK reacted to airscale in 1/18 Hawker Fury
thanks chaps
just a quick one to say wing painting is done without issue thank goodness
used radu's masks for the roundels and then started to lay out the top wing squadron marks - i also had some round blanks to cover the roundels in the masks I made, the rest was tamiya tape..
..getting there..
..mixed up a match to the fuselage paint & airbrushed..
..and job done
..lots more details on the wing still to go, but I am so relieved that is out of the way..
TTFN
Peter
-
KUROK reacted to airscale in 1/18 Hawker Fury
Hi again everyone
as I always say - thank you so much for all the kind things you say - I just like doing my thing and it is very humbling to read the comments left here
I cracked on with the upper wing - same format as the lower wing in using very thin plastic card, embossed with a ballpoint to simulate the ribs / catenary and then carefully using impact adhesive to fix the skins to the wing structure..
..the tips were again a problem as the plastic doesn't like the compound curves, but I think I sorted it out in the end..
..by the time I took this pic, both wings and the middle section were skinned, primed and sorted. I made the whole wing so I could cut the ailerons out and they would conform properly - here I am using a printed part of my wing plan to match the aileron to the mini forward spar underneath the skin..
..the ailerons were cut out with sharp blades, mini saw blade and a few cuts with a slitting disc.. the profile is different on the top to the bottom, but I had no drawings so all I knew was the outlines..
..with the ailerons removed some of the structural details can be added - there are two teardrop shaped recessed into the wing that make space for big balance weights sticking out of the front of the ailerons - these were made by plunge moulding the recesses and letting them into the bottom wing skin...
..here insulating tape is used to protect the embossed rib detail while I fill and fair in the recesses..
..once the structural bits were done it was time for rib tapes, many, many rib tapes..
..as before, the tapes and any linen patches are made from decal film - there is a lot of it...
..the circular hole on the lower surfaces is where there is a disc shaped bellcrank to control the aileron
..with everything done, it was time for paint - alclad white aluminium..
..the rib tapes are quite subtle and I think worth the hours of work..
..another look at the underside and the details..
..the ailerons were also completed - an interesting detail top right is a small glass inspection window which seems to have a white notice with red writing inside it - made that using an airscale decal
..the internal shape where it meets the wing will be all wrong, but this can't be seen so it is what it is..
..complete topside - the gaps between the sections is fine - in fact I would say mine is tighter than the real one
..and the underside..
..probably get all the markings on the wing topside next.. I am NOT looking forward to that...
TTFN
Peter
-
KUROK reacted to Sweety in Corsair F-4U 1A Tamiya 1/32 Cockpit resin Eduard
Hi all,
Not much in advance these times.
The bottom of the cockpit is almost finished.
See you soon,
Sweety
-
KUROK reacted to The Madhatter in Zvezda Star Destroyer - a new detailing project
I'm often asked for a size reference.Maybe this may help:
Anyway, that's all I have for now but I'll update once I'm fully finished the trenches.
Thanks for stopping by and for those who are actually still following this - you get an extra thanks for your enduring patience with me while I fumble my way through this
Till next time!
Si
-
KUROK reacted to The Madhatter in Zvezda Star Destroyer - a new detailing project
Thanks very much guys. Hope you don't get too bored with it as I am not a terribly fast builder
I did a lighting test tonight of the bridge and I am happy with how it turned out. I made a number of mistakes on the internals and had numerous electrical issues but I got there in the end.
I've also been cutting away at the body to accommodate the fibers. I've actually finished the whole top but just haven't taken any pics yet because it's not daylight
Anyway, I just wanted to share the results of the lighting. I'm really happy with how it came out.
Till next time
Si
-
KUROK reacted to Radub in Zoukei-mura Bf-109 & Fw-190 updates - New The Old Man blog n.113
The hobby is not dying, it is evolving and taking different shapes. Technologies and techniques have been improving since the birth of this hobby. Compare a Frog model from the fifties to the latest model from Japan. All technologies and techniques that made that Frog model possible are indeed “dead”, but the hobby of making models is still here.
Home 3D printing is not going to replace injection-moulded models just like home paper printing did not replace newspapers or bookshelves. 3D models are expensive, fragile and prone to unpredictable shrinkage. You will never be able to make a 1/32 3D-printed FW 190 cheaper than a ZM FW 190. The machine is expensive, the resin is expensive and the artwork is expensive whether you buy it or you invest the man-hours in designing it. The failure rate is high. For every beautiful 3D-printed model you see on social media there are trash cans of misshapen and twisted bodged half-prints.
I would not look at the young people to gauge the “future” of anything. Saying that they have a short attention span and that computer games or electronic devices are too distracting means nothing. When they are so absorbed by doing what young people do, they also do not care about architecture, rocket science or intracranial surgery. Yet I am sure that we will still have architects, engineers and surgeons in the future. They may also build models too.
Radu
-
KUROK reacted to Ironwing in 1/18 Hawker Fury
Peter
Im reminded of the the times when I was a young boy. Id visit my local LHS and stand in awe of the models on display and wonder how these things could exist. Surely those who built them were of a different sort. I could only hope for the skill and talent needed to create such things.
I get that same sense of wonder when I look at your work..the same sense of awe.
The skill, tenacity, and creativity you repeatedly demonstraight is surely made of that righteous stuff possessed by only a certain few.
Im glad your here with us...
Best
Geoff
-
KUROK reacted to Dukie99 in P-38G Lightning: Operation Vengeance - FINISHED
Getting close to the finish line. This is where I stand after decaling my P-38G, so everything is glossy. Actually the only decals are the Foxbot stencils and the kill marks, everything else has been done using homemade masks on my Silouhette. Paints are MRP, still a bit to do in terms of weathering but I am really happy with the look of that bird.
Cheers,
David
-
KUROK reacted to PrzemoL in Roland C.II Meerkatze (1/32, Wingnut Wings)
The propeller made from veneers, glued together, soaked with CA glue, carved to shape, painted with a mix of Minitaire Clear Brown and Clear Golden Yellow, decalled with Axial logos and fitted with the spinner. And so Roland is finally complete.
-
KUROK reacted to PrzemoL in Roland C.II Meerkatze (1/32, Wingnut Wings)
Thanks for you continuous support. And the Roland is almost ready, I just need to wait for the veneer propeller...
-
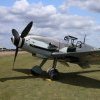
KUROK reacted to airscale in 1/18 Hawker Fury
well thank you for so many kind words
you guys are too kind
I have finished up all the panels around the radiator, but that will have to wait until next time as there is bigger news...
guess what this is...
..it's the build jig for one of the upper wings - I translated (& corrected) plans, interpreted photo's and drawings and drew up my own plans - this is the underside of the wing - the most critical part as this is where all the strut mounts, rigging mounts and spacing needs to be super right to mate properly with the lower wing and cabane struts..
..the lines represent the ribs and a block & carrier are at the leading edge to hold half round stock up above the plan where it needs to meet the nose of each rib - keeps it all straight too..
speaking of which, there are 41, thankfully all the same profile (apart from at the tips..) here they have been made by using a brass template with two holes at the spars that are a tight fit for big press pins to pin stock plastic to balsa and cut each rib's outline. There are a lot of them & once done they are broken out and put together like this for block sanding..
..I started with the centre section, by now the pin holes in each rib have been enlarged to be a tight push fit on the brass tube spars
..thicker end ribs were added and card fills in the spaces to give torsional stability, also little bits of tube added for strut mounts..
..the wings are the same method except a black card tip is cut to shape & let into the structure - black so I can see the centreline when shaping later..
..I bent the few degrees of dihedral into brass rods and used the centre section slid on to the wing structure before the rod spars were fixed to get the relationship to the wing right
..a small square brass sub spar was added to the top where the aileron is and again stock filled up the gaps..
..times two - soon had the entire upper wing done..
..I made up a stiff card jig that maps the relationship between the fuselage and wings - it sits on the lower wing and sets the exact position of the upper wing (or it will when I come to make struts & fit it), but useful to see what it all looks like..
..we have my first biplane
..looooong way to go, but thats a big step forward..
TTFN
Peter
-
KUROK reacted to wpierson in 1/18 Hawker Fury
Hi, I'm late to this thread, but I'd like to suggest a product. It's called Renaissance Wax, it's a fine crystalline wax that jewelers and museums use to keep their metal displays from oxidizing. Sometimes clear coats will dull a polished panel, but if you can keep the air from reaching the metal, it'll stay bright for a very long time. I dabble in jewelry and love the stuff!
-
KUROK reacted to MikeC in A Pair of Pups - Finished
Some small progress: the cockpit is coming along, the seat is installed, and the instruments are installed in the panel, specifically I've used the kit decals.
Now spot the ringer: one small decal "got away", so I dug into my stock and used a random dial from an MDC sheet of German WWII dials. I expect you can spot which one, but needs must, better than a blank dial.
-
 KUROK got a reaction from Nighthawk Calling 1 in TFC's Bearcat
The engineering history of the Bearcat is fascinating.
To get the high performance they had to make the wing lighter. So to deal with extreme bending moments (as in a high speed dive pull out) the wing would solve its own problem...with primer (detonating) cord that would shear off the outer wing panels!
At least one sailor on a maintenance crew died from these explosives.
-
KUROK reacted to airscale in 1/18 Hawker Fury
evening chaps, hope you are having a great weekend at the bench
..bit more Fury mayhem...
..attached the lower wings - I replaced the carbon rod spars (two of which had snapped off anyway as I had to partially cut them after realising there was dihedral..). Basically I drilled out the first inch or so and put brass spars through the tubes in the fuselage (already part of the cockpit frame) and slid the wings on - I also perforated the mating face on the wing itself for better adhesion as all the time I had been concerned with the strength of those carbon spars after i compromised them by cutting them
the whole lot was jigged up and JB Weld metal used & left overnight - they are good and strong now..
..with this done the radiator bath was added too so I can do the final skin parts around it..
..also some last minute detail was added to the radiator
..the wing gaps will be taken care of when I skin this bit..
..next up was the prop - I had a crumpled drawing to work from..
..this was cut and cropped into sections so I could align a datum line and get it as near as straight as possible and a new drawing made in scale..
..with that and a bit of basswood left over from the fuselage plug I had what I needed..
..I had originally planned to try 3D modelling, but it's way out of my wheelhouse, so I thought I would just try it..
..stuck the drawings to the wood and used my new bandsaw to cut the outlines in both axis I had..side first as it leaves a flat top for the plan to go down..
..I tried really hard to get the angled hub right, but in the end thought it better to turn a hub and vacform a skin having checked K2902's prop was painted..
..got rid of some of the wood underneath to make room and made it fit - filling the void with CA..
..after quite a bit of refining I was happy with it - I also turned the hub from perspex acrylic..
..I would have liked to have stained the prop after so much work, but not to be...
..I tested painting just the wood as I wanted to preserve the texture, but the result was overall better after a prime with Mr surfacer and then paint..
..probably can't see it in this dry fit, but the grain can just be seen and it has a lovely texture..
..it looks overscale here, but I think it's just because it's missing the top wing so looks out of proportion - it is as per the drawings and other plans & I think looks fine..
..just that radiator and under wing skinning left here then its onto the upper wing where it will get dull for a bit
TTFN
Peter
-
KUROK reacted to PrzemoL in Roland C.II Meerkatze (1/32, Wingnut Wings)
The monkey has started growin legs and... wings.
-
KUROK reacted to Alex in 1/24 Airfix F6F-5 Hellcat "Kicked Up A Notch": New eBook Now Available!
Beautiful work and you are ripping right along with this one!
-
KUROK reacted to allthumbs in 1/24 Airfix F6F-5 Hellcat "Kicked Up A Notch": New eBook Now Available!
That cockpit looks soooo good!
-
KUROK reacted to chuck540z3 in 1/24 Airfix F6F-5 Hellcat "Kicked Up A Notch": New eBook Now Available!
May 9/21
With all the responses wanting a weathered aircraft, I’m sure glad I asked! Having said that, it won’t be really beat up, but it will look well used..
The cockpit is almost done and like all my other cockpits, here is the sequence I use:
Gloss Black Lacquer of all parts. Mask off those areas that are to remain black, then paint with the interior color, in this case Model Master Interior Green Enamel (FS34151). While I like MRP paint better for spray application, you need to brush paint touch-ups and MRP paints do not brush very well, if at all. In order to get a very fine coat of paint without any dusty paint turbulence, I thinned the paint heavily with Mr. Color Leveling Thinner 400. After the enamel has dried for at least a day, paint repairs of all colors are made, including the application of other colors like red on switches, etc. Spray a thin coat of Tamiya X-22 Acrylic Clear Gloss. This will not only prepare the paint for the application of several decal placards and gauges, but it will also make the parts easier to handle with your bare hands without the paint rubbing off. Apply cockpit decals. For this I used both the Airscale decals and the kit ones, which are both excellent! Dry brush silver enamel on black areas to make detail pop, as well as painted areas where you want aluminum showing through due to wear. With the X-22 acrylic undercoat, cleanup is easy with paint solvent. Add a dark wash to those areas you want to accentuate. For this I use The Detailer in Black, which is water soluble and easy to use. Apply Tamiya pastels as you see fit to create some grime. Dull coat all parts to knock down the shine. Add a small drop of Future/Pledge to all gauges to bring the shine back. Fully assemble cockpit parts.
Here are the cockpit parts after paint and a coat of X-22.
If you use the Airscale side panels, the surface detail must be sanded smooth, removing small switches and handles. The Airscale PE parts have holes where the switches were, so I drilled holes and added small bits of wire to create new ones. For other cockpit details, I bought a selection of ANYZ handles, knobs and switches. Although a bit too small at 1/32, they still worked out fairly well.
Here is a good example. On the left I added a handle that I painted red, which is the “Carburetor Protected Air Control”, while in the middle of the top dial on the center console, I added a knob for the “Ammunition Rounds Counter”. The Airscale IP and gauge decal have a hole where these parts are to be placed, so I drilled them out and glued the stem of the ANYZ part into them. I added many other switches and knobs throughout the cockpit in the same manor.
The right side wall, showing off the Adriatic resin. These are mostly Airscale decals, partly because many of them are missing in the kit decals. Note how that big decal on the lower left side sucked down over the raised detail, giving the appearance of red circuit breakers with labels under each one.
The left side wall, with more of the same.
The back wall, which is mostly Adriatic resin.
The lower front area. The floor and pedals are a lot dirtier than they look under this bright light.
Major cockpit parts all glued to the left side, as per kit instructions. Since the rear wall is all resin, I used CA glue applied from the rear.
With the seat dry fit, you can still see quite a bit of all the detail behind it, but not much underneath it. I will be using HGW fabric seat belts that need to be threaded through the “towel bar” on the headrest, so I left it off for now.
Next step is to add the rear landing gear well, then I can close up the fuselage, with a major step done!
Thanks for all your comments and looking in.
Cheers,
Chuck
-

 KUROK got a reaction from John1 in Great Wall Hobby P-40B Tomahawk in 1/32
LOL! Clara Peller wants her Tomahawk!
-
KUROK reacted to MikeC in A Pair of Pups - Finished
Sorry for the pause, I have been doing a little bit here and there on this, and today I made a start on masking the wings for the black stripes. They do not fall conveniently along a rib: after a bit of measuring and counting, I came to the conclusion that the wing and tailplane stripes were 0.39 inches wide. Now, as a Brit "of a certain age" I'm equally at home using Imperial or metric measurements, and on converting this, found it was 0.9906cm. Well, the job just got a whole lot easier, because I figured that 1cm was close enough, and of course that happens to be the width of a medium reel of Tamiya tape. Even better, the wing has a constant chord over most of the span, thus making it easier to keep the tape exactly fore-and-aft.
Starting in the middle of the upper wing, I laid a piece of tape over where the centre black stripe would be, and used that to place the masks for the inner two white stripes. Then I carried on from there, using the piece of tape I'd used in the centre as a spacer.
This is a whole lot easier than it would have been if I'd had to cut the tape to achieve the correct width.
I'm also getting some basic colours down on Henry. The boots and uniform are still to do, and I think the moustache colour has strayed a bit, but that will be taken care of.
Next up: carry on with masking.
-
KUROK reacted to scvrobeson in 1/32 Copper State Nieuport XXIII
Weathering has continued on the Nieuport, and I think it's pretty much done for weathering. These French planes did not get quite as dirty as their German counterparts, maybe the silver dope didn't soak up oil stains as much, but I tried to replicate what I could see on photos. Next up should be a semi-matt clear coat then the last few things that need to be painted on. Then it's time to attach the landing gear and wings. Let me know what you think.
The rudder stripes were masked and painted, didn't feel like using the decal, then trying to match the paint to fill in any gaps.
Matt