Mastergandalf Posted August 23, 2016 Share Posted August 23, 2016 Hello, I congratulate you on the great age looks very realistic.Keep up the great photosBest RegardsRainer Scale32 1 Link to comment Share on other sites More sharing options...
Scale32 Posted August 23, 2016 Author Share Posted August 23, 2016 Wow, what an awesome paintjob! wow Bevan, thats gorgeous! Wow, that really is an incredible painting/weathering technique! Cheers, Marcel Jeez, that's super. Well done. Jim Well done so far!! Cheers guy's Link to comment Share on other sites More sharing options...
Scale32 Posted August 23, 2016 Author Share Posted August 23, 2016 Hello, I congratulate you on the great age looks very realistic. Keep up the great photos Best Regards Rainer Thanks Rainer Link to comment Share on other sites More sharing options...
Scale32 Posted August 23, 2016 Author Share Posted August 23, 2016 Ok now for the weapons..... As you can see the tanks have had an oil wash of sorts (still drying)they will be cleaned up in due course. Missiles have been clear coated awaiting oils and what not. I found after painting the airframe and getting the gear on that she was a tail sitter, no call out in the instructions to add nose weight so I was pretty peeved. Oh well what to do now I said to myself! Ended up adding weight to the front of each fuel tank using fishing sinkers. I did tape the tanks to their pylons then taped to the airframe..... seemed to work. Now I'm a little worried about the wing to pylon join considering the extra weight. Fingers crossed. Cheers Bevan Greg W, jgrease, Zero77 and 2 others 5 Link to comment Share on other sites More sharing options...
ClumsyDude Posted August 23, 2016 Share Posted August 23, 2016 Looking awesome Bevan. I agree it's a bit of a heartbreaker about the tail sitting ... Good luck with the fix. Jim Scale32 1 Link to comment Share on other sites More sharing options...
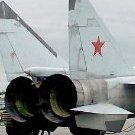
Scale32 Posted September 2, 2016 Author Share Posted September 2, 2016 Cheers Jim....Some weathering to the ordnance..... The fuel tanks received a stippling oil wash of black and burnt umber which is really hard to see. I then sealed with acrylic clear and started on the leaks out of the filling points. A thicker mix of the oil wash was used for this. Flat coat is Humbrol enamel flat coat. Sharp Derwent colour pencils were used for light scratches and Testors Aircraft Grey was used with a sponge for further detail. Prisma colour water colour pencils were used for the streaking of the fuel stains. I used Tamiya's "dark brown" enamel panel line colour for the missiles then flat coated with Humbrol flat coat. Not sure what to do with the exhaust area... bank it off .....paint black? Cheers Bevan Greg W, Zero77, Starfighter and 1 other 4 Link to comment Share on other sites More sharing options...
Zero77 Posted September 2, 2016 Share Posted September 2, 2016 (edited) Very nice ! The painting and weathering on the fuel tanks (and on the whole aircraft !) is amazing ! Edited September 2, 2016 by Zero77 Scale32 1 Link to comment Share on other sites More sharing options...
spyrosjzmichos Posted September 2, 2016 Share Posted September 2, 2016 Oh wow! That's some of the best paintings I've seen on a model! Stunning! Scale32 1 Link to comment Share on other sites More sharing options...
dodgem37 Posted September 2, 2016 Share Posted September 2, 2016 I like your style. Very nice. Sincerely, Mark Scale32 1 Link to comment Share on other sites More sharing options...
ericg Posted September 2, 2016 Share Posted September 2, 2016 I found after painting the airframe and getting the gear on that she was a tail sitter, no call out in the instructions to add nose weight so I was pretty peeved Welcome to jet modelling mate! Looks great so far and look forward to seeing it on the table at expo next year mate. Eric Scale32 1 Link to comment Share on other sites More sharing options...
ROM Posted September 3, 2016 Share Posted September 3, 2016 impressive weathering... really... Scale32 1 Link to comment Share on other sites More sharing options...
Scale32 Posted September 12, 2016 Author Share Posted September 12, 2016 When installing the wing pylons I discovered that some of the holes needed to be filled and a couple drilled to accept the weapon load I chose. I fixed the holes with some plastic rod using super glue and snipped them off flush with my sprue cutters I sanded smooth with a piece of sprue with some 600 wet and dry super glued to the end and cut down to a smaller size to keep the repair as small as possible. And blew it back in. And with the pylons in place. Cheers and thanks for looking in Bevan jgrease, Dany Boy, Greg W and 2 others 5 Link to comment Share on other sites More sharing options...
Zero77 Posted September 12, 2016 Share Posted September 12, 2016 Nice repairs ! I like the trick of the small bit if sanding paper glued on a piece of sprue. Good idea ! I dont know if the front wheel is hollow or not but if so, you can try to drill a hole in the bottom and fill it with small lead balls (like the "liquid gravity" stuff, or small leads for fishing). It would works only if a very few grams are needed, though. Scale32 1 Link to comment Share on other sites More sharing options...
Scale32 Posted September 13, 2016 Author Share Posted September 13, 2016 Nice repairs ! I like the trick of the small bit if sanding paper glued on a piece of sprue. Good idea ! I dont know if the front wheel is hollow or not but if so, you can try to drill a hole in the bottom and fill it with small lead balls (like the "liquid gravity" stuff, or small leads for fishing). It would works only if a very few grams are needed, though. G'day Zero77, Not sure where I got the idea for the sanding paper on the end of a piece of sprue but it really works a treat for very small repairs especially on already painted areas. As for the weight issue I put fishing lead sinkers in the fronts of each fuel tank and it solved the tail sitting issue but thanks for your suggestion none the less. I'm not sure what the liquid gravity stuff is though. Cheers Bevan Link to comment Share on other sites More sharing options...
Scale32 Posted September 13, 2016 Author Share Posted September 13, 2016 Welcome to jet modelling mate! Looks great so far and look forward to seeing it on the table at expo next year mate. Eric Cheers Eric, it'll be there warts n all. impressive weathering... really... Thanks Rom I'm really glad you like the Mig. Your paint is some of my inspiration. Link to comment Share on other sites More sharing options...
Recommended Posts
Create an account or sign in to comment
You need to be a member in order to leave a comment
Create an account
Sign up for a new account in our community. It's easy!
Register a new accountSign in
Already have an account? Sign in here.
Sign In Now