

John1
-
Posts
4,622 -
Joined
-
Last visited
-
Days Won
15
Content Type
Profiles
Forums
Events
Posts posted by John1
-
-
Fantastic job!
-
9 hours ago, Jennings Heilig said:
What a snooze fest.
I actually enjoyed it (not just because the Patriots won). Haven't seen too many good defensive games this years, the game nowadays is pretty much just QB's wracking up scores on pretty much every drive. This was a nice change of pace.
Anyway, thanks for the info on those handles. I figured they might be emergency jettison levers. Regardless, I'll add them to the list. This is going to be a decent amount of work but as I'm home recovering from last night's festivities, I've actually got some time for modeling. I might have to approximate those pulleys, the space to mount them is very tight due to the mirrors. We'll see how it turns out.
-
41 minutes ago, Jennings Heilig said:
I think (I think) the red handles on each side are the ones that allow the canopy to be partially opened and locked in place at various points along the track. The yellow one connected to the wires is the lock release to open the canopy when it’s fully closed. The yellow handle is interconnected with the push button external canopy release on the left side. Don’t absolutely quote me on that, but I think that’s what they are.
With America’s favorite team winning yet another Super Bowl, I’m shocked you would’ve been able to provide this info. Regardless, Thanks very much for adding to my to- do list. Way to go Patriots!
-
On 11/18/2018 at 6:31 PM, MikeMaben said:
One more ...

So yet another question - were those two red handles at the base of the canopy present on all F4U-1 versions? Dana Bell's pics don't show this area in any detail.
-
On a serious note: Hey Vince - it's good to see you back. I'm truly glad and want you to know that the info you provide is greatly appreciated.
-
18 minutes ago, Jennings Heilig said:
STOP THE PRESSES!!! NEW RESEARCH JUST UNEARTHED!!!
Discuss...
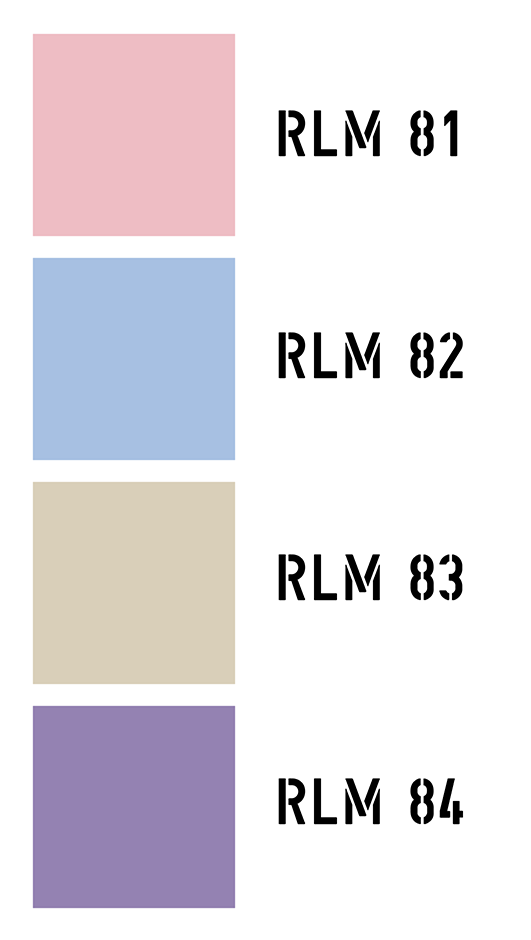
")
According to my extensive research (that I'm not inclined to share with anyone), in the closing days of the war, the RLM issued an urgent command to re-label these paints using a hyphen. The correct designation was actually RLM-XX (ie RLM-81, RLM-82, etc). You heretics need to step up your game. If you can't even use the proper designation for this paint, how can I depend on you to provide any useful information as to it's actual color / mode of application.
Discuss....
-
11 minutes ago, Eagle Driver said:
Is today the last day for the Hornet?
By the way it really bugs me when it is referred to as "Legacy"
It is The Hornet. The mighty Hornet that was one of my first aviation love affairs.
Last day for USN flight ops was 2/1.
https://defence-blog.com/news/u-s-navy-farewells-f-a-18c-hornet-aircraft.html
Obviously, they will be flying for many more years with the Marines. Not sure if they'll end up on any carrier decks though...
-
7 hours ago, vince14 said:
Is there any proof that the Blue Angels (or indeed any military aerobatic team) are successful as a recruitment tool, though? How many people join the Navy purely because they saw the Blue Angels in flight?
Don't get me wrong, I think aerobatic teams are a nice thing to have. But I'm not convinced that anyone has ever walked into a recruitment centre and signed up purely because they saw some aircraft flying in close formation. In fact, isn't the movie Top Gun often quoted as the best recruitment tool the Navy ever had?
These teams are definitely "nice to have" but at a time when line units aren't even close to combat ready due to lack of parts and personnel, I'd argue that they are an unnecessary drain on resources and as noted above, I'd also guess that their value as a recruiting tool is vastly over-rated.
I saw the Blues and T-birds multiple times as a kid and not once did I ever think - "Wow, that's is so cool I think I'll run down to the recruiter's office and sign up (instead I joined the Army
). I know it will be regarded as sacrilege but I'd suggest scrapping one of the teams and simply going with a single flight demo team to represent all of the US armed forces.
I really don't know how other countries with more severe budget restrictions manage it. Canada comes to mind. When the Snowbirds do a demo, that could be a sizable percentage of all flyable Canadian military jets in the air.
-
Wow.... I have to ask and you certainly don't have to share if you feel it's inappropriate but how much would that layout go for (even just a ballpark)?
Fantastic work, hope your client gets many years of enjoyment out of it.
-
File under "taking my ball and going home". Never ceases to amaze me that grownups could actually get heated over something as trivial as the proper application of paint on an airplane.
Ahh well, I'm sure this thread will persevere.
-
5 minutes ago, Vincent/MDC said:
Do not worry, the real experts will come back since i'm stopping contributing
You really took the time to remove all your posts / pictures because of a difference of opinion with one member?
I guess it sucks for the rest of us who actually benefited from your content. Hope you feel better by doing this, I just need to find a head-shaking emoji now.
-
Guys,
Can everyone take a step back? I think I speak for most of the people viewing this thread, I'm a "non-expert" who just finds this subject to fascinating. I would really appreciate it if everyone could lose the hurt feelings and just remain in this thread (or at minimum, don't go back a delete previous posted comments). I've gained invaluable info from pretty much every post in this thread and was hoping it would continue as a general repository for pictures and knowledge on this subject. Not gonna happen if all the smart guys storm away due to hurt feelings or perceived slights.
Can you please revisit your decisions? This thread is pretty special....
-
3 hours ago, Juggernut said:
FWIW.... I'm unsure about the specifics regarding the Blue Angels but I do know that the USAF Thunderbirds fly aircraft that can be made combat ready in a short while (as in hour(s)).
I’ve read in a few articles that’s a PR myth and it would take considerably longer (weeks) to get the jets (in either service) back to combat status.
Personally, I’m fine with the Blues flying older jets. I know a few mechanics in the SH community and they are saying most non-deployed squadrons on a good day might have 4 operational jets, on other days, maybe half that number. Why on earth would we take new build jets and give them to the Blues when the tactical squadrons are in such horrible shape?
-
Wow!!!
-
1 hour ago, Gazzas said:
Man, I love that scheme! I've been thinking about it, lately.
Me as well. I think those Barracuda decal sheets are long out of stock though.... Not sure if anyone else does those markings.
-
18 hours ago, JeepsGunsTanks said:
That's a damn fine looking Corsair. With the right background and a few effects, it would look like the real thing!
You mean the peeling paint on my deck doesn’t enhance the realism of my pictures?
I seem to recall someone was selling a photorealistic carrier deck display. I might have to track this down.
Thanks very much much for the compliments!
-
42 minutes ago, Vincent/MDC said:
a point i raised earlier which has been apparently missed by the researchers concerns the radical change introduced in the composition of rlm66 AND its application, basically replacing RLM02 in all practical purposes. The late war a/c with rlm66 landing gears are not a coincidence
You learn something new every day! Did this apply to a specific aircraft type or was it widespread?
-
5 hours ago, airscale said:
my desktop...

arguably THE most beautiful Spit version
Peter
I’ll argue that the Mk I/II had the most pleasing lines. Ironically enough, those later versions were regarded as pigs, when compared to the impeccable handing characteristics of the early Spits.
- williamj, Martinnfb and Jolly Roger
-
 3
3
-
-
On 1/27/2019 at 3:14 PM, Eagle Driver said:
I can bet that 80% of the people in those discussions haven't seen a MiG-21 except maybe in a museum. Fantasy football team leaders.
So should I care, or anyone else for that manner? That is what is killing the hobby.
Exactly on the subject on that thread here.
This is meant to be fun, not a constant research for flaws, let alone spending money on resin for improvements that are barely visible.
Sorry but I have no use for an "expert" who insinuates that simply because he/she has been up close and personal with any aircraft, he/she is uniquely entitled to be the ultimate SME on it. Assuming their claims are even true (this is the internet after all), that doesn't give them a leg up on anyone else to pass judgement on how a model compares to the real thing. Heck, if anything, it's been shown that those who flew / operated weapons were often the least reliable when it came to recalling specifics about their appearance.
I spent a good chunk of the late 80's / early 90's, carting an M-16 through the woods. Ask me to look at a 1/35th example and determine if it's dimensionally accurate and I'll tell you I really don't have a clue. However, there are undoubtedly plenty of folks online who never held a real M-16 in their hands who can jump in and provide accurate information on this subject.
As far as the quest for accuracy being responsible for "killing the hobby", spare us that drama. If anyone quit a hobby that they supposedly enjoyed because some folks online voiced concerns about the accuracy of a model, I'd suggest that they probably had other issues going on. For some, the research into minor details like the nose profile of a MiG-21Bis is enjoyable and rewarding. Correcting the issue on their model adds to the enjoyment of the building process. That's not insinuating that the folks at the other end of the spectrum aren't wrong, it comes down to personal preference. Neither side is "killing the hobby".
- Jeff T, Rick Griewski, MikeC and 2 others
-
5
-
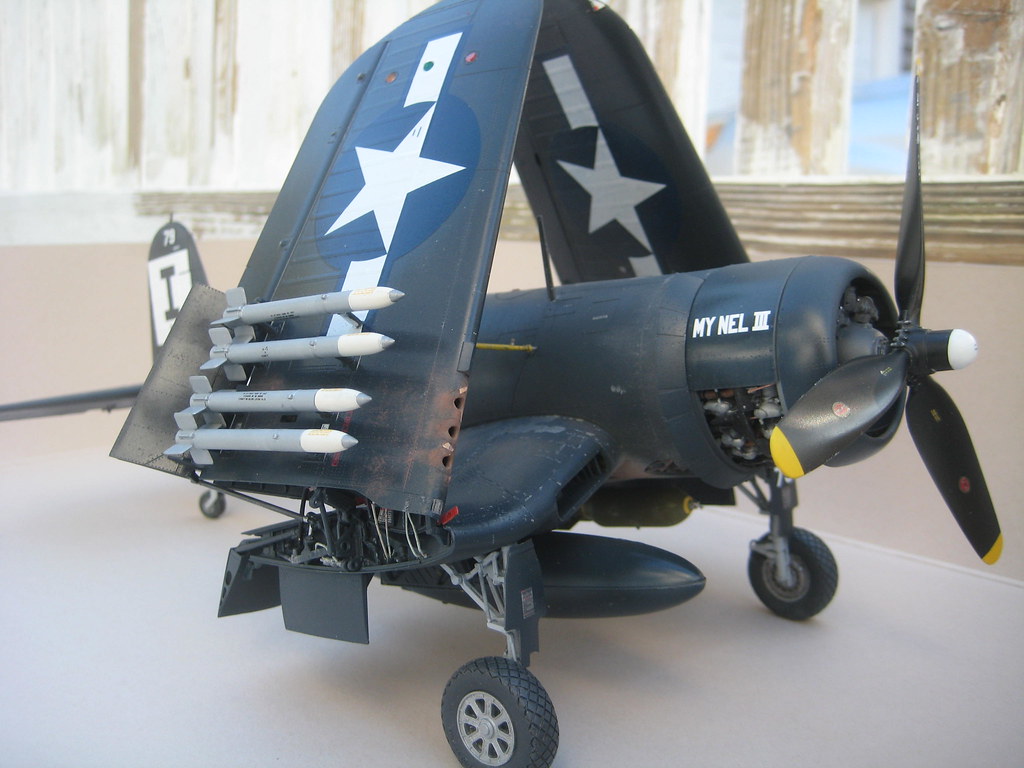
So, just to prove I haven't been totally sitting on my butt for the last three week, I figured I'd post a few pics to show my very limited progress. As noted above, I've been adding the hydraulic lines in the wing fold area. I also added the kit's actuator linkage from the wingfold to the outer flap. Kudo's to Tamiya, this area is incredibly complex and yet they seem to have replicated pretty much all the major bits, down to servicing placards. They even provided the gun camera and landing light fixtures that are mounted within the outer wing. Just as importantly, they designed everything in a manner that makes a very complex area fairly easy to build. All I can add is to study the instructions closely and when in doubt, dry fit before gluing. My modifications were pretty basic. I drilled some small holes in the wingroot base for a couple of hydraulic lines (the remainder go through one of the lightning holes or just connect to one of the hydraulic actuators) and added a total of 7 lines using small dia copper wire painted grey. Note on colors - from the pics I've seen, these hydraulic lines came in multiple colors, including GSB. I opted for a darkish grey just to add a bit of color vrs everything being dark blue. There was also a larger dia (also made from copper wire) line in the aft section of the wing, this was painted flat black.
I know I sound like a record here but Dana Bell's book has some very clear pics of this area that I found to be invaluable. Regarding reference pictures - one word of caution - I've noticed that if you are just googling pictures on the net, many of them are of restored warbirds. Take these pictures with a big grain of salt, most warbirds are not 100% accurate replicas in all areas. Many WW2 cockpit details are stripped out (armor, avionics, various small fittings, etc) and modern fittings added. Same applies to hydraulic lines, etc. No guarantee that stuff like this is the same color or even in the same configuration as on a military F4U that was in service back in 1945. In this regard, good period reference pics, such as those in Bell's book are invaluable.
Anyhoo... Here are a few pics of the wing fold. Since this is sadly a football-free weekend, I'm hoping to get the other wing completed as well. Wish me luck and as always, thanks for looking.
This pic highlights some of the weathering I did with that artists silver pencil. I really like using this! Weathering is still ongoing, got to add a few black-ish scuffs and some chipping around the fuselage, below the cockpit. The rest of the airframe will be left in it's current shape.


- Anthony in NZ, TenSeven, MikeMaben and 4 others
-
7
-
Wow... that's really first class work. How did you like those HGW Wet Transfers? Are you applying any stenciling / service markings?
-
4 hours ago, Eenyweeny said:
Not much progress to report I'm afraid... Work keeps getting in the way!
The Vector cowl arrived and I'm impressed! the level of detail is incredible:
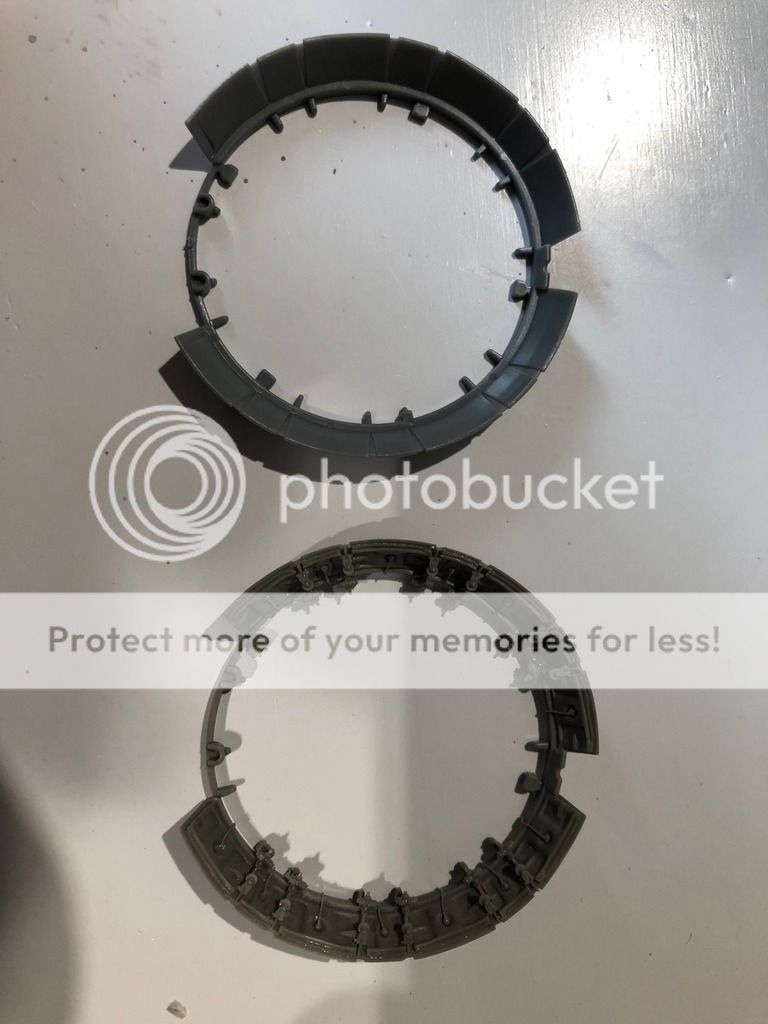
I haven't decided how to tackle the removal of the existing ribs in the Tamiya cowl front piece... any advice would be greatly welcomed.
That's all for now...
Great looking work! With regard to removing the ribs in the forward section of the kit cowling, what I did was this - (assuming you have an X-acto knife), purchase a pack of chiesel blades. Using a good pair of shears, cut down either side of the blade so it’s only a cm or less wide. Then just push the blade under each rib and peel it away. You’ll have to clean the surface up with some sanding but it should come out ok. The thinner the blade the better. I think I may have tried to curve each edge with some pliers so it conformed better to the curved cowling interior. Hope this all makes sense!
-
17 hours ago, Jennings Heilig said:
Any updates John?? I'm having withdrawals
Hi Jennings! I'm an inherent slacker, even more so as I get towards the end of a build. That being said, I finally got some motivation and have done a bit a work. Primarily with installing the hydraulic lines within the wingfold. Also started a bit of work on the canopy (added the mirrors). I'll post a few pics shortly. Next up will be to try to replicate the canopy release pulley system. That's gonna be some fiddly work, not quite sure how I'm going to do this, those pulleys are pretty small. Tamiya seems to have missed that release lever as well. Very uncharacteristic of them.
Stay tuned....

Dark Blue Killer - Tamiya F4U-1D Corsair
in Works in Progress
Posted
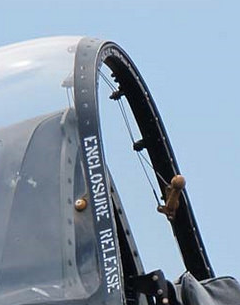
So I've got a bit more completed. I added the hydraulic lines to the port wing fold (no need for pics, it looks identical to the ones above) and I started adding some details to the canopy. I never noticed previously but there is a good amount of hardware present that strangely enough, Tamiya missed. See below (thanks to Jennings and Mike Maben for these great pics):
This includes the red painted canopy locking handles, the yellow canopy release lever and a very complex pulley and cable system that runs from the exterior canopy release push-button to the yellow release handle. I started out with the easy stuff - I fabricated the release handle from a thin diameter styrene rod, that I filed down to represent a more rectangular cross section. I thought about using scrap PE but this handle is thicker and PE wouldn't look as realistic. The knob on the end is simply multiple dabs of superglue that were allowed to dry between applications. Aside from that, I just used a smaller diameter rod and a square of styrene as the base. The locking handles were just a small section of .025" rod, cut to length and topped with a wafer thin section of .040" to represent the flared section at the end.
Here is my progress so far.... I'm not totally happy with the outcome but I think it will look ok once the canopy is installed on the aircraft. I'm on fence about the yellow handle that might be a bit too "chunky" but again, we'll see how it looks a bit later... sometimes close up pics tend to exaggerate small details like this.
Now I'm trying to figure out how to replicate the pulley system. Space is pretty tight due to those mirrors and they kind of throw off the geometry of the system. Not sure how I'm going to approach this one. Stay tuned....