
tomprobert
-
Posts
1,596 -
Joined
-
Last visited
-
Days Won
27
Reputation Activity
-

 tomprobert got a reaction from Mal_Belford in 1/32 Short Stirling
Howdy, folks.
With the school summer holidays here, my workbench has seen some action and the Stirling is back!
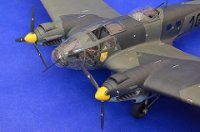
I’ve busied myself finishing off the cockpit components - all that you see here, other than the radios which are spares from an HK Lancaster, have been stratch built and made from various bits of plastic card. Belts, however, came from Eduard:
With everything painted up, it was all installed in the flight deck:
There’s just a couple more very small bits to make and add, and then I can add the canopy… a job I’m not looking forward to, considering its very delicate nature!
Stay tuned…
Tom
-
tomprobert got a reaction from Mal_Belford in 1/32 Short Stirling
Afternoon all,
My modelling mojo has deserted me of late, but I have had the beginnings of a return the last couple of days, so fancied doing a bit more to the Stirling.
A while ago I made all the framing for the bomb aimer’s windows from Evergreen, as the kit supplied parts are completely the wrong shape and the plan was/is to add my own glazing.
Thankfully, and despite the incorrect shape, I have been able to use parts of the kit supplied clear parts, carefully measuring and cutting them one by one:
They were then ‘dropped’ into the framing using Formula 560 canopy glue, with the edges neatened up and sealed with Milliput Black. The end result isn’t too bad and once the whole area has been blended in with a top coat of paint, it should pass muster from 50 yards!
I’m leaving the centre panel right until the end as a means to remove any bits of dust or stray debris - plus I need to make the bomb sight mounts which will be very fragile.
Another job ticked off…
More when there’s more.
Tom
-
 tomprobert got a reaction from Out2gtcha in 1/32 Short Stirling
Afternoon all,
My modelling mojo has deserted me of late, but I have had the beginnings of a return the last couple of days, so fancied doing a bit more to the Stirling.
A while ago I made all the framing for the bomb aimer’s windows from Evergreen, as the kit supplied parts are completely the wrong shape and the plan was/is to add my own glazing.
Thankfully, and despite the incorrect shape, I have been able to use parts of the kit supplied clear parts, carefully measuring and cutting them one by one:
They were then ‘dropped’ into the framing using Formula 560 canopy glue, with the edges neatened up and sealed with Milliput Black. The end result isn’t too bad and once the whole area has been blended in with a top coat of paint, it should pass muster from 50 yards!
I’m leaving the centre panel right until the end as a means to remove any bits of dust or stray debris - plus I need to make the bomb sight mounts which will be very fragile.
Another job ticked off…
More when there’s more.
Tom
-
 tomprobert got a reaction from LSP_Kevin in 1/32 Short Stirling
Howdy, folks.
With the school summer holidays here, my workbench has seen some action and the Stirling is back!
I’ve busied myself finishing off the cockpit components - all that you see here, other than the radios which are spares from an HK Lancaster, have been stratch built and made from various bits of plastic card. Belts, however, came from Eduard:
With everything painted up, it was all installed in the flight deck:
There’s just a couple more very small bits to make and add, and then I can add the canopy… a job I’m not looking forward to, considering its very delicate nature!
Stay tuned…
Tom
-
 tomprobert got a reaction from chukw in 1/32 Short Stirling
Howdy, folks.
With the school summer holidays here, my workbench has seen some action and the Stirling is back!
I’ve busied myself finishing off the cockpit components - all that you see here, other than the radios which are spares from an HK Lancaster, have been stratch built and made from various bits of plastic card. Belts, however, came from Eduard:
With everything painted up, it was all installed in the flight deck:
There’s just a couple more very small bits to make and add, and then I can add the canopy… a job I’m not looking forward to, considering its very delicate nature!
Stay tuned…
Tom
-
tomprobert got a reaction from chukw in 1/32 Short Stirling
Afternoon all,
My modelling mojo has deserted me of late, but I have had the beginnings of a return the last couple of days, so fancied doing a bit more to the Stirling.
A while ago I made all the framing for the bomb aimer’s windows from Evergreen, as the kit supplied parts are completely the wrong shape and the plan was/is to add my own glazing.
Thankfully, and despite the incorrect shape, I have been able to use parts of the kit supplied clear parts, carefully measuring and cutting them one by one:
They were then ‘dropped’ into the framing using Formula 560 canopy glue, with the edges neatened up and sealed with Milliput Black. The end result isn’t too bad and once the whole area has been blended in with a top coat of paint, it should pass muster from 50 yards!
I’m leaving the centre panel right until the end as a means to remove any bits of dust or stray debris - plus I need to make the bomb sight mounts which will be very fragile.
Another job ticked off…
More when there’s more.
Tom
-
tomprobert got a reaction from Mal_Belford in 1/32 Short Stirling
Many thanks and if it’s finished, yes.
-
 tomprobert got a reaction from Shoggz in 1/32 Short Stirling
Howdy, folks.
With the school summer holidays here, my workbench has seen some action and the Stirling is back!
I’ve busied myself finishing off the cockpit components - all that you see here, other than the radios which are spares from an HK Lancaster, have been stratch built and made from various bits of plastic card. Belts, however, came from Eduard:
With everything painted up, it was all installed in the flight deck:
There’s just a couple more very small bits to make and add, and then I can add the canopy… a job I’m not looking forward to, considering its very delicate nature!
Stay tuned…
Tom
-
 tomprobert got a reaction from dennismcc in 1/32 Short Stirling
Howdy, folks.
With the school summer holidays here, my workbench has seen some action and the Stirling is back!
I’ve busied myself finishing off the cockpit components - all that you see here, other than the radios which are spares from an HK Lancaster, have been stratch built and made from various bits of plastic card. Belts, however, came from Eduard:
With everything painted up, it was all installed in the flight deck:
There’s just a couple more very small bits to make and add, and then I can add the canopy… a job I’m not looking forward to, considering its very delicate nature!
Stay tuned…
Tom
-
 tomprobert got a reaction from patricksparks in 1/32 Short Stirling
Howdy, folks.
With the school summer holidays here, my workbench has seen some action and the Stirling is back!
I’ve busied myself finishing off the cockpit components - all that you see here, other than the radios which are spares from an HK Lancaster, have been stratch built and made from various bits of plastic card. Belts, however, came from Eduard:
With everything painted up, it was all installed in the flight deck:
There’s just a couple more very small bits to make and add, and then I can add the canopy… a job I’m not looking forward to, considering its very delicate nature!
Stay tuned…
Tom
-
 tomprobert got a reaction from JayW in 1/32 Short Stirling
Howdy, folks.
With the school summer holidays here, my workbench has seen some action and the Stirling is back!
I’ve busied myself finishing off the cockpit components - all that you see here, other than the radios which are spares from an HK Lancaster, have been stratch built and made from various bits of plastic card. Belts, however, came from Eduard:
With everything painted up, it was all installed in the flight deck:
There’s just a couple more very small bits to make and add, and then I can add the canopy… a job I’m not looking forward to, considering its very delicate nature!
Stay tuned…
Tom
-
 tomprobert got a reaction from blackbetty in 1/32 Short Stirling
Howdy, folks.
With the school summer holidays here, my workbench has seen some action and the Stirling is back!
I’ve busied myself finishing off the cockpit components - all that you see here, other than the radios which are spares from an HK Lancaster, have been stratch built and made from various bits of plastic card. Belts, however, came from Eduard:
With everything painted up, it was all installed in the flight deck:
There’s just a couple more very small bits to make and add, and then I can add the canopy… a job I’m not looking forward to, considering its very delicate nature!
Stay tuned…
Tom
-
tomprobert got a reaction from blackbetty in 1/32 Short Stirling
Afternoon all,
My modelling mojo has deserted me of late, but I have had the beginnings of a return the last couple of days, so fancied doing a bit more to the Stirling.
A while ago I made all the framing for the bomb aimer’s windows from Evergreen, as the kit supplied parts are completely the wrong shape and the plan was/is to add my own glazing.
Thankfully, and despite the incorrect shape, I have been able to use parts of the kit supplied clear parts, carefully measuring and cutting them one by one:
They were then ‘dropped’ into the framing using Formula 560 canopy glue, with the edges neatened up and sealed with Milliput Black. The end result isn’t too bad and once the whole area has been blended in with a top coat of paint, it should pass muster from 50 yards!
I’m leaving the centre panel right until the end as a means to remove any bits of dust or stray debris - plus I need to make the bomb sight mounts which will be very fragile.
Another job ticked off…
More when there’s more.
Tom
-
 tomprobert got a reaction from Tolga ULGUR in 1/32 Short Stirling
Howdy, folks.
With the school summer holidays here, my workbench has seen some action and the Stirling is back!
I’ve busied myself finishing off the cockpit components - all that you see here, other than the radios which are spares from an HK Lancaster, have been stratch built and made from various bits of plastic card. Belts, however, came from Eduard:
With everything painted up, it was all installed in the flight deck:
There’s just a couple more very small bits to make and add, and then I can add the canopy… a job I’m not looking forward to, considering its very delicate nature!
Stay tuned…
Tom
-
tomprobert got a reaction from Tolga ULGUR in 1/32 Short Stirling
Afternoon all,
My modelling mojo has deserted me of late, but I have had the beginnings of a return the last couple of days, so fancied doing a bit more to the Stirling.
A while ago I made all the framing for the bomb aimer’s windows from Evergreen, as the kit supplied parts are completely the wrong shape and the plan was/is to add my own glazing.
Thankfully, and despite the incorrect shape, I have been able to use parts of the kit supplied clear parts, carefully measuring and cutting them one by one:
They were then ‘dropped’ into the framing using Formula 560 canopy glue, with the edges neatened up and sealed with Milliput Black. The end result isn’t too bad and once the whole area has been blended in with a top coat of paint, it should pass muster from 50 yards!
I’m leaving the centre panel right until the end as a means to remove any bits of dust or stray debris - plus I need to make the bomb sight mounts which will be very fragile.
Another job ticked off…
More when there’s more.
Tom
-
 tomprobert got a reaction from Landrotten Highlander in 1/32 Short Stirling
Howdy, folks.
With the school summer holidays here, my workbench has seen some action and the Stirling is back!
I’ve busied myself finishing off the cockpit components - all that you see here, other than the radios which are spares from an HK Lancaster, have been stratch built and made from various bits of plastic card. Belts, however, came from Eduard:
With everything painted up, it was all installed in the flight deck:
There’s just a couple more very small bits to make and add, and then I can add the canopy… a job I’m not looking forward to, considering its very delicate nature!
Stay tuned…
Tom
-
 tomprobert got a reaction from Kais in 1/32 Short Stirling
Howdy, folks.
With the school summer holidays here, my workbench has seen some action and the Stirling is back!
I’ve busied myself finishing off the cockpit components - all that you see here, other than the radios which are spares from an HK Lancaster, have been stratch built and made from various bits of plastic card. Belts, however, came from Eduard:
With everything painted up, it was all installed in the flight deck:
There’s just a couple more very small bits to make and add, and then I can add the canopy… a job I’m not looking forward to, considering its very delicate nature!
Stay tuned…
Tom
-
 tomprobert got a reaction from BradG in Airfix classic 1/24 Spit MkIa
Some good progress on the big Spitfire of late...
Following others when building/improving this kit, I have added some plastic card laminate to the leading edges of the ailerons to improve the fit. Being designed to move, there were unsightly gaps where the ailerons join the wing - this improves things greatly and avoids the 'toy-like' look of the original:
The original Airfix kit is well know for its retractable landing gear and hollow wheel bays - it's relatively simple to box these in using plastic card and improves the look immeasurably:
With this done the rest of the airframe comes together very rapidly - there's some filler needed but it's very much a product of its time. I've painted the prop, too, and this is just a push-fit. I am not using the engine but the forward part of the Merlin is easy to attach to the forward part of the cowling to hold the prop in place:
I now need to sort a few blemishes and install the clear parts. It's all coming together rather quickly!
Until next time,
Tom
-
 tomprobert got a reaction from JayW in 1/18 Scale P-51B 3D Print Build
Modelling magic on a different level. This has been a pleasure to follow.
Tom
-
 tomprobert got a reaction from mc65 in 1/32 Short Stirling
Afternoon all,
My modelling mojo has deserted me of late, but I have had the beginnings of a return the last couple of days, so fancied doing a bit more to the Stirling.
A while ago I made all the framing for the bomb aimer’s windows from Evergreen, as the kit supplied parts are completely the wrong shape and the plan was/is to add my own glazing.
Thankfully, and despite the incorrect shape, I have been able to use parts of the kit supplied clear parts, carefully measuring and cutting them one by one:
They were then ‘dropped’ into the framing using Formula 560 canopy glue, with the edges neatened up and sealed with Milliput Black. The end result isn’t too bad and once the whole area has been blended in with a top coat of paint, it should pass muster from 50 yards!
I’m leaving the centre panel right until the end as a means to remove any bits of dust or stray debris - plus I need to make the bomb sight mounts which will be very fragile.
Another job ticked off…
More when there’s more.
Tom
-
 tomprobert got a reaction from Anthony in NZ in Airfix classic 1/24 Spit MkIa
Some good progress on the big Spitfire of late...
Following others when building/improving this kit, I have added some plastic card laminate to the leading edges of the ailerons to improve the fit. Being designed to move, there were unsightly gaps where the ailerons join the wing - this improves things greatly and avoids the 'toy-like' look of the original:
The original Airfix kit is well know for its retractable landing gear and hollow wheel bays - it's relatively simple to box these in using plastic card and improves the look immeasurably:
With this done the rest of the airframe comes together very rapidly - there's some filler needed but it's very much a product of its time. I've painted the prop, too, and this is just a push-fit. I am not using the engine but the forward part of the Merlin is easy to attach to the forward part of the cowling to hold the prop in place:
I now need to sort a few blemishes and install the clear parts. It's all coming together rather quickly!
Until next time,
Tom
-
 tomprobert got a reaction from CODY in 1/32 Short Stirling
Afternoon all,
My modelling mojo has deserted me of late, but I have had the beginnings of a return the last couple of days, so fancied doing a bit more to the Stirling.
A while ago I made all the framing for the bomb aimer’s windows from Evergreen, as the kit supplied parts are completely the wrong shape and the plan was/is to add my own glazing.
Thankfully, and despite the incorrect shape, I have been able to use parts of the kit supplied clear parts, carefully measuring and cutting them one by one:
They were then ‘dropped’ into the framing using Formula 560 canopy glue, with the edges neatened up and sealed with Milliput Black. The end result isn’t too bad and once the whole area has been blended in with a top coat of paint, it should pass muster from 50 yards!
I’m leaving the centre panel right until the end as a means to remove any bits of dust or stray debris - plus I need to make the bomb sight mounts which will be very fragile.
Another job ticked off…
More when there’s more.
Tom
-
 tomprobert got a reaction from KiwiZac in Brigade Models' 1/32nd Spitfire TR9 conversion
I think I'll throw my hat into the ring with this - Brigade Models' recent 1/32nd TR9 conversion which uses the Revell MkIX as a base:
I've hankered after one of these as I live just down the road from Biggin Hill and see them over my house all the time. But, the main reason is because my amazing family bought me a flight in one for my 40th birthday - the birth of your children and getting married are memories that will stick with you forever, but a flight in a Spifire...
I actually got some stick time and flew it myself for about 10 minutes and what a machine! Two wonderful victory rolls over my home county, buzzing my mate playing cricket, and seeing my family in the chase plane alongside me was enough to bring a tear to my eye. If you ever get the chance to fly one, grab it!
Here are some shots from my sortie in 'Grey Nurse' taken by my wife:
So, what's in the box? Well...
Lots of resin goodies to make the twin-sticker: a new cockpit section (the two seaters had the front cockpit moved forward to help with CoG and, of course, to make room for the guy or gal in the back!) which is cast in light grey resin. Rivet and panel detail has been nicely captured. You get a new seat for the rear cockpit, second instrument panel and cockpit controls, a new rear cockpit 'tub' built up from resin sidewalls, late mark wheels and a nicely vacformed new rear canopy:
The decal sheets are really, really nice and cover some modern 'warbirds' as well as those used operationally... choices, choices:
A sheet with comprehensive instructions as to how to fit the new tub as well as the other differences between a standard MkIX and the trainer is provided:
All in all it's a pretty comprehensive set and looks like it'll give everything that's needed to do the conversion.
Now, which scheme? I'm likely to leave this until later in the build but I'm useless at NMF as well as painting invasion stripes, so I'm certainly leaning more towards the BoB scheme (this aircraft was used in these colours for the film I believe) or the Dutch example... we'll see!
I'm afraid there's no guarantees of regular updates as I have lots of other projects on the go and like to hop about as the mood takes, but I do aim to start cutting plastic soon which will no doubt help get the juices flowing!
I'll be back when there's something to report...
Tom
-
 tomprobert got a reaction from KiwiZac in Airfix classic 1/24 Spit MkIa
Cheers, gents. Sadly no further progress to report of late as the mojo has completely deserted me... I've looked hard but just can't seem to find it
-
tomprobert got a reaction from KiwiZac in Airfix classic 1/24 Spit MkIa
Howdy, folks.
I haven’t got around to starting my Brigade TR9 conversion yet, but was rummaging in the loft the other day and found this - the classic Airfix 1/24 Spitfire MkV. Being inspired by @Erwin’s lovely rendition of his MkI, I thought why not..?
Box art:
All the parts are present to build the MkI which is my plan - I have ordered some decals to replicate N3200, which was famously shot down (after claiming a Stuka) during the evacuation of Dunkirk and buried on the sands over time at Sangatte, near Calais. Pilot Sqn Ldr Geoffrey Stevenson spent the remainder of the war as a POW.
The remnants of the airframe were recovered in 1986 and in early 2007 restoration began to airworthy condition - it still resides at Duxford to this day wearing its 19 Squadron codes and has been restored to look exactly as it did when lost on 26th May 1940.
So… this will be built largely OOB just as Airfix intended, although I have bought some Airscale instrument bezels to enhance the IP, some Eduard belts and I’ll box in the wheel bays using plastic card.
There was lots of flash present - not surprising given its vintage - and the cockpit parts were quickly assembled. The rear fuselage got a spray of aluminium, as per references:
The main cockpit was then sprayed up, a few bits and bobs such as Milliput seat cushions (modern pilots don’t like getting sore bottoms!) added so the fuselage is now ready to be buttoned up:
I’m going to replicate the model as the modern day warbird so have kept everything absolutely immaculate like the real thing.
I’m keeping the cowling buttoned up as the engine area is rather basic and lacking in detail and I want to actually get the build completed within the time frame of the GB - I don’t want to lose momentum or interest…
More when there’s more…
Tom