Search the Community
Showing results for tags 'Spitfire'.
-
Here is my latest build, a MkXVI Spitfire, by Tamiya, which I built as my contribution to the Colour My World Blue group build. It represent Spitfire SL721 which became the personal plane of Air Chief Marshall Sir James Robb, from 1946 to 1951. As you can read below, this plane has had a very long career, and she still flies. You can find the full build detailed here: https://forum.largescaleplanes.com/index.php?showtopic=72233 Spitfire SL721 never flew in WW2, as it was delivered new to No.6 Maintenance Unit of 27th August 1945. From there, it went to the Fighter Command Communications Squadron in October 1946, then later that month it went on to the Meteoroligical Flight for use by Sir James Robb, who at that time was Commander in Chief of RAF Fighter Command. Soon afterwards, it was sent back to Vickers Supermarine for refitting. All armament was removed, and the gun bays converted to luggage lockers. The gun sight was also removed, as was the rear fuselage fuel tank, and much of the remainder of it's military equipment. It was also painted in RAF Scheme D Light PRU Blue as seen here. In this form, the plane was a dream to fly as it's performance was very much enhanced by the removal of so much weight. The plane was used by Air Marshall Robb to tour the various bases in Great Britain. It also appeared in a few races, including the Kings Cup. In June 1948, it was involved in a landing accident. The pilot on this occasion was AVM Sir John Boothman, who was also the pilot who took the Schnieder Trophy in 1931. SL721 was sent back to it's manufacturer's for repair, this time being repainted in RAF Scheme D PRU dark blue. The plane went back to the 31 Squadron RAF (nominally) for Sir James Robb's continued use, who by now was Commander In Chief, Airforces Europe, until her retired in August 1951. Sir James handed over his plane to the commanding officer of the Central Flying School at Little Rissington until in late 1954, despite many objections from the CFS staff, the plane was ordered to be scrapped. While awaiting it's fate at RAF Lyneham, it was spotted by an automotive garage owner who purchased it for 120 pounds for display on his forecourt at Swandean It was well looked after here, and the engine was stared regularly to keep it in reasonable fettle. Three years later, the plane was moved to Lord Montagu's estate for display, where it appears to have stayed, in the open, until 1966. It seems to have been traded multiple times in a very short time span, without actually being moved, firstly for 2000 pounds, then 3000GBP, then 4000GBP. Finally in 1967, it made it's way to the United States, by now being owned by William "Bill" Ross, a Chicago businessman and aircraft collector. Ross had the plane refurbished in Atlanta, Georgia, and it was now painted in a glossy green/brown camouflage with azure blue undersides, but still wearing JM-R as squadron codes. SL721 spent some years now on the display circuit in the US, often flown by legendary warbird pilot Jerry Billing. Some time in 1972, the plane was sold to Englishman Doug Arnold, and shipped back to the UK. He repainted the squadron codes with his initials D-A. Again, the plane appeared at air displays until it was sold again in 1978 to Woodson K Woods of Chino, California. Here, Woods repainted SL721 in a more accurate green/grey camouflage and again refurbished the plane. It now wore the squadron codes WK-W and again flew on the display circuit. It also appeared at Reno in 1981, in mock combat with a Hispano ME109 "Buchon", where SL721 achieved her first "kill", shooting down the Buchon in mock combat. Woodson loaned SL721 to the San Diego Aerospace Museum for 7 years, starting in 1982. On return, the plane was trucked to Colorado for a complete rebuild. Woodson's son Chris would care for the plane for another 8 years until in late in 1998, he had the plane repainted again, this time in azure blue and in the markings of Sir James Robb. The plane was sold again in 2000 or 2001, soon after appearing again at Reno. This time, it went to Canada and became part of the Vintage Wings of Canada collection. Here, it was repainted in the markings of TB886, AU-J, a Spitfire XVI flown by 421 Squadron RCAF and has flown many displays in honour of fallen Canadian airmen of WW2. It was put up for sale again in August 2017. Earlier this year, SL 721 was purchased by a Belgian consortium, and is now flying again in that country, registered as OO-XVI. https://forum.keypublishing.com/showthread.php?145017-The-Belgians-are-with-flying-Spitfire-once-again-OO-XVI Who knows?? Maybe SL721 will fly again in the skies over Britain. Cheers, Michael
-
https://s9.postimg.org/h490lng4v/41783_D11-5_C69-4_C70-_BFE5-5_A55_FCAE5416.jpg This showed up on my Twitter feed this morning. If it's not a fake it's an awesome shot. Can't help but wander who took the photos though?
-
small side project while waiting for some parts for the TBF-1c Avenger. Cockpit and engine are those brassin parts from Eduard. Spitfire painted with Alclad "Polished Aluminium". Pin-wash was done with clay-based wash from Ultimate. The exhausts are installed in a wrong angle. They point slightly upward. Anyway, fun to build and I learned how to weather Alclad paint...somehow. lol If MJ250 really was in NMF. Idk. Dirk
-
Hi! I decided to finish my old project. It is a Spitfire Mk Vc conversion based on old Hasegawa Vb and new Revell Mk II kits. I added new wing bubbles and ammo panels, new shape of plate for Hasegawa windscreen. From Japanese kit i used Vokes Filter too. Master gun barrels and Montex mask were needed.
-
Not a bad model from Airfix, I picked this up from one of the sales at Aldi here in Australia. I still think Airfix have some work to do with the depth of their panel lines, but I admit I've been buying quite a few of these new Airfix kits. Decals came from Blackbird Models in the UK.
-
I can't seem to make any headway with my two 1/32 Sopwith Camels - the rigging just has me in knots (Ha ha, that was a LITTLE funny, right? ). But I've found some enjoyment in some of the 1/72nd kits and the Eduard kits are just a joy to build. Fit and detail are amazing for kits in this scale, instructions are very clear - and they don't take up a lot of space. Ok, so why twins? I purchased a Profi-Pack kit of the Spitfire Mk IXc, and knowing I have many different decals to play with, purchased an Mk IXc OVERTREES set to go with it. My first Overtrees - which is simply a sprue-only kit - no decals, masks, PE or instructions (which for Eduard can be downloaded from the site - but I used the Profi-Pack instructions anyway. Here is the kit box: Here is the OVERTREES label. They also make available the PE frets if you want too... Since I can build two kits at the same time I decided to try some different things with the OVERTREES build - namely some masking (those D-Day Strips) and the camo masks work and a non-PE IP. Turns out, you really can't see much of a Spitfire IP anyway. Unfortunately, I should have bought a second set of canopy masks - masking the tiny Spit front windscreen takes a steadier hand than mine so I'll either try and reuse the masks from the Profi-Pack build or may give tape another go. Here are the two birds I'm building; (DU*N) as the Profi-Pack and the OVERTREES build is (WX*D). Apologies that I'm jumping into this build at probably more like the 75% (where did I put those build pics?? The masking for the camo alone took me a day!) but here is where I'm at so far. Still need to finish the landing gear and start the weathering, as well as adding the antennas, fuel caps, pitot tubes, etc. WX*D is on the left, DU*N is on the right. The camo is Vallejo Model Air and the Sky fuselage bands are painted as are the yellow leading edge stripe. On DU*N, the red 'tape' covers are painted on, while on WX*D they are the kit decals. Honestly, for as easy as it was to mask, so much easier to paint than try and align the 4 decals. For looks? I think after sealing with a clear coat then a matte or flat coat it will be a wash. But I like painting them better. Ideally, I was going to use masks for the national insignia on WX*D, but in the end, I kind of just wanted to get on with it. And the fact that the Eduard decals react beautifully to Micro Set. I 'paint' on some Micro Set where I want the decal, put the decal down and cover again with some Micro Set. I'll revisit in a couple of minutes, using a brush to smooth out any wrinkles but very quickly all the decals snuggled down into the panel lines. NOTE: What I've found is you don't have a lot of time to move and adjust the decal with this method. The solution gets to work very quickly breaking down the decal and if you don't move fast enough (15-25 seconds max) it can turn to mush. That reminds me. The 'door's on both aircraft will be open, the ones there are just masks for the fuselage painting. I also used more of the stenciling on DU*N although again, at this scale, unless you know where to look they are actually very hard to see. Next up is another clear coat to seal in the rest of the decals and then start on some weathering - esp on the underside. Not going to go crazy, but hope to show some of the oil streaks common to the type. DU*N also has a lot of the PE grills and screens so hope to show those off a bit better. I'll work on some better photography for the next batch, hopefully! Thanks for looking and of course, comments are welcome. Chris
-
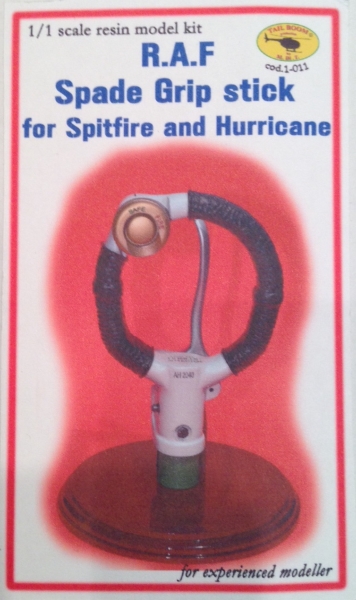
 I hope to try and do a build of Trumpeter's 1/24th Spit Vb kit, but having a look at the cockpit and the amount of work to bring it up to snuff... Anyway, to try and make sure I finish something for a Group Build on time, I will do this relatively simple kit: It is a 1:1 scale kit made by Maurizio Di Terlizzi, who has a range of 1:1 WWII gunsites and grips.
- 59 replies
-
- 3
-

-
- Spitfire
- Spade Grip
- (and 1 more)
-
Hi, All In January 2017 I decided to restart old Revell's Spitfire Mk. 22/24 kit, which I started around a year earlier, but gave up temporarily due to its poor fit and lack of detail - and the most important, lack of idea, how to paint it. This time however it was most of all to be an exercise in rescribing, scratch-building and riveting (using RB tool and must say it was fun) - did this all for the very first time in such a large scale, so didn't want to spoil any better or more expensive kit... Therefore added here some more details: upgraded wheel wells and new landing gear covers, SAC gear legs, resin wheels, formation lights, Eduard's seat belts and dashboard, CMK's resin gunsight. This is really a vintage kit and it shows.You can find the workshop thread here. I was hoping to get a result, which would look nice in the second row on my shelf, in Southern Rhodesian markings. Have I won? Well, she's not perfect, please judge yourself - I hope you like it Best regards Hubert (The prop'n'spinner are "bluetacked" only and moved a bit during the photo session... sorry for that).
- 18 replies
-
- 18
-
-
Here's my entry in the GB. It's the Tamiya low back XVI kit. I'll be using Life Like decals to do TD248. I have a bit of AM to add to the build but it'll be mostly OOB. This means I'll have two different Spitfires on separate group builds at the same time. Carl
-
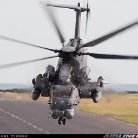
Vintage Wings of Canada performed a test flight of their recently restored Spitfire Mk.IX, in markings of 442 Squadron RCAF. She flew without issues this morning at 9:30am. I now have two Spitfires (and a Mk.XIV crated in storage), a Mustang, two Hurricanes a P-40 and a Swordfish (among other aircraft) within two hours driving distance. This was the restoration project that was started in Comox, BC. Richard
-
Here's my entry into the GB: It looks like Revell removed the original Matchbox copyright and logos getting the mould here: I'm painting to deviate a bit from the instructions in the hope that it'll make assembly easier, particularly around the wing root area. As for AM, I'm going to throw a bit at it, mostly some leftover Tamiya bits and new belts. Carl
-
Hello all, Thought I'd kick the year off be posting a couple of images of this tribute to Edgar Brooks. I began this build during the GB but stalled when I got distracted. During the holidays I have been able to re-visit it and finally finish my tribute to Edgar. Better late than never. Hope you enjoy the end result. I had hoped to be able to display the model all buttoned up but the intake under the nose does n't want to come off anymore. I managed to batter the kit stencils into submission but chickened out with the larger markings which were masked and painted. sluggo kindly provided the masks which worked beautifully, thanks Randy. The cannon are metal items and fitted perfectly. Really a top notch product. Also, the wheels are resin items from Barracuda studios. Excellent product and heartily recommended. The finish is Tamiya AS whizz can with a coat of clear gloss lacquer over it from Montana Gold spray cans. I then toned that down in places with Valejo satin varnish before weathering with various mediums from Games Workshop inks through water colour pencils to pastel chalks. I finally gave up trying to use Photobucket and reverted to Joomeo but it's a while since I use that site so hope the images show up for everyone. Any comments, good or bad, are most welcome. Cheers.
- 22 replies
-
- 21
-
-
- Tamiya
- 32nd scale
- (and 6 more)
-
 Takka!Takka! Takka! Takka! After finishing my FR IX, I guess I couldn't stay away. So here's my next Spitfire build. As most have probably guessed, this will be MH434 from the film Battle of Britain. I'll be using the fundekäls sheet for the markings. The biggest hurdle I had was that I had previously assembled most of the wing. In doing so, I used the wrong cannon fairing bulges. To replicate the look of the .303 armed MK II Spitfire, the cannon barrels and their fairings were removed. This meant I had to remove them from my wing. I decided to try and cut them off with a small razor saw. This worked out better than I thought and I managed to get both fairings removed without damaging any of the detail on the surrounding panels. Next were the leading edge inserts. I used sprue from the kit to plug the openings. Then I sanded them to their approximate shape. The inserts were then attached to the wings and the final shaping will be done once they're dry. I also filled in the holes in the wing panels with sheet styrene. Carl
- 136 replies
-
- 7
-
-
- Spitfire
- fundekäls
- (and 2 more)
-
 Hi fellow GBers (feels good to say that) At last I can actually join in since my Tamiya MkXVI landed this morning. I've only just opened the box so it's early days but I'm thrilled to be on board. Cheers.
 -
Here's my entry into this GB. The PRU pink Spitfires have certainly been an eye-catching scheme over the years. When I first thought about doing one, I wasn't sure about the shade of pink. Edgar was very helpful in figuring that out. I'll be starting with the Tamiya IXc kit: The contents are a bit jumbled as I had to mix it with another kit to get under the 25% completion limit. For extras, I'll be using some Barracuda resin bits, RB rad screens and Ad Astra paint masks for the markings. Carl
-
http://www.jonbius.com/edgar-brooks-spitfire-notes/ Cheers, D.B.
-
Just an observation on my part, but I've been looking over Revell's Spitfire II and noted the mold inserts in the wing. There are inserts for the gun ports, the upper wing blisters, and one which would allow for the Vb or Vc cannon bulges. With new parts for the cannon, a Vokes or even Aboukir filter, a wing radiator, and a canopy they have got a Vb Trop. The wing blister could be tailored for Vb or eliminated for Vc. Additionally, for a Vc, the three piece gear leg assembly could accommodate the change in the gear's rake with the substitution of a single part. Like I said, it is just an observation on my part
-
According to the instructions Part 40 is to be fitted to the starboard cockpit. I can't find any evidence of a device like this on Spitfires. However, it resembles the radio wave tuner which was, to the best of my knowledge, only fitted on Seafires. Is this just a slip-up by Revell or am I missing a piece of the puzzle?
-
While meandering the net I stumbled onto these Spitfire drawings. http://www.geocities.jp/yoyuso/spit1a/spit1ae.html The drawings were created by Jumpei Temma , an exceptionally skilled modeler and artist. What I found noteworthy was the how well they match the Revell 1/32 Spitfire II. Just curious if these drawing had any role in the kit's design?
-
I've just recently gotten back into creating aircraft profiles, more for fun and to get work off my mind. I know this site hosts quite a few really talented artists and historians and I would be really grateful if you all wouldn't mind giving a critique. It would really help me to keep getting better. http://bad-rabbit-design.deviantart.com/gallery/ My thanks in advance to all.
-
Hi all, I'm beginning this thread to spur me into action in the proper scale again. Although I've got a couple of larger scale projects on the back burner my most recent modelling has been in other scales. I have many of you to thank for this sudden re-kindling of desire. As we all know, there are a multitude of threads here on LSP that make the mouth water and can't help but inspire the viewer. I'm obviously not immune because I've felt compelled to begin a new project only days after completeing my last model. The creative juices are flowing and I've dilligently saved as many threads as I could to my favourites so that I can refer to them for ideas and techniques. My plan for this build is still rather fluid and I'm fluctuating between a war weary bird or a show bird depending on who's thread I've just been looking at. Most recently I've been inspired by Chuck Sawyer and his P-38 show bird so at this point in time I'm swaying towards a restored Spitfire with a smidge of weathering plus a pilot on board. Next time I look at Warbird's Spitfire build I'll probably revert back to building a war horse again. There are a couple of parameters that I'm set on though. I will definitely be doing some modifications to the Revell kit and it will definitely have a pilot on board. Some of the detail on the Revell model does n't sit well with me personally so I'll be attempting to get the thing to look more the way I want it plus, the addition of a pilot figure is a way of reducing the amount of detail I'll need to add inside the cockpit. So, that's where I'm at. A statement of intent so to speak. I'll probably be calling on you guys for alot of help and advice so I hope you'll keep popping in to keep me on the straight and narrow. Bye for now.
-
Ok, Ok, Ok, I caved.... Granted with all my other irons in the fire this may take a while, so I am grateful for the Dec 31 end date. ...It may take every bit of it. The box: The goodies inside: The conceptual drawing: I actually did a thumbnail sketch probably 2 years ago, then did the above colored rendering. I will be making the majority of this up as I go along, but at this point here is the basic concept and list of mods. Reno styled Unlimited Racer, based on the Spitfire. Rolls Royce Griffon engine with modified Shackleton Contra-rotating propellers Boil off system for engine cooling and oil cooling. Cockpit moved aft and modified bubble canopy and windscreen. Filled and smoothed wings and fuselage. Modified landing gear. I have been dying to build this, and this is the perfect excuse to do it.
-
These were two of the finest kits i have ever built. They are beautiful kits. They are both built straight from the box with the exeption of belts in the hurricane. The undersides and earth were airbrushed but the green was brush painted. That was a pain. The Tamiya paints airbrush beautifully , but not so good on the brush painting side i n my experience. I wish i could take better photos , they really dont do the complete models justice. My only small bugbear was the undercarriage on the spitfire. They could have been mounted better. Cue the Battle of Britain music!
-
 Here's my Spit, which I began over two years ago, with an extended break in between... (The WIP is here) This was a kit of firsts for me: My first camo paint job My first use of aftermarket decals, resin, and photo etch parts It would be no surprise for me to report that it was a well engineered kit and any fit problems I may have experienced were of my own doing... Further, I was delighted for the most part with the resin parts, especially the engine rocker covers, the pilot seat, and the cockpit hatch... I am not sure I would purchase the cockpit add-ons, other than the photo etched control panel... The Barracuda Cast decals (stickers) were really quite excellent and settled onto the craft better than any decals I've used; however, they are tender and must be used a bit more carefully than OOB decals... Finally the Gator masks I used for the camo paint job were excellent too... I would grade my build performance from two different perspectives: From the perspective of the top builders on this site, I give myself a B-/C+, because so many of the Spits contain far more extras than I could imagine adding, plus they are far cleaner builds than mine... From my own personal capabilities and experiences, I give myself an A-/B+ for stretching myself on a build further beyond where I have ever been before... much of that stretching was a result of following so many excellent builds on this site... I really love epic builds and this was one for sure...
 -
Shot this a couple of months ago at the Chicago Museum of Science and Industry... nice "in-flight" display bearing down on a Stuka just in front of it... seeing it psyched me up to finish off my Tammy kit... They also have a captured U-Boat down in the basement... went on board... pretty cool...


.thumb.jpg.f0920d798d5d8600fb58b1d8a906ddff.jpg)