
ChuckD
-
Posts
914 -
Joined
-
Last visited
-
Days Won
9
Reputation Activity
-

 ChuckD got a reaction from Greg W in A Birdcage in Turtle Bay - An F4U-1 Diorama
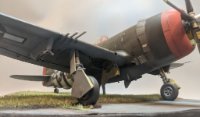
Hi, all. Back with an update after making good progress today.
First, our gallant protagonist has been roughed in. Surprisingly, the Black Dog resin figure fit the scene pretty well. I will only have to do some minor shaping and filling behind the left shoulder to clean him up. I'll need to fix his fingers as they broke when I tried to straighten them a bit, but that shouldn't be too big of a problem.
I'm going to have to deviate from the source photo just a bit here as the parachute is going to cause a bit of an issue. In the reference photo, I believe Lt. Ray had his parachute pack on the seat pan with the straps splayed out the cockpit and down the side of the fuselage. On the figure set, the parachute pack (not attached) is integral to the figure and all the associate straps and harnesses are already molded onto the figure. I don't think I've got it in me to remove all the molded detail then sculpt in other detail that would inevitably be needed after such a task. So, in our version of history, Lt. Ray will be entering the a/c with his pack on his rear. Artistic license, etc, etc, etc.
When I got to looking at the second figure - the one that I need to sculpt from the waist up - I realized he was standing on the section of wing outboard of the fold line. So, I needed to build the wings. After that, I was so close to being done, I decided to finish it up. So, aside from some clear bits, antennae, a pitot tube, and the Anyz Model canopy rail, the build is more or less done. All the gear stuff is dry fit, including the doors. Same for the prop.
As others have said, this is a wonderful kit. The engineering on it is just superb and it really went together well. The only fit issues I have are near the top of the cowling, so, I'll need to do a little filling there. But, outside of that, it was a good clean build and I'm glad I've got another in the stash. That's not to say I missed any opportunities to shoot myself in the foot... I forgot to add the little clear windows on the leading edges for the gun cams and such. I didn't realize it until I'd almost closed up the small panels on the top of the wing above them. Fortunately, by reaching into the small panel on the top of the wing, I was able to finagle the two clear pieces in place without too much trouble. Story of my life.
Anyhoo, I hope to make some progress on the figures and the base now. The build work will be halted until those have been addressed. Again, I don't want to paint and finish the airplane, as I just know I will run out of steam if I save the figures for last.
-
ChuckD got a reaction from Greg W in A Birdcage in Turtle Bay - An F4U-1 Diorama
Thank you! I'm glad to know it wasn't operator error.
Anyway, good progress today.
After sifting through my spares bins, these were the two best candidates for the lower half of the crew chief. The left is the standing pilot figure from this Corsair kit. The right is a 1/35 scale Wehrmacht Nashorn gunner figure also from Tamiya. Curiously, they're identical in dimensions despite the difference in scale. In the end, I opted for the standing pilot figure and began scraping off details that I wouldn't need.
This is after getting the torso down to almost nothing and adding the wires for the arms. Front:
Back:
Here is the basic jacket sculpted with Green Stuff. The hands are from a 1/35 set of heads and hands from Hornet. Again, despite the "smaller" scale, they look a little large, but I'm hoping that will become less obvious after the arms are fully sculpted. I'll also be adding some pockets and such to the jacket once the base material cures.
The back is okay. After this photo, I went back and did a little more detailing, so it looks a little better. I'll bend the arms into the proper position before adding the sleeves and such.
I also filled the gaps in the pilot figure, including the gaps between the parachute and the figure itself. I suspect I'll have some cleanup to do once I can get some primer down, but so far, I'm happy with the results.
While waiting for the epoxy putty to cure, I decided to build the Anyz Models canopy rail.
Unfortunately, I hacked off the mounting brackets for the mirrors while I was removing the frame from the 3D printing supports, so I had to fabricate absolutely tiny new ones from wire. Not perfect, but if they all hold together until final assembly, I'll be very happy. Lastly, I took the time to mask all the clear parts as well, so I'm getting close.
I hope to finish up the figure sculpting tomorrow, then start the final prep for painting on those. After that, I'll start focusing on the groundwork.
-
 ChuckD got a reaction from MikeMaben in A Birdcage in Turtle Bay - An F4U-1 Diorama
Ha! Yeah, Mike. It pretty much builds itself from here.
Thank you! I wasn't aware of that. I'll stick with him getting in from the left so it lines up better with the source material.
-
 ChuckD reacted to Uncarina in Zoukei Mura FW-190A-4 JG 54
Thank you Chuck, I’m glad you like it so far! I’ve really enjoyed watching and learning from your builds such as the A-20 so I’m glad to return the favor.
Cheers, Tom
-
 ChuckD got a reaction from Trak-Tor in A Birdcage in Turtle Bay - An F4U-1 Diorama
Thank you! I'm glad to know it wasn't operator error.
Anyway, good progress today.
After sifting through my spares bins, these were the two best candidates for the lower half of the crew chief. The left is the standing pilot figure from this Corsair kit. The right is a 1/35 scale Wehrmacht Nashorn gunner figure also from Tamiya. Curiously, they're identical in dimensions despite the difference in scale. In the end, I opted for the standing pilot figure and began scraping off details that I wouldn't need.
This is after getting the torso down to almost nothing and adding the wires for the arms. Front:
Back:
Here is the basic jacket sculpted with Green Stuff. The hands are from a 1/35 set of heads and hands from Hornet. Again, despite the "smaller" scale, they look a little large, but I'm hoping that will become less obvious after the arms are fully sculpted. I'll also be adding some pockets and such to the jacket once the base material cures.
The back is okay. After this photo, I went back and did a little more detailing, so it looks a little better. I'll bend the arms into the proper position before adding the sleeves and such.
I also filled the gaps in the pilot figure, including the gaps between the parachute and the figure itself. I suspect I'll have some cleanup to do once I can get some primer down, but so far, I'm happy with the results.
While waiting for the epoxy putty to cure, I decided to build the Anyz Models canopy rail.
Unfortunately, I hacked off the mounting brackets for the mirrors while I was removing the frame from the 3D printing supports, so I had to fabricate absolutely tiny new ones from wire. Not perfect, but if they all hold together until final assembly, I'll be very happy. Lastly, I took the time to mask all the clear parts as well, so I'm getting close.
I hope to finish up the figure sculpting tomorrow, then start the final prep for painting on those. After that, I'll start focusing on the groundwork.
-
 ChuckD got a reaction from Fanes in A Birdcage in Turtle Bay - An F4U-1 Diorama
Thank you! I'm glad to know it wasn't operator error.
Anyway, good progress today.
After sifting through my spares bins, these were the two best candidates for the lower half of the crew chief. The left is the standing pilot figure from this Corsair kit. The right is a 1/35 scale Wehrmacht Nashorn gunner figure also from Tamiya. Curiously, they're identical in dimensions despite the difference in scale. In the end, I opted for the standing pilot figure and began scraping off details that I wouldn't need.
This is after getting the torso down to almost nothing and adding the wires for the arms. Front:
Back:
Here is the basic jacket sculpted with Green Stuff. The hands are from a 1/35 set of heads and hands from Hornet. Again, despite the "smaller" scale, they look a little large, but I'm hoping that will become less obvious after the arms are fully sculpted. I'll also be adding some pockets and such to the jacket once the base material cures.
The back is okay. After this photo, I went back and did a little more detailing, so it looks a little better. I'll bend the arms into the proper position before adding the sleeves and such.
I also filled the gaps in the pilot figure, including the gaps between the parachute and the figure itself. I suspect I'll have some cleanup to do once I can get some primer down, but so far, I'm happy with the results.
While waiting for the epoxy putty to cure, I decided to build the Anyz Models canopy rail.
Unfortunately, I hacked off the mounting brackets for the mirrors while I was removing the frame from the 3D printing supports, so I had to fabricate absolutely tiny new ones from wire. Not perfect, but if they all hold together until final assembly, I'll be very happy. Lastly, I took the time to mask all the clear parts as well, so I'm getting close.
I hope to finish up the figure sculpting tomorrow, then start the final prep for painting on those. After that, I'll start focusing on the groundwork.
-
 ChuckD got a reaction from Uncarina in Zoukei Mura FW-190A-4 JG 54
Tom, I'm sorry I missed this post! I really enjoy your work and your thorough breakdown of the process. This will come in handy when I decide to tackle the ZM Butcher Bird.
-
 ChuckD got a reaction from O.W in A Birdcage in Turtle Bay - An F4U-1 Diorama
Thank you! I'm glad to know it wasn't operator error.
Anyway, good progress today.
After sifting through my spares bins, these were the two best candidates for the lower half of the crew chief. The left is the standing pilot figure from this Corsair kit. The right is a 1/35 scale Wehrmacht Nashorn gunner figure also from Tamiya. Curiously, they're identical in dimensions despite the difference in scale. In the end, I opted for the standing pilot figure and began scraping off details that I wouldn't need.
This is after getting the torso down to almost nothing and adding the wires for the arms. Front:
Back:
Here is the basic jacket sculpted with Green Stuff. The hands are from a 1/35 set of heads and hands from Hornet. Again, despite the "smaller" scale, they look a little large, but I'm hoping that will become less obvious after the arms are fully sculpted. I'll also be adding some pockets and such to the jacket once the base material cures.
The back is okay. After this photo, I went back and did a little more detailing, so it looks a little better. I'll bend the arms into the proper position before adding the sleeves and such.
I also filled the gaps in the pilot figure, including the gaps between the parachute and the figure itself. I suspect I'll have some cleanup to do once I can get some primer down, but so far, I'm happy with the results.
While waiting for the epoxy putty to cure, I decided to build the Anyz Models canopy rail.
Unfortunately, I hacked off the mounting brackets for the mirrors while I was removing the frame from the 3D printing supports, so I had to fabricate absolutely tiny new ones from wire. Not perfect, but if they all hold together until final assembly, I'll be very happy. Lastly, I took the time to mask all the clear parts as well, so I'm getting close.
I hope to finish up the figure sculpting tomorrow, then start the final prep for painting on those. After that, I'll start focusing on the groundwork.
-
 ChuckD got a reaction from geedubelyer in A Birdcage in Turtle Bay - An F4U-1 Diorama
Thank you! I'm glad to know it wasn't operator error.
Anyway, good progress today.
After sifting through my spares bins, these were the two best candidates for the lower half of the crew chief. The left is the standing pilot figure from this Corsair kit. The right is a 1/35 scale Wehrmacht Nashorn gunner figure also from Tamiya. Curiously, they're identical in dimensions despite the difference in scale. In the end, I opted for the standing pilot figure and began scraping off details that I wouldn't need.
This is after getting the torso down to almost nothing and adding the wires for the arms. Front:
Back:
Here is the basic jacket sculpted with Green Stuff. The hands are from a 1/35 set of heads and hands from Hornet. Again, despite the "smaller" scale, they look a little large, but I'm hoping that will become less obvious after the arms are fully sculpted. I'll also be adding some pockets and such to the jacket once the base material cures.
The back is okay. After this photo, I went back and did a little more detailing, so it looks a little better. I'll bend the arms into the proper position before adding the sleeves and such.
I also filled the gaps in the pilot figure, including the gaps between the parachute and the figure itself. I suspect I'll have some cleanup to do once I can get some primer down, but so far, I'm happy with the results.
While waiting for the epoxy putty to cure, I decided to build the Anyz Models canopy rail.
Unfortunately, I hacked off the mounting brackets for the mirrors while I was removing the frame from the 3D printing supports, so I had to fabricate absolutely tiny new ones from wire. Not perfect, but if they all hold together until final assembly, I'll be very happy. Lastly, I took the time to mask all the clear parts as well, so I'm getting close.
I hope to finish up the figure sculpting tomorrow, then start the final prep for painting on those. After that, I'll start focusing on the groundwork.
-
 ChuckD got a reaction from Dpgsbody55 in A Birdcage in Turtle Bay - An F4U-1 Diorama
Thank you! I'm glad to know it wasn't operator error.
Anyway, good progress today.
After sifting through my spares bins, these were the two best candidates for the lower half of the crew chief. The left is the standing pilot figure from this Corsair kit. The right is a 1/35 scale Wehrmacht Nashorn gunner figure also from Tamiya. Curiously, they're identical in dimensions despite the difference in scale. In the end, I opted for the standing pilot figure and began scraping off details that I wouldn't need.
This is after getting the torso down to almost nothing and adding the wires for the arms. Front:
Back:
Here is the basic jacket sculpted with Green Stuff. The hands are from a 1/35 set of heads and hands from Hornet. Again, despite the "smaller" scale, they look a little large, but I'm hoping that will become less obvious after the arms are fully sculpted. I'll also be adding some pockets and such to the jacket once the base material cures.
The back is okay. After this photo, I went back and did a little more detailing, so it looks a little better. I'll bend the arms into the proper position before adding the sleeves and such.
I also filled the gaps in the pilot figure, including the gaps between the parachute and the figure itself. I suspect I'll have some cleanup to do once I can get some primer down, but so far, I'm happy with the results.
While waiting for the epoxy putty to cure, I decided to build the Anyz Models canopy rail.
Unfortunately, I hacked off the mounting brackets for the mirrors while I was removing the frame from the 3D printing supports, so I had to fabricate absolutely tiny new ones from wire. Not perfect, but if they all hold together until final assembly, I'll be very happy. Lastly, I took the time to mask all the clear parts as well, so I'm getting close.
I hope to finish up the figure sculpting tomorrow, then start the final prep for painting on those. After that, I'll start focusing on the groundwork.
-
ChuckD got a reaction from Trak-Tor in A Birdcage in Turtle Bay - An F4U-1 Diorama
Hi, all. Back with an update after making good progress today.
First, our gallant protagonist has been roughed in. Surprisingly, the Black Dog resin figure fit the scene pretty well. I will only have to do some minor shaping and filling behind the left shoulder to clean him up. I'll need to fix his fingers as they broke when I tried to straighten them a bit, but that shouldn't be too big of a problem.
I'm going to have to deviate from the source photo just a bit here as the parachute is going to cause a bit of an issue. In the reference photo, I believe Lt. Ray had his parachute pack on the seat pan with the straps splayed out the cockpit and down the side of the fuselage. On the figure set, the parachute pack (not attached) is integral to the figure and all the associate straps and harnesses are already molded onto the figure. I don't think I've got it in me to remove all the molded detail then sculpt in other detail that would inevitably be needed after such a task. So, in our version of history, Lt. Ray will be entering the a/c with his pack on his rear. Artistic license, etc, etc, etc.
When I got to looking at the second figure - the one that I need to sculpt from the waist up - I realized he was standing on the section of wing outboard of the fold line. So, I needed to build the wings. After that, I was so close to being done, I decided to finish it up. So, aside from some clear bits, antennae, a pitot tube, and the Anyz Model canopy rail, the build is more or less done. All the gear stuff is dry fit, including the doors. Same for the prop.
As others have said, this is a wonderful kit. The engineering on it is just superb and it really went together well. The only fit issues I have are near the top of the cowling, so, I'll need to do a little filling there. But, outside of that, it was a good clean build and I'm glad I've got another in the stash. That's not to say I missed any opportunities to shoot myself in the foot... I forgot to add the little clear windows on the leading edges for the gun cams and such. I didn't realize it until I'd almost closed up the small panels on the top of the wing above them. Fortunately, by reaching into the small panel on the top of the wing, I was able to finagle the two clear pieces in place without too much trouble. Story of my life.
Anyhoo, I hope to make some progress on the figures and the base now. The build work will be halted until those have been addressed. Again, I don't want to paint and finish the airplane, as I just know I will run out of steam if I save the figures for last.
-
 ChuckD got a reaction from Brett M in A Birdcage in Turtle Bay - An F4U-1 Diorama
Thank you! I'm glad to know it wasn't operator error.
Anyway, good progress today.
After sifting through my spares bins, these were the two best candidates for the lower half of the crew chief. The left is the standing pilot figure from this Corsair kit. The right is a 1/35 scale Wehrmacht Nashorn gunner figure also from Tamiya. Curiously, they're identical in dimensions despite the difference in scale. In the end, I opted for the standing pilot figure and began scraping off details that I wouldn't need.
This is after getting the torso down to almost nothing and adding the wires for the arms. Front:
Back:
Here is the basic jacket sculpted with Green Stuff. The hands are from a 1/35 set of heads and hands from Hornet. Again, despite the "smaller" scale, they look a little large, but I'm hoping that will become less obvious after the arms are fully sculpted. I'll also be adding some pockets and such to the jacket once the base material cures.
The back is okay. After this photo, I went back and did a little more detailing, so it looks a little better. I'll bend the arms into the proper position before adding the sleeves and such.
I also filled the gaps in the pilot figure, including the gaps between the parachute and the figure itself. I suspect I'll have some cleanup to do once I can get some primer down, but so far, I'm happy with the results.
While waiting for the epoxy putty to cure, I decided to build the Anyz Models canopy rail.
Unfortunately, I hacked off the mounting brackets for the mirrors while I was removing the frame from the 3D printing supports, so I had to fabricate absolutely tiny new ones from wire. Not perfect, but if they all hold together until final assembly, I'll be very happy. Lastly, I took the time to mask all the clear parts as well, so I'm getting close.
I hope to finish up the figure sculpting tomorrow, then start the final prep for painting on those. After that, I'll start focusing on the groundwork.
-
 ChuckD got a reaction from ARay87 in A Birdcage in Turtle Bay - An F4U-1 Diorama
Thank you! I'm glad to know it wasn't operator error.
Anyway, good progress today.
After sifting through my spares bins, these were the two best candidates for the lower half of the crew chief. The left is the standing pilot figure from this Corsair kit. The right is a 1/35 scale Wehrmacht Nashorn gunner figure also from Tamiya. Curiously, they're identical in dimensions despite the difference in scale. In the end, I opted for the standing pilot figure and began scraping off details that I wouldn't need.
This is after getting the torso down to almost nothing and adding the wires for the arms. Front:
Back:
Here is the basic jacket sculpted with Green Stuff. The hands are from a 1/35 set of heads and hands from Hornet. Again, despite the "smaller" scale, they look a little large, but I'm hoping that will become less obvious after the arms are fully sculpted. I'll also be adding some pockets and such to the jacket once the base material cures.
The back is okay. After this photo, I went back and did a little more detailing, so it looks a little better. I'll bend the arms into the proper position before adding the sleeves and such.
I also filled the gaps in the pilot figure, including the gaps between the parachute and the figure itself. I suspect I'll have some cleanup to do once I can get some primer down, but so far, I'm happy with the results.
While waiting for the epoxy putty to cure, I decided to build the Anyz Models canopy rail.
Unfortunately, I hacked off the mounting brackets for the mirrors while I was removing the frame from the 3D printing supports, so I had to fabricate absolutely tiny new ones from wire. Not perfect, but if they all hold together until final assembly, I'll be very happy. Lastly, I took the time to mask all the clear parts as well, so I'm getting close.
I hope to finish up the figure sculpting tomorrow, then start the final prep for painting on those. After that, I'll start focusing on the groundwork.
-
 ChuckD got a reaction from GMK in A Birdcage in Turtle Bay - An F4U-1 Diorama
Ha! Yeah, Mike. It pretty much builds itself from here.
Thank you! I wasn't aware of that. I'll stick with him getting in from the left so it lines up better with the source material.
-
 ChuckD reacted to MikeMaben in A Birdcage in Turtle Bay - An F4U-1 Diorama
Hey cool ! the rest is easy, right Chuck ?
-
 ChuckD got a reaction from Madmax in A Birdcage in Turtle Bay - An F4U-1 Diorama
Hi, all. Back with an update after making good progress today.
First, our gallant protagonist has been roughed in. Surprisingly, the Black Dog resin figure fit the scene pretty well. I will only have to do some minor shaping and filling behind the left shoulder to clean him up. I'll need to fix his fingers as they broke when I tried to straighten them a bit, but that shouldn't be too big of a problem.
I'm going to have to deviate from the source photo just a bit here as the parachute is going to cause a bit of an issue. In the reference photo, I believe Lt. Ray had his parachute pack on the seat pan with the straps splayed out the cockpit and down the side of the fuselage. On the figure set, the parachute pack (not attached) is integral to the figure and all the associate straps and harnesses are already molded onto the figure. I don't think I've got it in me to remove all the molded detail then sculpt in other detail that would inevitably be needed after such a task. So, in our version of history, Lt. Ray will be entering the a/c with his pack on his rear. Artistic license, etc, etc, etc.
When I got to looking at the second figure - the one that I need to sculpt from the waist up - I realized he was standing on the section of wing outboard of the fold line. So, I needed to build the wings. After that, I was so close to being done, I decided to finish it up. So, aside from some clear bits, antennae, a pitot tube, and the Anyz Model canopy rail, the build is more or less done. All the gear stuff is dry fit, including the doors. Same for the prop.
As others have said, this is a wonderful kit. The engineering on it is just superb and it really went together well. The only fit issues I have are near the top of the cowling, so, I'll need to do a little filling there. But, outside of that, it was a good clean build and I'm glad I've got another in the stash. That's not to say I missed any opportunities to shoot myself in the foot... I forgot to add the little clear windows on the leading edges for the gun cams and such. I didn't realize it until I'd almost closed up the small panels on the top of the wing above them. Fortunately, by reaching into the small panel on the top of the wing, I was able to finagle the two clear pieces in place without too much trouble. Story of my life.
Anyhoo, I hope to make some progress on the figures and the base now. The build work will be halted until those have been addressed. Again, I don't want to paint and finish the airplane, as I just know I will run out of steam if I save the figures for last.
-
 ChuckD got a reaction from Biggles87 in A Birdcage in Turtle Bay - An F4U-1 Diorama
Hi, all. Back with an update after making good progress today.
First, our gallant protagonist has been roughed in. Surprisingly, the Black Dog resin figure fit the scene pretty well. I will only have to do some minor shaping and filling behind the left shoulder to clean him up. I'll need to fix his fingers as they broke when I tried to straighten them a bit, but that shouldn't be too big of a problem.
I'm going to have to deviate from the source photo just a bit here as the parachute is going to cause a bit of an issue. In the reference photo, I believe Lt. Ray had his parachute pack on the seat pan with the straps splayed out the cockpit and down the side of the fuselage. On the figure set, the parachute pack (not attached) is integral to the figure and all the associate straps and harnesses are already molded onto the figure. I don't think I've got it in me to remove all the molded detail then sculpt in other detail that would inevitably be needed after such a task. So, in our version of history, Lt. Ray will be entering the a/c with his pack on his rear. Artistic license, etc, etc, etc.
When I got to looking at the second figure - the one that I need to sculpt from the waist up - I realized he was standing on the section of wing outboard of the fold line. So, I needed to build the wings. After that, I was so close to being done, I decided to finish it up. So, aside from some clear bits, antennae, a pitot tube, and the Anyz Model canopy rail, the build is more or less done. All the gear stuff is dry fit, including the doors. Same for the prop.
As others have said, this is a wonderful kit. The engineering on it is just superb and it really went together well. The only fit issues I have are near the top of the cowling, so, I'll need to do a little filling there. But, outside of that, it was a good clean build and I'm glad I've got another in the stash. That's not to say I missed any opportunities to shoot myself in the foot... I forgot to add the little clear windows on the leading edges for the gun cams and such. I didn't realize it until I'd almost closed up the small panels on the top of the wing above them. Fortunately, by reaching into the small panel on the top of the wing, I was able to finagle the two clear pieces in place without too much trouble. Story of my life.
Anyhoo, I hope to make some progress on the figures and the base now. The build work will be halted until those have been addressed. Again, I don't want to paint and finish the airplane, as I just know I will run out of steam if I save the figures for last.
-
 ChuckD got a reaction from CODY in A Birdcage in Turtle Bay - An F4U-1 Diorama
Hi, all. Back with an update after making good progress today.
First, our gallant protagonist has been roughed in. Surprisingly, the Black Dog resin figure fit the scene pretty well. I will only have to do some minor shaping and filling behind the left shoulder to clean him up. I'll need to fix his fingers as they broke when I tried to straighten them a bit, but that shouldn't be too big of a problem.
I'm going to have to deviate from the source photo just a bit here as the parachute is going to cause a bit of an issue. In the reference photo, I believe Lt. Ray had his parachute pack on the seat pan with the straps splayed out the cockpit and down the side of the fuselage. On the figure set, the parachute pack (not attached) is integral to the figure and all the associate straps and harnesses are already molded onto the figure. I don't think I've got it in me to remove all the molded detail then sculpt in other detail that would inevitably be needed after such a task. So, in our version of history, Lt. Ray will be entering the a/c with his pack on his rear. Artistic license, etc, etc, etc.
When I got to looking at the second figure - the one that I need to sculpt from the waist up - I realized he was standing on the section of wing outboard of the fold line. So, I needed to build the wings. After that, I was so close to being done, I decided to finish it up. So, aside from some clear bits, antennae, a pitot tube, and the Anyz Model canopy rail, the build is more or less done. All the gear stuff is dry fit, including the doors. Same for the prop.
As others have said, this is a wonderful kit. The engineering on it is just superb and it really went together well. The only fit issues I have are near the top of the cowling, so, I'll need to do a little filling there. But, outside of that, it was a good clean build and I'm glad I've got another in the stash. That's not to say I missed any opportunities to shoot myself in the foot... I forgot to add the little clear windows on the leading edges for the gun cams and such. I didn't realize it until I'd almost closed up the small panels on the top of the wing above them. Fortunately, by reaching into the small panel on the top of the wing, I was able to finagle the two clear pieces in place without too much trouble. Story of my life.
Anyhoo, I hope to make some progress on the figures and the base now. The build work will be halted until those have been addressed. Again, I don't want to paint and finish the airplane, as I just know I will run out of steam if I save the figures for last.
-
ChuckD got a reaction from Uncarina in A Birdcage in Turtle Bay - An F4U-1 Diorama
Hi, all. Back with an update after making good progress today.
First, our gallant protagonist has been roughed in. Surprisingly, the Black Dog resin figure fit the scene pretty well. I will only have to do some minor shaping and filling behind the left shoulder to clean him up. I'll need to fix his fingers as they broke when I tried to straighten them a bit, but that shouldn't be too big of a problem.
I'm going to have to deviate from the source photo just a bit here as the parachute is going to cause a bit of an issue. In the reference photo, I believe Lt. Ray had his parachute pack on the seat pan with the straps splayed out the cockpit and down the side of the fuselage. On the figure set, the parachute pack (not attached) is integral to the figure and all the associate straps and harnesses are already molded onto the figure. I don't think I've got it in me to remove all the molded detail then sculpt in other detail that would inevitably be needed after such a task. So, in our version of history, Lt. Ray will be entering the a/c with his pack on his rear. Artistic license, etc, etc, etc.
When I got to looking at the second figure - the one that I need to sculpt from the waist up - I realized he was standing on the section of wing outboard of the fold line. So, I needed to build the wings. After that, I was so close to being done, I decided to finish it up. So, aside from some clear bits, antennae, a pitot tube, and the Anyz Model canopy rail, the build is more or less done. All the gear stuff is dry fit, including the doors. Same for the prop.
As others have said, this is a wonderful kit. The engineering on it is just superb and it really went together well. The only fit issues I have are near the top of the cowling, so, I'll need to do a little filling there. But, outside of that, it was a good clean build and I'm glad I've got another in the stash. That's not to say I missed any opportunities to shoot myself in the foot... I forgot to add the little clear windows on the leading edges for the gun cams and such. I didn't realize it until I'd almost closed up the small panels on the top of the wing above them. Fortunately, by reaching into the small panel on the top of the wing, I was able to finagle the two clear pieces in place without too much trouble. Story of my life.
Anyhoo, I hope to make some progress on the figures and the base now. The build work will be halted until those have been addressed. Again, I don't want to paint and finish the airplane, as I just know I will run out of steam if I save the figures for last.
-
ChuckD got a reaction from Greg W in A Birdcage in Turtle Bay - An F4U-1 Diorama
Progress! wheel wells and wing roots are dine. No weathering yet, but a base coat is down.
No warranties express or implied on spelling, grammar, or diction due to wine consumption. 8|
-
ChuckD got a reaction from Greg W in A Birdcage in Turtle Bay - An F4U-1 Diorama
Hi, all. Back with a small update. Progress has been kinda slow this week as I've been busy with work, stuff with my kiddo, and I've been under the weather. I think for the diorama, I'm not going to attach the a/c to the base. The odds of the dio traveling outside my model room (before it makes its final trip to the dumpster after I'm cold and in the dirt) is near zero, so it shouldn't much matter if the plane and base are detachable. With that in mind, I'm taking some time to detail things on the under side of the plane that would never be seen if attached to the base.
The Corsair has quite a bit of plumbing running through the wheel wells, so I tried to simulate that here. I also opened the lightening holes on the bottom of the spar to run plumbing in there. I'm still searching for photos of the gear bay forward of the spar though. There has to be plumbing in there for the main hydraulic actuator and other sundries. So far, all the sources I've found have come up dry. I've got amazing photos of the bay aft of the spar (thank you again, @Dana Bell!), but the search continues for a good look forward of the spar.
I had to add the door actuators so that I could plumb them properly without the doors being in place. Fortunately, the doors can be added after the fact with no issue. The only downside is that, until the gear is slotted in place, they become load bearing when the assembly is placed right side up. You can already see that the actuator on the right has started to weaken.
It's amazing how helpful it is to use lead wire. It's so much more friendly to use than even soft copper or brass.
Anyway, that's it for now. Next up will be a similar treatment to the other wheel well, then assembling the main gear. On the plus side, I just learned that my new company closes down over the holidays, so I get an unexpected paid week off between the holidays! With nothing else planned, that should allow for some pretty decent progress to wind out the year.
-
 ChuckD got a reaction from Rocat in A Birdcage in Turtle Bay - An F4U-1 Diorama
So, it's apparently time for me to buy a lottery ticket.
No sooner had I stuck a piece of tape over the Quinta IP, than this happened.
I was trying to mix up a lighter color of green to use for dry brushing when I squeezed my ancient Vallejo white juuuuust a bit too hard. Man I got lucky; not an errant speck on the unmasked areas.
Anyway, after recovering from that, I went on to finish the cockpit today. The interior is lightly chipped via the sponge method, then dirtied up a bit with oils and enamels. The results of the Quinta set and painted wires are really nice.
Where the tail wheel would toss up debris and dirt, I splashed dark enamel washes along with some lighter mud tones using the speckling method.
Again, the speckling is not nearly as pronounced to the naked eye. If I had more brain power, I'd get really good with model photography but I only have so much bandwidth and I already spend enough of my days in front of a computer anyway. So, I'll live with my phone doing it's consumer-friendly best and over-emphasizing the speckling.
The results of the wiring below the IP are pretty solid and I'm happy with them. They can't be seen much when it's all together, but it still adds quite a bit of visual interest.
And, with that it was time to close up the fuse! This is always a fun milestone of any airplane build. Don't tell anyone, but it's starting to look like a Corsair already.
The roundish body of the corsair swallows most of the detail I spent yesterday building. :/
And that's it for now. I'm back to work tomorrow, so I suspect updates will slow down quite a bit, but the next steps are to add the firewall, exhausts and engine. Then it'll be on to the tail wheel assembly and the wings!
-
ChuckD got a reaction from Rocat in A Birdcage in Turtle Bay - An F4U-1 Diorama
Boy howdy, there is nothing like spending an entire day adding miles...
...and miles...
...and miles...
...and miles...
...and miles...
... and miles...
...of wiring and linkages...
just so that you can close up the fuselage and never see any of it ever again.
C'est la hobby, I suppose.
Anyway, as you can see, I've made quite a bit of progress on the cockpit. At this point, it's roughly base coated and the lovely Quinta set has been (mostly) added. I have obviously not yet done any weathering or anything, so it's pretty underwhelming at this point. The next step will be to touch up the base coat, paint the newly-added wiring and such, then gloss, wash, weather, etc.
I'm not going to cover much of the actual build process of the kit itself - certainly not as in depth as I went on my A-20G a few months ago - because this kit has had roughly a half a million build threads devoted to its several iterations over the years. So, I shan't belabor that point, but as I get along and reach milestones, I'll post updates.
I did receive the Black Dog figure kit and the paints I need to achieve the salmon primer, so we're moving forward there. I can't really start roughing in the figures until I at least get the wings under the fuselage. To combat my gnat-like attention span, I'm going to shift my focus from the a/c to the figures and groundwork as soon as I get the wings in place. I'm concerned that if I finish the a/c in entirety, I'll be too tempted to move on to something else and never actually finish the dio idea.
Anyhoo, no more modeling for me today, my brain is fried.
-
ChuckD got a reaction from Rocat in A Birdcage in Turtle Bay - An F4U-1 Diorama
Thanks, Mike! I do appreciate it. Anything to provide more and clearer information to the scene is helpful!
I spent yesterday getting the engine around. I added the spark plug wiring and other assorted oil plumbing. As always, the photographs make the dirt and oil speckling look far more pronounced than it is to the naked eye. And the data plate is a close approximate from the spares bin. All in all though, despite how much the ignition wiring fought me, I'm very happy with how it turned out.
The forward cowling got a little love too.
And the two dry fit together.
The Quinta cockpit set is supposed to arrive today, so I should be able to get moving on the build proper today or tomorrow.
-
ChuckD got a reaction from ARay87 in A Birdcage in Turtle Bay - An F4U-1 Diorama
Hi, all. Back with an update after making good progress today.
First, our gallant protagonist has been roughed in. Surprisingly, the Black Dog resin figure fit the scene pretty well. I will only have to do some minor shaping and filling behind the left shoulder to clean him up. I'll need to fix his fingers as they broke when I tried to straighten them a bit, but that shouldn't be too big of a problem.
I'm going to have to deviate from the source photo just a bit here as the parachute is going to cause a bit of an issue. In the reference photo, I believe Lt. Ray had his parachute pack on the seat pan with the straps splayed out the cockpit and down the side of the fuselage. On the figure set, the parachute pack (not attached) is integral to the figure and all the associate straps and harnesses are already molded onto the figure. I don't think I've got it in me to remove all the molded detail then sculpt in other detail that would inevitably be needed after such a task. So, in our version of history, Lt. Ray will be entering the a/c with his pack on his rear. Artistic license, etc, etc, etc.
When I got to looking at the second figure - the one that I need to sculpt from the waist up - I realized he was standing on the section of wing outboard of the fold line. So, I needed to build the wings. After that, I was so close to being done, I decided to finish it up. So, aside from some clear bits, antennae, a pitot tube, and the Anyz Model canopy rail, the build is more or less done. All the gear stuff is dry fit, including the doors. Same for the prop.
As others have said, this is a wonderful kit. The engineering on it is just superb and it really went together well. The only fit issues I have are near the top of the cowling, so, I'll need to do a little filling there. But, outside of that, it was a good clean build and I'm glad I've got another in the stash. That's not to say I missed any opportunities to shoot myself in the foot... I forgot to add the little clear windows on the leading edges for the gun cams and such. I didn't realize it until I'd almost closed up the small panels on the top of the wing above them. Fortunately, by reaching into the small panel on the top of the wing, I was able to finagle the two clear pieces in place without too much trouble. Story of my life.
Anyhoo, I hope to make some progress on the figures and the base now. The build work will be halted until those have been addressed. Again, I don't want to paint and finish the airplane, as I just know I will run out of steam if I save the figures for last.