
ChuckD
-
Posts
920 -
Joined
-
Last visited
-
Days Won
9
Reputation Activity
-

 ChuckD got a reaction from ghatherly in Messerschmitts of North Africa: Bf-110E-2 and Bf-109F-4 Trop
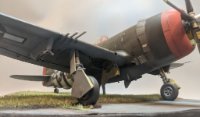
Hi, everyone. Back with another update. About 98% of the way through the build. Had today off and have spent almost the entire day today sanding, filling, sanding, filling, and so on ad nauseum. I've still got a few things to clean up, but right now, I'm waiting on some glue and some milliput to set, so I thought I'd take a moment to post a few progress photos. For filling, I've pretty much pulled all the stops. I've used Mr. Surfacer, Tamiya white putty (first time, not a fan), stretched sprue, milliput, and even small flecks of sprue to fill tiny gaps. Been an interesting experience. I loathe rescribing - primarily because I really suck at it - so I've found a good technique of sanding for a few seconds, then sharpening up the panel line with the scriber, then repeating till the join line is gone. I find that allows me to not dink around with dymo tape or whathaveyou to hold straight lines around curved surfaces. Not rocket science I guess, but it helped me. Also, I'm grateful that the 110 doesn't have many panel lines that run around the front of the leading edge.
Anyway, yak yak yak, on with the pics.
This is as of Thursday night. Most of the cowlings are dry fit.
I said early on that the nacelles are supposedly the weakest part of this kit. While they fit reasonably well, they are a textbook example of Dragon's theory of "why use one part when 7 (literally) will do?" Sigh.
Part of my beef here is that a lot of the parts - the main upper and lower cowl - have no positive attach points to the rest of the airframe. You can see the tabs below for mating them to each other, but when mating them to the rest of the aircraft, you're left to dry fit, pray, and/or invent profanity. To help alleviate this a bit, I glued a couple strips of plastic card to the inside surfaces to give me something to press against. It really helped in fitting the lower cowl to the lower wing part, but I'm less convinced it was helpful for the upper cowl.
The nose required a bit of sanding too. On the right side, the nose cone stood proud of the rest of the fuselage by a pretty significant margin... at least as far as models are concerned. If I had it to do again, I would've shaved the interior bulkhead down a bit to allow the nose cone to be flexed and glued. The white crap is Tamiya putty which I tried for the first time and didn't really care for. It seemed to chip quite often rather than sand smooth. So, I more or less had to go over the whole section again with Mr Surfacer 500 and sand again. Oh well. Each build brings new lessons.
Here's how she stands as of this writing. The tail is glued on, but the wings are still dry fit. I'm going to finish the cleanup and paint the wheel wells prior to attaching the wings. Dry fitting looks promising for the wings. There doesn't appear to be much of a gap anywhere except for at the very forward inboard section of each wing right at the leading edge. But, that shouldn't be too hard to clean up.
Looks rather Bf-110ish, doesn't she?
The right nacelle. In general, the right side fit better for some reason. As you can see, some of the cowl panels don't match up perfectly, but I'm not too worried about it. I'm going to knock the high spots down just a bit, then call it good. I've been around enough real airplanes to know that cowls don't always fit perfectly.
Left side.
Tail assembly. Once that milliput dries, I'll get some Mr. Surfacer in there to smooth it out a bit.
The lower wings with bomb racks attached and holes drilled for the drop tanks. I'm am not looking forward to the final fit of those. Their mounting brackets are fiddly as all getout. 1000:1 odds I get thru attaching those without breaking something.
A good look at the enlarged oil(?) cooler intakes. You have to basically remove 3/4 of the lower cowl pieces to fit these, though once you do, they fit pretty well.
These last shots show the most problematic area around the uh... cooler ... thingy... on the left wing. No matter how much I dry fit, adjusted, and tried again, it just would not line up, so I ended up gluing it as best I could, then back filling the area with Mr. Surfacer. In the end it turned out okay. The landing light bezel is one of the parts I'm waiting on to dry, so its seams are still pretty ugly.
Lower wing
Upper wing
All in all, there have been a few challenges, but for the most part the fit has been pretty good. Just a bit more cleanup and masking and I can finally start shooting chemicals at this big dumb thing. There is no way this thing will fit in my paint booth, so that will be an interesting challenge in its own right. Thanks for following along.
-
 ChuckD got a reaction from sandokan in Messerschmitts of North Africa: Bf-110E-2 and Bf-109F-4 Trop
If anyone's interested, here are my time tallies (in hours) to date:
Plan & Prep Labor: 16.05
Build Labor: 21.55
Paint Labor: 10.95
Weathering Labor: 1.90
Total Time: 45.55
Total Modeling Sessions 24.00
Avg Time per Session 1.90
Interesting to see that I've spent over a full working week or almost two full days of time building this model since starting on 9/16/17. Stats are fun.
-
ChuckD got a reaction from sandokan in Messerschmitts of North Africa: Bf-110E-2 and Bf-109F-4 Trop
Hi, everyone. Back with another update. About 98% of the way through the build. Had today off and have spent almost the entire day today sanding, filling, sanding, filling, and so on ad nauseum. I've still got a few things to clean up, but right now, I'm waiting on some glue and some milliput to set, so I thought I'd take a moment to post a few progress photos. For filling, I've pretty much pulled all the stops. I've used Mr. Surfacer, Tamiya white putty (first time, not a fan), stretched sprue, milliput, and even small flecks of sprue to fill tiny gaps. Been an interesting experience. I loathe rescribing - primarily because I really suck at it - so I've found a good technique of sanding for a few seconds, then sharpening up the panel line with the scriber, then repeating till the join line is gone. I find that allows me to not dink around with dymo tape or whathaveyou to hold straight lines around curved surfaces. Not rocket science I guess, but it helped me. Also, I'm grateful that the 110 doesn't have many panel lines that run around the front of the leading edge.
Anyway, yak yak yak, on with the pics.
This is as of Thursday night. Most of the cowlings are dry fit.
I said early on that the nacelles are supposedly the weakest part of this kit. While they fit reasonably well, they are a textbook example of Dragon's theory of "why use one part when 7 (literally) will do?" Sigh.
Part of my beef here is that a lot of the parts - the main upper and lower cowl - have no positive attach points to the rest of the airframe. You can see the tabs below for mating them to each other, but when mating them to the rest of the aircraft, you're left to dry fit, pray, and/or invent profanity. To help alleviate this a bit, I glued a couple strips of plastic card to the inside surfaces to give me something to press against. It really helped in fitting the lower cowl to the lower wing part, but I'm less convinced it was helpful for the upper cowl.
The nose required a bit of sanding too. On the right side, the nose cone stood proud of the rest of the fuselage by a pretty significant margin... at least as far as models are concerned. If I had it to do again, I would've shaved the interior bulkhead down a bit to allow the nose cone to be flexed and glued. The white crap is Tamiya putty which I tried for the first time and didn't really care for. It seemed to chip quite often rather than sand smooth. So, I more or less had to go over the whole section again with Mr Surfacer 500 and sand again. Oh well. Each build brings new lessons.
Here's how she stands as of this writing. The tail is glued on, but the wings are still dry fit. I'm going to finish the cleanup and paint the wheel wells prior to attaching the wings. Dry fitting looks promising for the wings. There doesn't appear to be much of a gap anywhere except for at the very forward inboard section of each wing right at the leading edge. But, that shouldn't be too hard to clean up.
Looks rather Bf-110ish, doesn't she?
The right nacelle. In general, the right side fit better for some reason. As you can see, some of the cowl panels don't match up perfectly, but I'm not too worried about it. I'm going to knock the high spots down just a bit, then call it good. I've been around enough real airplanes to know that cowls don't always fit perfectly.
Left side.
Tail assembly. Once that milliput dries, I'll get some Mr. Surfacer in there to smooth it out a bit.
The lower wings with bomb racks attached and holes drilled for the drop tanks. I'm am not looking forward to the final fit of those. Their mounting brackets are fiddly as all getout. 1000:1 odds I get thru attaching those without breaking something.
A good look at the enlarged oil(?) cooler intakes. You have to basically remove 3/4 of the lower cowl pieces to fit these, though once you do, they fit pretty well.
These last shots show the most problematic area around the uh... cooler ... thingy... on the left wing. No matter how much I dry fit, adjusted, and tried again, it just would not line up, so I ended up gluing it as best I could, then back filling the area with Mr. Surfacer. In the end it turned out okay. The landing light bezel is one of the parts I'm waiting on to dry, so its seams are still pretty ugly.
Lower wing
Upper wing
All in all, there have been a few challenges, but for the most part the fit has been pretty good. Just a bit more cleanup and masking and I can finally start shooting chemicals at this big dumb thing. There is no way this thing will fit in my paint booth, so that will be an interesting challenge in its own right. Thanks for following along.
-
 ChuckD got a reaction from Rick Griewski in HK Models hinting at 1/32 B model P-51!
Dang. Read the first few pages of this on my phone last night and didn't realize that the thread was a couple years old. I'm not all that much of a fan of Mustangs, but if reasonably priced, I'd throw in on one or two. I'm looking forward to the new RoG D-model due to its price, but have never bought one of Tamiya's due to the cost. I guess I just quantified exactly how much I like the P-51. Huh, interesting.
-
 ChuckD got a reaction from CANicoll in Target, I mean tank, I mean Panther.
Hey, as a heads up, I've done a couple of these Panther kits w/Magic Tracks before. If you don't glue on the running gear, you can absolutely paint them separately. I usually leave the road wheels, idlers, and drive sprockets off and paint them separately. Then, after the tracks are painted and ready to go on, I add the road wheels to the hull. Then, I will slip the idler and sprocket into a track and slip them onto their respective mounting studs (or holes, whichever). A fully-assembled run of Magic Tracks has enough flexibility to accommodate that kind of handling without breaking. That's how I've done all of my magic track kits and it seems to work great. Better than leaving an un-glued gap and trying to fix that up after painting and cleaner than trying to join hull halves after painting too.
Your mileage may vary.
-
 ChuckD got a reaction from CATCplSlade in Target, I mean tank, I mean Panther.
Hey, as a heads up, I've done a couple of these Panther kits w/Magic Tracks before. If you don't glue on the running gear, you can absolutely paint them separately. I usually leave the road wheels, idlers, and drive sprockets off and paint them separately. Then, after the tracks are painted and ready to go on, I add the road wheels to the hull. Then, I will slip the idler and sprocket into a track and slip them onto their respective mounting studs (or holes, whichever). A fully-assembled run of Magic Tracks has enough flexibility to accommodate that kind of handling without breaking. That's how I've done all of my magic track kits and it seems to work great. Better than leaving an un-glued gap and trying to fix that up after painting and cleaner than trying to join hull halves after painting too.
Your mileage may vary.
-
 ChuckD got a reaction from LSP_K2 in Target, I mean tank, I mean Panther.
Hey, as a heads up, I've done a couple of these Panther kits w/Magic Tracks before. If you don't glue on the running gear, you can absolutely paint them separately. I usually leave the road wheels, idlers, and drive sprockets off and paint them separately. Then, after the tracks are painted and ready to go on, I add the road wheels to the hull. Then, I will slip the idler and sprocket into a track and slip them onto their respective mounting studs (or holes, whichever). A fully-assembled run of Magic Tracks has enough flexibility to accommodate that kind of handling without breaking. That's how I've done all of my magic track kits and it seems to work great. Better than leaving an un-glued gap and trying to fix that up after painting and cleaner than trying to join hull halves after painting too.
Your mileage may vary.
-
ChuckD got a reaction from Rick Griewski in Target, I mean tank, I mean Panther.
Hey, as a heads up, I've done a couple of these Panther kits w/Magic Tracks before. If you don't glue on the running gear, you can absolutely paint them separately. I usually leave the road wheels, idlers, and drive sprockets off and paint them separately. Then, after the tracks are painted and ready to go on, I add the road wheels to the hull. Then, I will slip the idler and sprocket into a track and slip them onto their respective mounting studs (or holes, whichever). A fully-assembled run of Magic Tracks has enough flexibility to accommodate that kind of handling without breaking. That's how I've done all of my magic track kits and it seems to work great. Better than leaving an un-glued gap and trying to fix that up after painting and cleaner than trying to join hull halves after painting too.
Your mileage may vary.
-
 ChuckD reacted to LSP_Ron in Target, I mean tank, I mean Panther.
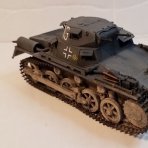
For the last two weeks I've been sitting at the kitchen island working on this. It's the 1/32 Dragon Panther D kit, the instructions are typical Dragon, as clear as mud and have you looking for a base ball bat at times but I got through it. I've never attached tracks to the tank before painting but with this kit you really don't have a lot of choice. Next up is painting the lower hull and tracks then attaching the upper hull and paint and weather
Cheers
-
 ChuckD got a reaction from Bill Cross in Messerschmitts of North Africa: Bf-110E-2 and Bf-109F-4 Trop
Straight future, Bill. After flat coating with Liquitex matte varnish, I got a little straight future on a brush and dropped it into the dial faces. Since the dials were so well-molded, they contained the future like little basins. That allowed for a nice clear gloss/glassy finish for the instruments.
-
 ChuckD got a reaction from G-Man in Messerschmitts of North Africa: Bf-110E-2 and Bf-109F-4 Trop
Straight future, Bill. After flat coating with Liquitex matte varnish, I got a little straight future on a brush and dropped it into the dial faces. Since the dials were so well-molded, they contained the future like little basins. That allowed for a nice clear gloss/glassy finish for the instruments.
-
 ChuckD got a reaction from tucohoward in Messerschmitts of North Africa: Bf-110E-2 and Bf-109F-4 Trop
Hi, everyone. Back with another update. I asked my wife earlier this week if I could have a modeling day this weekend, since I hadn't had much in the way of bench time. Happily, she was cool with it, so I started around 8am this morning and worked on and off - mostly on - throughout the day today until now. That said, I was able to make quite a bit of progress.
After a grand total of 31.3 labor hours, here is the current state of affairs:
Cockpit is lightly weathered and dusted, fuse is together, HGW seatbelts are done, canopies are masked (not pictured), and I've gotten the landing gear together. I've just started dabbling in the cowlings and I'm pretty sure I see now why they're the widely regarded as weak spot of this kit. The directions essentially show you just putting them around the engine and being good to go... but there's no way to locate them that way, so I'm going to have to cobble them together very very slowly and carefully to ensure they fit correctly. If I come up with a good way, I'll be sure to share for posterity's sake.
Anyway, here are a few in progress pics from today:
This is after the cockpit had been weathered and shaded w/oils and the seatbelts completed. When I bought the HGW seatbelts, I had no idea that building them would entail you actually building little seatbelts. They're pretty awesome. I got a little heavy with the wash on the pilot's belts, so there's that.
Side panels
IP w/reflector glass. This makes the whole thing look glossy, but it's not. I did drop some future in the gauges just to give them some gloss effect.
Seatbelts! Pedal straps are tamiya tape painted brown.
Fuse closed up. These two shots show the pigment dusting I used to put some dust inside the beast. It is in Africa after all. I'm going to model it with the pilot's canopy open and the gunner's canopy closed, so a lot of this should still be pretty visible once it's all said and done.
I'm going to let the fuselage joins harden for a day, then go at cleaning them. I may have to rescribe a few things, but overall the fit has been great. I've decided to just close the cowls and abandon my idea of leaving one open.
That's all for today. Hopefully I'll have another update or two this week as I plug through the cowls and clean up join lines. Thanks for following along.
-
ChuckD got a reaction from ghatherly in Messerschmitts of North Africa: Bf-110E-2 and Bf-109F-4 Trop
Hi, everyone. Back with another update. I asked my wife earlier this week if I could have a modeling day this weekend, since I hadn't had much in the way of bench time. Happily, she was cool with it, so I started around 8am this morning and worked on and off - mostly on - throughout the day today until now. That said, I was able to make quite a bit of progress.
After a grand total of 31.3 labor hours, here is the current state of affairs:
Cockpit is lightly weathered and dusted, fuse is together, HGW seatbelts are done, canopies are masked (not pictured), and I've gotten the landing gear together. I've just started dabbling in the cowlings and I'm pretty sure I see now why they're the widely regarded as weak spot of this kit. The directions essentially show you just putting them around the engine and being good to go... but there's no way to locate them that way, so I'm going to have to cobble them together very very slowly and carefully to ensure they fit correctly. If I come up with a good way, I'll be sure to share for posterity's sake.
Anyway, here are a few in progress pics from today:
This is after the cockpit had been weathered and shaded w/oils and the seatbelts completed. When I bought the HGW seatbelts, I had no idea that building them would entail you actually building little seatbelts. They're pretty awesome. I got a little heavy with the wash on the pilot's belts, so there's that.
Side panels
IP w/reflector glass. This makes the whole thing look glossy, but it's not. I did drop some future in the gauges just to give them some gloss effect.
Seatbelts! Pedal straps are tamiya tape painted brown.
Fuse closed up. These two shots show the pigment dusting I used to put some dust inside the beast. It is in Africa after all. I'm going to model it with the pilot's canopy open and the gunner's canopy closed, so a lot of this should still be pretty visible once it's all said and done.
I'm going to let the fuselage joins harden for a day, then go at cleaning them. I may have to rescribe a few things, but overall the fit has been great. I've decided to just close the cowls and abandon my idea of leaving one open.
That's all for today. Hopefully I'll have another update or two this week as I plug through the cowls and clean up join lines. Thanks for following along.
-
 ChuckD got a reaction from MikeMaben in Messerschmitts of North Africa: Bf-110E-2 and Bf-109F-4 Trop
Hi, everyone. Back with another update. I asked my wife earlier this week if I could have a modeling day this weekend, since I hadn't had much in the way of bench time. Happily, she was cool with it, so I started around 8am this morning and worked on and off - mostly on - throughout the day today until now. That said, I was able to make quite a bit of progress.
After a grand total of 31.3 labor hours, here is the current state of affairs:
Cockpit is lightly weathered and dusted, fuse is together, HGW seatbelts are done, canopies are masked (not pictured), and I've gotten the landing gear together. I've just started dabbling in the cowlings and I'm pretty sure I see now why they're the widely regarded as weak spot of this kit. The directions essentially show you just putting them around the engine and being good to go... but there's no way to locate them that way, so I'm going to have to cobble them together very very slowly and carefully to ensure they fit correctly. If I come up with a good way, I'll be sure to share for posterity's sake.
Anyway, here are a few in progress pics from today:
This is after the cockpit had been weathered and shaded w/oils and the seatbelts completed. When I bought the HGW seatbelts, I had no idea that building them would entail you actually building little seatbelts. They're pretty awesome. I got a little heavy with the wash on the pilot's belts, so there's that.
Side panels
IP w/reflector glass. This makes the whole thing look glossy, but it's not. I did drop some future in the gauges just to give them some gloss effect.
Seatbelts! Pedal straps are tamiya tape painted brown.
Fuse closed up. These two shots show the pigment dusting I used to put some dust inside the beast. It is in Africa after all. I'm going to model it with the pilot's canopy open and the gunner's canopy closed, so a lot of this should still be pretty visible once it's all said and done.
I'm going to let the fuselage joins harden for a day, then go at cleaning them. I may have to rescribe a few things, but overall the fit has been great. I've decided to just close the cowls and abandon my idea of leaving one open.
That's all for today. Hopefully I'll have another update or two this week as I plug through the cowls and clean up join lines. Thanks for following along.
-
ChuckD got a reaction from Bill Cross in Messerschmitts of North Africa: Bf-110E-2 and Bf-109F-4 Trop
Hi, everyone. Back with another update. I asked my wife earlier this week if I could have a modeling day this weekend, since I hadn't had much in the way of bench time. Happily, she was cool with it, so I started around 8am this morning and worked on and off - mostly on - throughout the day today until now. That said, I was able to make quite a bit of progress.
After a grand total of 31.3 labor hours, here is the current state of affairs:
Cockpit is lightly weathered and dusted, fuse is together, HGW seatbelts are done, canopies are masked (not pictured), and I've gotten the landing gear together. I've just started dabbling in the cowlings and I'm pretty sure I see now why they're the widely regarded as weak spot of this kit. The directions essentially show you just putting them around the engine and being good to go... but there's no way to locate them that way, so I'm going to have to cobble them together very very slowly and carefully to ensure they fit correctly. If I come up with a good way, I'll be sure to share for posterity's sake.
Anyway, here are a few in progress pics from today:
This is after the cockpit had been weathered and shaded w/oils and the seatbelts completed. When I bought the HGW seatbelts, I had no idea that building them would entail you actually building little seatbelts. They're pretty awesome. I got a little heavy with the wash on the pilot's belts, so there's that.
Side panels
IP w/reflector glass. This makes the whole thing look glossy, but it's not. I did drop some future in the gauges just to give them some gloss effect.
Seatbelts! Pedal straps are tamiya tape painted brown.
Fuse closed up. These two shots show the pigment dusting I used to put some dust inside the beast. It is in Africa after all. I'm going to model it with the pilot's canopy open and the gunner's canopy closed, so a lot of this should still be pretty visible once it's all said and done.
I'm going to let the fuselage joins harden for a day, then go at cleaning them. I may have to rescribe a few things, but overall the fit has been great. I've decided to just close the cowls and abandon my idea of leaving one open.
That's all for today. Hopefully I'll have another update or two this week as I plug through the cowls and clean up join lines. Thanks for following along.
-
 ChuckD got a reaction from mywifehatesmodels in Messerschmitts of North Africa: Bf-110E-2 and Bf-109F-4 Trop
Hi, everyone. Back with another update. I asked my wife earlier this week if I could have a modeling day this weekend, since I hadn't had much in the way of bench time. Happily, she was cool with it, so I started around 8am this morning and worked on and off - mostly on - throughout the day today until now. That said, I was able to make quite a bit of progress.
After a grand total of 31.3 labor hours, here is the current state of affairs:
Cockpit is lightly weathered and dusted, fuse is together, HGW seatbelts are done, canopies are masked (not pictured), and I've gotten the landing gear together. I've just started dabbling in the cowlings and I'm pretty sure I see now why they're the widely regarded as weak spot of this kit. The directions essentially show you just putting them around the engine and being good to go... but there's no way to locate them that way, so I'm going to have to cobble them together very very slowly and carefully to ensure they fit correctly. If I come up with a good way, I'll be sure to share for posterity's sake.
Anyway, here are a few in progress pics from today:
This is after the cockpit had been weathered and shaded w/oils and the seatbelts completed. When I bought the HGW seatbelts, I had no idea that building them would entail you actually building little seatbelts. They're pretty awesome. I got a little heavy with the wash on the pilot's belts, so there's that.
Side panels
IP w/reflector glass. This makes the whole thing look glossy, but it's not. I did drop some future in the gauges just to give them some gloss effect.
Seatbelts! Pedal straps are tamiya tape painted brown.
Fuse closed up. These two shots show the pigment dusting I used to put some dust inside the beast. It is in Africa after all. I'm going to model it with the pilot's canopy open and the gunner's canopy closed, so a lot of this should still be pretty visible once it's all said and done.
I'm going to let the fuselage joins harden for a day, then go at cleaning them. I may have to rescribe a few things, but overall the fit has been great. I've decided to just close the cowls and abandon my idea of leaving one open.
That's all for today. Hopefully I'll have another update or two this week as I plug through the cowls and clean up join lines. Thanks for following along.
-
 ChuckD got a reaction from Trak-Tor in Messerschmitts of North Africa: Bf-110E-2 and Bf-109F-4 Trop
Hi, everyone. Back with another update. I asked my wife earlier this week if I could have a modeling day this weekend, since I hadn't had much in the way of bench time. Happily, she was cool with it, so I started around 8am this morning and worked on and off - mostly on - throughout the day today until now. That said, I was able to make quite a bit of progress.
After a grand total of 31.3 labor hours, here is the current state of affairs:
Cockpit is lightly weathered and dusted, fuse is together, HGW seatbelts are done, canopies are masked (not pictured), and I've gotten the landing gear together. I've just started dabbling in the cowlings and I'm pretty sure I see now why they're the widely regarded as weak spot of this kit. The directions essentially show you just putting them around the engine and being good to go... but there's no way to locate them that way, so I'm going to have to cobble them together very very slowly and carefully to ensure they fit correctly. If I come up with a good way, I'll be sure to share for posterity's sake.
Anyway, here are a few in progress pics from today:
This is after the cockpit had been weathered and shaded w/oils and the seatbelts completed. When I bought the HGW seatbelts, I had no idea that building them would entail you actually building little seatbelts. They're pretty awesome. I got a little heavy with the wash on the pilot's belts, so there's that.
Side panels
IP w/reflector glass. This makes the whole thing look glossy, but it's not. I did drop some future in the gauges just to give them some gloss effect.
Seatbelts! Pedal straps are tamiya tape painted brown.
Fuse closed up. These two shots show the pigment dusting I used to put some dust inside the beast. It is in Africa after all. I'm going to model it with the pilot's canopy open and the gunner's canopy closed, so a lot of this should still be pretty visible once it's all said and done.
I'm going to let the fuselage joins harden for a day, then go at cleaning them. I may have to rescribe a few things, but overall the fit has been great. I've decided to just close the cowls and abandon my idea of leaving one open.
That's all for today. Hopefully I'll have another update or two this week as I plug through the cowls and clean up join lines. Thanks for following along.
-
 ChuckD got a reaction from TorbenD in Messerschmitts of North Africa: Bf-110E-2 and Bf-109F-4 Trop
Hi, everyone. Back with another update. I asked my wife earlier this week if I could have a modeling day this weekend, since I hadn't had much in the way of bench time. Happily, she was cool with it, so I started around 8am this morning and worked on and off - mostly on - throughout the day today until now. That said, I was able to make quite a bit of progress.
After a grand total of 31.3 labor hours, here is the current state of affairs:
Cockpit is lightly weathered and dusted, fuse is together, HGW seatbelts are done, canopies are masked (not pictured), and I've gotten the landing gear together. I've just started dabbling in the cowlings and I'm pretty sure I see now why they're the widely regarded as weak spot of this kit. The directions essentially show you just putting them around the engine and being good to go... but there's no way to locate them that way, so I'm going to have to cobble them together very very slowly and carefully to ensure they fit correctly. If I come up with a good way, I'll be sure to share for posterity's sake.
Anyway, here are a few in progress pics from today:
This is after the cockpit had been weathered and shaded w/oils and the seatbelts completed. When I bought the HGW seatbelts, I had no idea that building them would entail you actually building little seatbelts. They're pretty awesome. I got a little heavy with the wash on the pilot's belts, so there's that.
Side panels
IP w/reflector glass. This makes the whole thing look glossy, but it's not. I did drop some future in the gauges just to give them some gloss effect.
Seatbelts! Pedal straps are tamiya tape painted brown.
Fuse closed up. These two shots show the pigment dusting I used to put some dust inside the beast. It is in Africa after all. I'm going to model it with the pilot's canopy open and the gunner's canopy closed, so a lot of this should still be pretty visible once it's all said and done.
I'm going to let the fuselage joins harden for a day, then go at cleaning them. I may have to rescribe a few things, but overall the fit has been great. I've decided to just close the cowls and abandon my idea of leaving one open.
That's all for today. Hopefully I'll have another update or two this week as I plug through the cowls and clean up join lines. Thanks for following along.
-
 ChuckD got a reaction from mozart in Messerschmitts of North Africa: Bf-110E-2 and Bf-109F-4 Trop
Hi, everyone. Back with another update. I asked my wife earlier this week if I could have a modeling day this weekend, since I hadn't had much in the way of bench time. Happily, she was cool with it, so I started around 8am this morning and worked on and off - mostly on - throughout the day today until now. That said, I was able to make quite a bit of progress.
After a grand total of 31.3 labor hours, here is the current state of affairs:
Cockpit is lightly weathered and dusted, fuse is together, HGW seatbelts are done, canopies are masked (not pictured), and I've gotten the landing gear together. I've just started dabbling in the cowlings and I'm pretty sure I see now why they're the widely regarded as weak spot of this kit. The directions essentially show you just putting them around the engine and being good to go... but there's no way to locate them that way, so I'm going to have to cobble them together very very slowly and carefully to ensure they fit correctly. If I come up with a good way, I'll be sure to share for posterity's sake.
Anyway, here are a few in progress pics from today:
This is after the cockpit had been weathered and shaded w/oils and the seatbelts completed. When I bought the HGW seatbelts, I had no idea that building them would entail you actually building little seatbelts. They're pretty awesome. I got a little heavy with the wash on the pilot's belts, so there's that.
Side panels
IP w/reflector glass. This makes the whole thing look glossy, but it's not. I did drop some future in the gauges just to give them some gloss effect.
Seatbelts! Pedal straps are tamiya tape painted brown.
Fuse closed up. These two shots show the pigment dusting I used to put some dust inside the beast. It is in Africa after all. I'm going to model it with the pilot's canopy open and the gunner's canopy closed, so a lot of this should still be pretty visible once it's all said and done.
I'm going to let the fuselage joins harden for a day, then go at cleaning them. I may have to rescribe a few things, but overall the fit has been great. I've decided to just close the cowls and abandon my idea of leaving one open.
That's all for today. Hopefully I'll have another update or two this week as I plug through the cowls and clean up join lines. Thanks for following along.
-
 ChuckD got a reaction from Durangokid in Late TBF-1 Avenger conversion from TBF-1C
Awesome work. The Trumpeter avenger kits are fantastic and you're really upping the ante.
-
 ChuckD got a reaction from Loach Driver in A newbie's attempt at the Tamiya F4U-1A
Hi, guys. I've posted a few times here, but never shared any LSP works. Truth is, I've been kinda disappointed in my efforts with them and haven't had anything I really felt like sharing. In just the last year, I've made the jump into 1/32 A/C from the realm of strictly 1/35 armor. I feel like a lot of the processes used to paint and weather armor just don't seem to work all that well with LSPs.
Anyway, I went for a fairly clean attempt at the Corsair on this. I ran into some problems with the decals silvering really badly due to a poor clear gloss that I laid down. So, after sanding them off to remove them, then affixing all the rest, I was kind of ready to complete this one and get it off the bench. So, not a whole lot of weathering happened beyond some basic silver pencil chipping, exhaust and gun smoke staining, and a wash. That's also why it's kind of a conglomeration of two different decal schemes. All that said, it's no match for some of the stuff I see posted here, but any C&C is welcome. be gentle!
-
ChuckD got a reaction from sandokan in Messerschmitts of North Africa: Bf-110E-2 and Bf-109F-4 Trop
Everything loosely mocked up for effect:
-
ChuckD got a reaction from sandokan in Messerschmitts of North Africa: Bf-110E-2 and Bf-109F-4 Trop
Hi, everyone. Back with an update at last. I should've mentioned in my original post that this will be a somewhat pokey build log. I don't get a ton of free time in my life and what I do get, I balance across several different hobbies. I also like to update when I actually have something substantive to post. That said, I've made some pretty good progress in the last few weeks on the base coating and detailing of the cockpit. I've got everything pretty well tidied up and will be moving on to irrevocably botching the weathering here shortly. I have to admit that I found a really great thread here from 2011 and have been using it as my primary photo reference. So there are some special thanks necessary to poster Ralph Riese for his photos and reference.
As a fun aside, this is the first kit I've actually started tracking time spent on the build. My goal is to get a fun picture of just how much time and labor this build represents. As of this post, I've spent 3.8 hours on building, 8.2 hours on painting, and 2.8 hours on ancillary tasks like prepwork, photos, posting updates here, etc. A total of 14.8 hours across 10 different bench sessions for an average of 1.48 hours per session. What can I say, I'm a stats geek.
Anyhoo, here we go.
Here are the major sub-assemblies laid out. I opted for the RLM02 cockpit with RLM66 panel.
Cockpit sidewalls with wiring:
The radio stack:
Cannon tray and oxygen bottles:
The instrument panel. This is straight out of the box. I finished it with a mix of paints and colored pencils. I believe the latter has some real promise for tight detail work, but the Mr Paint finish I used leaves such a fine, smooth finish, there wasn't much for the pencil to grip on. Due to the fine detail of the molded plastic, this was a joy to paint and detail.
Instruments and ammo counter (and mold seam - damnit) for the gunner/radioman:
Ammo drums that will never see the light of day once everything is buttoned up:
The cockpit. For the amount of detail on the IP, the amount of detail here is a little lacking, in my opinion.
The rear gunner's mount:
-
ChuckD got a reaction from Bill Cross in Messerschmitts of North Africa: Bf-110E-2 and Bf-109F-4 Trop
Everything loosely mocked up for effect: