
radial
-
Posts
190 -
Joined
-
Last visited
-
Days Won
1
Content Type
Profiles
Forums
Events
Everything posted by radial
-
I agree with Walker. Do basic decals and let the aftermarket do the rest. I'm biased because my plan is to do the cowled and spatted Red Baron flight team scheme. Just gimme the plastic!
-
Lohner Tl Austro-Hungarian Flying Boat
radial replied to Tnarg's topic in Anything But Injection Moulded!
Hope you sort out the PB thing as I would really like to follow your scratch building techniques. -
ARE THE PRICES OF THE MODELS GETTING TOO HIGH OR ?
radial replied to ssculptor's topic in LSP Discussion
My last total scratchbuild cost in the neighborhood of $ 800 in material costs alone. So IMHO kits are cheap. -
For sure an exceptional display of modeling.
-
Martin, Would you be offering the Fairchild as kit?
-
1:32 Curtiss P-6E Hawk - available for purchase!
radial replied to Silver Wings's topic in Silver Wings
How bout parts photos of the P6 E and the Stearman like you did with the Bulldog. Will buy both. 30's bipes all the way! -
Very well done. Especially impressed with the base. Congrats!
-
"Lady LiL" - RFI - Foiled HKM B-25J Strafer
radial replied to Out2gtcha's topic in Ready for Inspection
What a fantastic build! I especially enjoy your clear and concise WIP's. Thank you for the foiling tutorial -
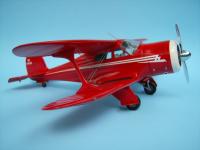
Got first place at the NATS with the Waco! And as a bonus met a bunch of LSPers too"
-
Right now halfway to Loveland. In Lincoln NE. A wave to Brian as I passed Omaha. It looks like its on in the scratchbuilt category.!... Maybe I should turn around and go back to chitown LOL.
-
1/32 recovered B-17 - UPDATE 12/10/13 - FINISHED - YAY!
radial replied to richdlc's topic in Works in Progress
This is special. You captured the brutishness of the 17 -
Trumpy's P-51B times two - Dominic Gentile and Ralph Hofer
radial replied to Thomas Lund's topic in Works in Progress
You might try painting the red band then cut the checker squares out of white decal trim sheet. May get some bleed through. -
Thanks for all the great ideas gents. I'll probably be using a combination of filling the seam, painting and decal strip. Thanks Paul and Geoff for the kind comments. Here's another peak.
-
Scratch Waco SRE. I have to join the top wing to this build after all the final paint and decalling is done. The question is how to eliminate the seam with minimal damage to the surrounding paint work. Any advice would be appreciated.
-
Wow, makes my struggles with scratch single engine A/C look puny. Curious, why 1/35 scale?
-
Do not like MLDF because on large scale big decals there are noticeable brush strokes/ marks. Have always used any gloss lacquer in cans or airbrushed. The key is a very lightly misted first coat and letting it dry for at least 4 hrs. A second light coat and your good to go. Because of the "hot" nature of lacquer wet coats will run the ink or cause crackling.
-
Thanks for the concise description of your foiling process. I've been practicing on a mule model for about a year and my problem area has been tight concave sections like wing fillets. Between you and Brian this is great information!
-
I find myself over buying materials and supplies particularly solvent items for fear they will not be available in the future. Not a vulture but maybe a doomsday prepper.
-
You might want to use the shaped nose plug as a mold to crash form the correct shaped nose. Good work so far!
-
Foiled HKM B-25J Strafer - 345th BG Air Apaches - Lady LiL
radial replied to Out2gtcha's topic in Works in Progress
Exceptional work! Looking forward to your foiling process for tightly curved areas. -
Hobbycraft Sea Fury Hawker Company demonstrator G-AKRY
radial replied to airscale's topic in Works in Progress
For latches you might try thin slices of chrome automotive pinstriping. It's slightly thicker than Mylar and self adhesive. Been liking your build! -
Foiled HKM B-25J Strafer - 345th BG Air Apaches - Lady LiL
radial replied to Out2gtcha's topic in Works in Progress
Brian, thanks for your concise description of the foiling process. You've already answered 10 questions about foiling I didn't even know I had!! Keep up the good work. -
Go to the Williams Bros. website. They do most of the golden age racers that are available in 1/32. I've built several and they are pretty good.
-
Very very good rendition of rarely seen subject!
-
Foiled HKM B-25J Strafer - 345th BG Air Apaches - Lady LiL
radial replied to Out2gtcha's topic in Works in Progress
Excellent work going on here! Especially looking forward to the foiling process as I've been experimenting with foil in for the last 8 mos. I have followed yours and Foilers tutorials. You guys make it look easy....it ain't.
