Search the Community
Showing results for tags 'tamiya'.
-
Hello I will join the group build officially with my Tamiya Mk.IXc TOLLY HELLO. I will do a in flight build most likely. I like to know should i build with clean lines ( No P-51 tear drop tanks ) or with the tanks? Also need some custom masks done of the MK 210 markings on the side of the fuselage? http://i25.photobucket.com/albums/c55/abreu2828/PhotoSpitfire1a.jpg http://s25.photobucket.com/user/abreu2828/media/SpitMK210001c.jpg.html http://i25.photobucket.com/albums/c55/abreu2828/300cupz.jpg I will post some photos soon of my start. Cheers Danny
-
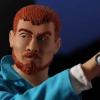
Long overdue posting here, apologies, but finally took a few final pictures. Also put BBD up on the stand as well. This is my first large-scale build having built almost exclusively in 1/48 and starting with the Tamiya P-51D was quite a treat. This is not quite an OOB build, using some Photoetch from Eduard in the engine compartment (and conveniently covered up, UGH!) and the cockpit (ditto - using the pilot figure was probably not my brightest idea ever). The HGW Seatbelts were not easy to get together - for me anyway - but really look good in this scale compared to the nightmare they were in 1/48!. The decals are a combination of Zotz checkers for the nose, Big Beautiful Doll and the wingtips checkers are from Eagle Cal and the rest from the kit itself. The paints are mostly acrylics - Tamiya TS-12 on the fuselage for example and Model Master, and the exhaust area is Model Master Metalizer. I have a lot of bottles of it from a long time ago, but it seems to keep well and I recently figured out a new venting system for my paint booth so I can actually paint with the aromatic metalizers and enamels now without smelling up the house. If you followed along the build thread you know about the issues with the nose checkers and other fun I had with this terrific kit. http://forum.largescaleplanes.com/index.php?showtopic=56418&hl= Apologies - I am totally off on the white balance - I'll have to reshoot. The nose is two decals - the Zotz decals fit the Tamiya nose nearly perfectly. The nose cone/prop assembly is not overly tight so does pull away some from the fuselage. The Zotz decals require a white band to be painted around the first row of checkers, careful matching the white. I don't usually have the plane mounted on the stand, and I'm not entirely thrilled with the fit of the panel that replaces the landing gear, but BBD does look good in flight. As much detail as went into the engine bay, unless you take off all the panels much of it is hidden. I didn't super detail the topside of the engine and now regretting it. Also seeing that I'll need to be doing some weathering around the exhaust stacks. But one of my favorite items in the kit really are the figures. I love the pilot, and hope to do a mini-diorama sometime.
- 27 replies
-
- 10
-

-
- P-51D
- Big Beautiful Doll
- (and 2 more)
-
 Here's my entry into this GB. The PRU pink Spitfires have certainly been an eye-catching scheme over the years. When I first thought about doing one, I wasn't sure about the shade of pink. Edgar was very helpful in figuring that out. I'll be starting with the Tamiya IXc kit: The contents are a bit jumbled as I had to mix it with another kit to get under the 25% completion limit. For extras, I'll be using some Barracuda resin bits, RB rad screens and Ad Astra paint masks for the markings. Carl
 -
 Hello LSP Crew I like to use the 356FG 360FS "PI-J" Sr. No.44-15052 P-51D-15-NA. ( Blue Diamonds ) from Zoukei-Mura on a Tamiya Mustang. Has any one done this or seen the fit of them? Just not sure of the Blue Diamonds cowl fit Bottom AC photo http://www.spruebrothers.com/sbmimages2/zkmsws004-d01.jpg Thanks for you help Cheers
 -
Picked up this lovely little (big) kitty early this morning, I have wanted one of these forever and now I finally have one! For those who don't know, this is a full option model, RC with sound. lights. effects etc. CLEAR the bench, I'm goin in! Paul
-
Hello after recieving this set i put a few things on hold and start this on. The kit. The F-4C/D from tamiya. The conversion kit from GT resin. some reference. The only things i just need are the intakes(underway) and some eduard bits. Progress will be slow so i hope you have patience. Mark
-

Tamiya 1/32 Early P-51D "Lou IV" finished 07-09-15
MustangManiac posted a topic in Works in Progress
Hello everyone, This is my first time to post a build on here and I'm a little ways into my build already but I thought why not share my progress and gather some others' input for future builds. I'm making the 1/32 Tamiya P-51D pretty much OOB. I do plan to use some OOP Pyn-up decals I have. I can't decide which one I want to do first though, I'm torn between Passion Wagon and Moon Mullins' P-51D. Both of these birds are early production P-51s with a filletless tail. Before I post pictures of my decals can someone please tell me if it's allowed to post nude pin-ups that were nose art? I'll add pictures as soon as I figure out how that works and I get an answer to my question. Cheers, Brady -
Back when I could still see smaller scale models I went after Tamiya's really nice 1/48 Scale P-51D kit with the Lou IV markings. Added some Eduard cockpit PE but the big exercise for me was dropping the flaps and working weathering the paint. I wanted a really well worn Lou IV. Left wing insignia is way off register; I just have not done anything yet to fix it. Paint is mostly Model master acrylics weathered using sanding pads of various grits. Last picture shows the both of the ailerons dropped - I fixed it as shown in the previous pictures but it took me a long time to find the errror.
-
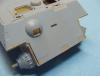
Hello all: Well, I got damn sick and tired of watching all the great builds going on here and not having anything to participate with. So, I canned the P-61 (actually put it back in the box and shelved it but "canned" elicits a more appropriate feeling regarding the Avionix sets that I attempted to use. Adjectives of disappointment with those sets fail me at the moment so I'll forget about it and move on.) Anyway, I pulled out a Tamiya first release P-51D from the stash shelf and decided to "have a go" (best British accent). Below are a few of the photos of the progress I've made on it and while nowhere near some of the abilities I've seen here lately, I'm confident it'll be as right as I can make it without having to succumb to AMS; if I do, then it'll probably never get done. The kit itself is a mismash of block numbers that Tamiya had to do to get more than one version out of a single box. Consequently, the details of some of the parts on the kit aren't quite correct for an earlier P-51D. The kit lends itself better to the block 20-25 series aircraft out of the box. Wherever I need to make a change to a kit part to accurately represent the block 15 aircraft, I'll do my best to point it out. The first shot below is of the oil tank, firewall and the rear half of the V-1650 Packard Merlin. Without going into too much details, P-51D-15-NA aircraft had an oil tank without a dipstick. The kit provides a "bump" for the dipstick by the filler neck which I promptly sanded off. I also made a filler cap from punched styrene disks with stretched sprue "ears". They're not really noticeable in the photo but they are there. I dropped the damn thing on the ground about 20 times before I got it glued in place. I was damn lucky to find it more than once! The interior green on the firewall is a mixture of my own using Testor's enamel zinc chromate and flat black; the same way the original interior green was made. The mixture is about 10:1, using the Mk. 1 eyeball to judge the color until it "looked right". The oil tank itself, while seen in natural metal on most wartime Mustangs is Testor's Model Master Interior Green which, in my opinion, is WAY off the mark. Maybe I just got a bad mix but if my older bottles of the color weren't solidified, I would've used them as the colors were much better. I painted the tank as the surface of the tank is somewhat pebbly and wouldn't yield a good natural metal finish; so, I painted it and am calling it a replacement tank from the spares depot.... That's my story and I'm stickin to it. I also discovered a little known piece of information (at least to me) about the firewall from reading the P-51D E&R manual. The firewall is mostly armor plate excepting behind the oil tank itself which is stainless steel. So, I painted that portion of the firewall, a stainless steel color (or reasonable facsimile thereof ) Attachment straps are aluminum although they should probably be a steel color as aluminum is almost never used as band clamps to hold tanks in place...it's far too weak. The engine is Tamiya X-18 semi-gloss black which looks fantastic in 1/32. The bolt/nut details were picked out with a sharpened toothpick and some Testor's chrome silver paint. I'd say it looks convincing for an out of box engine. The next photo is, you guessed it, the cockpit area. Basic coloring of the cockpit floor is flat black representing the non-skid paint used to cover the plywood flooring. The zinc chromate recessed area is actually the top of the wing (on the real aircraft). I've forgotten exactly what the silver cylinder is for but it's silver.... LOL. I've yet to paint the control locking pin red and the control column is awaiting some painting effects to accentuate the canvas boot at the base of the column (it can be seen in the lower right corner of the photo). I used MDC luftwaffe cockpit gauge decals ( I know, I know, it's not right) for the fuel gauges on the cockpit floor and used Microcoat Gloss for the lens. At normal viewing distances, without magnification, you'll never be able to tell they're luftwaffe gauges. The canvas cover below the seat got a coat of OD. I have not yet weathered the cockpit floor other than some drybrushing to make the magnificent detail on this kit pop out. I'll add some wood colored paint wear later. The flooring under the fuselage fuel tank is/was plywood and I represented that with some Testor's wood colored paint...doesn't look too bad and when it's installed, you probably won't be able to see much of it anyway. The fuel tank itself got a coat of Tamiya X-18 with some of the metal parts of the tank being picked out in flat black. The radio/battery rack will also be painted flat black, not interior green as called out in the Tamiya instructions. I haven't looked deep enough into the specifics of -15 Mustangs to see whether or not the SCR-522 radio was installed or the earlier version. A quick look at the P-51D/Mustang IV Illustrated Parts Catalog will provide the answer, I just have to go look it up. I sure hope it's the SCR-522 radio set as I do NOT want to scratchbuild an entire radio set...PITA. I'm getting lazy in my middle agedness You'll also take note of the white plastic rod that runs on the left side of the radio rack. That my friends, is the tank vent which Tamiya only faintly tries to portray on the tank. If you have the kit (built or unbuilt) and look at the tank in the forward left hand corner, you'll see a small length of raised plastic eminating from a small, circular area with four represented fasteners. That is the tank vent as Tamiya provides. Early P-51D's had only the vent tube. Later marks (-20 and later I'm thinking) had a carburetor vapor return line integral with the 90 degree elbow that come out of the tank. I know it's tough to envision without a specific photograph so I'll refer you to dodgem37's excellent build of this same kit for illustration of that specific feature which is portrayed flawlessly. The seat is the Warren-Macarthur style and used if for no other reason that the vast majority of Mustangs I see have the Shick-Johnson seat installed. The Shick-Johnoson seat was more common on later Mustangs but there's no hard and fast rule to say which Mustangs got which seats, regardless of production block. This is probably one of those cases where the aircraft got whatever seat was available at the time. The earlier the block number, the better the chance of having a Warren-Macarthur seat though. Similar seats were in the B and C Mustangs. Mustang seats, according to my references were painted dull dark green so that's what this one got. That and a set of HGW seat belts/harness which while tricky to assemble, look very convincing once installed. I'm a long-winded poster sometimes and you'll please forgive the few photos in relation to the text. I've a long way to go but this kit is a gem and it shouldn't be too long before I add to this topic with more pix. Thanks for looking in
-
Build of a Tamiya kit, this time the 1/48 Mustang III kit paired with the Techmod decal sheet. A great subject matter that doesn't get a lot of attention in the bigger kits. The Mustang III's were very interesting in their camo and markings.
- 14 replies
-
- 4
-
-
- Tamiya
- Mustang III
- (and 1 more)
-
Here is my Tamiya Mustang finished with Stencil Pal stencils. I really liked the "other" mustang that was on the box top of the Tamiya kit but no one made decals. So in an effort to learn something new, I used a set of Lazy Daisy stencils made by our very on Sluggo from Stencil Pal. The experience was great and I'd recommend those stencils to everyone! I'll have to caveat this with my photographic skills are not good and there are still one or two things left to do, but for all intents, this one is done. Here are the basics of the build: http://forum.largescaleplanes.com/index.php?showtopic=53833&page=1 Stencils were used for the nose art, tail number and squadron markings I wanted to be able to show off the engine. The quality of the kit is amazing. When you can start using "Tamiya" as a verb.... The cockpit is a kit in and of it's self! Hope everyone enjoys! As far as I know, it's the only Lazy Daisy out there!
-
 Hi guys, sorry to post again pictures of my Corsair to soon, but this two birds looks really nice together
- 20 replies
-
- 11
-
-
After a wonderful response for the albatros plans, i decided to make a thread for my question as well. For another future planned long-long term project im thinking of a german F-4F. Since the Revell has one in 1/32 scale, but it is not really a clean build, also it has lots of cosmetical errors im thinking of converting the tamiya's kit. After brief review of all kits in their range I determined that the most accurate variant is F-4EJ. The only modifications required to turn it into german phantom would be: Slatted wings (resin), and elevators without the slats (will try to source one from the C/D kit - that is if someone would have them). Are this all the major modifications, or am i missing other bits and pieces as well? Or would it be wiser to get the revell kit afterall? Also, if i would like to make slattless elevator, is it enough if i cut (or fill) the slots on the original tamiya parts from the EJ kit? Marko
-
I've had this kit for about a year. I finally decided to build it and am glad I did. This has to be the best model kit manufactured (aside from the 1/48 Trumpeter deHavilland Hornet ) ever! It just falls together... The reason for the delay was that I wanted to build a specific aircraft but couldn't find the decals (deckels?) and was offered the opportunity to use some custom Stencil Pal stencils (thanks Randy a.k.a. Sluggo). Building is about having fun and learning, so I started right away. I figured I could get the cockpit done pretty quick while using the Barracuda decals...not so fast...it's taken me quite a bit to get to the point of closing the fuse... The obligatory starting shot! Cockpit underway. No real problems here other than getting the photo-etch harness to stay glued to the seat.
- 53 replies
-
- 2
-
-
- Stencil Pal
- Mustang
- (and 1 more)
-
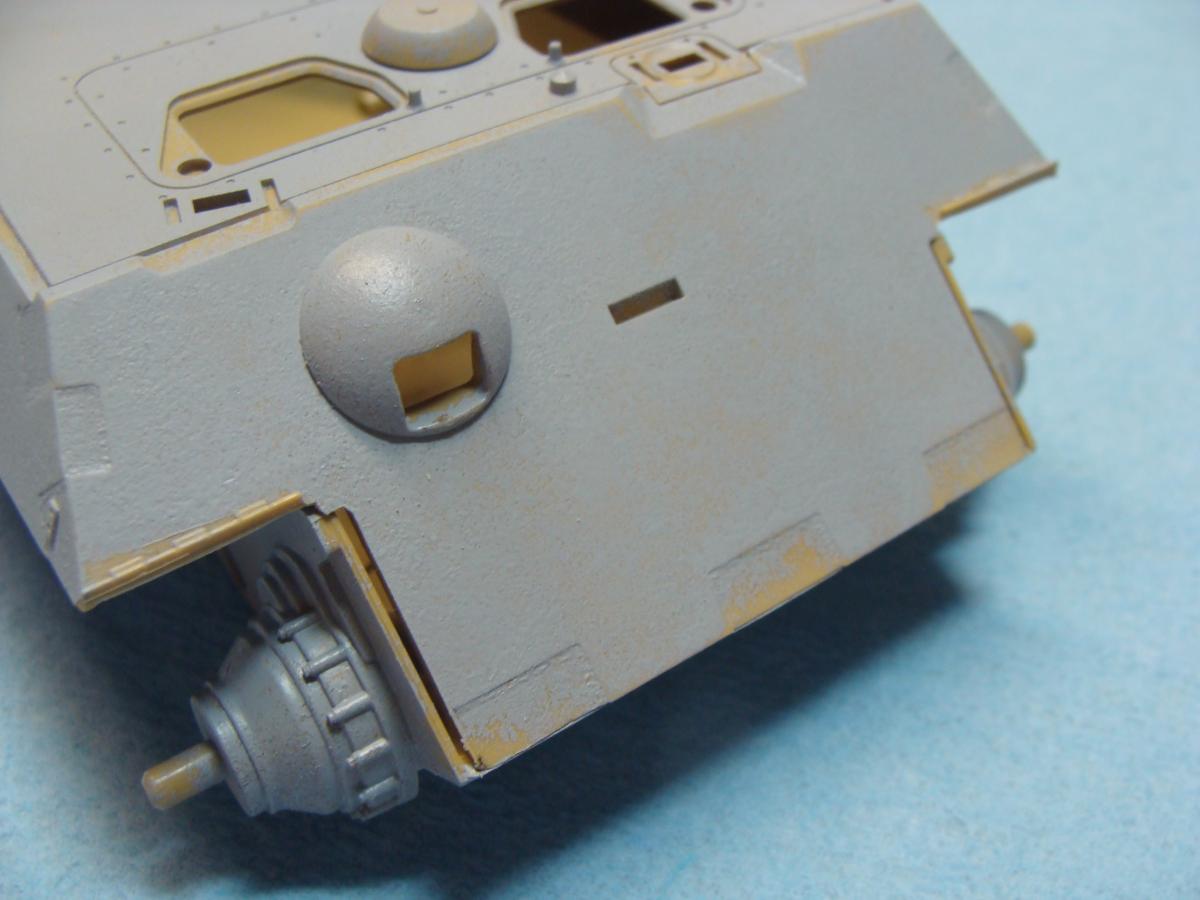
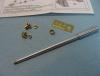
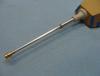
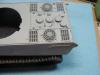
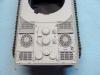
So, for those of you who didn't know, I model all kinds of things, and one of my favorite things to model are WWII AFV's. I had the chance a while back to gather together what I thought would be the ultimate King Tiger accessories as well as Tamiya's King Tiger and then promptly went back into my large scale aircraft building phase and forgot about it for a while. I am currently building two resin aircraft in the Korean War Group Build here on LSP, but I needed a break before I hit absolute burn out. When I need a break I break out a tank, and so, here we are. Here is a picture of what I started with and the beginning stages of construction. Tamiya King Tiger Aber Photo Etch for fenders front and rear as well as side and basic set that has all of the various detail parts for the main hull and turret. Armorscale Turned barrel and break as well as their replacement mantlet. Model point provided new turned barrels for the bow machine gun. Fruil Tracks The vehicle I am modeling is a late production KT, and at this stage a lot of the smaller Aber details are not installed so they don't get inadvertently removed while I'm working on paint. the first thing I do prior to to much construction is to texture the entire tank to add that extra bit of realism. For this, I use Mr. Surfacer 500 tapped on with an old brush until it builds up random texture. Any high spots get knocked down with some fine sand paper and then you have a really nice textured base coat to work from. Here are a couple of pics highlighting the texturing in progress. Once that was all done, I started on the incredibly detailed barrel and brake. In short order I had it assembled test fit and ready to prime, just an amazing little gem this thing turned out to be. I also added all the various welds with Milliput fine white putty. OK so, fast forward to a couple of days after that, and here are some parts that are a combination of Aber, Tamiya, my punch and die set and some NBW castings. More next page Paul
- 87 replies
-
- 2
-
-
- King Tiger
- Aber
- (and 1 more)
-
My F4U-1A kit just arrived, and I'm looking at potential builds. Since my last Corsair was a Leatherneck one from the Cactus Air Force (therefore wings extended), I'd love to do a carrier-based build this time with folded wings. Any suggestions on planes, especially USMC planes aboard ship? I know I could do a factory-delivery aboard a "jeep" carrier, but would prefer a fighting airframe with some weathering potential. TIA as always, you guys are the best.
-
 Here's my Spit, which I began over two years ago, with an extended break in between... (The WIP is here) This was a kit of firsts for me: My first camo paint job My first use of aftermarket decals, resin, and photo etch parts It would be no surprise for me to report that it was a well engineered kit and any fit problems I may have experienced were of my own doing... Further, I was delighted for the most part with the resin parts, especially the engine rocker covers, the pilot seat, and the cockpit hatch... I am not sure I would purchase the cockpit add-ons, other than the photo etched control panel... The Barracuda Cast decals (stickers) were really quite excellent and settled onto the craft better than any decals I've used; however, they are tender and must be used a bit more carefully than OOB decals... Finally the Gator masks I used for the camo paint job were excellent too... I would grade my build performance from two different perspectives: From the perspective of the top builders on this site, I give myself a B-/C+, because so many of the Spits contain far more extras than I could imagine adding, plus they are far cleaner builds than mine... From my own personal capabilities and experiences, I give myself an A-/B+ for stretching myself on a build further beyond where I have ever been before... much of that stretching was a result of following so many excellent builds on this site... I really love epic builds and this was one for sure...
 -
 We have just approved the profiles for our two new sheets for the F4U-1a Corsair - just in time for the Tamiya 1:32 kit! We will also offer them in 1:48 and 1:72 for those interested! Here they are in no particular order: We'll post them on our site soon for pre-orders, Happy Modeling, Judy - Eagle Editions
 -
I have started work on the Tamiya A6m2b Zero. It is a superb kit and I have been spending the last several weeks studying resources and gathering materials. I purchased a copy of Aero Detail's Zero book. I have been spending a lot of time studying j-aircraft.com and a couple other parties have helped me out with some details. Particularly George from Arawasi provided me a few key photos of Zero's at Tainan airbase. Also Pat D a regular on Hyperscale sent me a ton of photos to help me out with radio details, or should I say non details. As I have found out the plane I am building was sans radio equipment. According to j-aircraft.com the radio equipment had not been fully integrated with the airframe to obtain good working reliability. As a result on land based planes the equipment was frequently deleted. The plane I am building in particular was recovered on Guadalcanal some years ago and it was determined it did not have radio equipment. Saburo Sakai also has stated this plane was not radio equipped. To help out with my build I purchased the Big Ed Pe set, masterbarers machine guns, and the Burna decal sheet. I started on the cockpit this weekend. I feel one area where the Tamiya Zero is a little plain is in the cockpit. The resources I have found show lots of raised rivets. So I have added some in areas likely to be visible especially in light of radio deletion. Also there are very prominent lightening holes in the double bulkhead behind the pilot. My plan was to reproduce the double bulkhead idea however I found the kit part had a wide enough flange to carefully drill relief holes. Now for a couple images. I am using archer resin rivet decals. If you slice close to the rivet line and use decal solvent they will form to any shape you want.
-
I've had quite a bit of spare building time while sorting out the AFV F-16, so I thought it would be best to put to some use on this project. Originally, the plan had been to do a sort of production line build on a number of Tamiya Spitfire kits at the same time. I figured I would have the paint out and it would just be easier to do them all at once. Castle Bromwich on my workbench. I was going to do an HF VII, FR IX in PRU Pink, an Mk IX as used in the Battle of Britain film, an RCAF FR IX,the PR XI and finally a XIV. I sort of came to my senses and decided that might be a bit too much at once. So I scaled back and am just doing the PR XI: I have two sets of the Ali Cat conversion set so don't worry, I have the correct decals. The MH434 build I'll start in the regulat WiP section. The first step I did was to start filling in most of the panel lines and all the rivet detail on the wings. I used Mr.Surfacer 500 and a small piece of brass as a putty knife to spread it out as best as I could. Here's after wet sanding off the excess. Fortunately, there were only a couple of places that needed a second coat.
-
Greetings everyone! This is a build that I started late last summer. My builds usually take a while due to family stuff and my own a.d.d. but this one is taking a little longer since we moved recently and the holidays. Anyhow, this will be my version of Tamiya's Supermarine Spitfire mk IXc. I originally intended to build it straight oob but that didn't last long. I've added a resin seat and cockpit upgrade as well as the cockpit door from Barracuda and will be dressing her in Eagle Cal decals. I'll be doing the Polish fighting team scheme in honor of my Polish wife! If my updates are a little slow please bear with me, I build slow. The Barracuda control column next to the kit part The Barracuda seat next to the kit part
-
Now available! http://www.zactomodels.com/ Lately I've been busy working on a wrong scale project (http://www.arcforums.com/forums/air/index.php?showtopic=268873) and haven't had time to make any new patterns. I did take the time to adapt my Tomcat fuel tank pylons (from my Trump intake set) to fit the Tamiya kit. You will need to drill locator holes and remove the existing locator pins on the intake parts. Tamiya got these in the wrong location. Cheers, Chris
-
This is another in my series of builds "Aircraft my Father Fixed". Up to now I've built mostly the aircraft my Father worked on while in Burma in the latter half of WWII while attached to 5 Squadron. Before that he was with 81 Squadron from their entry into Operation Torch at Gibraltar Oct '42 up until Sicily had been pacified in Oct-Nov1943 whereupon he was transferred to Cairo en-route to India and 5 Squadron. Funnily enough, 81 Squadron followed his his wake a couple of weeks later and ended up based 5 miles down the road in India, re-equipping with Spitfire VIII, hence why we have a Christmas dinner menu from 81 Sqn in 1943 in my father's effects. Anyway, back to Tunisia in the spring/summer of 1943. Up to that point, the squadron had been equipped with Spitfire Vb Trop and Vc Trop (hence my earlier abortive attempt to convert the Hobbyboss Vb Trop to a Vc Trop), however these were beginnign to be outmatched by the German aircraft. The Tropical filters used on the V series had an unfortunate side-effect of reducing overall performance of the engine. So in May '43 81 Sqn started receiving Spitfire IXs. At this point they were based in Tunisia at Souk-el-Khemis airfield and subsequently moved to other airfields in the general vicinity. From reading Alan Peart's book "From North Africa to the Arakan" you get to see that conditions on these airfields were basic to say the least. So I want to try to capture a snapshot of the activity of the groundcrew in these conditions in my diorama. Build thread viewable here So here are the photos of the finished build: Made it in time for the Farnborough club meet tomorrow! Phew!
- 19 replies
-
- 2
-
-
- Spitfire IXc
- Operation Torch
- (and 2 more)
-

1:32 Tamiya Spitfire IX, 81 Sqn, Tunisia, Summer 1943
KallistiUK posted a topic in Works in Progress
Hi all, back again after a bit of a hiatus on this board as I've not been building LSP but Routemaster buses and Gerry Anderson models the last few months However, just before Xmas I began the next stage in my series of builds of "Aircraft my Father Fixed". Up to now I've built mostly the aircraft my Father worked on while in Burma in the latter half of WWII while attached to 5 Squadron. So far thats been a Hurricane IIc in 1:32 along with 2 P47 D Thunderbolts in bubbletop and razorback configurations in 1:48 (hence why they havn't appeared here!) I did begin a conversion of the Hobbyboss Spitfire Vb Trop to a Vc Trop using Grey Matter Figures resin wings, but managed to ruin them beyond recovery so gave that up earlier in the year. Before 5 Sqn in Burma, my Dad was with 81 Squadron from their entry into Operation Torch at Gibraltar Oct '42 up until Sicily had been pacified in Oct-Nov1943 whereupon he was transferred to Cairo en-route to India and 5 Squadron. Funnily enough, 81 Squadron followed his his wake a couple of weeks later and ended up based 5 miles down the road in India, re-equipping with Spitfire VIII, hence why I have a Christmas dinner menu from 81 Sqn in 1943: Anyway, back to Tunisia in the spring/summer of 1943. Up to that point, the squadron had been equipped with Spitfire Vb Trop and Vc Trop (hence my earlier abortive attempt to convert the Hobbyboss Vb Trop to a Vc Trop), however these were beginnign to be outmatched by the German aircraft. The Tropical filters used on the V series had an unfortunate side-effect of reducing overall performance of the engine. So in May '43 81 Sqn started receiving Spitfire IXs. At this point they were based in Tunisia at Souk-el-Khemis airfield and subsequently moved to other airfields in the general vicinity. From reading Alan Peart's book "From North Africa to the Arakan" you get to see that conditions on these airfields were basic to say the least. So I want to try to capture a snapshot of the activity of the groundcrew in these conditions in my diorama. So to begin with, the model - you've all seen plenty of sprue shots so I won't bother here, but at least here is the box: For the base I'm using a 300x300 wooden base supplied by one of my IPMS Farnborough colleagues from his website: http://www.ema-heritage.com/displaybases.html That should give enough space for the aircraft and some activity around it. Speaking of which, the donor kits for figures, materials etc include this lot: Yes I know there is 1:35 scale figures in there but my Dad was only 5' 5" tall, so they'll be okay On th eleft you can see some of the ValueGear stuff that I used in my Hurricane diorama earlier in the year. This stuff is superb, huge variety and excellent casting and detail. I picked up a set of crates as well which you can see in the glass ashtray in the top left. Above that is the IconAir accumulator trolley I built originally for the Hobbyboss build. I've added a small engine on the top of it to represent the generator that was fitted to many of them. This was sourced from the US Maintenance Yard kit from the compressor you can see at the bottom right of the box top picture. For the Spitfire I've got a collection of Decals for the inside and outside that will allow me to represent EN204 FL-L: (from the Osprey book "Spitfire Aces of North Africa and Italy) Note how the original "E" lettering has been badly overpainted to turn it into a "L" Here are the decals I'll use: There is a huge amount of aftermarket stuff for this kit and here is a selection of what I may or may not be using: There are wheels, seat, large cannon wing covers, cockpit door with seperate crowbar (not to be painted red!!), Cockpit upgrade set, cockpit stbd sidewall, "cloth" seatbelts PE Toolbox by Aber (just like the one I have in the Hurricane dio) and finally the PE set for the Hobbyboss Vb, but which contains some very useful bits for this build, eg the PE radio hatch door which will be used elsewhere on this build!- 27 replies
-
- 2
-
-
- Spitfire IXc
- Operation Torch
- (and 4 more)