

Midnightwrecking
-
Posts
65 -
Joined
-
Last visited
Content Type
Profiles
Forums
Events
Posts posted by Midnightwrecking
-
-
-
Thank you Quang, the offender has been suitably chastised! Thank you all for your comments!
-
Great job on a sobering piece of history. Makes you wonder why they bothered painting the stripes in the first place. My wife's uncle was killed at night while training, may or may not have been hit by a night fighter, details have remained sketchy.
-
-
Sometimes a project just has to simmer for a while!

-
-
Hi Chuck,
I feel your pain. When it comes to reworking surface details, I find that it's many times easier to remove the raised lines and rivets of an older kit (for example Hasegawa's stable of LS jets from the late 1970s like the Skyhawk, Freedom Fighter, and Starfighter) compared to filling the oftentimes unsatisfactory or inaccurate features on a modern engraved kit.
In theory, it should be easy to fill recessed lines and fasteners: fill 'em up with your medium of choice, let dry, and sand flush, creating a "blank slate" on which to work.
In reality, it's seldom so effortless.
The inevitable long term shrinkage from any solvent based filler (which might not reveal itself for weeks or even months) is one cause for frustration. Another is surface tension which, along with other microscopic processes, resists a putty/filler's ability to thoroughly permeate and "wet" small depressions. Too often pores are only "covered over," instead of filled, resulting in their reemergence after sanding back the surface.
Just ask anyone who has attempted the Sisyphean task of filling and "smoothing out" the wing of a Tamiya P-51D. For every success story, I'll bet at least a dozen modelers would admit to failure, at least on the first attempt (and I'm one of them!).
Here's an approach that works for me. Though I confess to not having tried it over an entire model, it's proved very effective for parts of my long-drawn-out Electric Intruder build (so long running I'm tempted to rename its build thread "Plight of the Intruder").
The technique involves the use of a scribing tool, stretched sprue and cyanoacrylate glue.
To illustrate, here's a look at the outside surface of the RH jet air intake of the Trumpeter A-6. Note the four rows of engraved fasteners (intended to depict permanent structural rivet heads, in this case).
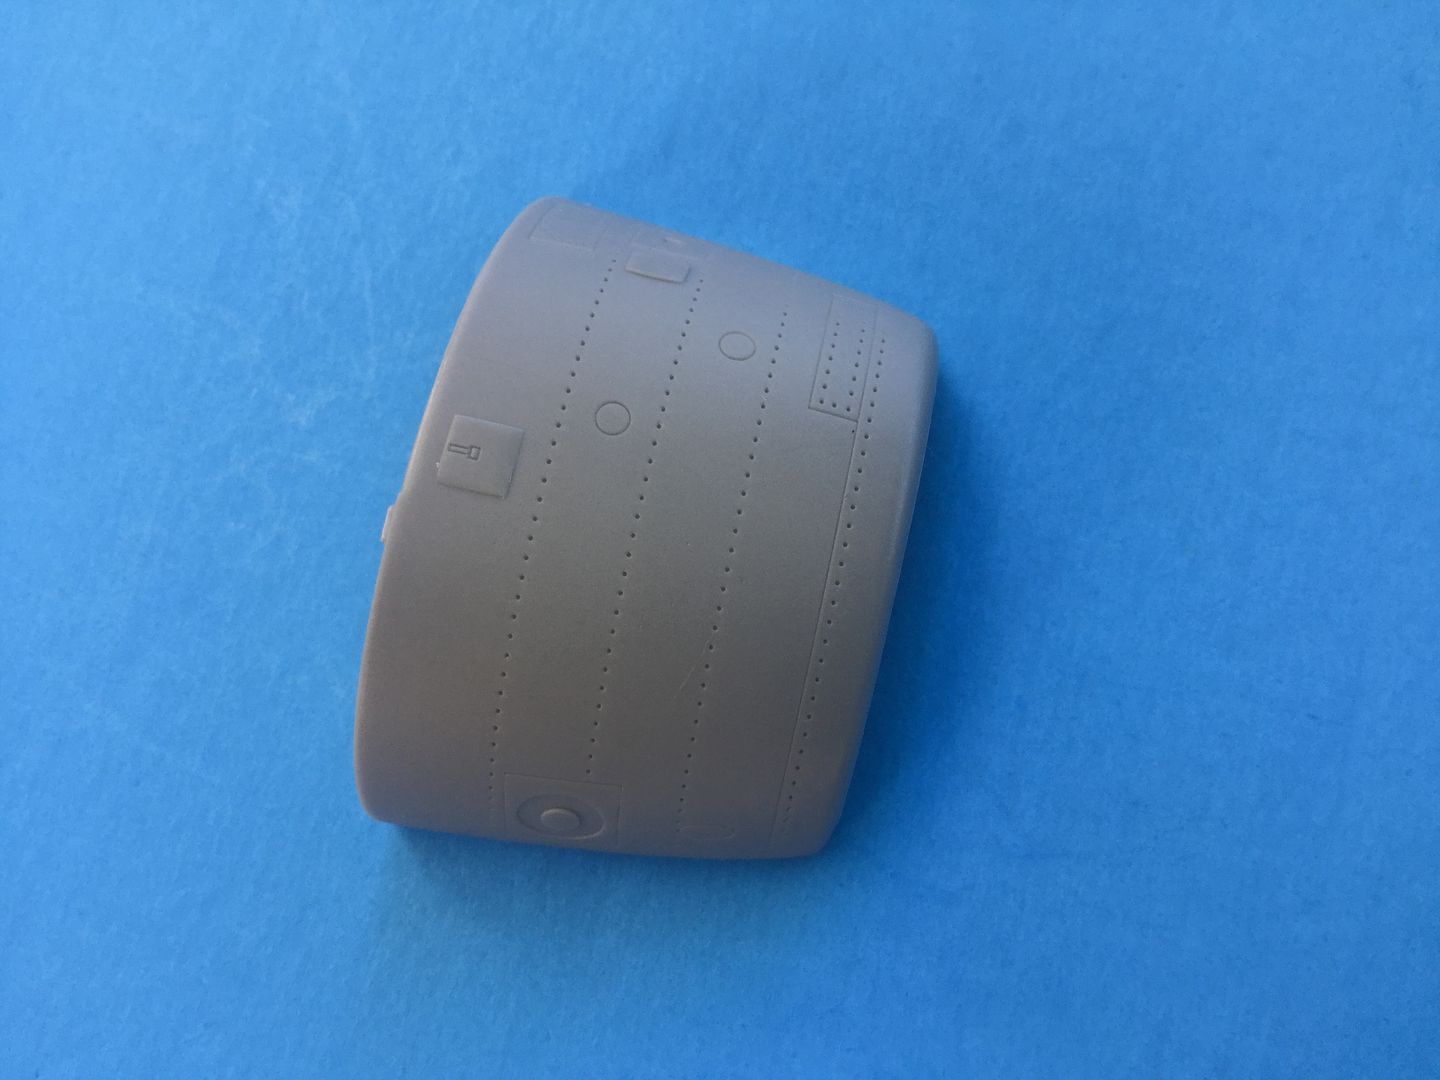
Photos of the real aircraft reveal a different look. The only fasteners visible are the screws for removable panels. The pattern of flush structural riveting, so prominently portrayed by Trumpeter, is practically invisible, even up-close at high resolution.
I decided to fill all of the kit engravings and start fresh. First, I ran my scriber along each row of rivets, the "dot-to-dot" treatment creating one long groove in the end. A length of stretched sprue is laid into each channel and secured in place with cyanoacrylate glue (medium or high viscosity types work best). Here, I would caution against the use of solvent cements like Tamiya Extra Thin to avoid that "sinking feeling" weeks later.
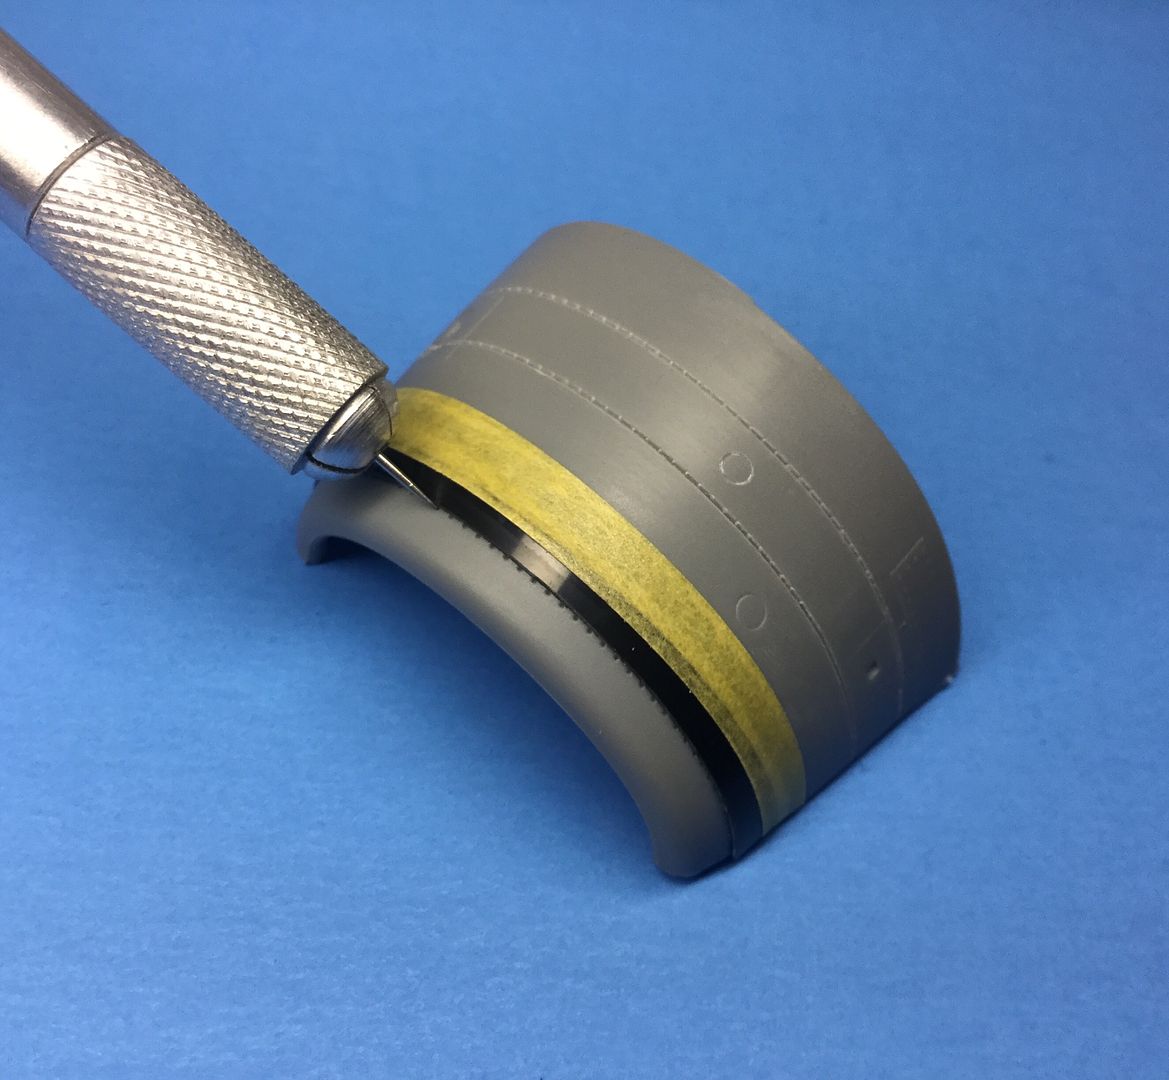
When the glue drys, everything is block sanded flush. I recommend the use of hard-backed sanders, at least in the early stages of dressing a seam treated with CA glue.
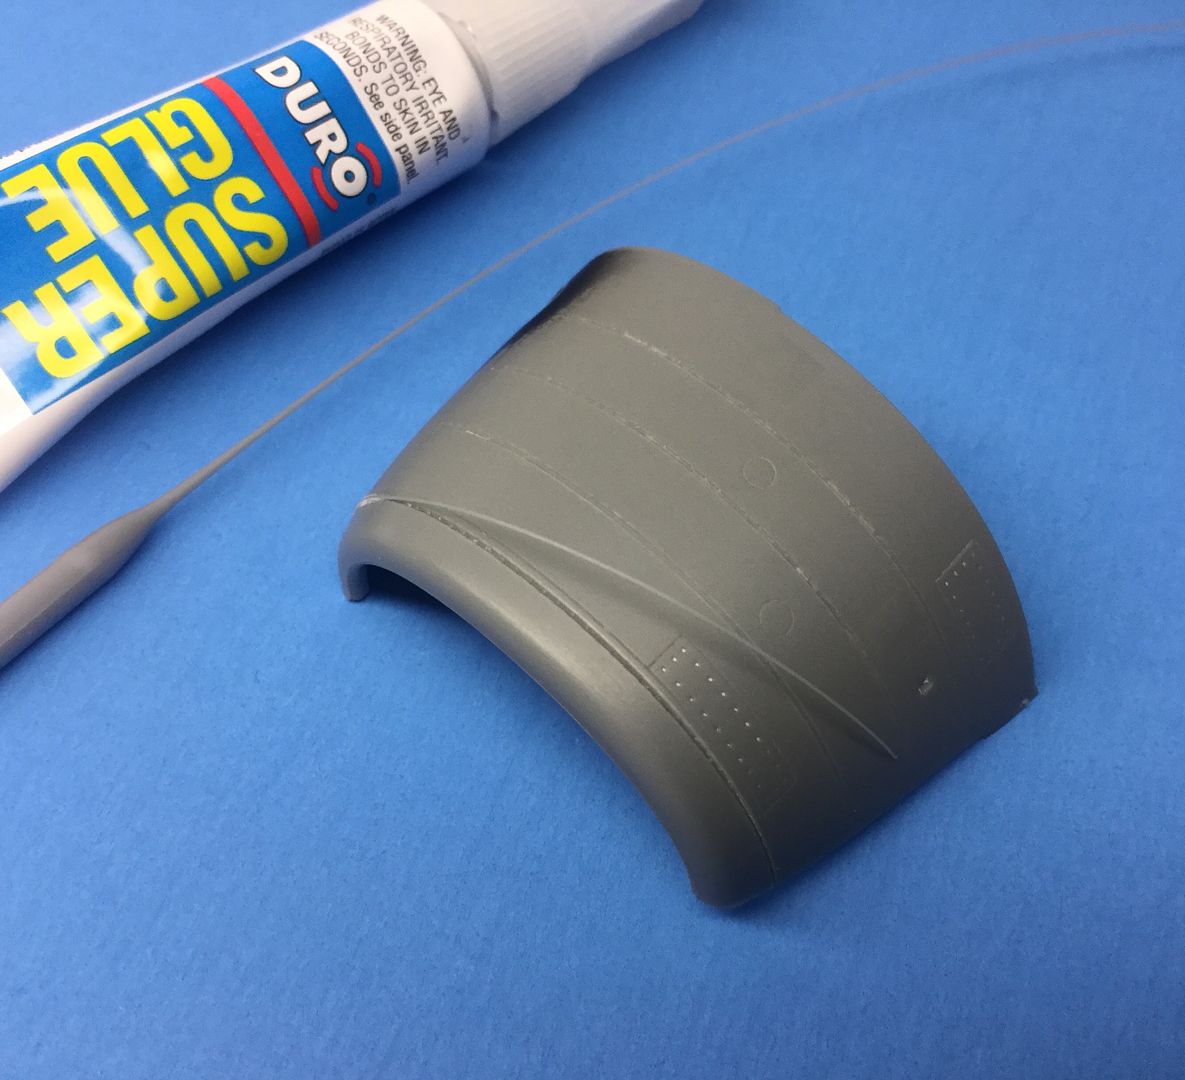
While it might seem (seam?) too labor-intensive a process, I can happily report that this technique seldom requires any do-overs (unlike most other methods, for reasons already mentioned). And it's as good a surface as any for re-scribing detail.
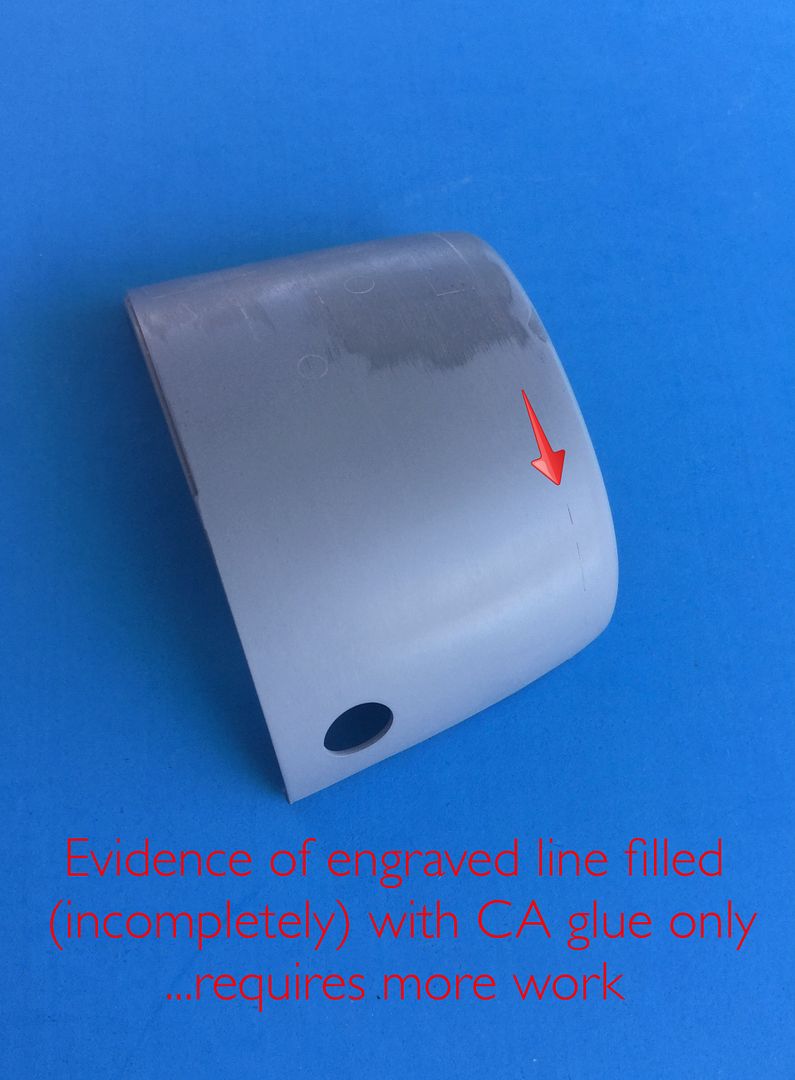
Here's a look at the part after seam treatment and a light coat of primer paint - the only blemish requiring touch up is a panel line that I originally addressed with a "conventional" technique of CA glue only (no initial widening of the trench or insertion of stretched sprue)...lesson learned!
Hope this helps.
Rich
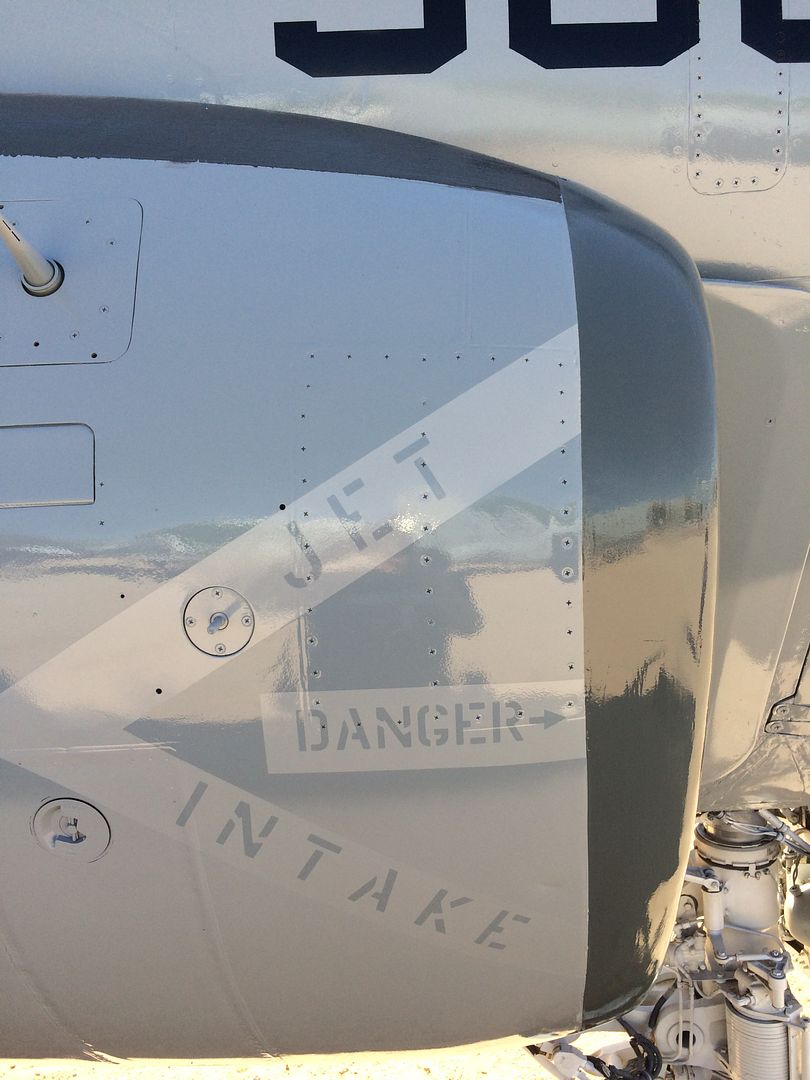
These are great shots. It shows that the aircraft was finished in a coat of thick heavy paint that has filled in almost all the surface imperfections leaving only panels etc. that are necessary for maintenance. You can even see by the sheen that it is not a smooth surface either! Something to remember when critiquing someone's painting skills.
-
I think this is a great choice for a B-17 build. It should be lots of fun replicating all of the many weathering and paint details on this aircraft.
-
I think that it is too well done for a normal earthling nine year old. I think you may have an extraterrestrial living with you, better check out his DNA!
-
Hey Jerry, before you carry on further I have to say that the sculptor completely botched her left arm. You try and hold a box with your arm and wrist in that position and you will see how awkward it is. You will want to hold the box lower with your arm and hand against it with your fingers underneath it.
-
-
I think that if you put that into a well done diorama you would have people taking a second look to decide if real or not.
-
Great work! I was able to do mine all buttoned up so I could avoid all but the cockpit.
-
I had some old Trumpeter kits lying around, so... Some shots of what is left of a Mig 15. I did this mini-dio as a game piece so I put it here. I used the wings for another piece which I will also post later.


- Stevepd, alain11, mywifehatesmodels and 5 others
-
 8
8
-
Clever idea and very well executed!

-
Absolutely fantasmagorical, but, it needs Orks!

-
418, if I remember my history 418 was an intruder squadron, bouncing around the night skies of Europe without radar! Great job on this. Lots of stuff in this kit that I had to scratch build for the Airfix 1/24 kit.
-
-
Epic, again the pics really top it off!
-
Great, topped off with excellent photos!
-
-
-
M' thank you for the plaudits! It is just my way of relaxing. The rounds are de-mil .22 shorts. I never make anything if I can find something lying around that will do the job.
The motive power, red makes it go faster!


Next up is the tender for water and what passes as fuel. As you can imagine it will be a very dangerous work environment!

-
I have an Airfix mossie project in mind but it is fermenting, meanwhile, relaxing with some railroading:
I bashed this together from bits, pieces and stuff found lying around. It protects the Ork and Western Railroad from all manner of threats, real or imagined.


- tucohoward and Vandy 1 VX 4
-
2


Piper Super Cub floatplane (PA-18-150) "Popeye"
in Ready for Inspection
Posted
This is a beautiful, clean replica. The control details really sets it off!