Search the Community
Showing results for tags 'hasegawa'.
-
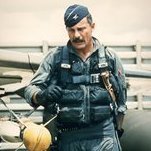
 Greetings all Here is my latest offering of a Ju87D-8(N) E8+HH that was operated by 1./NSGr.9 during the second quarter of 1944 near Florence, Italy. It was lost in action on 7th July 1944. The final camo pattern and colours are a bit of a departure from the kit call-outs, but the rationale behind the decisions because of actual photographic evidence can be found on the build article. 1/32 Hasegawa JU87D-8 kit Aires cockpit AIMS AB500 bomblet containers plus some flash hiders I poached from one of my AIMS Bf110 detail sets and an antenna isolator HGW seatbelts SB cannon barrels and pitot tube Quickboost Type A exhausts Quickboost Spinner and VDM blades Profimodeller detail set for airbrake hinges and underside bomb release Master Mg81Z barrels for the observer position Nice build overall, great having a big Stuka in the collection now!! Real bird is the 2nd aircraft of the image underneath...
- 26 replies
-
- 45
-

-
- junkers
- ju87d-8(n)
- (and 11 more)
-
 So thanks to Tolga and William first of all for piquing my interest in Hellcats after my wife stumbled on one at a a local market, where you can normally buy food, clothes, and whatnot, except model kits. Well, this seller was an exception apparently and for a very modest price (my wife is a great negotiator!) she took it home. Although the kit is a limited edition with 3 Minsi's, it's the same plastic that's probably older than I am. I was intrigued about kitbashing it with a Trumpeter Garfield Hellcat, and so happend to stumble on one at a second hand site here. edit: Williams excellent build is here: And for future reference, as at this moment it's on the same page, but it may not always remain so, here's Tolga's: If there's any other cool Hellcat related thread here, I can always add them of course. So, with a gazillion half-baked projects on the shelf, here I am starting another that will probably end up being half baked as well after I get the main kitbash done, but we'll see about that later. If it helps a bit for other to try it as well... why not? So with both Hellcatkits (speak that aloud a few times!) in hand, i removed the Hasegawa fuselage & Trumpeter lower/upper wing parts from their sprues and started thinking about the easiest way. The Trumpeter kit has wings that mate to the fuselage directly, following it's (bloated) shape, while the Hasegawa as moulded fillets to which the upper wings are glued. The bloated Trumpeter is actually about the size of the fillets wider, so I figured why not cut the Trumpeter upper wing parts straight & be done with it? That seemed, at first, like a workable idea; taped the shape up & if I were to cut along the tape it might work, as evidenced by sliding the part underneath the fillet. Of course things are never that easy, and I was glad (or not!) I tried to fit the lower part as well, before hacking up parts. Remember measure twice, cut once? I discovered 2 insteresting things: the Trumpeter lower wing part, despite the bloated fuselage, is an almost dead-on fit both in curves & length. However, somewhat to my dismay, the at the rear, the Trumpeter wing sits much lower than on the Hasegawa as seen here: Figured there were roughly 2 options (actually 3, leave both models alone & abandon the attempt...) : 1. cut the Hasegawa fillets off (as Willam did on his build as far as I could see), and build up the gap with Evergreen, adapt the upper wing to the Hasegawa fuselage 2. cut the lower wing about 75% off the Trumpeter part, and bend upward to match the Hasegawa fillet. i'm not sure which kit is correct, but looking at the curves & bends of option 2 I went with 1. Of course there'll be someone pointing out the wing will sit too low now... but when I started it my mindset was to make the best of 2 not-so-great kits and live with some shortcuts or inaccuracies. There, I said it So, option 1 it was; I used a Tamiya scriber to carefully get rid of the fillets, some cutting and sawing, until they were off: and, the moment of truth.... as expected, gaps, but I think I these can be closed with Evergreen, and as the Hellcat fuselage had some sort of ridge/fillet where the wings sits, I that may help too. This also needs some adressing with Evergreen: Of course I don't have the required thicknesses of Evergreen, so I'll need a visit to the local shop first before I can attempt to close those gaps up. I've got some other models in the works too, so I might even pause this one until one of those is finished before picking it up again, but hopefully it might help others out with some practical tips & guides. If anyone has some additional tips or info it's welcome as well, after all, I'm just meddling along Another hurdle is that the Trumpeter decals are very inaccurate, but my Hasegawa box has The Minsi, Minsi II and III -historically very significant aircraft, but with wings folded I want something with more markings on the wings, nose and tail -on the Hellcat the fuselage is pretty much invisible. (hence the ? in the title, not sure if I'll do an F6F-3 or F6F-5 yet).
- 18 replies
-
- 15
-
-
Got room for another Warhawk in this group build? This one is a training group P-40N with "Parrot head" art. No this has nothing to do with Jimmy Buffet...but I do like his music BTW. I will try to finish on time and to do that will have to try and avoid AMS disease... Dang it I'm a month late starting too.... Perhaps I will play some Jimmy Buffet while I build eh? "Cheeseburgers in paradise!....."
- 76 replies
-
- 15
-
-
Hi guys. This is my first topic here. I've been watching this forum for a long time, but I don't build large-scale models. I prefer 1/72 for aviation and 1/35 for vehicles. I was inspired by the work of the Fw-190 A8/R8 by Sasha As. It won't be fast, but I hope you enjoy it. I have this build kit. And I got guns by Master. But I want to build A3's variant in Tamiya's kit 61037 First I installed the wheels bay. I cut the plastic incorrectly and cracks formed. I will remove them later. It was also difficult to install the bay in the center. I was upset when I found a stumps on the cockpit floor for his legs. So I made elements that, in general terms, repeated the original. I will install leg bindings after painting. Eduard's photoetch is often flat in cases where it is not. I made a handle instead of a flat piece. Engines are always my headache. Only if you are building a large scale model you are not be cut with a scalpel and your desk will not be covered in your blood when you remove the pushers of cylinders. I had made the pushers out of copper wire. My set is A4, but I want A3, so I had made new panels with holes.
-
Greetings all I've always enjoyed the Stuka since I was a kid, so had it in the back of my mind to build a night attack version using the Owl markings. Managed to get hold of a Hasegawa G-2 (with Mater barrels) that I was going to convert into in D-8, but then as luck would would have it, I found a D-8 on an auction that fit the bill perfectly. So.....I suppose I will eventually get to building the night G-2, but this D-8 comes first. So below is the version of the D-8 I was going to build, however, the kit markings and camo scheme are way more appealing to me. So there we go. I'll be building that specific version as on the box art. The G-2 version I'll do at a later stage with the Owl markings... As you can see from the above pics, I've the Aires interior set, Eduard masks and HGW belts for it. On the way is a Quickboost spinner and blade set, as well as a Yahu IP Cheers Iain
- 137 replies
-
- 13
-
-
This is the oldish Hasegawa 1/72 kit. Despite being nearly 50 years old, the kit is surprisingly decent, with fine engraved lines and good decals, this boxing I think is 1992. It does lack cockpit detail and the decals are incorrect in this boxing for Scott's P-40E. Supplied is a serial number for the tail, which despite being incorrect, this aircraft had no serial painted on it and it lacks the white 7 for the rear fuselage (this came from the spares box). The 2014 dual boxing of the kit corrects these errors. A quick look online sees not very many 1/72 P-40E's available so for it's simple buildability and being fairly easy to come across, it's still up there with the best in scale for it's type. I rather hope Airfix might continue their P-40 line.
- 3 replies
-
- 12
-
-
- hasegawa
- flying tigers
- (and 1 more)
-
This is the older Hasegawa Mk Vb in 1/48 that was issued with Russian markings. The fit is pretty decent as you might expect from Hasegawa, the only issue being some warp in the wing to fuselage fit on one side, requiring me to put some spacers in. Once this is done the fit is almost perfect. Decals however were a little difficult to work with, they silvered on me despite being almost melted into the gloss surface. If I were to build this again I'd go for aftermarket. I did use some colour etch seatbelts from Eduard that really make the cockpit look nice. I knocked up a little base for it to sit on using tile grout for the soil and various grass tufts put into some longer grass mat that was pulled apart a little and then glued onto the surface with white glue. Some accessories were added to the base from the spares box and although I don't have any Russian pilots or ground crew, I will rectify that this week and put them on the base too.
-
Hello all, First off, I want to say that I have been browsing here for a few months as I am dipping my toes into 1/32 scale. There are so many amazing resources, builds, and craftsmanship here. I decided to join in on the fun. I recently bought Hasegawa's FW-190D late version which has the larger TA-152 style tail. I could not resist the elegant look of the box art and decided to buy it. I think it is pretty well known that the molding and fit is pretty good so I will skip all the "box opening" sprue pictures. I know that it is well known that the kit has a few shape issues. As this is my first dive into 1/32, I am going to keep it relatively simple. I am just going to be building it as is with the exception of some scratch built detail, Eduard masks for the canopy, 1man army masks, and some aftermarket seatbelts. First off, one detail I decided to add are the cowl flap actuators. To do this I first cut off some very small pieces of styrene rod. Next, I drill out holes in the cowl flaps for the styrene rods to sit in. I then take some Tamiya Extra Thin and place some in the holes, then place in my piece of styrene. After every piece I did a quick dry test fit to make sure the rods sat where I wanted at a correct angle while the glue dried. I found a few had to be longer than others. And the final result! I think it adds some visual interest to the cowl area, especially in this scale. It may not be 100% accurate as far as the arms go, but I think it is better than having nothing there! Thanks, and more to come.
- 135 replies
-
- 18
-
-
Hello all, Here is my recent Hasegawa/Revell/Hobby 2000 Fw-190 D9 This particular kit is the Revell edition, which comes in a slightly softer plastic the Hasegawa version but still retains the good detail and fit that the original version did....so, no complaints there. This aircraft 'Yellow 10' was Piloted by Major Franz Gotz and was based in Flensburg, Germany in May 1945 and assigned to Stab JG26. All paints used were Gunze Mr Colour and i did most of the markings with masks which saves quite a lot of hassles trying to flatten the decals with the 'ole gloss-sand-gloss-sand routine. The cockpit was done using the Red Fox Studio set to add a better look....not that you can see too much of it but adds to the overall look. As ever, all critique taken and any question are also welcome
- 13 replies
-
- 37
-
-

-

-
- mr colour
- hobby 2000
- (and 2 more)
-
Hi everyone! Well, here it is. Finally completed! Hasegawa's 1/32 kit of the P-47D Thunderbolt, depicting Captain Neil Stanley's Daddy RABBIT. The majority of the details were scratch built with the only aftermarket additions being a resin seat from Avionix and wheels from Eduard. This was my first attempt at a natural metal finish and for this I applied a variation of the black basing technique where the black was substituted with silver and the mottling was done with grey instead of the camouflage colours. Weathering was quite extensive was done mostly with oils while inks were used for the exhaust stains. Quite happy with the final result and I can now feel more confident in tackling another natural metal finish!
- 13 replies
-
- 20
-
-

-
- hasegawa
- p-47 thunderbolt
- (and 6 more)
-
Hello everyone! Back with another project and first for 2023. This time I will be tackling Hasegawa's 1/32 scale kit of the P-47D Thunderbolt, bubbletop version, and will depict Glenn T. Eagleston's aircraft. I will also be using the following aftermarket sets: Avionix resin cockpit Quickboost resin engine Eduard resin wheels I'm aware of the kit's misalignment issues around the cowling and Rick Kranias kindly pointed me to his detailed post on how to fix this. Quickboost provides a separate mounting for the engine which requires some surgery on the kit. Has anyone used this set and, if yes, did it it fix the issue? Hasegawa's kits are known for their good quality and accurately shaped moldings and are usually sold at a reasonable cost by keeping some details simple such as the surface details. So, that's how I decided to start the project. By riveting the whole airframe with the help of a Rosie the Riveter wheel. The riveting pattern is by no means an exact replica of the real thing but rather it follows the general plan with the aim to make the whole fuselage look more busy.
- 127 replies
-
- 32
-
-
- eaglecals
- daddy rabbit
- (and 10 more)
-
Here is my recently completed 1/32 Hasegawa Fw 190D-9 build of the JV44 Dora flown by Heinz Sachsenberg known as "Red 1". In addition to the kit parts, I've added the following aftermarket items to the build: 1. Aires 190D-9 resin cockpit set 2. Eduard 190D-9 brass flaps 3. Quickboost 190A gun barrels 4. Eagle Editions 190A/190D-9 Early resin tail wheel 5. Henri Daehne VS111 resin prop 6. HGW 1/32 Luftwaffe seat belts 7. Montex Masks 8. Eagle Cal decals
- 62 replies
-
- 31
-
-
-
In with this entry! Captain Hideaki Inayama was flying this striking Ki-44 in the 87th Sentai that was part of the 10th Hikodan of the Japanese home islands’ Eastern Defense Sector. He was credited with 5+ victories (Osprey’s Japanese Army Air Force Aces 1937-1945). This is the very nice Hasegawa kit, which is a nicely detailed yet simple kit. I intend to build essentially straight from the box. Some references: The aircraft in question: The link with this GB is that this aircraft has the number 25, hand painted, on its main gear covers. Stay tuned! Alain
-
 Hello, all! I decided to actually post a WIP thread for this one, for a couple reasons. First, I was lazy on my Fw 190A builds and didn't really document everything in photos as I went. My computer is slow and it's a hassle sometimes, so I use that as an excuse, but I also need the inspiration of my fellow modelers and that's probably going to be even more important for this build, given the subject at hand. This is one of those planes that, as soon as I saw photos of it, I knew I had to do it. To top it off, I'm trying to round out my 1/32 Focke Wulf lineup and I don't currently have a Dora in the collection. I built the old Revell 1/32 kit when I was young and a few Trimaster/Pro Modeler and Tamiyas in 1/48 scale, but nothing else in the LSP department. I also thought about posting this build in the Air Superiority GB, but there is only about two months left and I'm not sure if I want to put that time crunch into this one (and I might decide to do a quick build of the N1K2 Shiden for the Navy GB, instead!), as I still have a ton of experimentation and testing to do with the late war Luftwaffe colors from a couple of different paint manufacturers. As I explained in my 190A-5 RFI thread, I've recently changed paints (both by brand and by going from mostly enamel to acrylic lacquers). So, I have acquired a good spread from MRP, AK Interactive and Gunze. If need be, I still have some Model Master enamels as backups, but judging by my recent experiences with the other brands I just named, I don't think I'll be needing the MM paints any longer! So, first off, here's what I have to work with, for starters. I will also be using some Montex masks from other sets and may purchase some more, if needed. My daughter also has a Cricut, so I may take a stab at making my own masks, but we'll see. I paid for half of it, so hopefully she can teach me how to run the thing! We have the Hasegawa kit, Eagle Cals decals, Aber barrels for the 13mm nose guns, HGW belts and bits, as well as Quickboost cowl front, late gun cover, exhausts and intake scoop. This kit also came with the small Dragon PE set, which may not be perfect, but I think it will still be an improvement, especially for the cockpit. Now, for the subject. This plane is typically labeled as "Black 3" and there is quite a bit of discussion on the net about what it is/isn't, specifically in how it was painted, but also on it's Werk Number. I know there are experts who have stated their opinions and their reasoning, which seems sound, for the most part. However, as these things usually go, there's certainly some room for interpretation and to add to that, it seems that more photos have become available more recently that answer some questions, but also create more, at the same time. My goal here isn't to determine the definitive final word on what any of that should be. I would rather use input and comparison by others to come up with something I'm comfortable with and in the end it has to fit the way I think it should look, being that I'll be the one looking at it everyday. I'm sure not everyone will agree on all the points of this build, but it's for the fun of it, the hobby and the discussion along the way. As stated, two points of concern for me are the Werk Number and the paint scheme. I'm seeing the number differently as some experts. Maybe it's just my eyes, or the photo I'm looking at to come to that conclusion. The same can be said for some of the colors. I also understand factory paint schemes and official orders, etc. Those aren't necessarily absolutes, however, especially when you're talking late war Luftwaffe. The other issue is that the available photos appear to be taken with several different cameras/film and in varying weather conditions. Many of the photos have a very washed out appearance and others quite dark. What appears to be a clear color line on the plane's belly in one photo (suggesting perhaps bare metal/RLM75 or similar combo) cannot be seen at all in other photos and may just be shadow. The biggest question, however, may be "Was it actually Black 3, or Blue 3?". According to one discussion I saw, the back of one of the veteran photos says "Blue 3". We'll get more into all of this later. For now, here are the pics I have (posting under fair use. I found them on the web and I'm not using this for any financial gain. Quite the opposite, actually!) Hoping to get started on the cockpit in the next day or so and will post pics as soon as I see some progress. Until then, let the discussion begin! John
 -
This is a comparison of the new Revell Fw 190F-8 against the Hasegawa Fw 190F-8 so folks can decide which kit they prefer. Anything questionable was checked against photographs and other information to determine which kit (if either) got it right. Obviously, the full engine and separate control surfaces of the Revell kit are big plusses. And, the low price of the Revell kit in the US makes it hard to pass up. But, not everyone builds their models with everything hanging open. And, elsewhere in the world, the new Revell kit costs almost as much as the Hasegawa. This is not intended to be an in-depth scrutiny of either kit's accuracy. Rather, it is a direct comparison from a modeler's standpoint in an effort to clear up some of the myths, misconceptions and hype already associated with this new kit. Also, these were just the things that I was looking at. Your mileage may differ. If so, please feel free to document it and share it here. The Hasegawa kit's overall accuracy is widely reputed to be quite good, with the notable exceptions of prop, spinner and late upper fuselage gun cover shapes (along with some other, minor things). This is why the Hasegawa kit was chosen as the baseline for checking out the new Revell kit. Overall engineering, shapes and sizes are very similar between the two kits - almost to the point of the parts being interchangeable. Almost. The following images are being posted merely to illustrate the differences between the two kits so that the buyer can make up his/her own mind. Starting at the front: Updated spinner information HERE. Four more posts to come as the spam filter allows...
- 177 replies
-
- 14
-
-
Hi all After lurking in the shadows, I've eventually got my act together and am starting a post regarding my first build here on LSP . I've built quite a few kits, but this one is going to be my first in the public domain.....I know that there is an "In the Navy" GB going on, but I'm not sure I'll make the deadline for that GB, so didn't post this there. It's going to be a kitbash of the Hasegawa and Trumpeter Hellcats - if it goes that far - but my plan is to use the Hasegawa fuselage mated to the Trumpeter wings, as both kits IMO have their good and bad points. I've got a fair bit of AM to throw at it, and I know there will be some scratch-building required as well.... My overall problem with the Trumpeter kit is the fuselage - it looks way too blown and rounded, it should be more slab-sided, and the Hasegawa fuselage is way better (not perfect) in that respect! I do however like the Trumpy wings more than the Hasegawa offering (sans the Trumpeter mad riveter offering which will have to be addressed), hence foray into a kitbash. If it will turn out that way we'll have to see, I might end up doing a full Hasegawa if it's going to cause to many issues. But I do enjoy a challenge.....(ask my Revell Ju88C-6...it lived - many times it came close to doing a first and final flight into a wall) Here's pictures of the Trumpeter vs Hasegawa fuselages and cowls - you can see how bloated the Trump kit is... Trumpeter left, Hasegawa right. Hasegawa is not perfect, but it's a lot better!! Hasegawa Left, Trumpeter right. The Hasegawa cowl is WAY better than the Trumpeter. Might have to work on the chin and grin a bit, but I'll have a look once I've checked it against my cross-sections and references. So here we go. Hopefully I'll remember to take pictures as I go along If anyone has sage advice, please chip in!! Iain
- 13 replies
-
- 15
-
-
Greetings fellow modelers: After building a few 1/48 scale kits, I'm back to take a crack at another 1/32 Dora. I've decided on White 12, Wk Nr. 500408 from 5./JG 301. Here's some nice artwork from IBG's new 1/72 release. I tend to gravitate to the Mimetall camo schemes for some reason. I'll be using the Hasegawa ST-19 kit with a number of aftermarket items for the build. The aftermarket goodies include: Aires cockpit upgrade HGW riveting set Eagle cals #32-61 HGW seatbelts Yahu instrument panel One man army stencils Synthetic ordnance works landing gear Quickboost Exhaust Eduard canopy masks Quickboost gun barrels Master metal gun barrels Barracuda wheels Eduard exterior detail set I wanted to use a Henri Daehne spinner and prop kit, but unfortunately Henri has shut down his shop in Germany for good due to the economic situation. I'll have to make do with the kit prop and spinner. Mr. Color lacquers along with Tamiya acrylics will be the main paints used. Here are some photos of the front office, which is now complete. I've also completed the engine plug with some extra plumbing and wiring. Starting on next steps to close up the fuselage. Thanks for looking. Comments and critiques are always welcome.
- 29 replies
-
- 24
-
-
1/32 Hasegawa Mitsubishi A6M5 Zero Type 52 "Night Fighter"
IainM posted a topic in Works in Progress
Next build is this Hasegawa A6M5 Type 52 Zero Night Fighter (Kit no 08252). This kit will be built mostly OOB, with a few AM enhancements, and I will be using the kit decals to cut masks from for painting. (Scheme as per the box art) The aircraft will be built with a closed canopy - to show off the 20mm cannon that was installed in the rear part of the cockpit fuselage decking. Having an open canopy would hide the defining part of this aircraft - so I will not be going to town on the cockpit - it will be built OOB with nothing extra than some HGW belts. I have a HGW rivet set to throw at it, as well as Master brass barrels and Eduard wheels and CMK Bay doors. I also have an Eduard exterior detail that I bought for my Tamiya Zero (built) but never used it. Thought I might use it on this kit, but some measuring, looking at fit, etc later. I've decided against it as the design of this Tamiya-specific AM wouldn't work well. So the wheels wells remain as they are, and the flaps will remain up! The gear wells will do, perhaps a line or two will be added. So far I've snipped the major parts off the sprues, and completed the assembly work on some sub-assemblies. Most of it is only dry fitted at the moment, but parts like the cockpit assemblies are ready for paint Fuselage halves are only dry-fitted together, as well as the engine. It seems to go together pretty well!! I've drilled out the holes in the cylinders for the ignition wires, etc I made rivets on the rear cockpit decking, this was missing on the kit, but quite prominent on the real a/c. Will have to redo some of them methinks once I glue it all together The kit gear legs with the Eduard wheels and CMK doors. CMK only provides two support struts between the doors and the legs, should be three, so I'll have to SB another one, but that shouldn't take too long at all!- 30 replies
-
- 18
-
-
Just completed this one for the "Turning Japanese" GB, which was an absolute blast to participate in. The Hasegawa kit is excellent, overall, with outstanding fit and good detail. However, I added a few things to the kit, as well. The additions/modifications were... * Yahu Instrument Panel. * HGW seatbelts. * Master brass cannon barrels. * Wires, hoses, etc. added to the cockpit. * Added sparkplug wires and hoses to engine. * Riveted the entire airframe. * Most markings masked and painted. National Insignia masks from Dead Designs and tail/fuselage number masks were made on a Cricut, using the kit's decal sheet as a guide and cut from Tamiya's Kabuki tape paper. *Antenna wire made from EZ-Line. *Probably plenty of other little bits that I'm forgetting (noticed that I forgot to add the landing gear indicators to the tops of the wings, but I'll get to that!) Paints used were mostly Gunze/Mr. Hobby, with a few from Tamiya, MRP and AK interactive. I also used some of AK's Engine oil and Pigment Fixer (for pastel dirt/dust). The photos were difficult, since I'm currently snowed in and would usually be doing outdoor, forced perspective shots. I had to take them in my shop with LED lighting, which is pretty horrible for photography and made capturing the colors extremely difficult. There is a lot of glare that I couldn't quite get rid of. The plane appears much brighter in most of the photos than it appears in real life. From more than a couple feet away, it appears plenty dark, but as you get closer, the layered color shades and underlying rivets start to pop out at you. Overall, I'm quite happy with how it turned out and am looking forward to the next GB! Thanks for looking and for everyone who followed along with the WIP thread. On to the pictures! Thanks again, John
-
On the workshop landed such a small and quick project Mc.205 "Veltro" from Hasegawa in 1:48. The model almost straight out of the box, the rest will come out during construction. As the model has its years this is the start of its construction. Another Italian but in JG77 camouflage.
-
 Well, after much consideration, and complicated by the vast pool of amazing talent on display here at LSP making me feel like l am in the company of master craftsmen, I have decided to post a build log of my first LSP as an adult. A bit of background, like most here I was an avid modeler as a boy, 1/48 was my chosen scale, almost exclusively aircraft, and those were all world war two military aircraft. Then I went away to school, started a career and family, and suddenly, decades later, I saw a modeling magazine, and decided I could use the distraction of another hobby, something I could do at home. I started with 1/35 armor, thinking my fat fingers could re learn the hobby with something larger and less dainty than aircraft. I learned a lot, PE, resin, scratchbuilding, patience, stencils rather than decals, weathering, oil paints, figure painting, and the wonderful community of the internet. Rather than reclusive loners toiling away and safeguarding secrets, I found a worldwide community of people anxious to share tips and techniques. Well, it was bound to happen. At a raffle, I won some wingy things, notably Hasegawa's 1/32 P-47, and I am ready to build it. And blog it. Warts and all. Now that I'm grown, money isn't as tight as it was when I was on an allowance. So I do indulge in aftermarket stuff occasionally, but I like to add details the old fashioned way, too. So let's list the kit and aftermarket I have planned, subject to change should I mess up the kit engine, or decide not to use an AM part: Hasegawa P-47 bubbletop Big Ed PE, including exterior and colored cockpit details. (I will first paint the kit panel, then decide if its acceptable. I will likely need input on that.) Quickboost gun barrel covers RB Productions seat belts Custom masks by Mal Mayfield. I am going with Gabreski's bird, I know its been done to death but I love the colors and I built one in 1/48 that came out well. I plan to detail the kit engine, see below, but that is subject to change if I muck it up. I am aware of some pitfalls, I already filled the wing and fuselage sink marks. I know I need to drop the engine mount by a millimeter, but will likely ask for some help on exactly how to do that. In the past couple weeks, I masked the detail around the sinkholes and filled them. I planned to use Mr Surfacer, but my pot dried up. Luckily, I had some Tamiya white putty. Stinks worse than the old squadron green, but it was easy to work with. Then I started on the kit engine, which is nothing to write home about, but I guess not much will be seen. The detail on the cylinders is pretty soft. I painted the cylinders with a testors non buffing metalizer I had on hand, cant remember if it is steel or aluminum. I did several washes, starting with Flory dark, which didn't want to stick at all, so I switched to some home brewed oil wash, van duke brown and white spirit. Then I drilled for plug wires, and added the oil piping from .9mm lead wire, it's a little fat but I want it to be seen since I bothered to put it there. While contemplating a resin motor, I looked at a lot of resin and photos of real engines, and decided the Hasegawa motor is pretty lacking. The ignition cable assembly is some kind of combo between the round and square cross section. I decided I will build the round, so I cut off the detail and cut some small brass tubing to serve as the openings for the plug wires. I will add the wires next, but here are some photos of where it sits today. I work very slowly, and sometimes I cant get bench time in for a few weeks, then I will log time every evening for a week, so I apologize in advance if updates are sporadic. Boring wing fix Engine work Wedding ring for scale. Even though these parts are over scale, i dont think i can work with parts much smaller. Inter ear drain tubes added. Rear bank, the front ones came out smaller and tidier Dry fit, just to see how it is fitting. I will add ignition wires next. Any comments and criticism are welcome. This is good exercise, but is it worth it? Thanks for reading, Bill
- 603 replies
-
- 20
-
-
- thunderbolt
- hasegawa
- (and 2 more)
-
Thanks to everyone who posted in my thread asking for advice regarding ordnance on US aircraft in RAF service, specifically Thunderbolts in Burma. So I thought that the least I could do by way of a "thank you" was to post a WIP. Here's the kit: And here are the bits: I'll be adding a set of RAF bombs per the advice in due course. The nondescript square top right is my sheet of home-cut masks, I thought the cuts wouldn't show, but it deserves to be there. And I decided to start with a bit of "creative destruction" on the panel to fit the Yahu one. I've only just started here. It seems a shame somehow, but I had already bought the Yahu panel. If I do a second one I may not bother, I'll see what I can do with the kit panel. That's it for now, more in due course.
- 53 replies
-
- 14
-
-
Hello every body Here is my first build here and i hope he will go to the end... My idea is to make the Italian G-14 WNr 464380 yellow one of Mjr. Mario Bellagambi. I will develop the history of this plane (the research part of the building is my favorite) later I would like to thanks Mr Jean-Claude Mermet, a one "O" nine master researcher who really help me by his knowledge during this buid. The base is of course the old but good Hasegawa G-14. Good because he is detailled and nice in shape, old because there are a lot of details to had. The most boring are the landing gear bay to detail. For begining the excellent cockpit from MDC with a bit of detailing (end MW 50 instrument on the left) and MDC dials, Airscale stencil and HGW seat belts (G-6 model). The base is Tamiya XF63 (next time i will use AK real i think) and highlight with XF66. The seat had before an aluminium coat. Brush paint with Prince August. Weathering is a mix of ... improvisations with oils, pigments, felt pen, color pencil, etc... Hope you enjoy it. I am open to any comment and correction. Next will be the fantastic Henri Daehne Prop :-) Best from France Sorry for the picture quality, I am not a good photographer... Matt
- 15 replies
-
- 18
-
-
Good day, gents. A little while ago, I decided to participate in the Multi-Engine Group Build. Since my entrant will be the HKM B-17E built to be the Swamp Ghost, I need to clear the bench to make room for the big, four-engine beast. So, I knocked out the Trumpeter F4F-4 last weekend and plan to have the Hasegawa Ki-84 Frank done by this weekend. Being on a major early Pacific war kick right now and, being something of a glutton for punishment, I have decided to tackle the Hasegawa P-40E before the end of the year. Thus, this WIP thread, the speed-build of the Hasegawa P-40E. Here's to hoping I can get it out the door by 12/31/18 because I fully intend to start the group build B-17 thread on 1/1/19. That said, I made some good progress this weekend. The cockpit is done and, if I get any time at the bench tonight, I should be able to close up the fuse halves. The cockpit of the P-40 is complete. Painted with a hodgepodge of Tamiya, Alclad, and Vallejo Model Colors. The interior green is a custom mix of Tamiya paints that I came up with. I believe it is 1:1 flat yellow and flat green. The only aftermarket item here is the seatbelt harness. The shoulder harness is from an Eduard kit in the spares box. The lap belts are Tamiya tape cut to length and painted. The buckles come from the same Eduard set as the shoulder harness. I realize it may not be perfectly historically accurate, but I figure it's close enough. Everything else is straight from the kit. Chipping was accomplished by using Micro Mask as an undercoat before painting base colors. Parts were weathered with oils and Tamiya black panel liner. The seat was washed with Tamiya's brown panel liner. I used a drop of Future on the two gauges to give them a glass lens appearance after picking out the dial face with a silver Prismacolor pencil. The hard-to-see hydraulic fluid leak on the emergency hand pump lever is Abteilun 501 Engine Grease oil paint. The pilots left-side panel. Chipped with a silver Prismacolor pencil and weathered with oils and Tamiya panel liner washes. Pilot's right side panel. Chipped with a silver Prismacolor pencil and weathered with oils and Tamiya panel liner washes. The instrument panel, all straight from the kit and hand painted as I've never had much luck overlaying decals on raised details. The dial faces were picked out with a silver Prismacolor pencil while the rest was painted with various Vallejo paints. The glass effect was achieved with a drop of Future into the molding for each dial. All in all, pretty happy with the final results.
-
Hello again Some more images taken, this time it's a FW190A-6/R11 of 6./NJG300. Hasegawa Fw190A-6 kit Eagleparts cockpit, spinner and prop, outboard cannon wing fairings, tail wheel set, main wheel/tyres EagleCals Fw190's JG300 Part 2 (used as reference for the major markings to cut masks, some decals used) Master Barrels and pitot set HGW seatbelts Quickboost Revi C/12D gunsights Owl Fug 217 antenna plus SB items AIMS Fw190 Oleo markings MDC Drop tank Landing light in the left wing leading edge SB. Now.....when I was building this kit, my references plus the riveting plans I was using showed the cannon fairings/bulges on top of the wings. I was told just after I laid the paint scheme down that the A-6 didn't have them. So disclaimer - I've probably messed up . I wasn't going to destroy everything to take them off. It is what it is. Paint is Gunze Laquers - RLM74/75/76 scheme, with the 74/75 misted over with 76 to reduce contrast. Thanks for looking Iain
- 17 replies
-
- 25
-
-
-
- fw190a-6/r11
- jg300
- (and 7 more)