

Daywalker
-
Posts
3,222 -
Joined
-
Last visited
-
Days Won
10
Content Type
Profiles
Forums
Events
Posts posted by Daywalker
-
-
7 hours ago, Pete Fleischmann said:
look at that perfect nosewheel placement on the lead-in line.
Guess who taught him that?
P
Certainly not THIS guy!


Congrats to your friend on his retirement!
-
On 9/9/2024 at 12:35 PM, RadBaron said:
I'm planning on it, but like everything, it's subject to change 🤣 I'd like to go up and camp for at least a few days, but time will tell.
Are you going to make it there?
I'll look for you next year there, hopefully you can make the flight up. The Fisk arrival seems quite daunting until you actually do it a couple of times, I flew up this year with my friend and his Zenith 801:

-
7 hours ago, Pete Fleischmann said:
Anybody see it/get it?

Q438 East to west.who says Canadians aren’t funny-
P
Johnny Dangerously, great movie!

- D Bellis, chrish and Pete Fleischmann
-
 3
3
-
3 hours ago, geedubelyer said:
The Hun is a great looking aeroplane.

I couldn't agree more!
-
-
-
And sprayed with some good old Tamiya rattle can AS-12 silver. As I am planning to leave the aircraft in natural aluminum, I wanted a silver color that was "close enough" to the aircraft aluminum.

- TankBuster, Shoggz and Furie
-
3
-
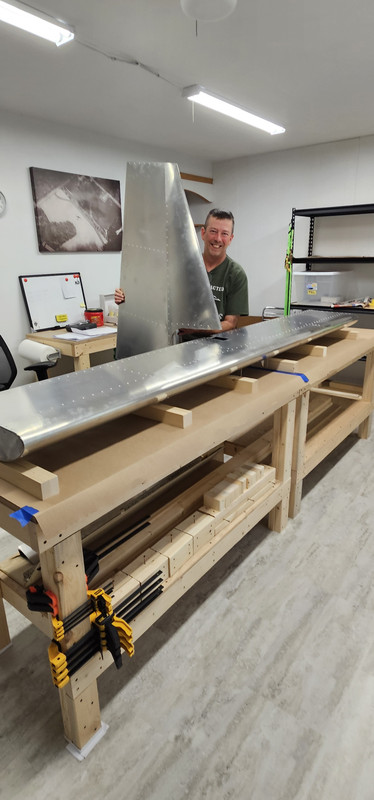
Small update on the 750 STOL, after completing the horizontal stab and elevator to the point where the remainder of the construction must be completed after mounting it to the airframe, I moved on to the flaperons. There are four separate panels, an inner and outer on each side. The inner panels have a control horn which attaches to the mixer assembly at the fuselage, and the outer assembly bolts to the inner one with a single bolt (though it also has two hinges on each panel like the inner panels). The plates on the ends of each panel are slightly offset, allowing the outer panel to sit a bit higher than the inner panel which is the Zenith way of building in washout. Quite ingenious actually! I finished three panels, unfortunately the right inner panel was damaged when i tried to build it without following the instructions TO THE LETTER. I missed one step, and in doing so warped and bent the panel. I will call Zenith to order a new $130 sheet (plus shipping) on Tuesday so that I can call the flaperons done. Then, onto the leading edge slats!
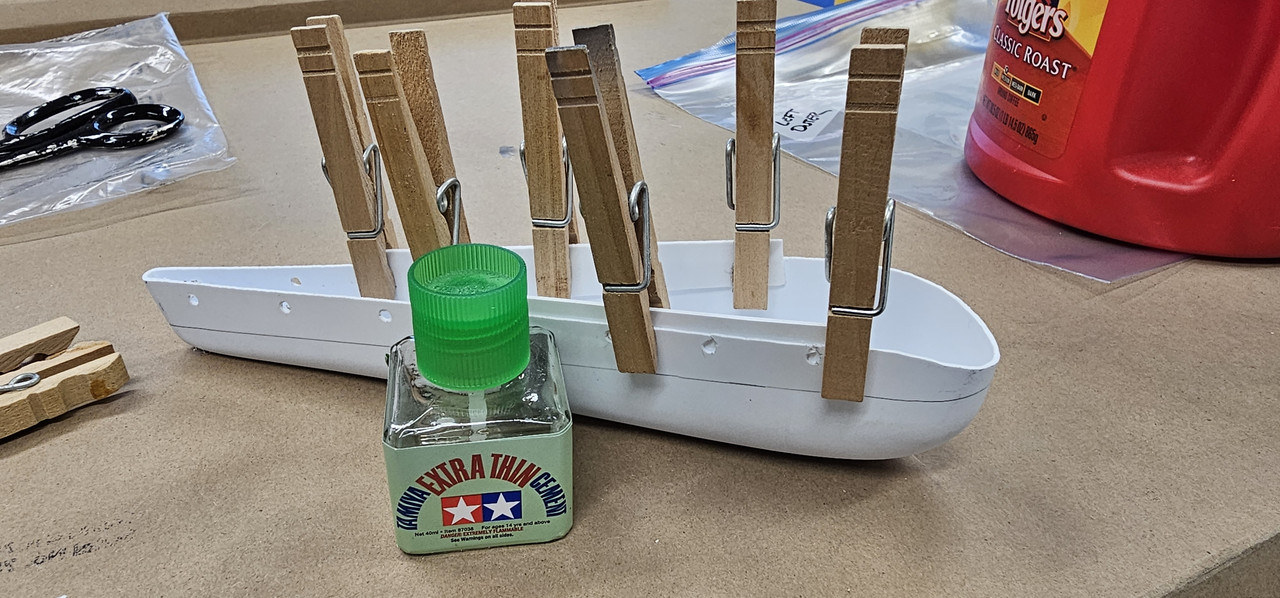
On a humorous side note, I did not expect to use Tamiya thin cement on a full size airplane LOL. The ABS plastic flaperon ends are pre-cut from the factory, but one of them was a bit shorter than the other side. After drilling out the mounting holes for stainless screws I removed to find that the holes in the ABS were so close to the factory trimmed edge that the plastic split apart there. To fix it, I trimmed some ABS plastic from another part from the aircraft and grafted it on to add some "meat" to the areas around the holes that needed it. Seems to work just fine! Dory the shop dog seems happy with the progress so far!
- Furie and TankBuster
-
2
-
39 minutes ago, Pete Fleischmann said:
Ya know- I get it. My whole career has been “higher faster farther “…and now that I’ve done all that- The thought of flying off grass and tooling around at 100 kts at 500 ft is so appealing. Back to my roots I guess..
I'll bring my Zenith down when I get 'er done, max cruise is about 90 kts...
-
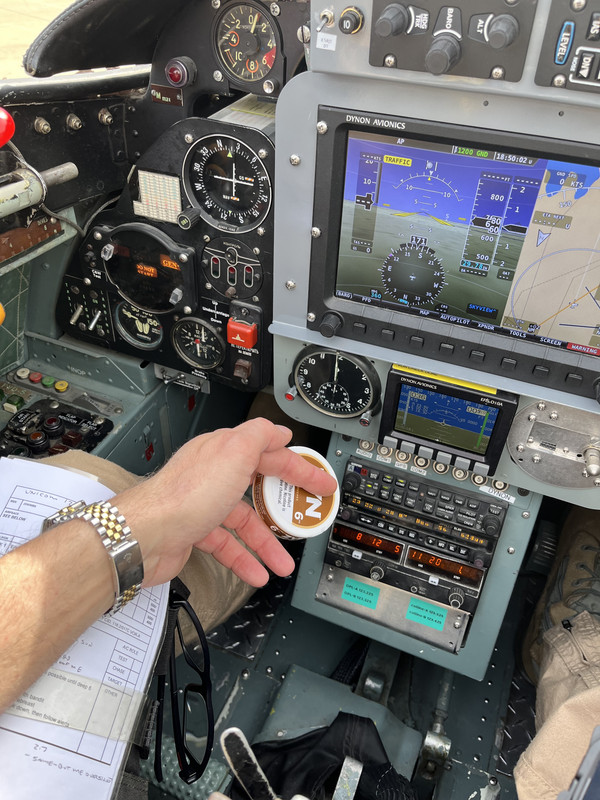
16 hours ago, Pete Fleischmann said:
A few random shots from the glamorous world of flight test-
always fly with Zinny the Pooh
P
Glamorous is right! Only the posh test pilot can be spotted on the ramp donning a Rolex.
-
OOPS!!! Imagine that sick feeling the pilot felt when they first heard the scraping metal and realized what had happened (assuming it was, in fact, and inadvertent gear up landing).
Congrats on the flying! The airplanes I currently fly and 172's and 152's and I have found that even though I may not flying something with a lot of "cool factor" like Pete does, the sensation of flying and realizing that I am doing something most can only dream of ALWAYS brings a smile to my face!
Today, I checked out in one of the local airport's 152's. They certainly are sporty compared to the 172's I usually fly.
-
6 hours ago, Pete Fleischmann said:
Chuck- when you are ready for an L-39 ride, let me know. Daywalker can give you the data dump.
Timmy! Is a repeat offender-
Dope has some L-39 stink on him too!
that is a license to steal!
P
Chuck - HIGHLY recommended!
-
On 7/29/2024 at 7:01 AM, Oldbaldguy said:
How was OSH this year? Heard rumors that homebuilt attendance was down and foot traffic was lower than previous years. When I checked the live feed Sunday AM the place was deserted. The show has certainly evolved over the years from a bunch of homebuilders getting together to swap stories to a yearly opportunity for people to show how big their big account is.
Hard to comment on attendance, as I was walking around in aviation heaven! It seemed busy there, but then with thousands of people and airplanes in one place it always does. Sadly, a Lancair crashed on Monday after we arrived killing both onboard. I haven't heard of any other accidents there, hopefully the one Monday was the ONLY one.
-
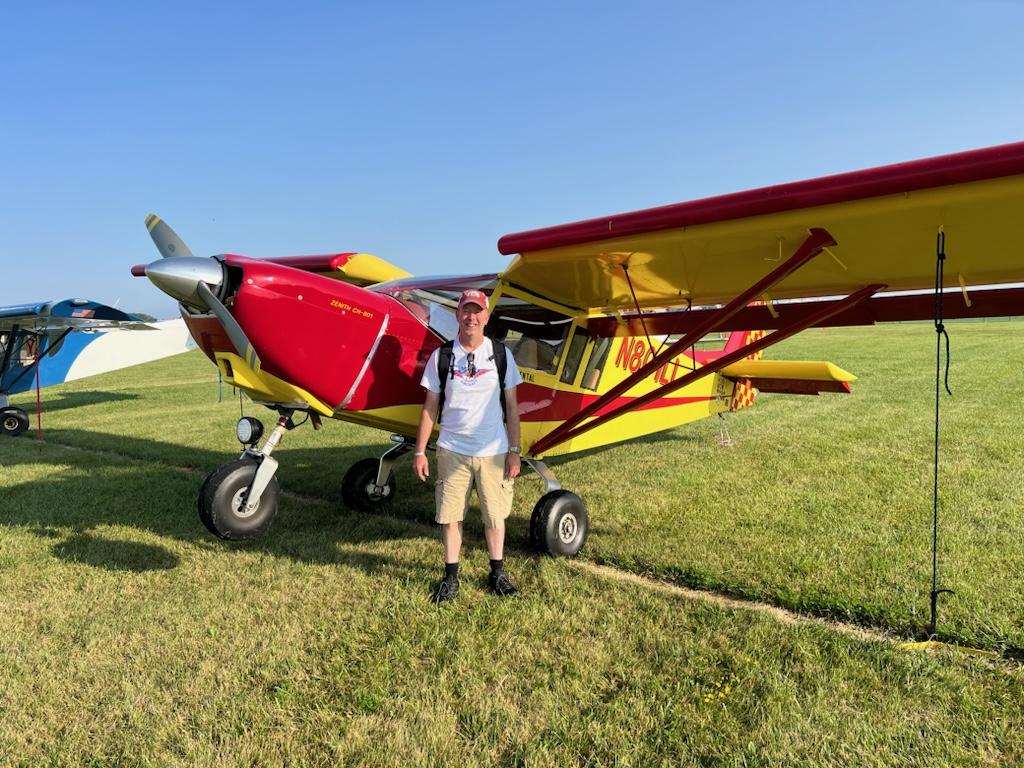
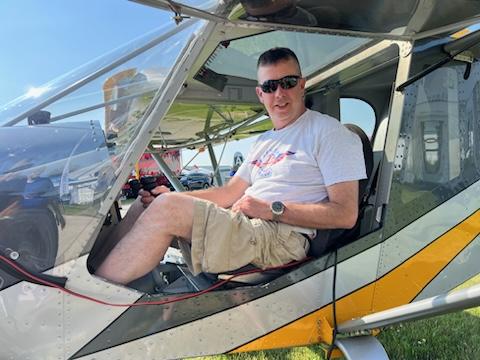
My friend and flight instructor owns a homebuilt Zenith 801 (N801LL) which we flew up to Airventure 2024 in Oshkosh, WI. This is the second time I have done the flight in, and flying the "Fisk Approach" is quite exhilarating! The arrival procedure is a 32 page document outlining all of the required procedures to fly into the busiest airspace in the world this week. I got a "red and yellow high wing - NICE ROCK!" from the guy at Fisk, and was cleared for runway 36L at the yellow dot. I floated over the dot a bit, but at least I didn't land short!
Flying out of KOSH minutes before the TFR took hold:
Me and my friend's Zenith 801, he wanted to tie it down with the nose in the air for fun:
Trying out the Avilution systems Zenith 750 STOL, this one had the dual stick option which I am considering and the guy at the booth let me try it on for comfort:
- Shoggz, TankBuster, rafju and 2 others
-
5
-
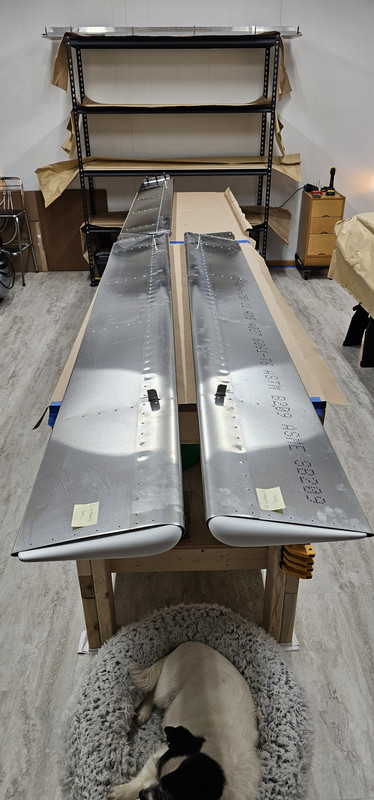
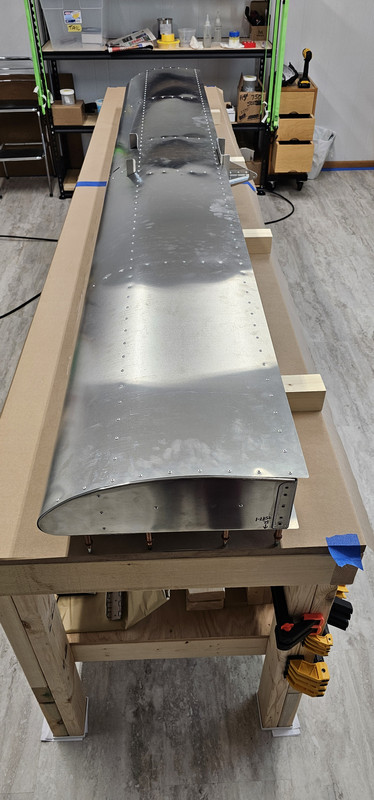
I've been working when I can on my Zenith, and now have the rudder and horizontal stab completed. I am currently working on the elevators, but am waiting for tools to arrive tomorrow to move forward. Instead of riveting the access panel for the elevator trim servo into the stab, I am adding nut plates to allow for flush mounted screws. However, this meant I needed to buy a rivet squeezer and dimple dies (something not needed for typical Zenith construction) from Aircraft Spruce. Once the tools arrive, I need to practice on some scrap before I commit the tools to actual expensive aircraft skins. Zenith stabilizers may look odd to those unfamiliar with the aircraft as the lower surface of the stabilizer is the curved side, the flat side is the top. In the photo below, the stab is upside down:
- ChuckD, geedubelyer, TankBuster and 2 others
-
5
-
6 hours ago, ChuckD said:
Thank you! I hope your zenith is coming along nicely. I got caught up in the super duty build on the Kitplane Enthusiast YouTube channel, and that’s gone a long ways towards fueling my interest too. I’m still kicking around the idea of a build, but in the end, I suspect a certificated a/c will be cheaper (relatively speaking).
Thanks! I suspect there will be some ebbs and flows, but I’m aiming to stay current now that I have access to the club. You’re right though, GA is stupidly expensive. The club’s Cherokee goes for $155/hr wet. Their Piper Colt - which I’ll get checked out in soon - is $100. At 6’2” I 100% do not fit in the club’s C150, so that’s not an option. I figure I’ll rent for a few years and see if I want to dip my toes in the masochism that is ownership. At least I have my A&P, so I can do some of the maintenance myself.Very cool! I too have been following along (albeit a few years behind him) Mark and his SD build, a lot of great info in his videos. I sure do wish I had his hangar.
4 hours ago, Shoggz said:Great story Chuck and congratulations on getting back in the sky.
I’m taking my first steps to join you this week - first lesson of what I hope will be enough to get the old PPL. Let’s hope the bank manager agrees!
AWESOME!!! You won't regret it, the sensation of flying is hard to resist.
- Pete Fleischmann, ChuckD and Shoggz
-
3
-
Congratulations Chuck, I am proud of you for pursuing your dream and finding a way to make it happen. I am touched that I was able to be a small spark of inspiration!
- Pete Fleischmann and ChuckD
-
2
-
45 minutes ago, Pete Fleischmann said:
actually I picked up dog poop then cut the lawn
Well, that's ALMOST as much fun.
-
Happy birthday Pete, hope you spent it tearing around the skies!
-
On 6/26/2024 at 12:20 PM, Oldbaldguy said:
This primer concept is actually pretty cool. If you haven’t already, I’d recommend torquing down various fasteners on a piece of scrap painted with this stuff to see if it tries to separate from the surface under stress. If it does, then you’ll need to regroup. If not, then you have all shorts of options. Better to know that now than later in the build because paint (or anything else) that won’t stay stuck or refuses to play well with the substrate is a real bummer. Zenair probably would like to know that as well.
Good point, thank you for that. I hadn't really considered checking the effects of the tinted primer but will certainly do that now.
7 hours ago, Mark_C said:I have one just question:
Will your rivets be raised or recessed?
Have fun with your plane!
Thanks Mark, raised rivets (mostly)!
-
Thanks Chuck, I must admit I really like the Cortec primer - easy to use and relatively non-toxic. It cleans up with water, yet seems quite durable. I did some tests on scrap pieces which took a LOT of scrubbing with strong solvents to remove.
I haven't yet decided on my powerplant, my plan for my visit to EAA Airventure this year is to find some people with engines I am looking at to see what others are using and what they like/dislike about them. At this point, the engines I am researching are the UL Power, Viking, Jabiru, Rotax, Lycoming, and Corvair conversion. There are probably others which I haven't really looked into yet. So many options!
Glad I was able to peak your interest in these Zenith kits. I have no affiliation with the company, but I was impressed by the flying qualities of the two I have flown and the people at Zenith Aircraft. I am not sure where you are located, but if it's in the realm of possibility I would highly recommend a visit to the factory in Mexico, MO and test fly one!
-
13 hours ago, ChuckD said:
It would seem odd to me to prime a metal surface with a clear. Wouldn't it be really difficult to tell whether or not you missed a spot? Also, is that sprayed on, or brushed on?
Yes indeed, it goes on by either spray or brush and has a milky white appearance when applied making it fairly easy to determine coverage. It dries clear, though the texture of the primer makes it detectable. In my case I used a foam brush to spread it on, and it looks pretty good. The best part about this primer is it's relatively low toxicity compared to comparable products which is a huge plus for me!
-
The primer I'm using on this aircraft is Cortec VCI-373 which is recommended by Zenith Aircraft. It smells suspiciously like the white primer for painting home walls in (strong ammonia scent) and looks milky in the can but dries clear. From the manufacturer, it is available in drums in both clear and a zinc-chromate like green, but is only available in smaller quantities in the clear finish. I wondered if it could be tinted, so I called the company yesterday to ask. They had not heard of it being done, but were enthusiastic about my trying it out. I added a couple of drops of Tamiya XF-4 yellow green which seemed to mix with it very well, and now the part looks like it's from a P-51 or P-47. I added quite a bit more paint to get the saturation I thought seemed about right, and will next experiment with it to see if it loses any of it's important protection qualities. If it works, I'll be able to prime in any color I choose!
- Shoggz, Martinnfb, Oldbaldguy and 2 others
-
5
-
4 hours ago, Pete Fleischmann said:
A buddy of mine is swapping out the Ivchenko engine from his L-39 for a Garrett 731.
I bet he’d make you a good deal on a slightly used Russian jet engine-P
Hmmm...

You may be onto something there!


Happy Birthday Daywalker!
in General Discussion
Posted
Many thanks guys!