

VintageEagle
-
Posts
365 -
Joined
-
Last visited
-
Days Won
1
Reputation Activity
-

 VintageEagle got a reaction from TAG in Revell 1/32 Me 262 A-1a W.Nr. 110958 'White 17' III./EJG 2 - THE COCKPIT
After a longer break, work continues. As those of you who have built Revell's Me 262 know the fit of the two cockpit side walls with the center floor piece is not great at all. I knew this and spend a lot of time dry fitting and ensuring a more or less acceptable fit. While I managed this, I was still not happy and also noticed that the cockpit in the orignial was one piece with the steel floor riveted onto it on one side. Hence, I filled the seams and sanded it to become one part, then added rivets using rivet decals from Quinta Studios (I used the double row 1/48 scale rivets, which were a perfect fit for this puropse) and painted the steel part in RLM 02. It know looks like in the original.
First, an example of how Revell tells you to assemble the parts (with the complete center piece in RLM 02 and panel line across the cockpit tube; photo is from Chris Wauchops excellent Me 262):
Then how it should look like:
Weathering and painting of the wooden blocks on the left still needs to be done, but the cockpit is then finally complete.
I have also started to work on the nose wheel landing gear & bay and have made some modification. I'll cover this next time.
Cheers,
Roger
-
 VintageEagle got a reaction from Paul in Napier in Revell 1/32 Me 262 A-1a W.Nr. 110958 'White 17' III./EJG 2 - THE COCKPIT
After a longer break, work continues. As those of you who have built Revell's Me 262 know the fit of the two cockpit side walls with the center floor piece is not great at all. I knew this and spend a lot of time dry fitting and ensuring a more or less acceptable fit. While I managed this, I was still not happy and also noticed that the cockpit in the orignial was one piece with the steel floor riveted onto it on one side. Hence, I filled the seams and sanded it to become one part, then added rivets using rivet decals from Quinta Studios (I used the double row 1/48 scale rivets, which were a perfect fit for this puropse) and painted the steel part in RLM 02. It know looks like in the original.
First, an example of how Revell tells you to assemble the parts (with the complete center piece in RLM 02 and panel line across the cockpit tube; photo is from Chris Wauchops excellent Me 262):
Then how it should look like:
Weathering and painting of the wooden blocks on the left still needs to be done, but the cockpit is then finally complete.
I have also started to work on the nose wheel landing gear & bay and have made some modification. I'll cover this next time.
Cheers,
Roger
-

 VintageEagle got a reaction from Hoss FL in 1/32 Hasegawa Fw 190D-9 White 12
Absolutely stunning and one of the best D-9’s I have seen! I like the subtle weathering and the use of positive rivets. It’s interesting to compare them with rivets added with a riveter tool. Although the rivets are less visible after paint is added they look more realistic. Would be interesting to see the result in person to see if they can hardly be seen or if they are well visible. I need to decide what kind if rivets to use on my Me 262 kit soon.
Roger
-
 VintageEagle got a reaction from Cheetah11 in F-16C Aggressor: is Tamiya F-16C 60316 only option?
Hi Pete, that looks outstanding. Beautiful model. Thanks for sharing!
Hi Nick, thank you. It will take a while to find them, but as I am working on another project right now, I am patient. The arctic scheme is very attractive. The blue and grey both seem darker than in the 64th Aggressor F-16s, but it may just be the photograph. The black and white areas are usually not that easy to hightlight with washes in a way that it doesn't look exaggerated, but still gives some depth to the uniform area. I've seen examples from other modelers that look amazing. Thank you for sharing the article's front page. It's always great to have some background information about the subjects we build. Cheers, Roger
-
 VintageEagle reacted to Stokey Pete in F-16C Aggressor: is Tamiya F-16C 60316 only option?
Excellent choice of scheme.
I have one of these myself in my F-16 collection.
-
VintageEagle reacted to Cheetah11 in F-16C Aggressor: is Tamiya F-16C 60316 only option?
Hi Roger
Good luck with the hunting of the Thunderbird kit and the Afterburner decals.
If you need a Plan B here are a couple of Block 30's. Article in Air Forces Magazine January 2010.
Cheers
Nick
-
VintageEagle reacted to Hoss FL in 1/32 Hasegawa Fw 190D-9 White 12
White 12 is now complete.
Here's a link to the build:
Here are the final photos. Thanks for looking!
-
VintageEagle reacted to Hoss FL in 1/32 Hasegawa Fw 190D-9 White 12
Thanks all for the comments. Progress continues. Main camo painting is now complete.
Here are a couple of shots after painting and masking the NMF under the wings, the RV band and the RLM76 control surfaces. The blue-green version of RLM76 has also been applied to the fuselage areas.
The following shots show various angles fresh after painting complete and masking removed. I have not micro meshed the surfaces yet to smooth the paint and expose rivets in various areas. I'll do that in the morning.
The overall sequence was primarily my standard Luftwaffe fighter method:
1. RV band
2. Underside of wings, stabs and fuselage NMF, RLM76
3. Upper surfaces of wings and stabs RLM81/RLM82 (fuselage masked)
4. Upper fuselage RLM81/RLM82, including mottles on the tail (wings masked)
The wings were masked using the floating mask method - paper cut outs elevated ~1mm above the surface with little tape rolls.
The fuselage was painted freehand.
Post-fading and shading was applied to all colors. My approach was to paint a very thin coat of the base color, followed by highlights and shadow areas using variations of the base color, all the time leaving the preshading clearly visible. The final coat is a blending layer of the base color applied such that the preshading is barely visible and the highlights and shadows are softened as appropriate.
I'm happy with the way the RV band turned out - nice and crisp. The rivet detail is visible as small bumps below the painted surfaces and pops nicely on the NMF under the wings.
Mr. Color lacquers were used for all colors. Bluegreen RLM 76 is Duck Egg Green, RLM 82 is straight from the bottle, and RLM 81 is a mix of RLM 81 and Red Brown in a 5:2 ratio.
That's it for now. After any necessary clean up and micromeshing, markings are next -- I'll be using masks for the main markings and stencils and decals for the white 12 and work number.
Thanks for stopping by.
-
VintageEagle reacted to Stokey Pete in F-16C Aggressor: is Tamiya F-16C 60316 only option?
A quick search led me to this issue of FSM.
https://finescale.com/issues/2010/march-2010
-
VintageEagle reacted to Cheetah11 in F-16C Aggressor: is Tamiya F-16C 60316 only option?
Hi Roger
If you are undecided I would suggest the Block30 and the Tamiya kit. The Tamiya kit is a dream to build and the Block 30 Aggressors have interesting colour schemes.. You only need AM main gear doors but these are not that obvious. AM wheels from Reskit are also readily available. Earlier ones also had no strengthening plates making the build easier. I have an article on Block 30 Alaskan Aggressors which I can scan if you require.
The Thunderbird kit is difficult to find and if you do a later Block42 you need the gear doors of the Block50 kit on it anyway. See if you can download the 1/48 Tamiya F-16 Aggressor instructions where all the differences will be much clearer.
Cheers
Nick
-
VintageEagle reacted to Thunnus in 1/32 Hasegawa Ki-61 Tei Hien
Sorry to have kept you waiting so long!
I've taken a few months break from modeling but am ready to start doing it again. For whatever reason, I feel it more difficult to re-start on the P-47D Eileen build since it is in the advanced painting stage. I wanted to get my hands on unpainted plastic to transition me back to building so I'm jumping back onto this Hien build. It's been boxed up for a few months now and it's time to take a peek to see where we are at.
Ahhh... now I remember. The resin cockpit has been completed but before I glue the fuselage halves together, I wanted to apply rivets to the fuselage parts. I got as far as drawing some lines on the port fuselage.
I finished sketching the rivet lines on both fuselage parts using a soft leaded pencil. I didn't have the patience to capture all of the rivet lines but put enough to add some needed surface detail to the model.
The rivets were made using a Galaxy Tools riveter in the 1.00mm size. Hard to see but this right after the rivets have been applied and the pencil markings washed off.
Using 600# sandpaper, I rubbed down the rivet lines to remove the raised plastic around each hole. I then applied a temporary brown wash to check the surface detail. Any rivets or panel lines that aren't holding the wash can be touched up now.
Here are the fuselage parts after the rivet job. After the touch-ups are complete, I'll scrub the wash off prior to gluing the fuselage halves together.
-
VintageEagle reacted to LSP_Kevin in New LSP Sponsor: ResKit!
Please join me in welcoming the team from ResKit as our latest sponsor!
As many of you will be aware, ResKit is based in war-torn Ukraine, but still manages to be one of the most prolific aftermarket producers in the modelling community. Not only that, but many of their products are aimed at improving LSP kits, helping our little niche in the hobby tremendously.
Welcome aboard, guys!
Kev
-
VintageEagle reacted to Stokey Pete in F-16C Aggressor: is Tamiya F-16C 60316 only option?
Straight out of the box, the Thunderbirds kit is what you want.
It is possible to convert the other Tamiya kit, using KASL resin parts to replace the intake, exhausts, gear, and doors. But it’s an expensive undertaking.
The old Academy single seat kit could serve you quite well too.
It all boils down to what kind of modeller you are. Do you want every nut and bolt correct? Or do you want something that looks about right but without doing too much cutting up of plastics.
I’ve got a couple of Aggressor jets in my collection, one from a Thunderbirds kit, and one from the older Academy kit.
LSP member @Pete Fleischmann is a former F-16 pilot, if you search through some of his threads, I recall he lists a whole bunch of things that you could do to recreate a super accurate Block 30 aircraft.
-
VintageEagle reacted to Cheetah11 in F-16C Aggressor: is Tamiya F-16C 60316 only option?
Hi Roger
It depends on which aggressor F-16 you want to do. USAF aggressors use Block25, 30, and 32. Navy used F-16N and F-16A. For a Block 30 you only need to replace the main gear doors and main undercarriage if you want to use the Tamiya kit. The other small details are easy to modify. Same for Academy kit.
For the Block 25/32 you need the Thunderbird kit almost as is, or the Academy kit and also change main gear doors with AM. (Or maybe Hasegawa)
For the Navy F-16N best to go with the Hasegawa if you can accept the detail. For the Navy F-16A same.
Once you have decided on which one I am sure Pete will be able to point out all the small details to change. He also did a great build article in Fine Scale Modeler of a Block30 by using the Tamiya kit which details many of the required changes.
Cheers
Nick
-
VintageEagle reacted to Ryan in 1/32 Italeri Mirage III E
Gear well assembled and installed. The front of the bay is also the rear bulkhead of the pit, so planning will be required when painting etc.
The kit also has hollowed out machine guns that are separate parts.
Stark colors of the bays are toned down once in place.
-
VintageEagle reacted to Thunnus in Trumpeter 1/32 P-47D Razorback "Eileen"
The insides of intercooler exits and the intercooler louvers have been painted.
A view of completed fuselage invasion stripes.
-
VintageEagle got a reaction from Paul in Napier in Revell 1/32 Me 262 A-1a W.Nr. 110958 'White 17' III./EJG 2 - THE COCKPIT
Thank you Jaro! I am glad that my comments are useful.
Thank you John! Your words mean a lot to me as I use your Me 262 B nightfighter as the gold standard for building a Revell 1/32 Me 262.
After a longer break (been very busy at work) finally some progress. I have more or less completed the cockpit with the following things done since my last update:
On the starboard side:
Added a scratch built bomb emergency drop lever on the starboard wall after I carefully removed the one moulded one. Added a small bracket and a plug which in the original connected to the flight helmet's headphones. I just need to add a black cable from the plug into the right console. I'll do that once the side wall and console are glued together. On the port side:
Added a home-made decal for the landing gear push button instructions (red rectangular placard with white border and text). The Eduard interior PE set includes the placard, but it is too large unfortunately. On both cockpit sides:
Added the wiring terminals at the position that corresponds to the wire terminals on the other cockpit wall side, which is inside the landing gear bay. Seat:
Added seatbelts. I went with RB Productions Luftwaffe seatbelts. I believe they are no longer available from Radu (Radu correct me if I am wrong), but I found the almost identical at Airscale (the laser cut paper looks virtually identical, while the etched parts are slightly different).
Next, contrary to the instructions I will probably glue the cockpit walls to the port and starboard consoles first before attaching them to the forward bulkhead. Apparently, the fit of the cockpit floor with the two side walls is not that good in the Revell kit and I'll have to be careful when assembling all parts to form the cockpit tub.
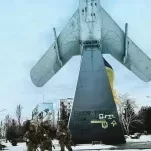
First, photos of the real thing.
Photo 1 shows the port side of the cockpit of W.Nr. 111711 taken shortly after the war. You can see the wiring terminal in front of the port console.
Photo 2 shows the starboard side of late Paul Allen's original Me 262 W.Nr. 500453 during restoration. One of the four terminals is not yet installed.
And now the photo of my model parts (apologies for the quality, I took the photo with my smart phone):
That's all for now.
Roger
-
-
VintageEagle got a reaction from Paul in Napier in 1/32 Revell Me 262B-1/U1 Nachtjager
Hi John,
I am excited about your latest project. I have this one also, but haven't found the time yet to work on it. In the past few months my focus has turned to finishing my Captured Eagles Vol. 2 book. Anyways, what I never liked about both Revell's and Eduard's panels is that they are based on Me 262 A-1a panels and more specifically: early-production panel with color coding of a JG 7 aircraft. Most won't bother as the differences are not huge, but I always hoped that there would be a nice and correct aftermarket panel.
There was an attempt by a forum member to 3D print such parts, but I think in the end the resolution was not high enough:
Instrument colors:
The red and white colors around the instrument dials was a typical feature of some JG 7 aircraft. Messerschmitt prepared a document with illustrations of how JG 7 has color-coded their instruments in a technical report from 1945 (I have a copy of that report that I copied at the NASM archives in Washington). I have only seen this type of color coding in cockpits of some JG 7 aircraft. Otherwise, the fuel related gauges were yellow in almost all late war production Me 262, but the temperature and rpm indicators had simple red lines on the respective limits.
Instruments:
Late war production models had a number of instruments missing. This was the result of an "Entfeinerung" effort towards the end of 1944, where as many parts as possible were removed in order to use less resources and a lower variety of different components. The jet engine differential pressure gauges, indicator for pitot tube heating in the blind flying panel and others were no longer installed. Careful study of the wartime photo of the Me 262 B panel (e.g. published in Smith/Creek's 4 volume book series; see below) helps determine which ones exactly. In the B-panel below there was just one fuel pressure gauge (yellow ring) and one oil pressure gauge (red-brown ring). The instrument to the right is a small voltage indicator that was inserted from behind. Then there is the auxiliary t&b indicator on the left of the temperature indicators. The temperature indicators have an unusually bright ring. I suspect it was white.
In addition, except for some early production Me 262s, the electrical indicators for the 4 MK 108 underneath the SZKK2 were never installed. The Me 262 B had a large repeater compass and not the small one of the A-1a. There, Eduard used the correct compass, but an incorrect shape of the blind flying panel. Eduard's panel is the one that was used in the Me 262 A-1 equipped as a bad weather fighter (FuG 125, autopilot) as documented by a wartime drawing and also a panel that was brought to the US. The nightfighter blind flying panel was made out of metal sheet (and not wood like in the bad weather fighter) and had a different shape. The lower edge consisted of straight lines and not a curved one. The nightfighter also had an additional 80mm instrument in a simple auxiliary panel attached to the lower edge of the main panel. I believe it was a double manifold pressure gauge to indicate the pressure difference of the two jet exhausts. The same instrument was used in the Ar 234 for example so that the pilot could easily determine if both engines had the same thrust. In the panel below there was a rectangular, late production rate of climb indicator, but the round one was more common.
But as I said at the beginning, most will not bother as the differences are small and a lot of effort would be involved to correct every detail.
I am looking forward to your build.
Cheers,
Roger
-
VintageEagle reacted to Thunnus in Trumpeter 1/32 P-47D Razorback "Eileen"
Thanks Jay! Here it is!
Here's the prop with the stencil decals and flat coat applied. Very light chipping on the leading edges of the prop blades.
After the invasion stripes, I painted the extra large US insignias on the wing bottoms. Most 78th FG Thunderbolts had insignias under both wings. I decided to do the blue color first to avoid any white sneaking through the edges, which happens sometimes when you paint the white first. I was going to mix my own shade of blue but when I shuffled through my paint inventory, I found a Mr Hobby Aqueous Blue FS15044 that was a great match for the blue on the Barracuda decal sheet.
After the blue dries, the rest of the mask is carefully placed within the mask outline on the wing. Temporary tape is used to keep the mask together.
The white areas of the mask are then weeded out. Tape and Micro Mask is used to seal the joint between the outer and inner masks.
White is then sprayed.
It's always fun to see the results as you peel off the mask!
No mishaps on the starboard wing bottom. There is a tiny bit of paint lift on the invasion stripe but that should be super easy to fix.
A very small paint lift on the port wing star... again, easy to correct.
The wing bottoms are painted. The next step will be to paint the fuselage bottom and the undersides of the horizontal stabs. And then I'll start painting the top side.
-
-
 VintageEagle got a reaction from D.B. Andrus in ZM kits apparently due in March of this year ...
Really? That’s great news!
The new Bf 109 G-14 kit is almost 50% more expensive than the Hartmann kit (13200 vs 9000 yen). Glad I ordered 3 Hartmann kits
-
VintageEagle reacted to MikeMaben in ZM kits apparently due in March of this year ...
Still waiting to see what the Basic line is like.
-
VintageEagle reacted to Pete Fleischmann in USAAF Beaufighter MkVIf
Got home late last night after the airline trip from hell. Up early to let the dogs out and shoot a flat coat of MRP on these parts-
here’s the chipping for the observers hatch- lots of paintwork on the aft rack to do still-
and the front half-
The attitude indicator is a little wonky- might fix that. Another power quadrant placard decal not quite straight-
cheers
P
-
 VintageEagle got a reaction from Uncarina in Revell 1/32 Me 262 A-1a W.Nr. 110958 'White 17' III./EJG 2 - THE COCKPIT
Thank you Jaro! I am glad that my comments are useful.
Thank you John! Your words mean a lot to me as I use your Me 262 B nightfighter as the gold standard for building a Revell 1/32 Me 262.
After a longer break (been very busy at work) finally some progress. I have more or less completed the cockpit with the following things done since my last update:
On the starboard side:
Added a scratch built bomb emergency drop lever on the starboard wall after I carefully removed the one moulded one. Added a small bracket and a plug which in the original connected to the flight helmet's headphones. I just need to add a black cable from the plug into the right console. I'll do that once the side wall and console are glued together. On the port side:
Added a home-made decal for the landing gear push button instructions (red rectangular placard with white border and text). The Eduard interior PE set includes the placard, but it is too large unfortunately. On both cockpit sides:
Added the wiring terminals at the position that corresponds to the wire terminals on the other cockpit wall side, which is inside the landing gear bay. Seat:
Added seatbelts. I went with RB Productions Luftwaffe seatbelts. I believe they are no longer available from Radu (Radu correct me if I am wrong), but I found the almost identical at Airscale (the laser cut paper looks virtually identical, while the etched parts are slightly different).
Next, contrary to the instructions I will probably glue the cockpit walls to the port and starboard consoles first before attaching them to the forward bulkhead. Apparently, the fit of the cockpit floor with the two side walls is not that good in the Revell kit and I'll have to be careful when assembling all parts to form the cockpit tub.
First, photos of the real thing.
Photo 1 shows the port side of the cockpit of W.Nr. 111711 taken shortly after the war. You can see the wiring terminal in front of the port console.
Photo 2 shows the starboard side of late Paul Allen's original Me 262 W.Nr. 500453 during restoration. One of the four terminals is not yet installed.
And now the photo of my model parts (apologies for the quality, I took the photo with my smart phone):
That's all for now.
Roger