Search the Community
Showing results for tags 'conversion'.
Found 16 results
-
 Here is another of my latest builds. The base is Lukgraph's Potez 25, heavily moded with some home-designed and 3D-printed parts. It was built as part of the "Sandbox" GB on LSM, where you can find a more detailed build log. Before the pics, some background on this project. The idea was to build a project "that had something to do with use in the sand or desert". When doing some preliminray reserach, I stumbled upon some pictures which had an irresistible appeal for me . Let me explain why : 1. French colonial presence in North and Western Africa. In the the XIXth and XXeth Centuries, France expanded its colonial empire across large chunks of Africa, in the North, with Tunisia, Algeria and Morocco, and in the West and Center, expanding from the Ivory Coast and along the river Niger. In 1893, Ensign Aube, on an armed launch, went thus up the Niger river, until he reached Tumbuctu, with the goal of establishing a French presence there. After a few weeks, he was unfortunatley massacred with his expedition by the local tribes, which were subsequently defeated and submitted by a French ground brigade. The French presence in Africa went with the development of routes between the colonies, and thus the French had to tackle a major hurdle between the North and the West of Africa, i.e. the Sahara desert. This was was progressively mapped and crisscrossed with a number of roads, during the 1920s. A road was thus departing from Morocco, Tunisia or Algeria, to merge in Algeria in the North of Sahara, and then went south across the Tanezrouft and Sahara towards Mali and West Africa. Along this road, a number of stations were established, every 50 kilometers, initially by burrying a barrel of water ("bidon" is the French word for barrel), and developing limited infrasructures along these "Bidon" outposts, namely ways to refill the tanks of the trucks, coaches, cars ... and aircrafts which attempted to cross the Sahara. A famous post is "Bidon 5", in the Tanezrouft, which even had a "hotel" made of the bodies of two coaches. The "Black Cruise" ... and the Pink Cruise In 1933, France established the Air Force as a separate entity from the Army. To celebrate this event, a PR stunt was put in place : the "Black Cruise". The idea was to have a major force, made of about 30 aircrafts, that would fly from Paris to the Western African colonies, and back. Under the command of General Vuillemin, the Black Cruise was a huge success, and demonstrated the capacity of the newborn Armée de l'Air to project its force across the empire. This widely acclaimed feat warmed the inter-service rivalry between the Air Force and the Navy, which had its own aerial component, and more specifically the feelings of Rear-Admiral De Laborde, a consumate sailor AND aviator, who commanded the French Navy forces in Africa. De Laborde wanted to show that the French Navy was as able as the new Air Force, by replicating the Black Cruise. In December 1934, a commemorative plaque for Ensign Aube was to be unveiled in Tumbuctu. De Laborde informed the Ministry, that, as the most senior French Navy representative in Africa, he would personally attend the commemorative ceremony, with his wife. He only "forgot" the mention that he intended to reach Tumbuctu by aircraft, in a remake of the African leg of the Black Cruise. Thus, in November 1934, De Laborde, leading a flight of three aircrafts, with his wife as passenger, took off from Bizerte in Tunisia, to cross the Sahara and reach Tumbuctu. The flight was a success, and although a veil was put on it officially to avoid fostering the inter-service rivalty, the flight earned the somewhat derisive nickname or "Pink Cruise", to take into account the presence of Countess de Laborde, wife of Jean de Laborde. I found a period picture of the three aircafts, adorned with their "fishhook" roundels typical of the French Navy aircrafts, during a stop in the middle of the Sahara. The idea of a Navy aircraft about 3000 kms away from the nearest shore was just irresistible for me. And thus my GB entry was set ! 2. The Potez 25 The Potez 25 can, in many aspects; be considered the F-16 equivalent of the 20s and 30s. Built by Potez (who had been associated in WWI with Marcel Bloch to build propellers, before Bloch and Potez parted ways in the early 20s), using conventional WWI construction techniques, but with an innovative engine bearer structure that allowed almost and 500 hp engine to power it, it was produced at more than 3 500 units, and sold un used by 24 countries, not a bad number for these troubled peacetimes. It was thus sold to Poland, and it is because of this Polish Aviation link that we now have a 1/32 kit of the Potez 25, thanks to Lukgraph. The main variant of the Potez 25 was the A2, powered by the very successful and reliable Lorraine W12 engine, and this was the one used by the Polish Air Force and therefore represented by Likgraph. Bu the French developed a specific version for the Potez 25, the "TOE" (for Theâtre d'Opérations Extérieures", aka foreign opertions theater). Compared to the A2, the TOA had many differences, starting by a heavier weight dur to an enlarged main tank (which was jettisonable in flight in case of fire), and an additional fuel tank of 300 liters, conforming to the belly of the Potez. The extra CFT and larger main tank implied a revised nose cowling, to fair into the deeper belly, and a fariring of the under-rear fuselage, up to the tail. The TOE had also a larger radiator, to cope for the wemer climates it was supposed to operate into. This was achieved by adding "ears" to the radiator, fairing in the covers of the lower cylinder banks of the Lorraine W12 engine. To cope for the heavier weight, a new oleo undercarriage was developed by Messier, as well as a new tail skid. The Potez TOEs of both the Black and Pink Cruise also had two extra water tanks that prolonged the fairings of the lower cylinder banks. De Laborde's aircraft, coded "BZ 65) (BZ stand for Bizerte, the main base of the French Navy aircrafts in North Africa), also had a revised upper fairing above the cockpit, with the suppression of the rear gun position, a new windscreen for this position, a head-rest fairing for the rear position. It also had a seat comparable to the pilot's one in the rear position, as opposed to the initial bench-type for the rear gunner, and a set of radio emitters and receivers, identical to the ones used during the Black Cruise. 3. Building and converting Lukgraphs' Potez 25 The Lukgraph kit ias a sound, if not perfect, basis for a Potez 25 A2. To represent a TOE, I had however to proceed to some major surgery and changes. I designed the conversion parts, and 3d-printed them. The list of new parts include: - a new radiator, - new fairings for the clyinder banks, including the extra water tanks - a new lower nose / cowling - an extension of the mainfuel tank - a new underbelly conformal fuel tank - a hew fairing for the rear fuselage - a new main undercarriage - a new tail skid - a second seat for the rear position - new wheels as the TOE ones wear of bigger diameter and larger thread than the A2 ones. The standard practice for aircrafts crossing the Sahara was to have a third, spare, wheel fastened to the side of the fuselage. - radios for the emitters and transmitter (3 sets overall) - a new upper fuselage fariring over the cockpit. This Included the head-rest fairing. - a new windscreen for both the pilot and the rear passenger. In the end, i designed the whole new upper fuselage with the windscreens, and then printed it in clear resin. - new throttle quadrants and throttles, as the supplied PE parts were too flimsy … The kit is a typical high-quality resin kit, with some 3D-printed parts. It has, however, a significant issue, namely the - large - main upper wing is molded solid. When assembled, the upper wing alone weighs 186 grams. And the finished aircraft with all the additions is close to 370 grams. One of my pet topics is trying to replicate the "mass feeling" of the original subject in kit form. In theory, using the same materials, we would have a similar density. Thus, if the all-up weight of the Potez 25 was 2500 kilograms, the 1/32 kit shoudl weigh 2500*1000/32^3 = 76 grams. The finished kit is almost five times more heavy than it should be if the density was constant ! This creates issues of their own : a) large resin wings are known to sag and flex over time, b) the 3d-printed resin undercarriage may not be strong enough to withstand durably the weight of the finished kit, c) the supplied interwings struts and cabane struts, in 3d-printed resin, may just as well be unable to withstand the weight of the upper wing in the long run, as they have holes for just stub inserts of rods, but are not designed to have the reinforcind rods going through them. So I modified the lower sesquiplane wings to incorporate a span-continuous double spar made of 2 mm aluminium tubing. The spars are connected to a reinforced carry-through structure in the fuselage. New struts were designed and printed that allowed to insert 1mm-dia steel rods across their wole length. The undercarriage was similarly designed to allow the introduction of brass rods reinforcements, and to be connected to the internal carry-trhough structure. By the way, the 3d-printed tail skid did not resist the weight and snapped after about a week. I replaced it with a new one sratchbuilt out of brass. The upper wing is made of three parts (a central and two outer wings panels). They were drilled to a significant depth to allow to insert 2mm-tube spars. And the rod-reinforced interwing struts and cabane struts all connect to the carry-through structure inside the fuselage or the lower sequiplane spars. The Potez 25 TOE was the workhorse mainstay used both for the Black Cruise and, as a utility aircraft, by the French Navy, and therefore for the « Pink Cruise ». De Laborde's Potez, coded BZ65, sported the 4-star pennant of a rear-admiral on its fin. This made BZ65 a true "Blue Goose" aircraft. The markings are a mix of masks, home-made decals and the kits decals (the "fishhooks" come from the Lukgraph decal sheet. All the rest is either masked or home-dessigned and printed. 4. The saynette I found many pictures of the various Sahara stops performed by French aircrafts. Whilst the major "Bidon" stops had fuel pumps, for both the wheeled vehicles and the aircrafts, in other places, the fuel drums were brought in by 4-legged bowsers, namely camels ! I had my scene : BZ65, the Potez of de Laborde and his wife, stopped in the Sahara, whilst camels bring in the fuel drums to replenish the aircraft. I found that the drums in these occasions used were not the "standard" 200 or 225 liters drums, but smaller, more handleable ones of 70 liters. A net search provided the specs of these 70-liters drums, which I also designed and printed. The ubiquitous "Japy" hand-pump was used for refueling. One was designed, printed and inserted in its location in the lower fuselage, where it cannot, unfortunately, be seen ... The 1/32 camels are 3d-printed, found on a German website. The figures, including Mrs de Laborde and his husband, are from various sources, like Red Dog or The Bodi Capsata, or others. Finally, a picture showed that these airbases in the Sahara had a windsock. One was designed and printed in clear resin. Duly painted, the see-through effect of the fabric windsocks was restituted pretty convincingly And now, after this lengthy intro, on to the pics. You can click on them to get enlarged versions. At the end are some detailed pics of the WiP process. I hope you like it. Hubert PS: the scene also had an « interesting » ingredient to it : part of the « sand » is actually some curry powder I had mixed up to the « right » colour on the Marrakech souk. The odour is now faded out, but my work area smelled very good for a few months 😂 …
- 24 replies
-
- 32
-

-

-
Alrighty folks! Some of you might remember my stalled scratch built 1/24th EA-6B. Check it out here: Lost the oomph and was in over my head, but I knew I could do better. I've learned loads since I started it, and some of it just wasn't up to snuff. I tossed it in the trash about a month ago and am ready to try again. This time it'll be with a Trumpeter 1/32 A-6E, which I'll convert (similar to the way Grumman built it back in the day: i.e. take a pretty sweet airframe, mess up the CG and a bunch of other stuff and make a beast!) This box just showed up tonight: I've got plans printed out already and have already been studying Starfighter's build to see how he tackled his... I'll be building it in-flight. Am investigating a couple of options--either standard in-flight and on a stand, or go full hog and figure out how to mount it on the arresting hook similar to other builds I've done. I think I can pull it off...more details as I figure that out. Here's my options--all have personal meanings as they were my squadrons. VAQ-135 "The Black Ravens" (happened to design that tail back in the day), if I don't do this jet, I'll do 503, which had my name on it. Here's me and a Gator, (a Great American!) in 503 back in 1999, courtesy of Tony Holmes. If I can't make the arrested landing work, I'll do either of these VAQ-133 "Wizards" jets. I was toying with our Desert Bird, as I was the Maintenance Officer back then. It was a great a/c, but for such a unique project, I don't know if I want that audacious of a paint scheme. I'm leaning towards 532--she was a War Horse during 2 trips to Afghanistan. Some airplanes always have gremlins, but not her. I think the only time she wasn't flying was when she was having inspections done. Of course as a Maintenance guy, that gives me fond memories. As a result, I have a ton of flight time in her. So that's where I'm at... Will have to borrow a friends welder to see if I can pull off the hook attachment. Once that's out of the way, I can start building in earnest. If not, no worries, it'll still be a great addition to my collection! This will be my first build log that I've posted to in over 3 years, so hopefully I remember to update it in a timely manner! More soonest, Peter
- 502 replies
-
- 29
-
-
- conversion
- prowler
- (and 1 more)
-
Hello everybody, I‘d like to introduce my conversion and detailing of Trumpeter‘s 1/24 Bf 109 G-2 to a F-4/Trop. The plane shown (W.Nr. 10154) was flown by Hans-Arnold Stahlschmidt of I./JG27 2. Squadron as “Red 1 +” in the period of June until September 1942. A lot of details were added most of them scratch built using information from contemporary handbook and spare parts list Thanks for watching. Regards Nils
- 29 replies
-
- 24
-
-
- 1/24 me 109
- scratch building
- (and 3 more)
-
FW190C-V18/U1 will be built using Planet Models conversion and Hasegawa's FW190D as donor kit. FW190 Vol 1 Smith/Creek identifies this plane has a NMF and supports with really nice clear photos. This will be all about Alclad. Parts washed and will start along with my other A8. Planet's conversion parts. Hasegawa's FW190D will be used as donor.
- 71 replies
-
- 1
-
-
- Planet Models FW190C
- Hasegawa FW190D9
- (and 1 more)
-
Hey everyone. As I get close to finishing my Pirate I shift my efforts to my new build. Next up a Scorpion. But not your ordinary, garden variety Scorpion. Oh no, can't do that. I have always been fascinated by the proposed "Advanced Scorpion". So here goes. You have to start somewhere so I will be starting with the Tigger Models F-89D. The plastic is thick, by Vac standards, and should stand up to all of the changes that I will be making. Here is the vac fuselage next to a 1:32 drawing of the F-89F. Whats different? Among other things the engine nacelles will need to be lengthened as this varient used a different engine than the D model. The tail has a different shape. The horizontal tail has been moved to a lower position on the fuselage. The canopy is different and has been blended into a re-designed spine. The canopy will also be changed. Some drawings show a one piece canopy covering both crew positions, other renderings show 2 separate canopies. Oh...and the wing is different, with mid-span weapons/fuel pods. Here I am working on the wing. I have cut out a lower blank. After cutting out the flaps I have epoxied a wooden stiffener to the lower blank. The upper wing is actually the wings from the original kit cut down to fit. I have also sprayed a grey primer onto the white plastic to make it easier to work on. Thanks for looking. Dan
- 95 replies
-
- 16
-
-
- vacform
- conversion
- (and 1 more)
-
Hi Guys, Back with another project that's going ahead at a cracking pace. I was at the Essex Model Show a few weeks ago and saw a Dragon 1/48 Mistel 6 on the shelf of one of the traders. So out with the fivers and I'm now the proud new owner. The week after was the Avon Show and I was on our club stand (Wiltshire Scale Modellers) and met up with Wunwinglow who took the kit with the intention of scaling up some of the parts and making them in 3D. Also got my hands on the new Revell Me-262A single seater courtesy of Andy Hills at Antics Models, another club member. I had already sourced the He-162 online, ordered a CMK Ejection Seat and a Yahu IP. A Kit: Untitled by Bruce Crosby, on Flickr A Book: Untitled by Bruce Crosby, on Flickr An Idea! Untitled by Bruce Crosby, on Flickr More to come!
-
Hi Guys, I'm supposed to be building six FW-190D models but I got myself into a bit of a challenge with other modellers who are building the Jerry Rutman P-51B resin kit. Now I've already built the Revell D and rebuilt the Trumpeter B (as a C) and fancied another build but can't find the JR resin for love nor money and certainly didn't feel like another Trumpeter kit. So I decided to do a conversion of two Revell kits, the newer D with the spine of the old (read: ancient!) B. Here's how the fuselages line up. Not bad. Here's my proposed changes to the wings, new panel lines and shorter ammo boxes. Not exact yet, just fibre penned to guestimate what I need to do to it. Where to cut the old B fuselage. The B fuselage parts cut out and the marked up chop on the D Well, can't stop now else that's two kits ruined! All taped up to cement the spines to the fuselage halves. And what I've got at the moment. As you can see, it's a start but there is lots and lots of graft and elbow grease needed still. Regards, Bruce Crosby
- 27 replies
-
- 13
-
-
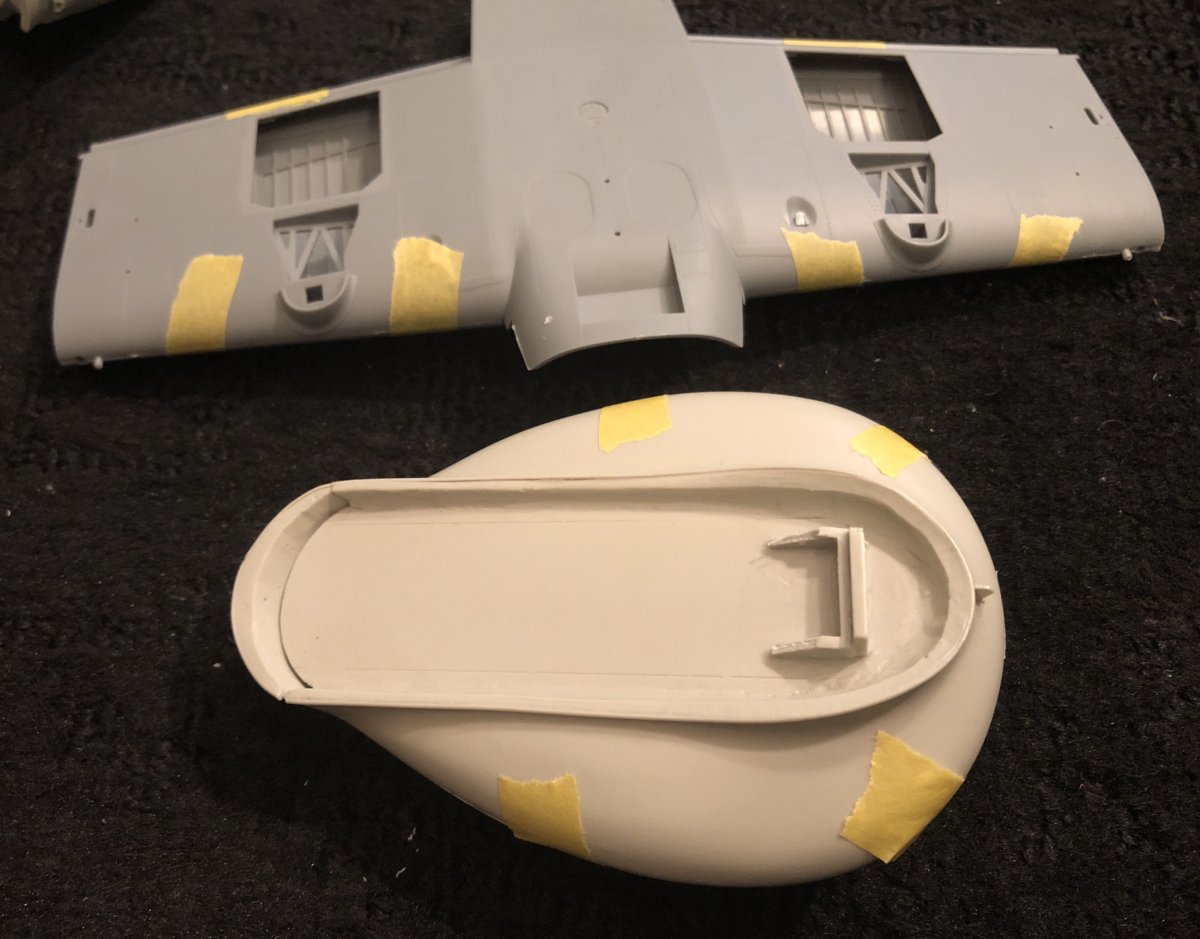
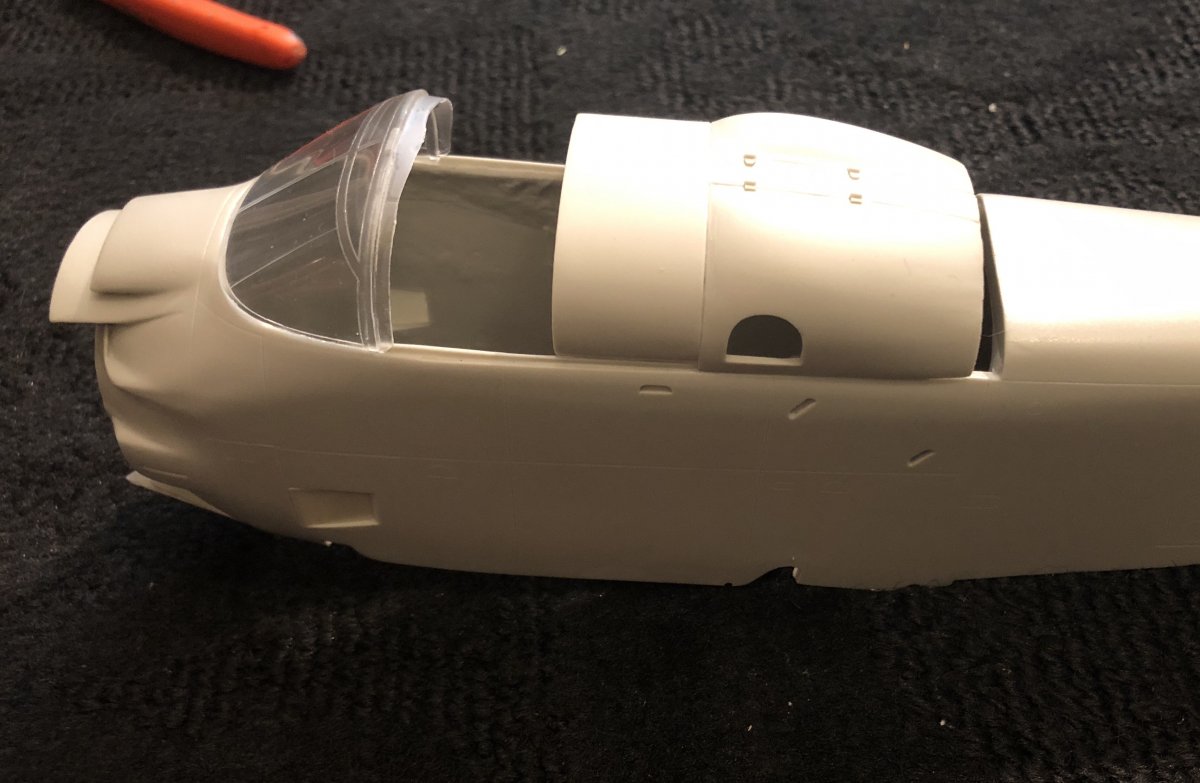
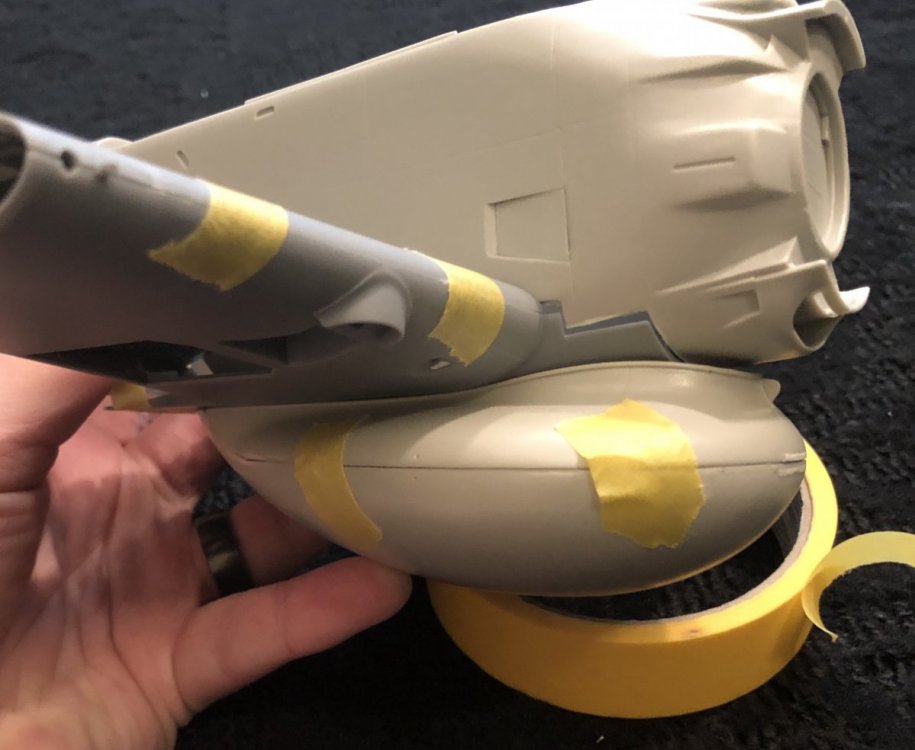
 Update 8/2/18 - work has begun! Normally I’d wait until I actually start working to write an in progress thread but I’m too excited to wait with this one. Fisher has not started shipping the AD-5W Guppy conversions just yet; decals haven’t arrived to them yet from Cartograf. Nevertheless Paul was kind enough to send the resin of the Guppy conversion my way so that I could get started. Initial dry fitting of major parts and the Trumpeter inner wings show near perfect fit. The massive Guppy radome is cast in two pieces to save weight and has “walls” fitting into the oil cooler recess of the trumpy lower wing to aid alignment. I trimmed the back end of these with sprue cutters to get perfect fit. The AD-5 will go in the fluorescent red scheme from Fisher’s decal sheet, but I will be fully arming it with two Tiny Tim rockets and a bunch of HVARs on the outer pylons. Maybe not technically accurate for the trainer scheme but there are photos of operational aircraft with that loadout and it looks too cool to pass on. Undecided on which Guppy scheme yet... This is going to be a fun project!!!
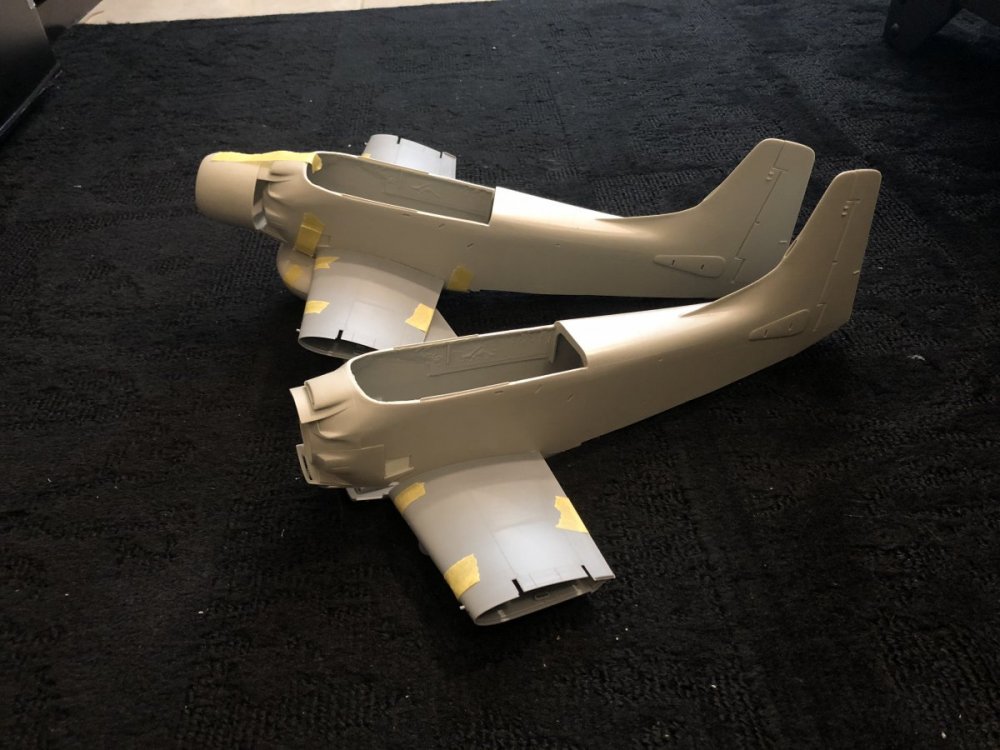
-
 Hi Boys and Girls, I have some awesome news for all of us itching to do a Seafire Mk XV or Mk XVII. I sent an email to Tim Skelton at Grey Matter Figures earlier this week asking if there was any chance there may be a Seafire Mk XVII conversion from his company and he said that he was currently working on one for a Seafire Mk XV/XVII conversion in 1/32 scale!! As of now it isn't going to have folding wings like I personally had hoped but it will have everything else we need. Tim told me that folded wings may come as a different conversion later on, but we are going to get a Seafire Mk XVII conversion set sometime soon from Grey Matter Figures!!!! I'm excited to see what comes of it. Tim didn't say what base kit he was focusing the conversion around as of now, but I did get his permission to tell you all this information first. Cheers, Brady
 -
Hey everyone! I thought you'd like to see what I'm working on at the moment, a 1:24 Harrier T.4. This is a conversion that I've wanted to complete for over 30 years and so now I've decided to have a go. In essence it's an almost complete reworking of the 40 year old Airfix Harrier GR.1 into the two seat T.4 and so I have to build a new nose, scratchbuild the cockpits and then build an entirely new tail section - as well as a complete redetail of the remaining airframe and features. I've given myself around 5 months to complete this model, so here's hoping I can! Though I'd love to detail it all on here, there's just too much information and too many pictures, so if you'd like to keep up with what's likely to be a very involved conversion, please follow the link and you'll find plenty more information! I'll also keep dropping some teasers onto here as well.. https://thekitbox.wordpress.com/2016/06/28/harrier-t-4-conversion-part-2/ https://www.youtube.com/watch?v=AfQeFAMdUVY
-
 I've always loved the looks of the F-16, even more so when it wears Israel's colors and markings. When the opportunity arose to trade for a 1/32 Tamiya F-16CJ with Isradecals, additional resin, and Isracast conversion parts, I took it (A big THANK YOU to Petrov27 here on LSP). When the very large box arrived last week, I began to explore my options. (That's actually his picture) My first inclination was to build it as a Barak (Hebrew for Lightning) of 101 Squadron (First Fighter Squadron) with its distinctive large winged skull emblem. But after looking over the decals and my book on the Barak, the tail art of 117 Squadron, The First Jet Squadron, really took my fancy. But the problem was 117 Squadron flew block 30 F-16's, and they were small mouth (NSI intake) block 30's. To build this I'd have to cross pollenate the intake from a 1/32 Tamiya F-16 Thunderbirds kit to build a plane from this squadron. Then I exchanged emails with Ra'anan Weiss of Isradecals. He said plane 360, is one of the few IAF block 30 F-16's with the large mouth, or MCID, intake. Problem solved. He's even sending me one of the squadron's 60th anniversary decals for the tail base. The first thing I've done, is problem solve how to fit some of the aftermarket bits for this plane. The Aires exhaust pipe fits spot on. And the detail is awesome. I must be careful aligning the inner and outer parts. They're slightly off in that picture, but they will look killer painted. Speaking of paints, I picked these up to lend a hand with the camouflage on this bird: I'll have some pictures of work being done soon. The first thing I'm going to tackle is the Aires gear bays. They fit well enough, but it's going to take a little work to make it just right.
 -
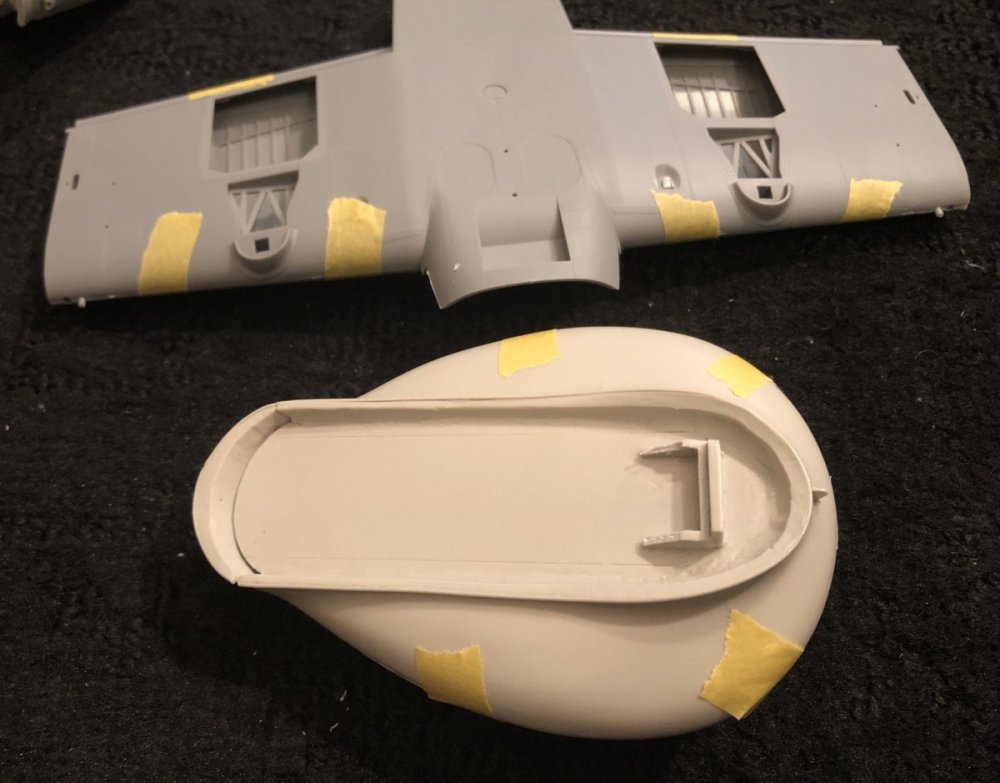
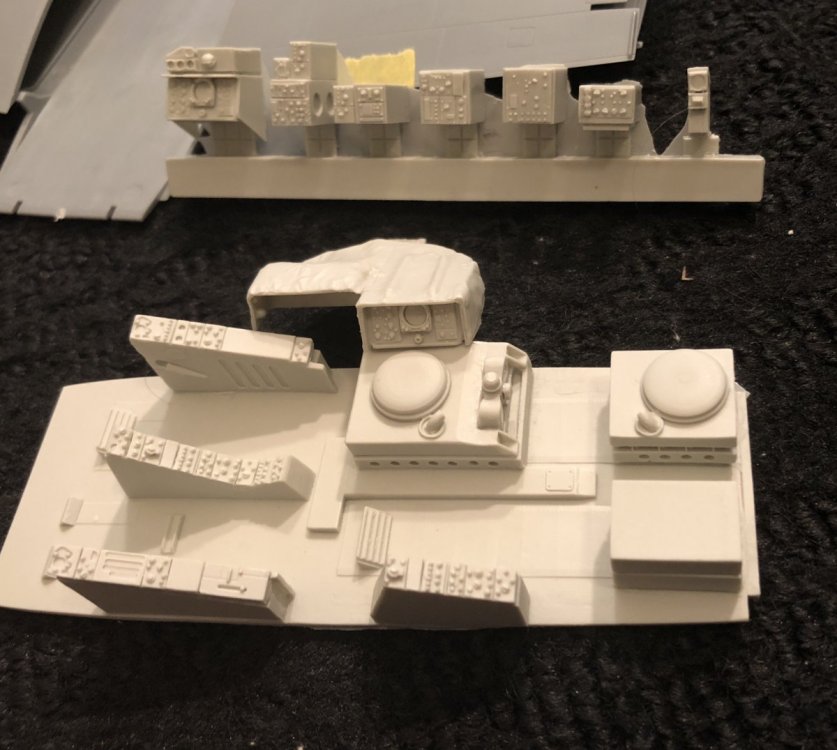
Hi all, Just to let people know I have started on the Ju 388 conversion. Engines being turned by a friend whilst I start on the structure. As you will know I have a number of parts already in stock thanks to the Ju 188 conversion I did a few years back but there is lots to do. 1. Can anyone provide me with photos of the seats? I have seen the excellent ones in the 1/48 scale kit but would like to see for myself if poss. 2. The cooling fan and thus engine cooling ring look a greater diameter than that on the Fw 190/ Ju 88, I would love to be wrong but any observations welcome. Here is the start of the Bodenwanne in Balsa wood. Need to varnish it and gradually make the grain disappear before filling and detailing ready for a vac form mould.
-
Hello ! At the moment i try to finish the most old builds possible. This one has not been started a very longtime ago (last spring), but now it's done, too. It the nice Revell G-6 kit, with the Alleycat resin G-12 conversion, the G-6 correcting and detailing set (with propeller, exhausts, ailerons...) and a G-4 set (to get the G-4 engine cowling and early wheels). In fact i dont really know if the aircraft i'm depicting was really based on a G-4, but too bad. Anyway, there is only one picture available as far as know. The build was very fun and without any major difficulties. Fitting the canopies was not very easy, but doable. The fuselage conversion needed a few adjustments but with some patience and some putty, it worked like a charm. The front cockpit is OOB and the rear one is what is inside the Alleycat conversion without any major modification, as it seemed acurate to me (at least with the very few pictures available). The only modification i did were the rear front office (i reshaped the upper instrument box) and the rear bulkhead as this part was not acurate in my opinion, though. Otherwise, i just added two RB seat belts sets, and an Aires gunsight. For the canopies i added some brass sheet rectangle to make the hinges and scratch built the small rods. Regarding the paintjob, the RLM76 was painted with AK paint. It was the first time i used them, and i was a bit surprised, and not really happy with it. I was absolutely unable to spray small details (for the motling) as i can do without any problem with the gunze paints i'm used to. I must be me as many of LSP members here use the AK paint and are very happy with it. For the RLM74 and 75, i used my usual Gunze paints, as the colors seemed better to me, and at least i could control the spray. Every marking were painted with custom masks. The markings for this specific aircraft were included in the Alleycat set, but the 512 was supplied in yellow and black or white and red. The final process was the weathering. I used various AK and Mig washes and filters, and added some black pigments around the exhaust staining and some dust on the belly and wheels. I know my choice for the red lower engine cowling may be a bit surprising and appear weird as it's very unusual in the Luftwaffe schemes. But this profile doesn't seem so incoherent when one changes it in B&W and compares it with the period picture. It may be fictionnal, it may be not. Nobody knows. And it was a training unit, so everything is possible. Anyway, i think these colors are a nice change in the usual LW schemes. To sum up, it was a funny build, sometimes a bit longer (longer than a usual Bf109 build), but very interesting. I really love the look of the 109 with that long greenhouse lookalike canopy. A very nice addition in a Bf109 collection. Here is the link to the WIP thread : http://forum.largescaleplanes.com/index.php?showtopic=61745 Hope you like it ! The final process was the weathering. I used various AK and Mig washes and filters, and added some black pigments around the exhaust staining and some dust on the belly and wheels.
- 32 replies
-
- 14
-
-
Well HEY Everybody.......LONG TIME NO HEAR!!! I just gonna say that 2015 can GET GONE from my life. I was able to purchase or trade for a few conversion sets this past year. I wanted to finish a couple of projects before diving into this load of resin (Yuck!) Move over on the SoD cause they ain;t done! Fresh start for New Year and still getting paid to talk airplanes (Love It). Also those that know me, know I don't like resin. I'm using GT Resins F-4B Conversion Set, Seamless Intakes and Zotz's MiG Killer F-4B set special made for this set,plus F-4 Data Sheet. This is defiantly the most ambitious model project I've started in 10 years, and will probably need help passing the finish line in a few months. Can't have Too Many PHANTOM's I've been surprised that no-one has WIP on this conversion, I see Mark 31 is knocking a GT Resin F-4C Wild Weasel set ​ "Outt'a the PARK" I'm gonna see how the pictures load on Windows Edge....Had a few issues the other day, but that was first attempt.
-
After a wonderful response for the albatros plans, i decided to make a thread for my question as well. For another future planned long-long term project im thinking of a german F-4F. Since the Revell has one in 1/32 scale, but it is not really a clean build, also it has lots of cosmetical errors im thinking of converting the tamiya's kit. After brief review of all kits in their range I determined that the most accurate variant is F-4EJ. The only modifications required to turn it into german phantom would be: Slatted wings (resin), and elevators without the slats (will try to source one from the C/D kit - that is if someone would have them). Are this all the major modifications, or am i missing other bits and pieces as well? Or would it be wiser to get the revell kit afterall? Also, if i would like to make slattless elevator, is it enough if i cut (or fill) the slots on the original tamiya parts from the EJ kit? Marko
-
 1/18 scale Lockheed Martin F-16CJ Fighting Falcon HAF BBI - Elite Force conversion / scratchbuilt The following article is to describe step by step the 1/18 scale Lockheed Martin F-16CJ Fighting Falcon Block 52, currently flying with Hellenic Air Force, conversion using the BBI - Elite Force toy model kit, bought from the States a couple of years before for less than $60 USD. Despite my enthusiasm when I finally got this 1/18 model in my hands, as soon as I opened the box which exceeds in length the 3 feet (!!!), I realized that I would face hard time and massive scratch building and I'd need to spend hundreds hours on my hobby bench to make it look descent. In the substance, it is not even a model to assembly but a game for children which could be ready in less than 2 minutes. The detail convinces only if you look the model from a distance while points such as landing gear system, engine nozzle, panel lines etc are real dramatic. Luckily, the model is accurate on dimensions and could possibly be used as a F-16 exhibit model that do not interest on conformity of colors, special details etc. So, I decide to begin the building from the zero and give life in this 82cm long monster with no detail (comparing to scale models by Hasegawa, Tamiya etc) but however this 1/18 F-16 toy has almost unlimited possibilities of becoming a high detailed scale model. It should be noticed that the model's airframe comes straight from the box already sealed and I had to open it and work it from inside. That's a hard work to do, because the fuselage remains stuck with internal reinforcing possessors and metal supports & screws that I should locate and carefully remove without causing any damage on plastic material. Following pics show the 82cm long beast, immediately after opening of packing box. I am already start thinking about finding the proper window to place this Falcon. By selecting heavy metal on my CD player (in order to become aggressive and get the “Friday 13th” feeling) and using a saw and a Dremel tool, I opened the fuselage, the basic airframe pieces were cut and useless parts such as landing gear, engine nozzle, a part of the air intake etc were removed and led to the garbage.
- 44 replies
-
- 1
-
-
- lockheed martin
- f-16
- (and 6 more)

.thumb.JPG.0f0c0659a1db77808d5fa22f018de2dd.JPG)