
Bill Bunting
-
Posts
36 -
Joined
-
Last visited
Recent Profile Visitors
1,043 profile views


-
 Michael931080 reacted to a post in a topic:
Are we doing this? Second LSP as an Adult—Tamiya F4U-1A? Throttle up for detail 7/7/23
Michael931080 reacted to a post in a topic:
Are we doing this? Second LSP as an Adult—Tamiya F4U-1A? Throttle up for detail 7/7/23
-
Derek B reacted to a post in a topic:
Are we doing this? Second LSP as an Adult—Tamiya F4U-1A? Throttle up for detail 7/7/23
-
Gazzas reacted to a post in a topic:
Are we doing this? Second LSP as an Adult—Tamiya F4U-1A? Throttle up for detail 7/7/23
-
R Palimaka reacted to a post in a topic:
Spitfire XVI C-GVZB / SL721 AU-J
-
 Bill Bunting reacted to a post in a topic:
Spitfire XVI C-GVZB / SL721 AU-J
Bill Bunting reacted to a post in a topic:
Spitfire XVI C-GVZB / SL721 AU-J
-
Cicciuzzo reacted to a post in a topic:
Spitfire XVI C-GVZB / SL721 AU-J
-
LSP_Kevin reacted to a post in a topic:
Spitfire XVI C-GVZB / SL721 AU-J
-
Shoggz reacted to a post in a topic:
Spitfire XVI C-GVZB / SL721 AU-J
-
Bill Bunting reacted to a post in a topic:
Spitfire XVI C-GVZB / SL721 AU-J
-
Bill Bunting reacted to a post in a topic:
Spitfire XVI C-GVZB / SL721 AU-J
-
Bill Bunting reacted to a post in a topic:
Spitfire XVI C-GVZB / SL721 AU-J
-
KiwiZac reacted to a post in a topic:
Spitfire XVI C-GVZB / SL721 AU-J
-
KiwiZac reacted to a post in a topic:
Spitfire XVI C-GVZB / SL721 AU-J
-
Bill Bunting reacted to a post in a topic:
Spitfire XVI SL721 - Finished!
-
williamj reacted to a post in a topic:
Spitfire XVI SL721 - Finished!
-
Bill Bunting reacted to a post in a topic:
1/32nd Revell Hurricane Mk.IIb, 135 Sqn, India/Burma Front, 1942-43.
-
Spitfire XVI C-GVZB / SL721 AU-J
Bill Bunting replied to Bill Bunting's topic in Ready for Inspection
Done! and thanks! -
Spitfire XVI C-GVZB / SL721 AU-J
Bill Bunting replied to Bill Bunting's topic in Ready for Inspection
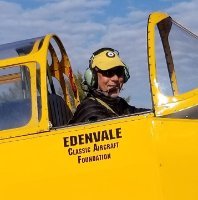
Last Friday I was able to visit the Mike Potter Collection in Gatineau Quebec. I met with Mr. Potter and presented the model on behalf of the donor, Graham Cairns, and myself. Mike was very pleased and appreciated the effort to replicate the aircraft as it was when he owned and flew it. It was a great day for me too as I was able to take over 250 photos of his Spitfire IX, Hurricane XII and P-51D for future projects. Here's Mike Potter and myself. In the background is his award winning DeHavilland Beaver. Cheers. -
Bill Bunting reacted to a post in a topic:
Spitfire XVI C-GVZB / SL721 AU-J
-
Bill Bunting reacted to a post in a topic:
1/32nd Revell Hurricane Mk.IIb, 135 Sqn, India/Burma Front, 1942-43.
-
Very very nice Tony. I'm looking forward to the kit. BTW I just had a close encounter with a Hurricane XII on Friday. Cheers!
-
Bill Bunting reacted to a post in a topic:
Spitfire XVI SL721 - Finished!
-
Spitfire XVI C-GVZB / SL721 AU-J
Bill Bunting replied to Bill Bunting's topic in Ready for Inspection
Thanks. Yes you may. Do you want more pics? -
Bill Bunting reacted to a post in a topic:
Spitfire XVI C-GVZB / SL721 AU-J
-
My first RFI and WIP on LSP is my recently completed Tamiya Spitfire XVI. I have tried to represent ser. SL721 as she was when owned by Mike Potter in Canada up until a few years ago. SL721 has been modelled by others in these markings "AU-J" / C-GVZB and also in it's original guises as "JM-R". The original aircraft was modified over time to suit the owners' needs and I have tried to capture the ones as she was when in Canada. SL721 is now in Belgium and registered as OO-XVI. LSP member red Dog modelled this version and I am grateful to him for making a set of masks and decals for me to complete my model. This model will be presented as a gift to Mike Potter next week as a Thank You for preserving the only flying Spitfire IX, Hurricane, Lysander in Canada along with a P-51D and until very recently a P-40 (sold). Mods to the base kit were: replaced the Hispano canon wing panels with flat panels (they are now luggage compartments). improved engine and firewall details with additional wiring and plumbing. improved cockpit detail with additional wiring, switch panels, seat cushion, modern seat harness, sidewall details, checklist storage, GPS mount, map lights. Addition of modern radios in the cockpit and antennae on the upper and lower fuselage. After market parts used were - Ultra cast cockpit door, Master brass canon barrels and ResKit 3-spoke wheels/tires. Paints are Tamiya laquers and gloss coat. Masks were used for the National markings (fin flash is kit decal), AU-J codes and the wing walk lines. Custom decals for the "William Harper" dedication, propellor labels and the "Chief" head dress emblem. Thanks to those who followed along on the WIP. https://forum.largescaleplanes.com/index.php?/topic/96156-spitfire-xvi-sl721-finished/ Cheers!
- 15 replies
-
- 21
-
-
She's Done! I will post some more pics in Ready for Inspection later but here's one. THANKS TO: red Dog for the masks and special decals. And to All who dropped in, followed and/or commented. Cheers!
- 63 replies
-
- 13
-
-
Here we go with the last little bits. And there's quite a few of them. I saw the "Ultracast" door online and decided that the detail on this was much better than I could do so it was quickly purchased and painted. The kit's decal had to be modified to match the layout as on C-GVZB. The canopy was painted outside and inside. Using the Tamiya masks cut just inside their lines worked perfectly on the inside. red Dog sent me some decals for the unique Commemoration labels. Although he sent them in a couple of colour variations, they didn't match my paints. These were touched up by brush, after I re-did the camo pattern. red Dog also included the prop markings. The black was a little pixilated but no problem, a touch up with a .05mm marker and they are great. Map lights on wire stalks were made from thin wire with the insulation partly removed, the insulation painted flat grey-black. One on each side. Along the way I broke one of the aileron hinges. It was replace with plastic card. - I almost forgot this one! A modern VHF antenna was made from shaped strut stock. A hole was drilled, the antenna base shape was carved, the piece cut off, a wire pushed through and then attached to the belly of the fuselage. A blade type transponder antenna is right behind it. NOTE - this was done before I had a good photo reference. Of course soon after doing this, I found a photo that shows the VHF wire antenna is fitted to the ID light location. On C-GVZB the original light was removed and a plate with the antenna was installed in its place. So I had to move mine to match. Isn't always the way, you find the perfect reference afterwards! The ELT antenna was made from wire with CA glue added to the tip and part way up to represent the coil in the wire that is shrink-wrapped. This is on the spine of the fuselage. That's it. She will be in the photo booth in the next day or two and then Ready for Inspection.
-
I decided to mask the wing walk lines - I'm very happy and will do this a lot more in the future. I did decide to use the kit decals for the fin flash. I also decided to use the kit decals for the fuselage roundel. It's there under the masking tape. The Code letters were done with the masks from red Dog. And then - GONE! I forgot to 'de-tack" the tape!!! Mind you the codes look good! The picture above is after sanding the bits of remaining decal off. A little re-painting is needed and I will either steal a roundel from another kit or paint it. I'm going to mull that over a couple of drinks. See you soon!
- 63 replies
-
- 11
-
-
OK so the main parts are painted top and bottom. Now for something very new to me - painting markings with masks. First off a big THANK YOU to red Dog from this forum for the masks. AU-J / C-GVZB has what I think are unusual/rare upper wing roundels, they may be more common but I haven't seen many. they are C-1 with a narrow white ring and a yellow outer ring on the upper wings. Anyway - masks are the way to go. I started with the undersides and it came out OK except....... It's in the wrong place!!!! WTF! Nothing to do with the masks, just my stupidity. So that part of the wing was masked off and the paint removed using Tamiya acrylic thinner. This thinner removes acrylic and laccquer paints with good control and not too smelly. And the same masks were used again in the correct place. The upper wing is done too. Note that the roundels were painted with Tamiya white, Testors enamel red and blue and a mix of Tamiya/Gunze for the yellow. The sheen is not there but it will come back with some gloss topcoat. I like the masking technique, I had to do a little touch up here and there but I didn't burnish the mask edges enough, I will get better! The serial numbers came out great. This is so superior to decals, I will try to use masks all the time for this scale. That's it for now. Cheers!
- 63 replies
-
- 13
-
-
Little bits and some painting done. The kit doors are a little disappointing with depth of detail and the canopy breaking bar is moulded in place. I decided to scrap off the bar and make my own using foil for the clips and plastic rod for the bar. For the practice - why not do two? Both the 'closed' and 'open versions were done, just in case... The prop was assembled and painted. Just for fun it is photo'd on top of a Tempest prop - that tempest is a brute compared to the Spitfire! First bit of paint - finally! The yellow (mixed Tamiya and Gunze acrylic Yellows) has been painted and masked, the Light Grey undersides are done, the Ocrean Grey is painted in and the Dark Green is started. Vintage wings keeps this aircraft immaculate, it's stored indoors and only flies a few dozen hours a year at most so it shows no signs of weathering. To this end no undercoats of high or low lights will be done. Tamiya lacquers, decanted and airbrushed were used for the main colours. Cheers!
- 63 replies
-
- 11
-
-
On the restored AU-J the gunsight is the older reflector type, similar to a Mark IX. Luckily that type of sight is located on the clear sprue in the kit. The restoration also included adding a Garmin GPS to the front of the mount. I duplicated the GPS mount with plastic card. The gold switch box under the left side of the coaming is provided by Tamiya but I didn't think it had enough detail. I tried modifying it, but destroyed it instead. A new one was made from plastic card glued together in layers, drilled and wire "switches" installed. At some point I realised that the restored aircraft did not have the drop tank jettison handle (on the floor near the pilot's right leg). So the PE one from the kit that was installed earlier was removed. The fuselage came together without any fit issues. All of the test fitting paid off. Since the canopy and door will be displayed open, I wanted to paint the canopy frames on the inside. I used the kit supplied masks on the inside of the windscreen and canopy. For the outside I used Tamiya tape cut to the framing. Always remember to use a fresh scalpel blade and low pressure when cutting. No need for aftermarket masks. The blown hood had a mould seam down the centre that was scraped, sanded and polished into oblivion. That's it for today! Cheers!
- 63 replies
-
- 11
-
-
No embarrassment at all! Dave has flown all of Mike Potter's warbirds except that one. It was sold before Dave got the chance. Here's a picture of Dave, me and the Lysander. Dave is in the beige flightsuit back to the camera. I'm near the tail in the olive flight suit. Dave asked me to answer questions about the Lysander if they were asked. Little did he know I can talk and talk! On a start -up, Dave asks the best questions like "is there any fuel leaking?" and "You'll let me know if it's on fire right?"
-
Yes. I believe the hand pump was only on the earliest Marks. The red bottle by the seat is compressed air for an emergency gear extension. It has a big handle to release the air into the hydraulic system quickly. This little valve and its lines are too small (IMO) to handle such a volume of air in a rush. I'm thinking that it may be the valve for filling the bottle? It's just my guess right now. Next month I will be presenting the model to Mile Potter, the previous owner of AU-J / C-GVZB. I will definitely be asking him about it!
-
Dave is actually a friend of mine, he lives nearby and we meet at the airport often and I'vehelped out with some of his Lysander trips. In fact he played a role in this build, he ferried the kit from the Ottawa donor to me to be built. Dave never flew the Mk.XVI at VWOC and the Mk.IX (Y-2K) is different so he wasn't sure. Thanks though!
-
red Dog - That's fantastic. Now I know what it is for. It looks very much like OO-XVI / C-GVZB since the drop tank control is missing and the added strap on the framework. Cheers!
