
Sepp
-
Posts
337 -
Joined
-
Last visited
Content Type
Profiles
Forums
Events
Everything posted by Sepp
-

Tamiya 1/32 P-51D - first LSP build with lots of little firsts - FINISHED
Sepp replied to Sepp's topic in Works in Progress
Well, after a week that I'm going to try very hard to forget, it was good to clear the mind with some more time spent on this. Firstly, the moulded gun barrels (or, I suppose, more correctly muzzles) have been drilled out and replaced with the lovely Master brass set. Apologies for the poor pic. Then I set about the wheel wells. I decided that out of the box, the kit doesn't have enough parts, so I detatched the inner gear doors from the centre divider. This made access to the side walls easier as I would be adding a few things to get the feel of lead wire, CA glue etc., and it will also help when it comes to installing a modern VHF aerial between them (as this build will represent a heritage/memorial flight bird) and when I play with bare metal foil on the scuff panels. In the process I discovered that said CA glue is very good at sticking anything to anything else, except the two things you're actually trying to stick together (particularly if one of the unintended participants is, say, one of your own fingers)... however, eventually i arrived here: Again, I'm not going overboard on it because 'how' currently trumps 'what'. Finally, I couldn't resist trying out the masks to see if my intended sequence was going to work so the Revell mule was stripped down and out came the Paashe. Don't look too closely at the finish because I barely allowed each layer to dry before moving to the next and didn't pay much attention to ensuring the masks were seated properly, because (as you can probably guess by now) the process is still more important than the finish at this stage. The red part of the diamond was another experiment and there might yet be more of that involving Sharpies and smaller stencil masks. I'm still heavy-handed with the airbrush but at least there are no runs, and although the wavy leading edge is not going to make it to the finish line it looks like the plan might actually work : The dry run has shown some improvements I can make to the markings masks to ensure proper placement and orientation but I'm happy with where things stand. Next up? Cockpit tub, I think - but for now, I can hear a cold beer or three calling! Cheers, Sepp -
Very nice work - and I love that moveable pipe
-
Defiance and Devotion......Revell Hasegawa Spitfire
Sepp replied to williamj's topic in Ready for Inspection
Superb work and very inspirational -
Tamiya 1/32 P-51D - first LSP build with lots of little firsts - FINISHED
Sepp replied to Sepp's topic in Works in Progress
Yes, indeed - very useful Once Silhouette has traced your outline/shape, multiple paths (like the two masks for the left wing in my original attempt) can be split using Object>Release Compound Path, and individual nodes can be adjusted using the (would you believe) Edit Points tool on the left-hand side. It is a very fiddly tool to use, I find, so atm I prefer to go back to Inkscape and re-import. -
MWP Project: Mirage IIIC "Ça va sans dire!"
Sepp replied to aquatarkus10's topic in Works in Progress
Absolutely beautiful work! -
Tamiya 1/32 P-51D - first LSP build with lots of little firsts - FINISHED
Sepp replied to Sepp's topic in Works in Progress
As I'm here, a tad more progress: Firstly, I rehashed the camo masks. Whilst the "full fat" versions work well on the wings, fin and tail, the fuselage is obviously a more complex shape and the meat of the masks was making laying them down problematic. I should have realised this... New version just uses the edges - much better. The sharp-eyed will notice each shape has a curvy and a splinter edge. The latter is the "inside" face, i.e., towards the meat of the masked area. I've also printed a "road map" showing the correct orientation for each piece, as some are rotated to fit the sheet. These prevent me going potty trying to remember which way up they should go, and in which order. Last, and by no means least from my point of view, I actually started playing with plastic. I polished out the seam on the canopy (Tamiya... why???) , masked it up and sprayed it - black inside, dark earth outside, inner face of the frame has also had a coat of matt varnish - and I'm quite pleased with the result. You might spot I also removed the small bump that the HF aerial leads through ... partly to see if I could. It only left the tiniest of scar, which isn't noticable, and what looks like a small crack on the top of the canopy in the pic below is just a reflection/artifact; the canopy is sound. As I haven't yet decided whether the bird will get a matt or satin finish, I'll return to the outside of the canopy when I cross that bridge. Actually, I should confess this is the second try. The first canopy turned out OK, too - then I thought "just one more pass with the polish"... and it cracked. Lesson: when it's good enough, stop! To prevent this one cracking I used Bluetak to make a slug for the canopy to rest on whilst polishing: "other cola-based beverages are available", lol Next up: tiny brass gun barrels... Sepp -
Tamiya 1/32 P-51D - first LSP build with lots of little firsts - FINISHED
Sepp replied to Sepp's topic in Works in Progress
Hi Bryan, I've found saving outlines as .png files (Inkscape: [select object] File>Export Bitmap) then dragging them into Studio (I use my desktop as a scratchpad, and drag drectly from there) and using Tracing Tool>Trace Outline has worked best. The national markings, diamonds and camo slices were all done that way and all seem pretty much bang on scale. Doesn't seem to be any distortion either, as the circles have all come out, well, circular The exception was trying to get Studio to trace a shape with intersecting lines like this (thin lines, hopefully you'll be able to see them): Studio appears to want to create an edge on both sides of the wavy line, no matter which option one chooses. Even splitting the figure into a box and separate line, the line still gets an edge all round, rather than being translated to a single cut... one option would be to draw the shapes in Studio, convert to paths and combine. I opted for the easier "change what I was going to do", as you'll see below As for scaling - it might be a resolution issue. Inkscape is not hugely brilliant at recognising "native" scale. It seems to use pixels and resolution to determine size. That's why I'm drawing to scale and exporting as a .png. The exported bitmap is what it is, the resolution issue doesn't occur. John -
Tamiya 1/32 P-51D - first LSP build with lots of little firsts - FINISHED
Sepp replied to Sepp's topic in Works in Progress
Thanks, Bryan I use Inkscape 0.48 - it's also what i used to draw the profile in the original post. I would jump to the newer version but they changed the native resolution so anything imported from 0.48 suffers a scaling error. I have lots of line art aircraft and vehicles done, and I really cannot face having to rescale every single one. The newer version can perform some really neat tricks, but good ol' forty-eight is (currently) good enough for what I do. I've also done the T-shirt thing but man, does it make a mess of the surface, and it's still really too sticky for fragile media like frisket. For that, I think I'll use the method suggested by Ade Rowlands. John -
Nice work Will follow along.
-
Tamiya 1/32 P-51D - first LSP build with lots of little firsts - FINISHED
Sepp replied to Sepp's topic in Works in Progress
Small update: I've been playing with another new toy this week (namely, a Silhouette Cameo 3), turning the intended 2D camouflage pattern into 3D-friendly masks and seeing how it handles various masking media. Still requires some tweaking but getting there with the help of a Revel -D5, which is also serving as a paint mule as I experiment with pre-shading, mottling and generally learning how to paint with an airbrush. I'm impressed with the Cameo's capabilities - it handles the sharp corners on the ermine tails nicely, but the carrier sheet is waaaay to sticky out of the box - they really need to sort that out. More later! -
Very nice subject, that! Beautifully executed, too
-
Tamiya 1/32 P-51D - first LSP build with lots of little firsts - FINISHED
Sepp replied to Sepp's topic in Works in Progress
I aplogise in advance that there will likely not be many pics, and what there are will be poor quality as the only camera I possess is the one on my phone. Money is tight atm, so this will in all probability not change in the forseeable future. Well, first baby steps. I spent the day yesterday playing with my new toy, a Paashe Talon. Very nice it is, too. Allow me to introduce parts C1 and C2. These two innocent pieces of plastic are going to get painted, stripped, scribed, riveted, filled, gouged, re-filled, painted and stripped (again) and generally will be horribly tortured over the coming weeks, poor things. I have to say, I'm impressed by Vallejo's Model Air paints. They've put up with my ineptitude very well, so far, and I was impressed with how little paint was required to get the white to completely cover the black in the test above. I also managed to get some paint (brushed Hannants' Xtracolour, for those who are interested in such details) and even some tiiiiny decals on the cockpit sidewalls: More later... -
Tamiya 1/32 P-51D - first LSP build with lots of little firsts - FINISHED
Sepp replied to Sepp's topic in Works in Progress
Thank you for your interest! My father's family is originally from Brittany, (hence my choice of 'what if'). The Kroaz Du forms the basis of the military ensign and unit colours... Aircraft markings in the timeline evolved from a differenced French roundel - early on I did indeed look at a Finnish-type cocarde, but I prefer the ermine spot -
Tamiya 1/32 P-51D - first LSP build with lots of little firsts - FINISHED
Sepp replied to Sepp's topic in Works in Progress
Thank you Nice to know someone is out there, lol. -
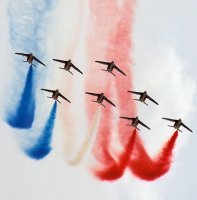
Hello world! By way of a (short) introduction, my name is John and the last kit I built was way back in 1975, when I was 14. Now I'm within touching distance of 58 and after lurking here for nearly nine years and marvelling, goldfish-mouthed, at the tremendous talent exhibited here, I think it's well and truly time that I actually took the plunge and had a go at nailing something together... My chosen victim subject aircraft is Tamiya's lovely 1/32 rendition of the later P-51D. It is beautifully produced and the cowling is, as many have said before, a work of art but why Tamiya chose to include toy-like features such as vinyl tyres, removable landing gear etc. is a puzzle to me. Oh well, it is what it is. For me, this build is not so much about the "what", so much as the "how to". When I was a kid, I was happy just to stick the bits together and slap some paint on and this , as the title says, is therefore a confection of firsts for me: first time using an airbrush, first time doing anything that might be kindly described as "detailing", first time using PE, brass, resin or DIY decals, first time masking markings etc., even the first time putting varnish on the thing! I realise that to some the notion of alternate history is an immediate and complete turn-off, but I enjoy it and it does allow me the freedom to explore technique without having to worry about doing justice to a historical subject. With this in mind, the end goal will be an unashamed "what if". Spoiler: this will probably also apply to some extent to my first few builds - many more firsts to go, including foiling - those of a nervous disposition should look away now Anyway, enough dithering - if all goes according to plan, it should turn out something like this: 12e Escadrille, Forces Armées Bretonnes, Algeria 1954/55 in support of the French campaign. Thanks for looking in
- 65 replies
-
- 13
-

-
Great rendition of an unusual subject. Very nice indeed
- 6 replies
-
- 1
-
-
- revell
- soccer war
- (and 1 more)
-
Spitfire on ground: ailerons always in neutral?
Sepp replied to nmayhew's topic in General Discussion
Don't forget: if you're gonna depict the ailerons other than in the neutral position, lean the top part of the control column above the pivot in the appropriate direction (toward the upgoing aileron). -
1/32 IM, preferably by Tamiya, even more preferably w/out needing major surgery ... Rafale M.D. 450 Ouragan Cessna Citation Excel or XLS (only because I used to fly 'em ) A really, really nice AlphaJet Beech 19 Sea Fury
-
Nice work! The owner's manual is very convincing and the Jepp folder is an inspired touch. You nailed the Cessna-cream panel colour, too. Naughty pilot for having loose articles in the cockpit, though
-
Bf 110E-3/trop 2.(H)/14 North Africa - almost done
Sepp replied to Fanes's topic in Works in Progress
Well, aircraft get moved around, reassigned, shot down and codes get reused, so I guess it's not too unusual to find two different airframes with the same code. 5F+YK was also worn by a Fi 156, for instance. Maybe you could start a shelf dedicated to that one code -
Me, I love what-ifs - especially of the alternate history/fantasy nation sort - but I'm sure there are others here who would have mini heart attacks at the very thought. On the other hand, I thoroughly enjoy reading along with some of the truly awesome down-to-the-last-nut scratch builds that are on here. Just do what you enjoy doing. None of us have the right to tell another their work lacks value.
-
Rick - according to Bruce Robertson's "British Military Aircraft Serials 1878-1987", R7673 was a Typhoon 1A (or poss 1B) which was later (if I'm reading the notes right) given maintenance airframe no. 4632M. [Edit to add] X7673 was a Beaufighter Mk. I Hope this helps!
-
That truly is a thing of beauty. Bravo!
-
Thanks! Been lurking here, quietly impressed, for a loooong time, but I've recently bought a little something to have a play with and we're currently weighing each other up over the bench, lol. Lloegr (also Lloegyr) is basically anywhere southeast of a line roughly between the Severn and Humber estuaries ... excluding Devon and Cornwall. Anyhoo, back to the show!
-
Lovely build, interesting and informative from the beginning. Just a thought... as your aircraft is undergoing maintenance, could you not simply reason that the missing armament has been removed for same "sorry, Guv, they're still with the armourer", for the sake of the GB? Then construct a bench, trestle or some such object showing them waiting to be re-fitted, once your barrels arrive? Think of the fun you'd have, scratching maintenance tags etc

