Search the Community
Showing results for tags 'Aires'.
Found 19 results
-
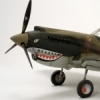
Here is my recently completed 1/32 Hasegawa Fw 190D-9 build of the JV44 Dora flown by Heinz Sachsenberg known as "Red 1". In addition to the kit parts, I've added the following aftermarket items to the build: 1. Aires 190D-9 resin cockpit set 2. Eduard 190D-9 brass flaps 3. Quickboost 190A gun barrels 4. Eagle Editions 190A/190D-9 Early resin tail wheel 5. Henri Daehne VS111 resin prop 6. HGW 1/32 Luftwaffe seat belts 7. Montex Masks 8. Eagle Cal decals
- 62 replies
-
- 31
-

-

-
OH yeah Baby...... Was hopping that one for a long time, everything was there, all the hardware, bell and wissel etc. but didn't feel the drive... Then there was my calling....lol ., that GB suggestion came up, and notice that perfect Angolian built a week ago.... Gonna go with everything or almost, from the Trumpet kit, Linden Hill decal sheet, the hole Aires package (pit, wheel and Exhaust) Quickboost scoops / spoilers, Aero discharge and maybe with a pilot..... also did put my hand on some Cutting Edge Atoll missile.. don't know if they ever used them but will find out. In the next few days, will definitly gonna go true Madmax Angolian WIP for some interesting ideal, but as always want to keep it a simple build and have fun first. Don't get far... Dan.
- 81 replies
-
- 15
-
-
- linden hill
- trumpeter
- (and 2 more)
-
Hello friends! I finished my He-162 model from Revell. I used Aires cockpit, Quinta studio 3D decal and True details wheels. R4M rockets from Ef-126 Das Werke kit. I use Gunze and RC colours for camo, LP Tamiya and Alclade for "metal" surfaces. I used Ucshi van der Rosten wooden decals for "wood surfaces". Regards, Sergey Budyansky.
- 16 replies
-
- 30
-
-
After the pink panther I found this bird in the same book This set a flame to model it as the image is in colour and I have done a PRU blue bird yet. Having secured 2 more Revell IXc boxings I pulled one out and set about working out the best way forward. I then turned to our forums for more inspiration and help and discovered this thread and comments. Has anyone tried the Alleycat Spitfire PR.XI conversion?? So now ordered said set from AlleyCat and awaiting its arrival, but also dug out a Revell Mk.IIa kit as well on MikeC thoughts. Now I really enjoy birds with unusual camo and markings so a Vc from Malta is a perfect buddy for the PR. Now to the scary bits... The Grey Matters wrap round canopy doesn't touch the sides in the IX fuselage, not even close, BUT its much closer in the Mk.IIa fuselage as this has the earlier more rounded screen. The Mk.Vc spits only had the later canopy so a perfect swap of fuselages EXCEPT they are different length due to the changes in engines, but are the same profile from the engine firewalls back. Deep breath and Razor saw out... Side by side First cut is the deepest Joined Pretty chuffed with outcome. Just need to find a juicy Malta scheme for the Vc now. BTW the wings mixed up are a perfect fit, so other than a little rescribing for the PR non gunned wing and drilling the cannon ports on the Mk.II lower section we are looking good.
- 148 replies
-
- 12
-
-
 I’ve been a little in the doldrums modelling wise for the last few weeks. My Harrier has stalled and made its way to the Shelf of Doom for a little while, I just can’t seem to get the mojo to get into it properly. This year and it’s madness has seen me forced to sell all my camera equipment to keep up with bills, as I had no wedding bookings for the entire year, leaving me with virtually zero income, and an uncertain future right now. Add into all this that I had a rude awakening with my health recently which means I’ve gotta commit a whole heap of time to exercising to improve that situation, and take some away from the modelling bench. I previously had one of these monsters built and on display at my old photo studio, but it got trashed by an misplaced lump of timber that my father was moving about. I was gonna attempt a salvage but then I saw one up for sale with loads of extras, so thought I’d do a build from the ground up again. So, I’ve pulled down the huge Trumpeter box that I recently acquired from another LSP’er. This is truly, a Flanker with almost everything being thrown at it. Along with the kit, there is the following that I’ve chose to use.... Zactomodels, Nose, intakes, canopy, pylons, and full missile setup. Aires, cockpit, wheel bays, exhausts, and a choice of ejector seat with our without a pilot. Master and Profimodeller, metal static dischargers, dynamic pressure sensors, and pitot tube. 2 choice of wheels, Contact resine, or Armoury. Begemot stencil decal set. Foxbot Ukraine AF digital camouflage masking set, and decals for said aircraft. I couldn’t quite find the room to put the kitchen sink into it as well, even though I may as well be throwing everything else at it. I have stayed away from adding any Eduard PE to it, I just can’t seem to get on with it to produce a satisfactory result. With all this, I’m attempting to build a showstopper, if I get it built how I have it in my mind currently. It’ll be a long and slow burner, the missiles individually are mini models! I’ve predicted my future, it’ll be saw, cut, trim, sand, dry fit, sand, dry fit, repeat until happy. Until then, I’ve got a lot of unboxing, cataloging, and sorting to get through.
- 85 replies
-
- 12
-
-
- zactomodels
- aires
- (and 2 more)
-
With the advent of 3D decals from Quinta et al I find myself having difficulties on choosing which path to go. 1. Quinta IPs + resin seats + resin canopies with inner frames etc https://aerocraftmodels.bigcartel.com/product/mcdonnell-douglas-phantom-replacement-canopy-set-for-tamiya-kits 2. All resin+PE cockpit set (like Aires) which caters for all areas but probably with more assembly and trial fitting involved. And yes, I dislike doing cockpits but still really like the look of a well-finished office. Any thoughts?
- 6 replies
-
- 1
-
-
- aires
- quinta studio
- (and 1 more)
-
after long time not building a plane i will start this one The Su-25UB from trumpeter i didnt founduch online builds off the twin seater What ihave to start with I still note sure what paint job i will give here but im thinking the grey digital camo Just a few things i have to think about is the rivets on the back off the plane that are in real life raisd Will i go for it or not More progress later when i start the beast O and thanks Jack for this kit Mark
- 28 replies
-
- 11
-
-
Hello. Having some holidays, finally, and getting really exited with all the F-104 builds going on, I decided to take mine from the shelf. Just curious where I left it, as always with some issues or lack of courage to get things done. In this case the old Hasegawa F-104G/S kit needs a full scribing and some riveting, to meet my standards. But I'm chicken with that part of modeling to be honest. More on that later. First some photos I made over the weekend that show were I am with the build. Left back side of the cockpit. Cut out the "floor", because the early ones had the bang seat go down. That looks real different. My ambition was to replicate some details of that. Will see what is left of that. Right hand side Sliding rail is made of brass profile. Bang seat can easily move up and down. Have to look up what AM I used on this part. Don't know anymore. Todays work. After fitting the Aires wheel bay (for Italeri kit not the Hasegawa) I like a little challenge yesterday, I started to rework the main landing gear. White styrene is Evergreen tubing in various dia / sizes. Aires were to fragile and rough on detail. Still need to work on some actuators for the big doors. And here I am right now. With some minor extra weight inside the nose cone it is not even a tail sitter. Happy me. You can see the fuselage was already painted in a black primer. I made a start some years back to polish that off to get the lines and rivets on the surface. Idea is to scribe and rivet from white lines and dots. It went to the famous shelf. Well I'm almost finished scribing now, rivets still to do. A two days work in total. Hope it looks good with some new coat of paint. More and better photos to come soon. Hope you all like it Robert Jan
-
A new project! With my Corsair build on the downhill side and me struggling with the scribing work on the Ta152H, I wanted a change of pace and decided to start introduce a new build. I am going to convert the Revell Bf109G-6 kit into a Bf109G-6/AS. This conversion utilized the Daimler Benz DB605AS engine with improved high altitude performance. Physically the G-6/AS is characterized by a new smooth engine cowling that deleted the characteristic "beule" bulges over the MG131 cannons mounted on top of the engine. The genesis of this project is rooted in me having the G-6 as a donor kit for an older G-10 build. I needed to the smaller wing bulge parts but otherwise the kit was complete and I wanted to make use of it. When Alexey at AMUR Reaver produced his G-6/AS resin cowling, I thought this was a great opportunity to utilize a kit I already had. So.... I had swapped out the smaller wing bulge from the G-6 kit with the larger wing bulge from the G-10 so these would need to be replaced. I picked up a set of the smaller bulge wing parts from Barracuda Studios, which I hope is a drop-in replacement. The core of the conversion is the AMUR Reaver resin cowling. It is cast in a cream color, similar to the resin that Barracuda Studios uses. There is some discoloration in the casting but it does not seem to manifest itself in the smoothness of the surface. The cockpit will be replaced with Aires resin. I had very good experiences with the Aires resin cockpit for the Revell G-10 build and am crossing my fingers that this set will be similar in design and execution. Three different breeches for the gun firing through the prop spinner... does anyone know which one(s) would be appropriate for the G-6/AS? The kit prop and spinner features an awkward seam resulting from trapping the prop blades between the forward half and back half of the spinner. This design also makes painting of the spinner difficult. To alleviate these issues, I'm going to use Barracuda Studios resin prop and spinner. The kit wheels will be exchanged for a set of Barracuda Studios resin wheels. The kit exhausts are not hollow so I'm replacing them with a Barracuda Studios resin exhaust and supercharger intake set. And finally... another resin/metal prototype for the landing gear! To summarize the aftermarket add-ons for this build: 1. AMUR Reaver Bf109G-6/AS Engine Cowling (Resin) 2. Barracuda Bf109G Upper Wings with Small Wheel Bulges (Resin) 3. Aires Bf109G-6 Cockpit Set (Resin and Photoetch) 4. Barracuda Bf109F-4 thru G-14 Prop and Spinner (Resin) 5. Barracuda Bf109G Wheels (Resin) 6. Barracuda Bf109G-6 Intake and Exhaust Set
- 209 replies
-
- 22
-
-
- amur.reaver
- barracuda
- (and 1 more)
-
I think it is time to queue up my next LSP project. I want to get out of the 109/190 groove and try something different (for me anyway) and I've settled on a Luftwaffe jet fighter, the Me 262. My subject will be this aircraft... Lots of cool visual features on this aircraft.... the hard mottle on the tail... the blue and white checkers... the yellow numerals... the bold skull badge... so the painting and markings should be fun to do. Here is a profile by Tom Tullis that shows what the entire plane may have looked like... I'll be using the Trumpeter Me 262 A-1a (Heavy Armament) kit. The following aftermarket add-ons have been purchased for this build: Aires Me 262 Resin Cockpit and Wheel Bay set Barracuda 262 Resin Main Wheels and Nose Wheel HGW Seat Belts Montex Super Masks I'm still in the painting stages of the 1/48 Hien build so I'm not sure when this one starts. But before I start cutting sprue, I'd like to take a look at the kit contents and the aftermarket stuff too. Visualizing the build components helps the gears in my head to start turning, identifying potential trouble spots and highlighting options and possibilities.
-
i will trow in a second build with all the sanding and filling going on i need to do something difrent that i can build the plan is to build a Tornado IDS with the flaps and slats from paragon pit and axhaust from aires also will build a few things from scrath I still dondt know what markings to use and this are the 3 options i have What happend so far on the kit i have removed a few panels to add more detail its the first time that im trying to do somthing like this so dondt go to hard on me still a lot to laern Still a lot to go before the first bay is ready but you will get the idee Mark
-
here my entry for this groupbuild What im going to use the old tamiya F-14A i know lot off work ahaed but im looking forward to do this I love the F-14 and also the camo so what can go wrong A lot off scribbing ahaed The kit and aftermarket Mark
- 40 replies
-
- 11
-
-
ok here we go with the conversion for the RF-8G After my ukrain bird it whas time for a new challenge I whas long thinking on how im going to make this and then i found this on the net so now lets get the party started what i have done so far Mark
- 41 replies
-
- 10
-
-
We review a set from Aires for the Revell 1:32 Typhoon kits: http://www.largescaleplanes.com/reviews/review.php?rid=2064 Iain
- 23 replies
-
- 3
-
-
- Typhoon
- Eurofighter
- (and 1 more)
-
Picked up a Trumpeter 1:32 F-8E Crusader from the Essex Modellers' Show with the intention of turning it into an RF-8. I have checked for other aftermarket to add to the model, and I see that Aires do two resin exhaust ducts for this kit; 2094 and 2127. I can't see the difference between them in the photos. Which would be right for an RF-8G, or does it matter which one to get? Jens
-
 OK, I just couldn't stay away so here's my newest GB entry. I'm just waiting on one to arrive for the Interwar years GB and then I'll have one in both. Although it's the final version of the infamous Lawn Dart, Brad OK'd it as being representative of the type. For AM bits, I have the Aires cockpit set and wheel bays, Eduard wheels, GT Resin burner can and exhaust, and the Zotz decal sheet. Carl
 -
So I have finally sold enough of my stash to get one of these honkin' big beauties for a new project. Not only have I been looking forward to building this jet, this will also serve to help me get my modeling mojo back after almost 10 months of hobby inactivity. My wife and I just recently moved, so I will also be breaking in my new modeling space. Let me get started by being a little more long-winded. Just so we all are on the same page, I am not a rivet-counter; I like to build stuff that looks as close as I can reasonably get within my skill level and on a budget. As I stated previously, I sold off a bunch of stuff from my stash to raise funds for this project, so here is a list of what I have accumulated: -Trumpeter 1/32 Su-27 B -Aires cockpit for above kit -Eduard Su-27 Flanker B exterior PE -Begemot Flanker Family Stencils (4 pages of stencils!) -Linden Hill Flanker Sparka Su-27/30 Family Two-Seaters (we'll get back to that in a minute) -A full set of Akan paints for the plane I'd like to build I also have the following items on order: -Zactomodels Su-27 replacement nose cone -Quickboost Su-27 instrument panel -Mastercasters Su-27 weighted wheels About the decals - I ordered these initially to do the Russian "weatherbeaten" standard Flanker, but everyone who's done one of these planes has done it. So I decided to do one of the blue-over-blue-and-blue Kazakh Flankers. I figure I'll do a fairly-new out of refinishing plane so I can load it with stencils (I love stencils!). My compromise here is that I will wind up painting the plane in the scheme used on the two-seaters because they just look nicer. Also, I'm wide open to suggestions and advice- if you've done this already, I'd really appreciate all the feedback I can get. This is my first WIP on LSP so please let me know how I'm doing! I've gotten a start on some small stuff, so my next post (after dinner) will show where I'm at as of today. Thanks for indulging me!
- 63 replies
-
- 2
-
-
- Aires
- Linden Hill
- (and 3 more)
-
 Hi folks, Here is a look at a neat diorama accessory brought to us through Aires and their Aero Bonus line. This resin aftermarket set gives the modeller six traffic cones to use in any contemporary diorama setting. Each cone is made up of two parts and will assemble easily with CA or other suitable adhesive. In usual Aero Bonus style the resin is in a cellophane envelope with a stiff card insert to protect the contents. A single folded sheet of instructions gives the part call out and suggested colour schemes. There is a small decal sheet with black letter stencilling and white bands. (On my set some of the decal's ink had dried to the covering paper.) I'll add an image or two of the finished items in due course. Cheers.
 -
Hi folks, Here's a look at a resin aftermarket diorama accessory by Aires' sub-brand, Aero Bonus. This piece is a waste oil tank and composes several resin parts. Packaged in Aero Bonus's usual style of cellophane envelope and stiff card inner, this little kit also includes a small decal sheet. The single folded instruction sheet gives assembly instructions and suggested colour call out plus decal placement. The resin components are beautifully crisp with no visible flaws and offer the modeller the choice of full or stowed height tubes. The tank handle is commendably thin. This should assemble simply using CA or other suitable adhesive. I'll post an image or two when I've built it. Incidentally, does anyone have any images of these devices in use so that I can get a feel for the level of weathering and soiling one might see please? Cheers.


.thumb.jpg.f23b2dc356f90ead35d25aa5e3609a95.jpg)