32nd_Plastics Posted July 23, 2010 Share Posted July 23, 2010 Hello All, My name is Gabriel Morales. I'm a new member to the forum and would like to start off with my recent WIP of the amazing Fisher Sea Fury. As my first resin kit I am finding myself using more sandpaper and files to true up the shapes, and enjoying every step of the way. I can't believe the amazing hand-cast work that Paul has done with this kit, so I will give it all the care, and time it deserves ! I always loved the bright, soft colors of the number 105 Sea fury and fell in love with it the first time I saw its pictures. So, here is my attempt at modeling it ! All comments, and advice for a resin-newbee welcome ! GM Link to comment Share on other sites More sharing options...
32nd_Plastics Posted July 23, 2010 Author Share Posted July 23, 2010 Some pics to start with: Link to comment Share on other sites More sharing options...
32nd_Plastics Posted July 23, 2010 Author Share Posted July 23, 2010 Here's a truing-up of the spinner and added rivet detail....I also split the block behind the spinner to model the crankcase fairing found on the full scale plane Does anyone know how to add more than one picture at a time? I am limited to 100 Kb per post and I've already downsized the pics as much as I can ?! thanks GM Link to comment Share on other sites More sharing options...
Barry Posted July 23, 2010 Share Posted July 23, 2010 Welcome GM, you'll find some truly talented modelers here that are very will to help! You've picked both a Beautiful aircraft and a well engineered kit to jump into resin with. I think you'll really enjoy the build, there are several others here on the site and all have turned out beautiful! I struggle with the pics also, I've found that you can crop them and cut out un-needed areas to help. I've also found that some pics can be cut down to 45-50 Kb and get two per post. Looking forward to watching your progress on the Sea Fury. Happy Modeling, Barry Link to comment Share on other sites More sharing options...
LSP_Kevin Posted July 23, 2010 Share Posted July 23, 2010 Everybody raves about this kit, so I think you'll have a great time with it. You'll have to change your LSP name to '32nd_Plastics_and_Resin' then! Looking forward to it, especially in those Aussie markings. Does anyone know how to add more than one picture at a time? I am limited to 100 Kb per post and I've already downsized the pics as much as I can ?! thanks You've got several options. Barry's suggestion is a good one, but still limits you to only a couple of shots per post. Bear in mind that there's no problem with separate posts for each photo, but I appreciate that it's annoying to do. Your best bet might be to use a third-party picture hosting service like Photobucket. It's free and relatively simple to use, though it does involve extra work and some cognitive overhead. Kev Link to comment Share on other sites More sharing options...
LSP_Ron Posted July 23, 2010 Share Posted July 23, 2010 You will love this kit. I've built two now. Make sure you give everything a good wash in soapy luke warm water to remove all the casting oils. Get yourself a photobucket account and upload your pics to it then post the URL link here. It's the best way for posting multiple pics and fairly easy to use. Ron Link to comment Share on other sites More sharing options...
branchline Posted July 24, 2010 Share Posted July 24, 2010 G'day Gabriel, Welcome aboard to what is a really neat webgroup and I look forward to watching your build (somewhere in the roof is one of these kits...) In reference to posting images, the three digital cameras I've purchased all came with a CD containing editing software all of which have resizing functions on them making resizing images really easy (they resize as a proportional % of both the vertical and horizontal aspects when adjusting just one dimension). The reason I use these tools and post the image directly is for no other reason than from my expereince as a mostly armchair modeller (at present). My 'modelling' time is spent mostly researching due to not having a dedicated modelling area in our small house and so I use this site and several others for much of the modelling research and pre-purchasing decision making is made of threads here of the models (if I'm considering buying a model I look it up here to see what comments are made about it and mostly will only buy if the comment is positive). However, there are a fair number of threads (typically the ones I'm interested in) that the images are no longer available as they have been removed off the thread originator's photobucket account meaning much of the story of the thread is lost, particularly if the thread is a year or so old. So if you can I would recommend you resize and post directly onto the thread. My cent's worth. Again Welcome, BRegards Brent Link to comment Share on other sites More sharing options...
Learstang Posted July 24, 2010 Share Posted July 24, 2010 Welcome, Gabriel! Nice to see another Houstonian on the site (too bad about our Astros, though). You've picked good subject matter - the Sea Fury has always been a favourite of mine and I think the most beautiful radial-engined aeroplane ever. Regards, Learstang Link to comment Share on other sites More sharing options...
Wurzacher Posted July 25, 2010 Share Posted July 25, 2010 Hi Gabriel! Welcome here at LSP! And what a great model to start here! On reduzing the size of your pics just try IrfanView, it is freeware and makes it very easy to reduze the size of your pics to the dimension you want by just giving the desired amount in! Open your pic in IrfanView, type "s" and click on "show options" opening an additional window. Tick "set size" and enter what size you need it. Rename the pic for not to change your only original file and save. Done! The Fisher Models Sea Fury is one of the nicest kit i have ever built in my life, a friend of mine painted Fisher´s pilot figure, i made and painted my first (!) base and put all in a custom made display base with a mirror on the back side: It was my first all resin kit, and i really had a great time building it. If you have any questions please feel free to drop me a line! Thomas Link to comment Share on other sites More sharing options...
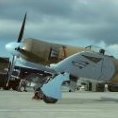
32nd_Plastics Posted July 26, 2010 Author Share Posted July 26, 2010 Thank you all (Barry, Kev, Ron, Brent, Learstang, Thomas) for the warm welcome and tips ! I am using an image resizer that will take the images down to about 40kb and maintain "decent" quality, so hopefully it won't look too grainy....as long as my rivets are visible ! Thomas, your Sea Fury is breathtaking ! It has motivated me even more to work hard on my project. Here's a little more work on the landing gear and prop. The brass casting is wonderful but needed about 45 min of filing and sanding. I wish I would have taken a before and after shot, but the one on the left shows the leg about halfway through the process and it is a little rougher. The spinner has been painted, glossed and then polished with sandpaper (3600, 6000, then 8000) to eliminate most of the "orange peel" effect. Also, rivets were added using MDC's hand-rivet tool....fun, but too bad they are not all visible in the pics. GM Link to comment Share on other sites More sharing options...
32nd_Plastics Posted July 26, 2010 Author Share Posted July 26, 2010 More pics - The spinner is not yet glued on...I don't really know what i'm waiting for, but i'll hold off a little longer, just in case ! GM Link to comment Share on other sites More sharing options...
Wurzacher Posted July 26, 2010 Share Posted July 26, 2010 Looks very good so far! When, some time in future, you are about to glue the spinner and the black gear to the engine face you might recognize some side clearance when attaching it. At least i did. So i used Magic Sculp (Milliput will do so, too) to glue the spinner/gear assembly to the engine face. This way you will be able to adjust the whole assembly to the cowl opening with ease! Which version do you plan to do? Thomas Link to comment Share on other sites More sharing options...
32nd_Plastics Posted July 26, 2010 Author Share Posted July 26, 2010 Thanks for the advice, I was wondering what to do there.....I will use something along the lines of an epoxy putty to glue the engine fairing into the motor, b/c the alignment does need some tweeking as it cures. I will be doing the RAN scheme number "105" as seen in my first post. I was fortunate enough to find decals for that exact plane. I couldn't find anything online until I did an eBay search and found Novascale (made by Aussie Decals) with the exact decals I needed ! GM Link to comment Share on other sites More sharing options...
Texas Posted July 26, 2010 Share Posted July 26, 2010 Very Nice Work....And Welcome Aboard.... Texas Link to comment Share on other sites More sharing options...
32nd_Plastics Posted August 9, 2010 Author Share Posted August 9, 2010 I felt the wheel wells could use a little more clutter so I wired it up a bit. thanks for looking ! GM Link to comment Share on other sites More sharing options...
Recommended Posts
Create an account or sign in to comment
You need to be a member in order to leave a comment
Create an account
Sign up for a new account in our community. It's easy!
Register a new accountSign in
Already have an account? Sign in here.
Sign In Now