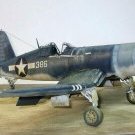
pascal JMW Posted July 17, 2016 Author Share Posted July 17, 2016 I really like the weathering you did on your Corsair, Pascal. Also, i like the IFF antennas you added from the stabs to the fuselage sides. I am sure that was not easy, and it probably made the model a lot more difficult to handle. I see a lot of heavily weathered -1 Birdcages and overall i think i like the balance of the weathering treatment the best on this one. Doing an early, heavily-weathered F4U-1, going from only black and white imagery is an inexact science. You get the best information you can, but its still subject to different interpretations. I know of one modeler who thinks the "Marines Dream" nose art was salvaged from another Corsair and wound up on 576. Certainly plausible, but who knows for sure?? Cheers, david Hi David nice to find you here, Thank you for your comment and compliment , For the IFF antenna it is not too difficult needs to make a very quiet day !, yes to trea needs to be very careful , I make that has the end before putting in the front window.. For photos black and white you are right it is always difficult we interpret, I try to get closer to the truth......... bye Pascal The nose art moved from 576 to Wramblin Wreck, I know of only one picture confirming this. Hi Scooby Yes right the pin-up moved on 386 , I have another birdcage tamiya 1/32 scale in my stash , if I find not the set resin to make F4U-2, I make 386 the continuity with 576 in the front window.. Link to comment Share on other sites More sharing options...
Jasta 14 addict Posted July 17, 2016 Share Posted July 17, 2016 thank you Danny (I work which has the acrylic gunze and tamiya) You can use H42 gunze which is the blue grey , But I dont like I find her too much.... I dont know but not great .... and for bottom gunze H51 light gull grey I leave on intermediate blue H56 gunze, with a first fine basic layer ( I never make a pre-shading in black ) Then I add directly in the airbrush a drop of navy blue gunze H54 for darkened certain panels lines , Then I cleared up the centers of panels , (directly in the airbrush again) the blue grey with light gull grey H51 to use for the bottom , And still darkened, and even more cleared up, several times to have several tone of blue grey I force on the mounted parts very cleared up, and for finish H 56 diluting has 90%pour to flood the whole And now decals and the real work of weathering begins, with diverse wash ,panel liner and varnish, the tone of the camouflage it modifies and still changes Photo montage , has to leave of one truth photo replaced by the model on Photoshop (I am sorry for my bad English) Tank's very much Pascal for this very clear and very interesting explanation. This technique is something to keep in mind, thank's mate Greetz Danny Link to comment Share on other sites More sharing options...
pascal JMW Posted July 19, 2016 Author Share Posted July 19, 2016 (edited) Hello You welcome bro ! I have build one second F4U Tamiya, I put some pics soon as I can .. (I have another birdcage 1/32 Tamiya in my stash ^^ ) Cheers Edited July 19, 2016 by pascal JMW Link to comment Share on other sites More sharing options...
bigern007 Posted July 20, 2016 Share Posted July 20, 2016 One of the nicer. ,,,,dirty ones,,,,well done. Cheers. Ernie pascal JMW 1 Link to comment Share on other sites More sharing options...
pascal JMW Posted July 27, 2016 Author Share Posted July 27, 2016 thank you very much Ernie ! Link to comment Share on other sites More sharing options...
benpada Posted July 30, 2016 Share Posted July 30, 2016 Very nice job on your Birdcage. Link to comment Share on other sites More sharing options...
munja Posted July 30, 2016 Share Posted July 30, 2016 Hello Pascal, Tu sais et aimes peindre. Bravo ! You know how and you like painting (translated from english to french ...) Link to comment Share on other sites More sharing options...
pascal JMW Posted August 1, 2016 Author Share Posted August 1, 2016 Hello Pascal, Tu sais et aimes peindre. Bravo ! You know how and you like painting (translated from english to french ...) merci mon ami ( thank you my friend ) Link to comment Share on other sites More sharing options...
Uncarina Posted November 18, 2016 Share Posted November 18, 2016 Pascal, I'm just getting caught up with your Corsairs. Excellent work on them, and thank you very much for sharing! Cheers, Tom Link to comment Share on other sites More sharing options...
dennismcc Posted November 18, 2016 Share Posted November 18, 2016 Stunning, just stunning Cheers Dennis Link to comment Share on other sites More sharing options...
Reuben L. Hernandez Posted November 18, 2016 Share Posted November 18, 2016 WOW!! This is one very nice looking Corsair, really like your weathering but I really like your choice of markings. IMHO Marines Dream has been overdone but that's just me, but adding that sharks mouth on one side of the cowling really sets this one apart. Extremely nice build and very inspirational. Reuben pascal JMW 1 Link to comment Share on other sites More sharing options...
Rod Bettencourt Posted November 20, 2016 Share Posted November 20, 2016 What a fantastic example!! The finish is superior scale effect. Thanks for sharing. Rod pascal JMW 1 Link to comment Share on other sites More sharing options...
pascal JMW Posted November 23, 2016 Author Share Posted November 23, 2016 WOW!! This is one very nice looking Corsair, really like your weathering but I really like your choice of markings. IMHO Marines Dream has been overdone but that's just me, but adding that sharks mouth on one side of the cowling really sets this one apart. Extremely nice build and very inspirational. Reuben thank you very much Reuben !! ( All not all right on the existence of the shark mouth ..; but it is my interpretation....) What a fantastic example!! The finish is superior scale effect. Thanks for sharing. Rod thank you Rod ! ( I have another birdcage tamiya 1/32 in my stash ^^ ) Link to comment Share on other sites More sharing options...
Recommended Posts
Create an account or sign in to comment
You need to be a member in order to leave a comment
Create an account
Sign up for a new account in our community. It's easy!
Register a new accountSign in
Already have an account? Sign in here.
Sign In Now