

mattlow
-
Posts
2,629 -
Joined
-
Last visited
-
Days Won
2
Content Type
Profiles
Forums
Events
Everything posted by mattlow
-
Nice one Larry. A hefty bit of scratchbuilding there! Matt
-
Ian Looking good so far. Sure goes together quickly for a large jet. You'll be giving Erwin a run in the speed building stakes at this rate. Matt
-
Lovely build. Would very much like to see some detail shots, particularly engine and pit. Matt
-
Thank you all for your words of encouragement. These DO help me keep on track. I do have a question for you all. The BV 155 V-1 was built and flew - therefore historically significant a/c. However, it did not carry armament, drop tanks or the cannon sized EZR telescopic gunsight - all pretty 'sexy' items. Should I do the V-1 as is, or the V-2 (90%) built at end of war (now sitting in Smithsonian storage) and slated for guns and tanks?? I may do a 155C (got as far as full size mock-up) which is even uglier than this one (in my opinion). Matt
-
Very nice work. Always glad to see an update to this thread. Matt
-
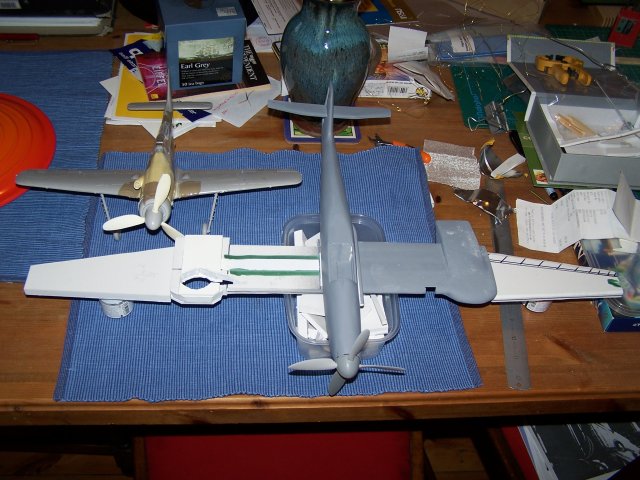
Ok here's the full span! The outer wing panels are still blocks of foam board. Some idea of size is given by the rather fetching Fw 190D-11 (Steve G - do reply about those Bentley drawings). Sorry for the poor quality pics - working in basic conditions. Hopefully there'll be some more significant progrees from November 06 in the next postings. Cheers Matt Low
-
Outlandish wingspan is the BV 155's most obvious feature. Here are the inner panels. As you can see this is currently a wing in two halves . I need to get onto the second half next. The 'lump' on the wing is the wheel bay (front) and the very large radiator bay at the rear.

-
One of the most impressive features of the 155 was the big four bladed prop. This is currently 'mocked up' with four Hasegawa 190D-9 blades, the actual blades will be larger - more like those of a D-11 or Ta 152. Spinner is two 109 spinners cut and glued together.

-
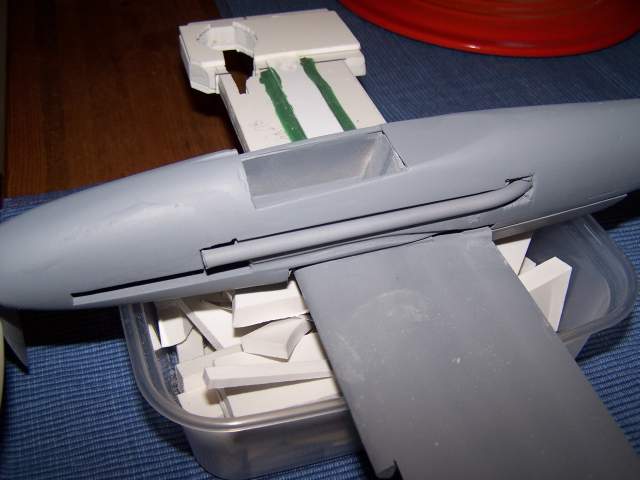
In this shot you can see the fairing under the fuselage which contains air intake for turbo and exit for used exaust gases. This still needs plenty of work to blend it into the fuselage sides.

-
Getting it to this stage has been a trial. I had a serious bout of 'confidence loss' when the whole thing looked crooked from above. I was ready to bin the fuselage and start again. However, some sanding and rebuilding has corrected it. The pipe running along the side here blew air from the turbo forwards to the engine. The lower cutout and channel is where the pipe taking exaust gases to the turbo blower fits.

-
Hi all Some of you looked at and commented on Pt I of this saga. If you want to see how I got here follow the link below. BV 155 part 1. Work stopped in Nov last year and has now restarted - in no small way inspired by Dave's ongoing Westland Whirlwind build - thanks Dave. Recent work has concentrated on cleaning up the fuselage. Front end had to be rebuilt as I got a bit over zealous with the heavy grit paper Basic routine is superglue - accelerator - sand - primer (rattle can) - sand - superglue..... Anyway enough words, here are some piccies, particulalrly for those who've not seen it before.


-
Nice work there. Particularly like the stitching. Matt
-
Radu This is looking so nice. This is a model that I am anticipating in the same way others looked forward to the Hasegawa P-47. Your package is assembled, by the way, and waiting for me to get to the post office. Matt
-
Looking good. Welcome to LSP. I'll keep an eye on this build . Matt
-
Coming along very nicely Erwin. Matt
-
Hi Hacker I wonder, will the thin plastic card you've used for 1st and will use for 2nd skin take being glued without warping/melting? I had thought of this for my BV 155 but was advised that the thin plastic wouldn't take the glueing. Getting a layer of bondo thin and even over the surface sounds quite hard to me?? What about using thin aluminium from foil tray etc... Klaus used it for parts of his He 162 to good effect. I'll watch your quest for a solution with great interest... Matt
-
Radu Having been one of the 'white metal' doubters (I've put white metal in quotes because it appears to be a term which covers so many mixes that it is almost meaningless??) I've just been looking at the metal legs from the Trump 262. These seem to be very tough with little apparent bend - much tougher than what I remember as 'white metal'. My concerns are no more. Matt
-
FW-190 D-11 Completed Photos!!!...at last...
mattlow replied to Dave Pratt's topic in Works in Progress
Dave A superb 190D. One of the best I've seen. Matt -
Radu It may be worth investigating cast brass legs. Certainly worth seeing how much they would cost over and above white metal and 'test the market'. Have noticed someone on eBay selling brass u/c for various a/c. Matt
-
Alan Thanks, the camo shows up so much better in the natural light. Very, very nice. Matt
-
Just thought it might be of interest for other folk to see what is being proposed with regard to a 'blown up' blown canopy (this is a shot of a 190A). My money would be on a blown canopy for the reasons given above and the fact that all the other D-11s I've seen have blown canopies. Sorry for the diversion from your fabulous build Dave. It is a fitting build for such a good conversion set. Matt

-
Hacker You are a speedy builder, but it certainly doesn't detract from the quality. Looking forward to seeing those wings coming together (and here's me putting off a set of Rutman vac-formed wings - what luxury!!). Matt
-
Dave Very effective. This is going to look really nice. Matt
-
Dave Thanks to seeing your build again I've got back to the 155. I'll put up some pics when enough's done. Matt
-
Dave I wish I was as far progressed. She's looking really nice. Home straight? Matt