
ChuckD
-
Posts
1,023 -
Joined
-
Last visited
-
Days Won
10
Content Type
Profiles
Forums
Events
Everything posted by ChuckD
-
Hi, all. Making progress this weekend, but it doesn't look like we'll make it over the finish line today. This is how most of the weekend has been spent. Holy smokes there are a lot of decals on this beast, including 10 of my least favorite kinds of decals... Long, narrow lines. The walkway demarcation on each wing is 5 separate pieces, two of which are just long, narrow lines, and two others are long, narrow "L" shaped decals. I'd considered painting them, but opted against it. In the end, they went down okay and are relatively straight. So, hooray. I also discovered that I've misplaced my reverse grip tweezers which are a critical tool for my decal process, so improvise, adapt, overcome and thus you see a hobby knife dunked in the decal water. :/ Oh well, it worked out okay. After the decals were sealed in with another clear coat, I did a pin wash with some burnt umber oil paint. It's subtle, but it turned out nicely. Lastly, I tried recreating that bizarro faded or repainted patch just forward of the canopy as seen here. It doesn't look to me like the typical fuel staining found in that area and almost looks like an area of paint has been applied. Perhaps, painted over an area of paint damaged by fuel? I don't know. No color photos exist of this photo session, so I have no idea what color it actually is. I tried to do it initially with airbrushing when I was base coating the plane, but it did not turn out well at all. It looked absolutely artificial. So, I went after it with very light blue oil paints today and I think it turned out reasonably close. I'm going to let those dry for a day or two then get to the proper weathering. Depending on how my week plays out, I may be able to wrap it up before this weekend.
- 143 replies
-
- 15
-

-
Ah, an aircraft straight from aviation's "let's throw it at the wall and see what sticks" age. It always amazes me that the Geebee was ever able to achieve flight. Anyway, the model's looking good!
-
HpH news - 1/32 Kate, Marauder, Ventura and 1/48 B-47
ChuckD replied to Kagemusha's topic in LSP Discussion
So by extension, we can then hypothesize that dentists build HPH resin kits to virtuoso levels. Is that what where we're going with this? -
Just a little update tonight. I laid the gloss coat down and will probably get to the decals and the start of weathering on Friday evening. I also finished painting and installing the Anyz canopy rail. What a neat detail!
- 143 replies
-
- 24
-
-
I can attest to this. From 2003 to about 2013, I held various FFLs and ultimately paid the tax to become a Class III SOT. During my time as a dealer, I owned MP40s, an MP43/1 (precursor to the StG44), an M1A1 Thompson, a pair of MG34s, an M53 (Yugo MG42 copy) that was a reweld, a Krinkov, an MP5/40, and a G36 along with a bunch of other esoteric crap. Not once did someone get done shooting a machine gun of mine and turn around to say "ho hum." Every single person who ever fired one turned around with a big grin on their face, proclaiming "that was awesome!" Even my 65 year old mother got a huge kick out of the MP5. I once went to a shoot in Michigan's UP, where we took the M53, linked 500 rounds of belts together and just let it run from the lafette mount. It made it about halfway before it jammed. My friend called it the "friendship belt." I ended up selling it all between 2013 and 2017 as I just got tired of it. I'd gotten everything I ever wanted and there was no more thrill of the chase. Things were too expensive and with a young kid around, it wasn't money I wanted to spend anymore. I picked up modeling in late 2013 and have never looked back. I totally respect the opinion of people who do not wish to associate with guns. All I ask is that same respect in return.
-
Double posting to wrap up the night here. We're getting there. Chipping is done - I kept it fairly subtle as there's no evidence the original plane was chipped to pieces. The gear and doors are firmly fixed in place and I applied a neutral gray filter over the whole thing. I really like the way that turned out - it faded the darker upper surfaces and toned down the brightness of the white belly and insignias. As filters usually do, it really helped tie the whole scheme together. The fading effect is subtle, but you can see it on the left wing and horizontal stab. It honestly looks a little overdone in the photos, but at 1:1 scale, it looks pretty great. Anyhoo, I'll let that dry and then hit it with a gloss coat to get some decals down.
- 143 replies
-
- 18
-
-
Thanks, Kev. It's definitely been an adventure for sure. Don't take my whining above too seriously. I'm just venting to pretty much the only group of people I know that would have an understanding ear. Chipping turned out well and I'm almost to the point of glossing. I might even get a decal or two on tonight.
-
Oh, what a journey it's been since last night's post. The rest of this project has gone exceptionally well - truly better than expected - and it would appear that the gremlins have just been waiting. The plane itself is fighting me tooth and nail. After posting, I went to start working on the insignias. After de-tacking the vinyl mask on the leg of my pants, I placed it on the left wing. I didn't like the placement so I pulled it off and a big sheet of paint came up with it. I had previously laid an undercoat of Alclad aluminum so that I could do some subtle fine sanding of the topcoat to expose the aluminum underneath. I remembered last night as I stared at the patch of missing paint a lesson that I'd learned the hard way on my NMF P-40B: topcoats don't adhere well to Alclad aluminum at all. So, I took some masking tape and started dabbing it on the wing and sure enough, everywhere there was an aluminum undercoat, the paint came off in sheets. So, a few more minutes with tape and a little bit of sanding, and I landed here. Good times. So, starting over, I took a few pics to show you what I didn't photograph when I was doing the base coating the first time. Mr. Surfacer 1500 primer. Pre-shading with a thinned down MRP-059 Schwartzgrau (RLM 66). This is my new go-to for pre-shading. It allows for more subtlety than straight black. From there, I base coated with MRP Sea Blue again, which more or less got me to the same point as I was at when I posted. Then, I happened to notice that one of the gear door actuators has broken off and 100% MIA. I'd had to glue them on way back when I was working on detailing the gear bays and, despite being very careful about it, one of them is gone. I didn't realize it at the time, but it's missing in the belly shot in last night's post. (Right hand gear, outboard door). So, when I'm ready to put the gear doors on, I'll have to scratch up a facsimile which shouldn't be too hard, but still. Then! My airbrush had been giving me fits all day with all sorts of erratic behavior. I'd broken it down and cleaned it 3x by the time I posted last night, but it was still blowing bubbles back into the cup. So, at the end of the night, I decided to tear it all down again for another deep cleaning. As I unthreaded the muzzle cap - as I have done thousands of times, the o-ring between the cap and brush body ripped in 2. I calmly set the whole thing down, turned off the lights, and walked out of the room. Enough for one night. Fast forward to now: We're back on track. I've ordered a new o-ring, nozzle, and needle for my airbrush. I actually have 2 identical Iwata HP-CS brushes, one that I run with the .35mm nozzle (primary) and one with the .50mm nozzle (secondary, for larger jobs). I tried swapping the .35mm nozzle/needle into my secondary brush and it immediately started bubbling paint. So, clearly the nozzle and/or needle are shot. For the rest of today's work, I used the larger nozzle and was super careful about my trigger pulls. Now, on to the insignias. There are probably much easier ways to do these, but this was essentially my method. Place the whole thing, mark the top point of the star and the 5 wedges with sharpie, remove star and bars, spray white. Replace star and bars oh. so. carefully. And then forget to take pictures. <facepalm> Remove wedges, paint blue, replace wedges oh. so. carefully. Remove surround, paint red. Say prayer. Remove all masks: That process alone took about an hour. Now repeat 3x more times, throw in some squadron numbers, and you get here: For whatever reason, I have had issues with paint lifting in a few other spots straight down to the bare plastic. I've never been one to wash my models prior to painting and I've never had such issues before. Gremlins out in full force. Hopefully they spent themselves last night because today has been a mostly enjoyable experience. Mostly. Anyway, now that it has some tonal variety, it's now starting to grow on me. Next I'll finish up the brushwork, do some light brush/sponge chipping, and lay down a gloss varnish for the decals. With luck, I'll be able to wrap it up by next weekend.
- 143 replies
-
- 15
-
-
Has anyone ever tried to buy a sprue from HKM? I want to do another gunship with the later cowls at some point, and I think the most economical way to do that would be to buy the K kit, then source the gunship nose sprue somewhere.
-
Yeah, maybe that's part of it. It's just raw paint at this point, no varnishes. And, MRP is more or less semi-gloss right out of the bottle. I'm sure it'll all tie together in the end, something was just bugging me as I was painting it. Maybe my brain hasn't fully recovered from the flu yet.
-
Hi, all. I'm (mostly) back from the dead and got the opportunity to work on the Corsair today. For the most part, I focused on getting the base coats down, and aside from a little bit of brush painting on details like the Anyz canopy rail, the basic base coats are done. Something's bothering me about the overall color scheme though... I can't put my finger on what through. I think it's something with the dark blue, but I just can't place what. Too dark? Maybe the way it interacts with the light gray of the primer undercoat? I dunno. A little fading helped a bit, so that was good. Anyway, I'm thinking/hoping that whatever it is that's bothering me will clear up once I get some insignias and other stuff with tonal variety in place. Maybe that's it? It's just a mass of blue tones with nothing to contrast and maybe the red insignia surround will do the trick.
- 143 replies
-
- 19
-
-
1:18 Scale B-17G Flying Fortress Forward Fuselage
ChuckD replied to patricksparks's topic in Works in Progress
Absolutely unreal. Awesome work. -
Think of all the engineering time and effort that went into designing all those superfluous parts. I wish instead that Trumpeter had spent more time improving the fit and accuracy of the kit. Looking good, Mike. Best wishes on your recovery!
-
Ray, you're a saint. I know I offered to write it, but life got the best of me and my time. Thank you for doing it. <3
-
Thanks for input, gents. I've been utterly flattened by the flu, so no updates for a while.
-
That looks great, Quang. With the announced price tag of the Infinity Model kit, this may have to be the Kate for me. I love the idea of the leading edge as a separate part. Brilliant.
- 135 replies
-
- 2
-
-
- japanese navy
- pearl harbor
- (and 5 more)
-
Does the Tamiya offering have the workable toy features like gear and such? That really turned me off to their Zero.
-
I've pitched a few. The Trumpeter Hellcat and the Revell P-51D are the most recent examples. On the other hand, I've pulled a few kits off the shelf after years and ended up turning out examples that I was/am really happy with. The Swamp Ghost was shelved for a year: The Tamiya Zero languished for 2 years. And the Tamiya E8 kit sat for 2 years, got paint splattered on it, parts lost, boxed and moved, then one day turned into this: So, at the end of the day, before I pitch a kit, I have to know that I'm absolutely, completely over it and it's BS. But, as I always say, life is too short to build crappy kits.
-
I still argue that the weakness of the nose gear is in the original aircraft design, not the model kit. Any metal that follows the design of the original gear - as the photos above suggest - will suffer from the same weakness. That said, now that I have the kit behind me, I think the plastic parts work fine as long as you're more careful than I was. Don't put the horizontal stabs on till after the wings are on and the main gear is under it. If you do that, you're fine.
-
Anyone have any ideas what color should be used on the inside of the sliding canopy? Googling, checking old build threads, and scouring my reference books is turning up very inconsistent and non-authoritative results. The interior of the windscreen appears to be black based from everything I can tell, so that's what I've done on this build. But, I'm stuck on what color to use on the interior of the sliding canopy.
-
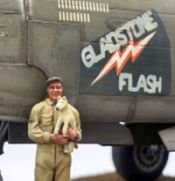
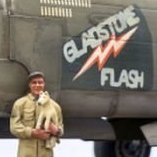
Hello, all. I'm back with another update. It is with great pleasure that I inform you, the figures are done. I make no pretenses to be an expert figure painter and certainly not anything like an expert sculptor. But, every figure is practice and I'm fairly happy with how these two turned out. I definitely see some things I would have sculpted differently, but those are all lessons to apply to the next project. Anyway, here a few shots. The scene is starting to come together! The crew chief... ... who started life as this: And, our intrepid pilot. Remember, this is what he looked like before: Yeah, now on to the final stage: the Corsair herself!
- 143 replies
-
- 16
-
-
Yep. The spine under the tail (in green below) is perfectly straight from the radio compartment to the tail gunner's position. On the HKM kit, there's a very subtle curve. It's not much, but it's noticeable once you see it.
-
I have done one HKM B-17, but it got shelved for about a year as the shape of the nose and tail really bothered me. If Aska or whatever Border's calling themselves this week can deliver a well-done B-17 in 1/35, you could probably count me in.
-
Yep, ignore me. I'm an idiot and forgot about the H model.
-
If you're not dead set on 1/32 for jets, the Tamiya F-14 is one of the most enjoyable builds I've ever done. I don't much care for jets, but I had to build the iconic Tomcat, and 1/48th is a far more manageable scale for jets.

