
LSP_Kevin
-
Posts
46,766 -
Joined
-
Last visited
-
Days Won
267
Content Type
Profiles
Forums
Events
Everything posted by LSP_Kevin
-
Thanks Dan, but hey, I am pushing myself! One area of trouble here is in trying to sketch out an accurate shape to begin with. After that comes cutting it out properly! I do have to be careful to limit my ambitions somewhat though, as I really do want to finish this one, and not consign it to the scrap heap because I bit off more than I could chew. I guess you have to learn to crawl before you can walk (etc), so I can't really expect to go from chronic hack to Radu clone in a single build. More to come... Kev
-
Thanks for the encouragement guys. Here's my latest attempt at scratchbuilding a seat: Left to right: kit seat, first attempt, latest attempt. It's an improvement, and the overall shape is closer to the real thing, but I've lost the characteristic curved back. I guess it will look OK painted up and in situ, but I think I'll wait for Manny's resin replacement. Kev

-
As I've explained elsewhere, getting your photos to a small enough file size is just as much a function of file compression as it is pixel dimensions. A lightly compressed JPEG @ 800x600 can still we well over 100KB, whereas a heavily compressed JPEG @ 800x600 might be 20KB or less (and look like absolute rubbish). You just need to dial up the compression a little more in whatever software you're using to reduce the images. Kev
-
Thanks Allok. You're right about the kit seat - purely fictional. The look of the seat on late model Zeros is pretty well-known, and the seat itself is pretty obvious in the cockpit, so I'm keen to get it looking the part. I used the kit part to determine the rough dimensions, and then a combination of photos and drawings (including those in the instructions for the Tamiya kit) for the specifics. The shape is way off, so here's hoping I get closer with the second go. Kev
-
Wonderful Brian. I agree with Chris about the markings too - I'm sure they weren't note-perfect on the real aircraft all of the time. Kev
-
I thought I might provide a quick update on how my attempts at scratchbuilding are coming along: woeful! Here's the evidence: This photos shows, left to right, the kit seat; my attempt to build a better one out of drink can aluminium; and the beginnings of the rear cockpit bulkhead. I'm happy enough with the bulkhead, but the seat's a disaster. Am I better off sticking to sheet styrene for that? I like the strength and thinness of the aluminium, plus it curves nicely for the seat back. But cutting, shaping and gluing it are proving to be real hassles. I'm also having trouble coming up with a decent template for the seat. Time for one of our local scratchbuilding wiz's to step in here with some advice I think. Oh well, back to the drawing board! Kev
-
Thanks Dom - looks amazing for a first go, and I can't wait for your blow-by-blow account. For my Zero build I'll be scratchbuilding most of the cockpit, the flaps, landing gear and probably the ailerons too. I also need to modify and detail many parts as I go. I really feel like I'm fumbling in the dark with it though, so I'm trying to glean whatever I can from builds like yours. Kev
-
It looks lovely. I really do like those colourful pre-war schemes. Kev
-
Great start Dom! I love the Typhoon, but only have the 1/48 Monogram kit in my stash. So, do tell us how you made your seat then! I'm currently trying my hand at scratchbuilding with my Zero build, and failing miserably. You on the other hand are going great guns. Well done. Kev
-
Whatever the colour, that instrument panel is incredible! Kev
-
Thanks Manny - they're helping me out too! Kev
-
Me too! Looks great Dave. Kev
-
Another update, but nothing too exciting unless you're a fan of rescribing (one of the world's great spectator sports). I've finished most of it bar the cowling, the hinges for which I have no idea how to accomplish yet. I've come to mistrust the drawings in the AJ-Press Modelmania book however (an enlargement of which you can see in the photo above). The dimensions are not consistent across the various views shown. For example, the length of the cowling is different in the side profiles from what it is in the plan views! And not by just a tiny bit either - 3mm in 1/32, or nearly 10cm on the real thing. Also, some of them don't really agree with photos in the same volume. They're still a useful guide though, and better than me trying to use photos alone. I made a backplate for the spinner from plastic card: My stupid camera has focussed everywhere except the area I tried to photograph. Stupid camera. The kit spinner looks too blunt to me, but I'm not certain. Any Zero experts out there care to comment? I've hacked away the rear portion of the headrest and will replace it with plastic card drilled out with lightening holes. It's a real mess at the moment (the kit's plastic is really thick): I need to start working on the cockpit next, but I have no idea how to approach it really. I understand that the Zero cockpit was akin to a cage inserted into the fuselage, but will I get away with simply adding detail to the sidewalls instead? Anything's gotta be an improvement over the non-existent kit detail I guess. This is all new territory for me, so please forgive the newbie questions. Kev
-
Yeah, I know. I don't plan to be anywhere near as ambitious as you however - I'm not that good Brian. I'll just steal some of your ideas for detailing and improvement. I don't imagine building it for a while yet though. I'd like to make my next build something that doesn't require rescribing! Kev
-
Magnificent Brian, as always! I really look forward to your updates on this thread, and I refuse to start my Revell 109 until you're done! I'll be referring back to every post for sure. Can't wait to see these two finished. Kev
-
That is one awe-inspiring build Dave! I l love the Whirlwind, but have only ever built the Airfix kit as a kid. Can't wait to see it finished. Kev
-
As most of us know, rescribing is a lengthy, tedious and laborious process. I'm doing this one in stages, and have nearly completed the top of the starboard wing: It's not completely accurate according to the drawings I'm using, but reasonably representative, which is all I'm really after. The shiny streaks are liquid cement brushed along the newly-scribed lines in order to clean up the 'swarf'. The yet-to-be-done port wing is shown for comparison. I'm happy to describe the process in more detail if anyone's interested, but I suspect that would be nearly as tedious as the task itself. Kev
-
Thanks Larry. I guess I'll have to stare at some photos for a while and see which method makes the most sense. If I screw up the wheel wells then I guess I'll have screwed up the model, so I'm keen to get them at least passable. Kev
-
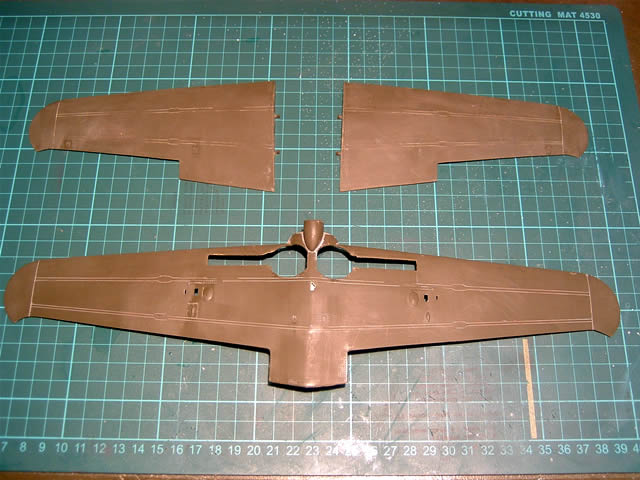
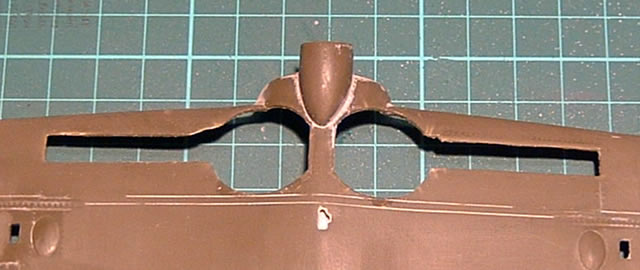
OK, some actual modelling progress at last! I've sanded off all the rivets and separated all the control surfaces: I thinned the wing trailing edges and will be attempting to construct flaps and ailerons for the first time ever. I've got some good photos of that area so I think I'll just glue those to the model. Unfortunately I made a hash of removing the moulded-in wheel wells, which were way too shallow: I think I can still make it all work, but I have to confess that I have no idea how to go about making new wheel wells. Any suggestions? (I know, shoulda thunked about that before cutting 'em out!) Next step is to begin the rescribing work. This should be easier now than it was on the Dora, as I've since acquired some better tools, some decent templates, and most of all, more experience! Kev
-
Fantastic result Graham! I couldn't imagine trying to tackle a model like this myself, and you've made it look easy. Can't wait to see what you tackle next. Kev
-

Montex masks application tip...this works like a dream
LSP_Kevin replied to Dave Pratt's topic in Decals & Masks
Wow, fantastic result Dave! The Montex masks are a bit expensive for me, but I'm keen to try painting markings on using my own masks, so you're tips will still be useful. Thanks! Kev -
Thanks for that info Mike. I found a local(ish) supplier a couple of days ago who can send me the IJN seatbelt set for 55 cents S&H! They just send stuff as standard mail, and most PE will fit in a standard envelope, so I think I'll order that one. I also vaguely remember seeing some resin wheel sets somewhere but can't find them anymore. Thanks Loic, PM sent. Kev
-
Thanks Koala. I bought jars of XF-76 & XF-71 during my shopping spree last weekend (from whence came the book). I also bought XF-75, listed as "IJN GRAY (KURE ARSENAL)" and XF-70, listed as "DARK GREEN 2 (IJN)". Not sure about these last 2 colours, but I've got some old jars of their Gunze equivalents to fall back on if I need to (and if they're any good still). Pick a scheme first - now there's a novel idea! I often can't make up my mind until so late that it delays the painting process! I'm keen to start on this one, but at the same time I realise I need to do a fair bit of reading first, or at least before getting too far. Oddly, I can find hardly any useful reviews or build-ups of this Revell kit on the web. I was hoping for a quick heads-up on where it's major accuracy problems are, but I guess I'll have to determine that for myself. Hopefully some actual modelling photos soon! Kev
-
Wow Bekim, having just finished that kit, I know how much work it is, and you're doing a magnificent job! I wish I had those kind of skills... Looking forward to following this one. Kev
-
I certainly know what you mean about being flat broke mate - if it wasn't for a tiny birthday windfall I would've struggled to get it myself. I'll definitely check out those PDFs though, as I think I'll need all the help I can get! I'm not really sure even where to start with it at the moment, so I think I just need to read the book now that I've got it, and try to get a better idea of what I need to do. Kev
