

Koala
-
Posts
652 -
Joined
-
Last visited
-
Days Won
1


-
 Greg W reacted to a post in a topic:
Trumpeter P38L
Greg W reacted to a post in a topic:
Trumpeter P38L
-
Greg W reacted to a post in a topic:
Trumpeter P38L
-
Greg W reacted to a post in a topic:
Trumpeter P38L
-
Greg W reacted to a post in a topic:
Trumpeter P38L
-
Greg W reacted to a post in a topic:
Trumpeter P38L
-
Greg W reacted to a post in a topic:
Trumpeter P38L
-
Greg W reacted to a post in a topic:
Trumpeter P38L
-
Greg W reacted to a post in a topic:
Trumpeter P38L
-
Greg W reacted to a post in a topic:
Trumpeter P38L
-
 Greg W reacted to a post in a topic:
Trumpeter P38L
Greg W reacted to a post in a topic:
Trumpeter P38L
-
Hi Dragonfly. Here's a tip, if its not too late. Do NOT prime or paint the clear cowl before you get it fitting nicely over the engine mounting rings. I had real trouble getting the cowl over the mounting rings and sitting correctly against the fuselage. I needed to do alot of sanding. This was really time consuming because, having already primed the clear plastic cowl, I couldn't see where it was binding up. If I hadn't painted the cowl, it would have been much easier because I could have seen exactly what was going on. HTH. Good luck. Oh yeah, beautiful paintwork on the 'pit.
-
Hi JohnB. Yep, the Hobbycraft kit could be a really discouraging project for a beginner and hopefully whatever help I can be will go someway to repaying my karmic debt for all the help I've sucked out of LSP. But, unlike your awesome F4U-1D build, mine only aspires to be a passable OOB job when finished. I've looked at those Trump Corsairs many times, dreaming of an RNZAF scheme, and always pull back daunted and afraid. Salute and best of luck to you mate. Mike, sure is a good feeling to look in the paper on most days and see a number of jobs that I'm now qualified to apply for that I don't even mind doing. Which is good, 'cause I parted company with me old 'master' not a nano-second after my time was up. "Thanks Warden. I really enjoyed breaking those rocks but I think I'll be on my way now. I reckon I'll walk taller without the shackles." I am going to do the 357th FG P-39s when they trained here in California. Yeah, there is something about modelling a warbird with direct relevance to your own turf. The RAAF subject of the Hobbycraft kit was stationed less than 50m up the road from me and certainly would have flown over where I live. (... although I have caught myself wondering more than once about how cool an Airacutie scheme might look... yeah....mmmmmmm......)
-
The rear air intake is hard to get right and I've settled for near enough. The alignment and moulding of the fuselage halves is vague and inconsistent at this point, a very hard shape to bring back into form after filling and filing etc. The splitter plate (I did bin the kit part) accentuates the symetrical irregularities and finaly had to be placed by Mk1 eyeball to average out the errors... The canopy is looking pretty reasonable. It sits up just a tad on the cockpit "roll bar" but settles down for a pretty reasonable fit. The door alignments seem to be excellent so I might be able to pose the complete model with the portside door closed (I heard this wasn't used much because of the throttle etc in the way) and the stbd door open, giving me a 'clean' side and an open side. Count the exhaust stubs ... 10, 11 and 12 - correct for the F series. Hey Mike! Sounds like a journeymans ticket to me! 5 years already?? Rgr that buddy. Only 4 years though... 1 more of study and 1 more of experience until I can get my full license. Not at the summit yet, but I can see it from here
-
Not massive progress, but some. A warning to anyone comtemplating building this kit - test fit EVERYTHING. The seat simply does not fit. I strongly recommend aftermarket replacement. I had to relocate the manual landing gear grank forward and outward from the supplied locating hole and the seat mounting bars had to have their backs filed down and be glued tight onto the rear bulkhead. This is after I had already substantially thinned the seat down. The bullet proof glass behind the seat is a real pain too. It cannot be used with the kit's radio without sliding the radio right back of its mounting rail. I even had trouble with my mounting racks and had to do some hasty last minute trimming.

-
Please inspire me to finish this build, so I can move on to other stalled projects. OK Jeroen mate, here goes... It's a beautiful build of a great subject. Definately worth the final effort needed to complete it, regardless of any possible flaws that only you and the LSP God will ever notice. The three display items combine to make a single, highly evocative exhibit. The tryptic of personal effect, man and machine combine to provide a thought provoking and moving historical vignette that will capture the interest of many more people just those with an interest in model planes. The wooden base sublty refers to the timber US carrier flight decks of the time. The moulding and finish is consistent with 1940's woodwork and adds importantly to the overall unison and ambience of the work. There ya go. Best I can do... And if I may make most humbly make some suggestions. 1. As stated above, the base is absolutely excellent. But if it were just a bit bigger, with enough space for the plane, the figure AND the autograph, then that would be just the ducks nuts. Could the autograph perhaps be placed underneath the fuselage, between the landing gear, or would it be lost there? 2. More weathering needed on the tyres bro IMHO. BTW, the folded wings provide better than normal display opportunities. Perhaps (in a small dustproof case) on a narrower shelf than that which would normally be needed for a model such as a book shelf or mantelpiece - nice. Cheers
-
Hi there fellas. Thanks for the kind responses. Mike... Have you thought about a clear coat to seal it up??? I'm starting suspect that you might just enjoy stiring the old pot just a little eh? How's things mate? Guess who's out of their time this month?
-
This is how I think I'm going to get around the radio issue. (Don't look right, don't fit right and don't tally up with the photos showing RAF and RAAF '39s without visible radio gear). I got the idea from Steve Evan's Airacobra build featured in the October 2009 edition of Model Airplane International. He used an empty radio shelf in the radio position, made from PE from his "spares box". His looks good and plausible, but was beyond my ability to reproduce. Here is my simple alternative mounting frame. If anybody asks it is as locally fabricated by RAAF fitters for the later installation of an RAAF radio set.... as per the reference book and photographs (that my dog ate). Anyway... painted and scratched up, these radio 'brackets' might look better than nothing? Anyone agree? Oh, and by the way, can I join the "I use beer cans for modelling" club now? Thanks for looking. Cheers

-
Here is my entry for the dirtiest seat-belt of 2010 competition. I used the pre-painted PE as templates to cut up some carefully hoarded old wine bottle foil. I can never get the PE to drape in anyway without heating it - rooting the pre-paint job... I'm not too unhappy with these, although its funny the difference between what my failing eyesight tells me I've done and what the photo's show. The dry brushed metal on the seat is not quite as offensive to the eye as it looks in this shot.

-
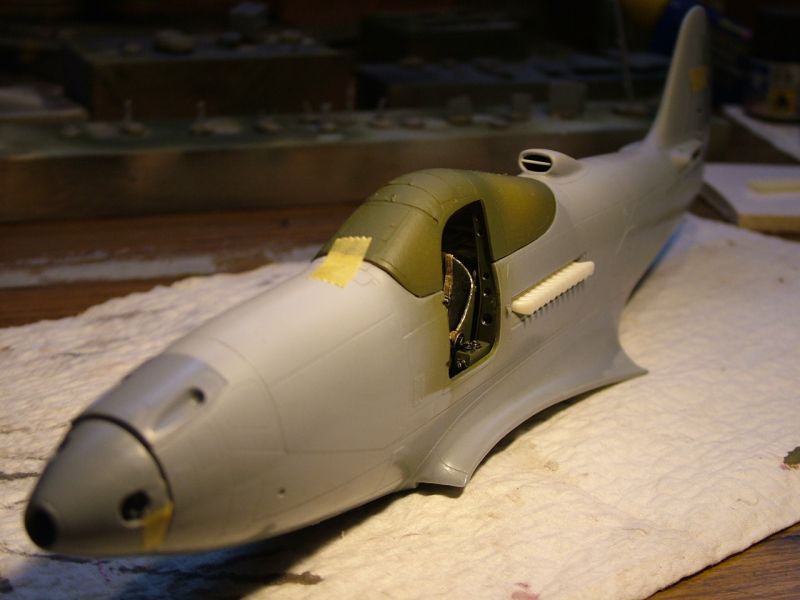
'Pit lookin in the starboard door. Main thing of interest here are the throttle quadrant linkages which I spent a stupid amount of time trying to replicate something along the lines of what's there. You can also see the big switchy sort of thing at the bottom of the intrument panel. Using the PE panel supplies means cutting of the moulded representation of this and settling for it being represented by a flat painted shape on the PE part. It really sticks out in photos so I fiddled with tiny bits of brass and evergreen to get something not as good as what I cut off the original plastic panel. My other gripes about the panel are the top two sections are made flat in one piece. The top panel sat out proud in the real thing. It was nail biting to separate the PE metal without wrecking the whole piece and/or the pre-paint job. And I should have repainted the pre-painted panel anyhow, the pre-paint job on this looks kind of dead despite a drybrushing before assembly.

-
Here is my attempt to date. A very big up-front thanks to LSP Matty for help in getting this far. Cockpit from portside showing scratched fuel selector, elevator trim wheel (out of focus), stb side foot pedal thingy, mid section of instrument panel and bits of plumbing etc.

-
Then not have alot to see at the end of the day... Good luck anyway. BTW - if using copper wire, anneal it. Heat it up cherry red and it becomes much softer and easy to form to shape (edit - when cool that is).
-
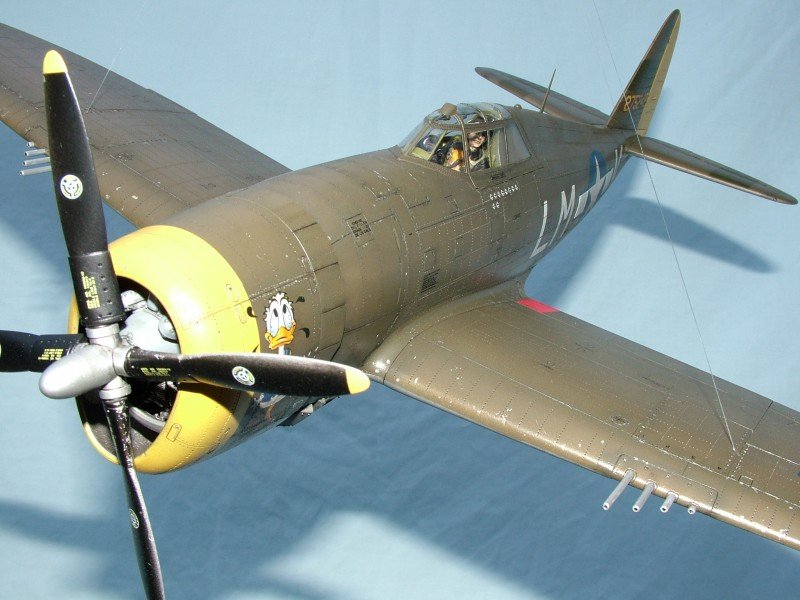
Then you can get your model looking something similar....

-
Ditto to all the above plus a small word of caution. Remember that while there is a wierd satisfaction in Modelling for God, that alot of the work in wiring up an engine barely visible at the end of the day. For example, a reference photo of a jug engine can look like this...

-
I found this article a big help. http://www.ipmsstockholm.org/magazine/2004..._colours_us.htm
-
You guys have got me goin with all these Franks but...
Koala replied to a topic in Works in Progress
Great work Tim. That seatbelt is really impressive. Hand painted?