Madbox Posted February 21, 2014 Share Posted February 21, 2014 (edited) Hi everybody, this is a build I have been promising for a while, I have finally got around to getting it started. What I am going to be showing you is how I paint figures, this is in no means the best way or an absolute method that is perfect, it just the way I have developed for me over the last few years, hopefully it will give a few you a few ideas and methods that will help you to bring another dimension to your aircraft, by adding a figure you can be just as proud of. I hope it helps many of you along to producing what you want from a figure without too much effort. the method I am using can be used on most scales as well as 1/48 scale. I will be using mainly acrylics to paint the figure along with a couple of other mediums, printers inks and maybe oils. explaining using the airbrush and paint brushes with the figure as well along the way. I will set this out in sections, in which I give the colours I am using and the method of painting the section I am doing. so i hope you will join in and please ask as many questions as you need, i will add what I can, when I can. the build should take about 2 weeks if I can get all the images and the painting done..... So here goes.... 1. Choice of figure is, as many of you will know the Modelcellar Werner Voss in 1/32 scale, is a brilliantly sculpted figure from their range. So first things first is of course to clean the figure up, as they are so well cast, there is usually not much to take off, the odd little seam line and the casting lugs that are on the bottom of the boots, and the tops of the arms, care must be taken on all clean up, as the engineering that has gone into these figures to make sure of the fit of parts, is as expected, superb. But you will find all figure companies go to great lengths to get their sculpting, casting and fit as good as possible, the same as most kit manufacturers do. I would like to just point out I am not promoting Modelcellar as a company, I just prefer their figures to the many others on the market, but really the choice is yours. Because the figure is resin, the figure should be cleaned in warm slightly soapy water to remove the clean up bits and the casting release agent before drying and putting the figure together using cyan glue. I like to work in small subassembly's the same as my aircraft, but with this being a simple figure only 4 parts in fact, the arms are the only thing that is glued to the body of the figure. Once dry I then drill a 0.8mm hole into the base of the neck of the figure to fit a bit of 0.8mm copper wire into the head, I also drill from the bottom of the boots to fit 2 bit of straightened paperclip into the legs, these are again glued with cyan glue. now we are in a position to prime, you can use what you prefer to use as primer, I use the Citadel Skull White primer as this dries to a dead flat base and adheres to the resin extremely well. Edited February 21, 2014 by Madbox Roy vd M. 1 Link to comment Share on other sites More sharing options...
Madbox Posted February 21, 2014 Author Share Posted February 21, 2014 OK, so we have the primed figure, I will be painting This in two sections the full body and the head. the body is the first thing I shall work with. The uniform represented here would be a field grey tunic and trouser, so the colours I shall be using are as follows, I shall be using the abbreviations of the colours through out Andrea Miniatures Field Grey NAC-04 (FG) Vallejo Matt Black 950 (MB) Vallejo Ivory 918 (IV) Tamiya Flat Base X-21 (FB) Vallejo Glase Medium 596 (GM) Carrier medium is distilled water (or boiled and cooled water) Preparing the paints, I am lucky enough to have a supply of small plastic catering pots with lids, this really helps in the painting of this figure as a paint storage method, I generally make too much of this first mix, to allow making the shadows and highlight colours from it. Ok first off I add the Field Grey (FG) and a touch of Matt Black (MB) to give my base colour (as the Andrea colour is a little too light) about 98% FG plus 2% MB, to this I add about 1 third again of Glase Medium (GM) and a touch of Flat Base (FB). I then add to this mix enough water to give a consistency of colour close to full fat milk if not slightly heavier, this is my base colour. WARNING ON FLAT BASE, DO NOT ADD TOO MUCH THIS WILL CREATE A CHALKY RESULT THAT IS NOT EASY TO GET RID OF, PLEASE USE SPARINGLY. From this base colour I split it equally into three pots, put the lid on one and mark it as base colour or BC, then I take another one and add 20% of the MB to create the shadow colour and for the other pot I add 20% IV (I use the ivory instead of white, because of the yellow content in it, its a warmer colour than straight white), mark up each of these pots with Shadow for the dark one and Light for the light one. This gives me my three colours to spray the torso and legs with an airbrush and leaves plenty of paint over for detailing afterwards. Roy vd M. 1 Link to comment Share on other sites More sharing options...
Tnarg Posted February 21, 2014 Share Posted February 21, 2014 Definitely will have to follow this. Thanks for showing us how from a figure painter with experience. Tnarg Link to comment Share on other sites More sharing options...
Madbox Posted February 21, 2014 Author Share Posted February 21, 2014 The base colour is obviously the first colour I use this is spayed in 2 or 3 light coats covering the whole of the figure except the head, I now use a hair dryer to dry the figure off, but not too close or too hot, resin get soft pretty quick.....droopy legs is the last thing you need. Now comes the part that gives the impression of light and shadow, it is actually forced light and shadow, you all know the sun light is from above and obviously this gives shadows, but even in dead cloud cover you will be able to see a difference in colours from shadow and light, so this is where observation comes in to play, Its a good idea to take a look at a mid coloured shirt dress jumper or clothing of a similar make up as the uniform, in normal light you will see a difference between the colour on the tops of the shoulders and the colour at the Bottom of the garment. this should give you a good idea of what we should be able to achieve. Shadow Ok, firsts step after the figure has dried and the airbrush is clean, I use the shadow colour, I thin it slightly more so I can reduce the pressure on the compressor to allow closer airbrushing without flooding the figure with paint. so here goes I now airbrush the figure from below what this does is to pick out the undersides of the folds that the sculptor has given the figure. Give the figure a couple of light passes from underneath up the front of the figure and the back of the figure, then the same for the sides, don't go too heavy with these as we will come back to the shadows in a short while. High lights Ok, second step after the figure has dried and the airbrush is clean, following the same way, thinning the highlight colour a little more and airbrushing this time from the top, again a couple of light coats, from above the shoulders this gives the forced highlights, from this point I will go back to the shadow colour and add another couple of passes from the bottom just to enhance the shadow areas plus the crotch and armpit areas, hence the lowered pressure on the airbrush. Please always keep in mind that you have decided the direction that the light is coming from and that lights and darks are opposites. I use this method in painting my aircraft as well, to give a transition of light on fuselages and even engine blocks, as it adds to the look of realism. On figures it helps pick out details as well as do the shadows and highlights Roy vd M. 1 Link to comment Share on other sites More sharing options...
Madbox Posted February 21, 2014 Author Share Posted February 21, 2014 (edited) Luckily, this figure has only the head that is to be painted in flesh tones, this is a bonus for all who have trouble painting flesh tone. What I will show you here is an easy way to get a very reasonable representation of flesh tones. first I will work with just basic tones using the method that has been employed for the torso. Airbrushing such small items such as a 1/32 head can be over whelmed with colour and paint if you are not careful, so all I can say is please make sure your paint is well mixed and the right consistency, and keep the pressure on the airbrush quite low to prevent build up on your airbrush and the figure's head. OK, the paints I will be using is a very convenient colour set from Andrea, its the flesh paint set, it consists of 6 colours ranging from the highlights to the shadows all in one box. they are numbered 1-6, but not in straight order, but in painting order as following the Andrea flesh painting method, I will be following the numbers but not the method. Also the Flaty Base and Glase Medium will be used as well as the distilled water. Again I mix three colours to use for the base colour, highlights and shadows, these are not mixed together but colour from the bottle mixed to the right consistency, these are determined by the figure its self. As you can see the figure has the hat on the head this means that I would need to start from the highlight colour first, this will be No.3, so base coat the whole head with this colour, for this figure I start from light and go to dark, all colours for the basic flesh tones are listed below. I will work with the flesh numbers on this section to make things easier 3. base colour (high light) 1. first shadow (mid tone) 5. second shadow (dark tone) So with the base colour dry, I now use the mixed No. 1 in the airbrush, only airbrushing from the bottom, just give Three light passes of the airbrush, just so that the colour starts to pick out the underside of the chin, nose, eyebrows and cheeks, make sure you also give the sides of th hea one or two very light passes from the bottom, so that the ears are also picked out with the colour. Dont worry if you are unanble to see the colour variation at this moment, it will be evident that it is needed. so on to the next colour No. 5, again mixed to the thin consistency with low pressure, airbrush from the same direction the bottom, but using only one or two light passes on the front of the head, and one pass on the sides. This should have now picked out all the detail that is needed at this moment. and allowing the head to thoroughly dry would help with the next stage. Now you should have the torso and head in a base coloured state, in my next post I will start the detailing of the figure. Again I will do this in sections starting with the head, so this can be finished before we detail the torso. If you have any questions you only have to add a post to this thread and I will give you any information I can Dave Edited February 21, 2014 by Madbox Roy vd M. 1 Link to comment Share on other sites More sharing options...
Madbox Posted February 21, 2014 Author Share Posted February 21, 2014 OK, now the next installment, I will be using the colours from the unform in a previous post and working the hat. So first things first is to mask off the facial skin areas including the hair, I will give a good reason for this when it comes to the painting of the head detail. I usually use Blutack for a short term mask, because if it is left on for too long it will take the paint off the figure. So as can be seen the head is fully masked, and the process of airbrushing the hat can now start, I used the same method of airbrushing the base colour first then once dry again airbrushing the shadows from the bottom and the highlights from the top. On this hat the top would be the front and the bottom would be the back as the hat sits on the back of the head slightly and he has his head leaning backwards slightly. this gives the same visual effect ads on the body of the figure. My next part to get to base colour is the socks, I decided top add the socks in an off white this is achieved by using the colours listed below, the lightest colour being the base on this one as I will be doing the base colour with a brush, then adding the lower colour of the socks with an airbrush. Vallejo Ivory 918 (IV) Andrea Miniatures English Khaki NAC-05 (EK) Tamiya Flat Base X-21 (FB) Vallejo Glase Medium 596 (GM) Carrier medium is distilled water (or boiled and cooled water) Brush used is a no.3 Davinci Meastro Start with two drips of Ivory (IV) from the bottle, add a brush tip of Flat base (FB), one drip of Glase Medium (GM) and two brush tips of English Khaki (EK), then three drips of the distilled water, this should give a very similar mix to the colour on the left, I paint the whole of both socks to the tops of the boots in this colour and leave to dry completely. The next mix of colour is the base colour with another two brush tips of the EK and a couple of drips of more water, centre of the picture, this is now a mix that can be the first of the two airbrush passes at the bottoms of the legs its not a problem that the paint goes over the boots, this is then left to dry. The next mix is the darkest colour for the very bottom of the socks this is again the second mix with added water and more EK, to almost the colour on the right of the picture below. again just blowing over the tops of the boots and onto the socks. at first this may seem to be a bit dark, don't worry as this will look totally different when the boots have been painted. Now for the boots this is again using three colours. I don't tend to use the Tamiya flat base for boots as the colours have a slight sheen, so are very good for boots. I paint the boots witha brush making sure of very neat edges at the tops of the boots. base colour is an all over painting of the DBL mixed with just water, the next mix is a little of the DBL and MB, but mixed to a wash the boots are then lightly covered in a wash of this mix and left to dry. Once dry I move on to one of the oldest method of highlighting, I do not do this on any other part of a figure as it has a different way of highlighting features that don't sit very well with cloth or flesh. The dreaded drybrushing. witha mix of the base DBL and Flesh no. 2, 50/50 but with no water, using a no.2 brush, I load the tips of the brush and wipe on a kitchen towel to remove neatly all the colour, then dry brush one boot at a time. Once dry I go back over with a thin wash of matt black. and allow to dry or use a hair dryer to speed things up. Andrea Miniatures Dark Brown Leather NAC-49 (DBL) Andrea Miniatures Flesh colour No.2 Vallejo Matt Black 950 (MB) Carrier medium is distilled water (or boiled and cooled water) This should now be at a stage when all the main base colours along with the highlights and shadows on the whole of the figure, for the detailing is added to each piece. Roy vd M. and Bozzaroo 2 Link to comment Share on other sites More sharing options...
Madbox Posted February 21, 2014 Author Share Posted February 21, 2014 Ok, now are onto the detailing.... Detailing. A lot of people would be very happy with the way that the figure looks at this stage, as you should be. The look of the figure would be very satisfactory, but for me it would still need all the little touches that bring it to life. So first on the list is the head, you can do this stage straight after the airbrushing of the head, but for me this is a very important stage and that is one of the reasons for mixing the flesh paint into sealable pots to use at a later stage, when I am happy with the resat of the figure. No more mixing should be needed with this stage as they have been done. 3. base colour (high light) 1. first shadow (mid tone) 5. second shadow (dark tone) This where a little practice is always best, with acrylics you end up with a better finish if you build the colours up in thin layers, this can be practiced with a couple of brush strokes with the mixed colour for the flesh, on a primed piece of plastic or even a practice figure. Using a No.0 brush, charge the brush with any of the three shades, then touch the brush onto some kitchen paper towel, This will stop a blob of paint being dumped onto the freshly airbrushed surface, now try brushing some on to the practice piece, don't use the point of the brush at 90° to the surface, lean it as if you are dragging the hairs of the brush, this give much better control of the flow of paint. you will notice that it leaves a thin layer of paint, this is good, but the other thing to take notice of is when you pull the brush from the surface, it pools the paint in that area at the end of the brush stroke, this can be used to your advantage. this helps in creating a heavier area and denser colour. Its easier to build up than take away with acrylic paints. The way you can use this to your advantage is on areas of the face where light falls most, above the eyebrows, bridge of the nose, tip of the nose, top of the nostrils, tops of the cheeks, he tops of the ears, top lip area and the top of the chin, below the bottom lip. moving the brush from the outside of the face to the centre of the face. Now you should be ready to do the highlights on the face, please refer to the images of the direction arrows to get a kind of out look on the direction and steps to follow. All of this I will show in the set of images below, these will show with red arrows the direction of the brush (except the nostrils as this just requires it on the top of the nostrils):- A. Forehead, above the eyebrows B. Bridge of the nose C. Tip of the nose D. Top of the nostrils E. Tops of the cheeks F. Beside the nose G. Top lip H. Top of the chin. J. Top areas of the ears This should look like he has lighter skin areas on the high areas of the face. Once this is dry, I now move onto the mouth, this is where observation of the lip colour is quite crucial, I use a mix of two colours for the bottom lip and another for the top lip. Andrea Miniatures Dark Brown Leather NAC-49 (DBL) Andrea Miniatures Flesh colour No.2 Andrea Dark Red XNAC30 (DR) Carrier medium is distilled water (or boiled and cooled water) The top lip is first and is a 50/50 mix of DBL and water, then finely line the top lip, giving a shape that follows the cast shape, make sure you do not go above the lip line. Next is a 50/50 mix of flesh colour No.2 and Dark Red (DR), this then has water added to it to make it thicker than milk, you then follow the shape of the lower lip, this should dry to give a colour very similar to the flesh colour of the lips. The next area is the eyes, yes the dreaded eyes. At this point I decide which direction the figure is going to be facing as the direction of the eyes is important, almost just as important is the catchlight in the eyes, this is what is going to bring the face to life. With the direction of the face decided, the way you are going to view the figure, this will give you the direction of the eyes, point directly at you. Having the face and eyes looking directly at you is actually the least interesting and the most difficult to paint. So to start with I mix the whites of the eyes, this from Ivory and Field Grey, start with one drip of the Ivory then add a brush tip of Field Grey to a colour just slightly darker than the Ivory, add a touch of glaze medium to keep the paint wet, using a No.000 or No.0000 brush, I fill just the fronts of the eyes, the Almond shape, once dry I add the pupils, using a mix of 50/50 MB and DBL then a touch of GM to keep wet, Eye paint pupils off centre to the side I have already decided before. once this dry on the figure, I then underline the upper eyelid with the same colour. Then I tidy up the shape of the upper and lower eyelids with the flesh colour no. 2 fresh mix from the bottle 50/50 with water. Then I add the catchlight in the eyes this is again done with the highlight colour from the flesh range and mixed 50/50 with water. Andrea Miniatures Field Grey NAC-04 (FG) Vallejo Ivory 918 (IV) Andrea Miniatures Dark Brown Leather NAC-49 (DBL) Vallejo Matt Black 950 (MB) Andrea Miniatures Flesh colour No.2 Vallejo Glaze Medium 596 (GM) We are now at the final stages for the face. my next mix is a crucial mix, so we need to get this one right, or you may not want to use this in your process. As the face will have a few harder lines of blended colour layers, this knocks it back a little to make it easier to see the face as a whole. OK, this is a wash that I use for the final stage, two drops of Satin Varnish 8-10 drops of water, one drop of Glaze medium and the smallest tip of a brush of the dark red, once mixed it should look like the photo below, I then use a hair dryer to warm the head, I use a no three brush dipped in the wash, the unload onto again kitchen paper towel, while the head is still quite warm , i then brush lightly over the whole of the flesh areas, including the eyes. it will almost instantly dry so you must do this as a layer at a time, but don't double layer it unless the colour needs it. The only place I would add a second layer is to the lower cheeks to give a slightly rosy cheek look. the very last part is to paint the hair for this figure a simple method works best, I am not familiar with the correct colour of hair but a mid brown seems to cover it best, making a heavy wash from DBL and water, I use a no.1 brush to paint the wash carefully over the hair areas, this allows the flesh colour to show through as well as the brown and in this or any smaller scale gives a good representation of hair. So thats the face done. Vallejo Glaze Medium 596 (GM) Andrea Dark Red XNAC30 (DR) Vallejo Satin Varnish 522 (SV) Carrier medium is distilled water (or boiled and cooled water) Andrea Miniatures Dark Brown Leather NAC-49 (DBL) Hope this OK up to now, if there are any questions, just ask away... Dave Bozzaroo and Roy vd M. 2 Link to comment Share on other sites More sharing options...
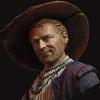
Madbox Posted February 21, 2014 Author Share Posted February 21, 2014 The hat has been painted in the same method as the uniform and with the same basic colours, what I have added is on the beading I have started with a Dark Red (DR) with a very fine 3/0 brush, then with a Mid Red (MR) I have just touched on the upper edges and around the front to give a highlight to show that it actually is a red, the sweat band area I have done in a Matt Black (MB), without any shading at all, as this will be over shadowed by the top of the hat anyway. The peak has been painted as well in the Matt Black, but them I have gone over it with a Satin Varnish to give the polished leather look, that is not too shiny. Next I like bring in the darkest of shadows, on the uniform, this is just where the tunic hangs over the top of the trousers and where the front of the tunic buttons up. I take a fine brush 3/0 and using Matt Black (MB) 50/50 with distilled water. After unloading it on to the kitchen towel, I run a line of black right in to the fillet that is caused by the one side of the tunic being buttoned over the other, you probably will not see it, but it does show when the next step is added, I also paint under the underside of the tunic, as this gives it a heavy shadow. As I have the Black mixed I then paint the buttons and belt buckles if there are any, before moving onto the printers ink or acrylic for the gold or silver, but for this little figure I use an ordinary pencil and just go over the buttons with that to give the metallic shine and finish required. My next little detailing method is one that I have actually taken from the AFV guys and use it on figures for the final details. I call it Pinging the Detail, its what brings it to life, what I do is take the final highlight colour that has been used on the particlar piece I have painted, load the brush, wipe it on kitchen towel, I am then ready to run the side of the brush down the material edges, edges of pockets, cuffs of sleeves and of course edges of collars, just to make these pull from the surface. The last detail before putting the figure finally together is to finish the socks. The pinging method comes inhere as well for adding a touch highlight to the tops of the socks, my next part is to take the Dark Red (DR) and paint two lines around each sock towards the top of the sock, making sure it is as neat as it can be, I then add to the Dark Red a touch of black and run A line of paint along the bottom edges of the red line. Then with a 50/50 mix of the (DR) and the Mid Red I run a line of this colour along the top edge of the initial red line, to give a kind of highlight and shadow, this also brings the detail out.. Andrea Dark Red XNAC30 (DR) Andrea Napoleonic Red XNAC34 (MR) Metallic colours are more of a personal choice and each persons usage of the colours determines the finish they wish to get Well putting the figure together carefully before attaching to your base work I can leave up to you. but this is now finished and as many of you will know is the prize I am giving for the best figure in the 1st figure group build, going on at this moment. so lets hope I get to see some great looking figures Dave Here are a couple of the final shots Bozzaroo and Roy vd M. 2 Link to comment Share on other sites More sharing options...
LSP_K2 Posted February 21, 2014 Share Posted February 21, 2014 I too have a copy of the MC Voss figure, as well as several others, but am holding off on building/painting it until I tackle his F.I sometime in the future. Link to comment Share on other sites More sharing options...
LSP_Kevin Posted February 21, 2014 Share Posted February 21, 2014 Awesome tutorial Dave! I really suck at painting figures, but would like to improve and tackle a few more. Thanks for posting such useful information. Kev Link to comment Share on other sites More sharing options...
Roy vd M. Posted February 21, 2014 Share Posted February 21, 2014 Man what a tutorial!! I'll keep this as my nr. 1 source for painting figures... thanks a bunch for taking the trouble to write down all of this! Bookmarked! Link to comment Share on other sites More sharing options...
krow113 Posted February 22, 2014 Share Posted February 22, 2014 Definitely well laid out. It will take a number of perusals to get all of it! I have always had trouble with the face. Link to comment Share on other sites More sharing options...
BGB Posted February 24, 2014 Share Posted February 24, 2014 WOHO!! Thats figure painting! Cheers Boris Link to comment Share on other sites More sharing options...
Iain Posted February 24, 2014 Share Posted February 24, 2014 Brilliant - huge thank you for sharing - just getting into figures and this helps hugely with techniques and inspiration! Iain Link to comment Share on other sites More sharing options...
Recommended Posts
Create an account or sign in to comment
You need to be a member in order to leave a comment
Create an account
Sign up for a new account in our community. It's easy!
Register a new accountSign in
Already have an account? Sign in here.
Sign In Now