
ChuckD
-
Posts
914 -
Joined
-
Last visited
-
Days Won
9
Reputation Activity
-

 ChuckD got a reaction from tucohoward in Messerschmitts of North Africa: Bf-110E-2 and Bf-109F-4 Trop
Hi, everyone. Back with another update. I asked my wife earlier this week if I could have a modeling day this weekend, since I hadn't had much in the way of bench time. Happily, she was cool with it, so I started around 8am this morning and worked on and off - mostly on - throughout the day today until now. That said, I was able to make quite a bit of progress.
After a grand total of 31.3 labor hours, here is the current state of affairs:
Cockpit is lightly weathered and dusted, fuse is together, HGW seatbelts are done, canopies are masked (not pictured), and I've gotten the landing gear together. I've just started dabbling in the cowlings and I'm pretty sure I see now why they're the widely regarded as weak spot of this kit. The directions essentially show you just putting them around the engine and being good to go... but there's no way to locate them that way, so I'm going to have to cobble them together very very slowly and carefully to ensure they fit correctly. If I come up with a good way, I'll be sure to share for posterity's sake.
Anyway, here are a few in progress pics from today:
This is after the cockpit had been weathered and shaded w/oils and the seatbelts completed. When I bought the HGW seatbelts, I had no idea that building them would entail you actually building little seatbelts. They're pretty awesome. I got a little heavy with the wash on the pilot's belts, so there's that.
Side panels
IP w/reflector glass. This makes the whole thing look glossy, but it's not. I did drop some future in the gauges just to give them some gloss effect.
Seatbelts! Pedal straps are tamiya tape painted brown.
Fuse closed up. These two shots show the pigment dusting I used to put some dust inside the beast. It is in Africa after all. I'm going to model it with the pilot's canopy open and the gunner's canopy closed, so a lot of this should still be pretty visible once it's all said and done.
I'm going to let the fuselage joins harden for a day, then go at cleaning them. I may have to rescribe a few things, but overall the fit has been great. I've decided to just close the cowls and abandon my idea of leaving one open.
That's all for today. Hopefully I'll have another update or two this week as I plug through the cowls and clean up join lines. Thanks for following along.
-
 ChuckD got a reaction from AlexM in Messerschmitts of North Africa: Bf-110E-2 and Bf-109F-4 Trop
Continued...
-
 ChuckD got a reaction from RLWP in Messerschmitts of North Africa: Bf-110E-2 and Bf-109F-4 Trop
Incidentally, I used future to secure the gunsight reflector glass to the IP. It has decent adhesive properties.
-
 ChuckD got a reaction from sandokan in Messerschmitts of North Africa: Bf-110E-2 and Bf-109F-4 Trop
Continued...
-
ChuckD got a reaction from tucohoward in It ain't the airbrush. It's the paint.
In spraying a test aircraft last week, I found that Mr Color tended to splatter more than MRP. The Mr. Color was thinned 2:1 and later 3:1 with Mr Leveling Thinner, and shot with an HP-CS with a .3mm nozzle at ~12psi. I could lay down the MRP paint with ease and the pattern was nice & tight. The Mr Color splattered and while the center of the spray cone was smooth, the fringes of the cone were much less consistent.
In short, I too, am an MRP convert. I'll still spray some Tamiyas and the occasional Vallejo product, but they will never behave like the MRP stuff.
-
ChuckD got a reaction from sandokan in Messerschmitts of North Africa: Bf-110E-2 and Bf-109F-4 Trop
Hey, as a quick heads up, the kit I'm using for this build is on sale today (12/14/17) at Dragon. http://dragonusaonline.com/item_detail.aspx?ItemCode=CHC3209
It's a pretty solid deal on a very nice kit.
-
 ChuckD got a reaction from MikeMaben in Messerschmitts of North Africa: Bf-110E-2 and Bf-109F-4 Trop
Hey, as a quick heads up, the kit I'm using for this build is on sale today (12/14/17) at Dragon. http://dragonusaonline.com/item_detail.aspx?ItemCode=CHC3209
It's a pretty solid deal on a very nice kit.
-
 ChuckD reacted to MikeMaben in Messerschmitts of North Africa: Bf-110E-2 and Bf-109F-4 Trop
Yep, I agree but it is very difficult to find photographic proof.
Just makes sense that they would paint that area with the underside
of the horizontals.
-
ChuckD got a reaction from sandokan in Messerschmitts of North Africa: Bf-110E-2 and Bf-109F-4 Trop
Well, it's been nearly a month, but progress hasn't stopped on ye olde Bf-110. The construction is complete and I've managed to get it primed with Mr. Surfacer 1500 black (great stuff). The reason why it took me a bit is because I wanted to build a Hasegawa Bf-109F4 Trop as an experimentation piece for painting RLM 79 and 78. The Hasegawa kit is just a simple dream, by the way. Practically falls together and looks great out of the box.
Anyway, I'm glad I did start painting with the 109, quite honestly. A few months ago, I bought a bottle of Mr. Paint's RLM79 sand yellow and had planned on using it for this build. I started shooting it on the 109's upper surfaces and it quickly became apparent that it was *way* too yellow. I'm not an expert on German paint schemes, but apparently their color match is RLM79 "(variant 1)." Maybe it's old news to others, but apparently there's a pretty vast difference between "variant 1" and what I came to believe was RLM79. Live and learn.
So, in looking around a bit, I found a couple other color equivalents. I have a pretty decent stock of Tamiyas and Vallejo Model Colors, but lacked XF-59 that all the color mixes call for with respect to Tamiya paints. I have the "RLM79" in Vallejo, but it was straight up pink. Even adding in some flat brown didn't do the trick. So, back to the drawing board. I found RLM79 in Mr. Color at Sprue Brothers, so I've got a jar of that and XF-59 coming and I'll try either of those to get these birds painted.
I cleaned up late last night after getting the base RLM 78 on the bottom of the 109 and the "marble coat" on the bottom of the 110, so no pics of paint progress just yet. I guess I didn't have an appreciation for just how much real estate there is on this beast when it comes to painting.
Question: Would the inboard sides of the vertical stabilizers below the horizontal stabilizer be painted RLM78 or 79? I'm guessing 78, but (shockingly) Dragon's instructions are lacking.
Now that I'm done building the 109, I hope to make more frequent updates to this. More to come soon.
p.s. I don't have hours totals at hand, but I can tell you that getting to the same point on both aircraft required 1/3rd the time for the 109 as it did for the 110. I'm 60+ hours into the 110 and only about 22 into the 109.
-
ChuckD got a reaction from MikeMaben in Messerschmitts of North Africa: Bf-110E-2 and Bf-109F-4 Trop
Well, it's been nearly a month, but progress hasn't stopped on ye olde Bf-110. The construction is complete and I've managed to get it primed with Mr. Surfacer 1500 black (great stuff). The reason why it took me a bit is because I wanted to build a Hasegawa Bf-109F4 Trop as an experimentation piece for painting RLM 79 and 78. The Hasegawa kit is just a simple dream, by the way. Practically falls together and looks great out of the box.
Anyway, I'm glad I did start painting with the 109, quite honestly. A few months ago, I bought a bottle of Mr. Paint's RLM79 sand yellow and had planned on using it for this build. I started shooting it on the 109's upper surfaces and it quickly became apparent that it was *way* too yellow. I'm not an expert on German paint schemes, but apparently their color match is RLM79 "(variant 1)." Maybe it's old news to others, but apparently there's a pretty vast difference between "variant 1" and what I came to believe was RLM79. Live and learn.
So, in looking around a bit, I found a couple other color equivalents. I have a pretty decent stock of Tamiyas and Vallejo Model Colors, but lacked XF-59 that all the color mixes call for with respect to Tamiya paints. I have the "RLM79" in Vallejo, but it was straight up pink. Even adding in some flat brown didn't do the trick. So, back to the drawing board. I found RLM79 in Mr. Color at Sprue Brothers, so I've got a jar of that and XF-59 coming and I'll try either of those to get these birds painted.
I cleaned up late last night after getting the base RLM 78 on the bottom of the 109 and the "marble coat" on the bottom of the 110, so no pics of paint progress just yet. I guess I didn't have an appreciation for just how much real estate there is on this beast when it comes to painting.
Question: Would the inboard sides of the vertical stabilizers below the horizontal stabilizer be painted RLM78 or 79? I'm guessing 78, but (shockingly) Dragon's instructions are lacking.
Now that I'm done building the 109, I hope to make more frequent updates to this. More to come soon.
p.s. I don't have hours totals at hand, but I can tell you that getting to the same point on both aircraft required 1/3rd the time for the 109 as it did for the 110. I'm 60+ hours into the 110 and only about 22 into the 109.
-
 ChuckD got a reaction from LSP_Kevin in Messerschmitts of North Africa: Bf-110E-2 and Bf-109F-4 Trop
Well, it's been nearly a month, but progress hasn't stopped on ye olde Bf-110. The construction is complete and I've managed to get it primed with Mr. Surfacer 1500 black (great stuff). The reason why it took me a bit is because I wanted to build a Hasegawa Bf-109F4 Trop as an experimentation piece for painting RLM 79 and 78. The Hasegawa kit is just a simple dream, by the way. Practically falls together and looks great out of the box.
Anyway, I'm glad I did start painting with the 109, quite honestly. A few months ago, I bought a bottle of Mr. Paint's RLM79 sand yellow and had planned on using it for this build. I started shooting it on the 109's upper surfaces and it quickly became apparent that it was *way* too yellow. I'm not an expert on German paint schemes, but apparently their color match is RLM79 "(variant 1)." Maybe it's old news to others, but apparently there's a pretty vast difference between "variant 1" and what I came to believe was RLM79. Live and learn.
So, in looking around a bit, I found a couple other color equivalents. I have a pretty decent stock of Tamiyas and Vallejo Model Colors, but lacked XF-59 that all the color mixes call for with respect to Tamiya paints. I have the "RLM79" in Vallejo, but it was straight up pink. Even adding in some flat brown didn't do the trick. So, back to the drawing board. I found RLM79 in Mr. Color at Sprue Brothers, so I've got a jar of that and XF-59 coming and I'll try either of those to get these birds painted.
I cleaned up late last night after getting the base RLM 78 on the bottom of the 109 and the "marble coat" on the bottom of the 110, so no pics of paint progress just yet. I guess I didn't have an appreciation for just how much real estate there is on this beast when it comes to painting.
Question: Would the inboard sides of the vertical stabilizers below the horizontal stabilizer be painted RLM78 or 79? I'm guessing 78, but (shockingly) Dragon's instructions are lacking.
Now that I'm done building the 109, I hope to make more frequent updates to this. More to come soon.
p.s. I don't have hours totals at hand, but I can tell you that getting to the same point on both aircraft required 1/3rd the time for the 109 as it did for the 110. I'm 60+ hours into the 110 and only about 22 into the 109.
-
 ChuckD got a reaction from Daniel460 in Messerschmitts of North Africa: Bf-110E-2 and Bf-109F-4 Trop
Well, it's been nearly a month, but progress hasn't stopped on ye olde Bf-110. The construction is complete and I've managed to get it primed with Mr. Surfacer 1500 black (great stuff). The reason why it took me a bit is because I wanted to build a Hasegawa Bf-109F4 Trop as an experimentation piece for painting RLM 79 and 78. The Hasegawa kit is just a simple dream, by the way. Practically falls together and looks great out of the box.
Anyway, I'm glad I did start painting with the 109, quite honestly. A few months ago, I bought a bottle of Mr. Paint's RLM79 sand yellow and had planned on using it for this build. I started shooting it on the 109's upper surfaces and it quickly became apparent that it was *way* too yellow. I'm not an expert on German paint schemes, but apparently their color match is RLM79 "(variant 1)." Maybe it's old news to others, but apparently there's a pretty vast difference between "variant 1" and what I came to believe was RLM79. Live and learn.
So, in looking around a bit, I found a couple other color equivalents. I have a pretty decent stock of Tamiyas and Vallejo Model Colors, but lacked XF-59 that all the color mixes call for with respect to Tamiya paints. I have the "RLM79" in Vallejo, but it was straight up pink. Even adding in some flat brown didn't do the trick. So, back to the drawing board. I found RLM79 in Mr. Color at Sprue Brothers, so I've got a jar of that and XF-59 coming and I'll try either of those to get these birds painted.
I cleaned up late last night after getting the base RLM 78 on the bottom of the 109 and the "marble coat" on the bottom of the 110, so no pics of paint progress just yet. I guess I didn't have an appreciation for just how much real estate there is on this beast when it comes to painting.
Question: Would the inboard sides of the vertical stabilizers below the horizontal stabilizer be painted RLM78 or 79? I'm guessing 78, but (shockingly) Dragon's instructions are lacking.
Now that I'm done building the 109, I hope to make more frequent updates to this. More to come soon.
p.s. I don't have hours totals at hand, but I can tell you that getting to the same point on both aircraft required 1/3rd the time for the 109 as it did for the 110. I'm 60+ hours into the 110 and only about 22 into the 109.
-
 ChuckD got a reaction from Rick Griewski in HK Models hinting at 1/32 B model P-51!
Dang. Read the first few pages of this on my phone last night and didn't realize that the thread was a couple years old. I'm not all that much of a fan of Mustangs, but if reasonably priced, I'd throw in on one or two. I'm looking forward to the new RoG D-model due to its price, but have never bought one of Tamiya's due to the cost. I guess I just quantified exactly how much I like the P-51. Huh, interesting.
-
 ChuckD got a reaction from ghatherly in Messerschmitts of North Africa: Bf-110E-2 and Bf-109F-4 Trop
Hi, everyone. Back with another update. I asked my wife earlier this week if I could have a modeling day this weekend, since I hadn't had much in the way of bench time. Happily, she was cool with it, so I started around 8am this morning and worked on and off - mostly on - throughout the day today until now. That said, I was able to make quite a bit of progress.
After a grand total of 31.3 labor hours, here is the current state of affairs:
Cockpit is lightly weathered and dusted, fuse is together, HGW seatbelts are done, canopies are masked (not pictured), and I've gotten the landing gear together. I've just started dabbling in the cowlings and I'm pretty sure I see now why they're the widely regarded as weak spot of this kit. The directions essentially show you just putting them around the engine and being good to go... but there's no way to locate them that way, so I'm going to have to cobble them together very very slowly and carefully to ensure they fit correctly. If I come up with a good way, I'll be sure to share for posterity's sake.
Anyway, here are a few in progress pics from today:
This is after the cockpit had been weathered and shaded w/oils and the seatbelts completed. When I bought the HGW seatbelts, I had no idea that building them would entail you actually building little seatbelts. They're pretty awesome. I got a little heavy with the wash on the pilot's belts, so there's that.
Side panels
IP w/reflector glass. This makes the whole thing look glossy, but it's not. I did drop some future in the gauges just to give them some gloss effect.
Seatbelts! Pedal straps are tamiya tape painted brown.
Fuse closed up. These two shots show the pigment dusting I used to put some dust inside the beast. It is in Africa after all. I'm going to model it with the pilot's canopy open and the gunner's canopy closed, so a lot of this should still be pretty visible once it's all said and done.
I'm going to let the fuselage joins harden for a day, then go at cleaning them. I may have to rescribe a few things, but overall the fit has been great. I've decided to just close the cowls and abandon my idea of leaving one open.
That's all for today. Hopefully I'll have another update or two this week as I plug through the cowls and clean up join lines. Thanks for following along.
-
ChuckD got a reaction from ghatherly in Messerschmitts of North Africa: Bf-110E-2 and Bf-109F-4 Trop
Hi, everyone. Back with another update. About 98% of the way through the build. Had today off and have spent almost the entire day today sanding, filling, sanding, filling, and so on ad nauseum. I've still got a few things to clean up, but right now, I'm waiting on some glue and some milliput to set, so I thought I'd take a moment to post a few progress photos. For filling, I've pretty much pulled all the stops. I've used Mr. Surfacer, Tamiya white putty (first time, not a fan), stretched sprue, milliput, and even small flecks of sprue to fill tiny gaps. Been an interesting experience. I loathe rescribing - primarily because I really suck at it - so I've found a good technique of sanding for a few seconds, then sharpening up the panel line with the scriber, then repeating till the join line is gone. I find that allows me to not dink around with dymo tape or whathaveyou to hold straight lines around curved surfaces. Not rocket science I guess, but it helped me. Also, I'm grateful that the 110 doesn't have many panel lines that run around the front of the leading edge.
Anyway, yak yak yak, on with the pics.
This is as of Thursday night. Most of the cowlings are dry fit.
I said early on that the nacelles are supposedly the weakest part of this kit. While they fit reasonably well, they are a textbook example of Dragon's theory of "why use one part when 7 (literally) will do?" Sigh.
Part of my beef here is that a lot of the parts - the main upper and lower cowl - have no positive attach points to the rest of the airframe. You can see the tabs below for mating them to each other, but when mating them to the rest of the aircraft, you're left to dry fit, pray, and/or invent profanity. To help alleviate this a bit, I glued a couple strips of plastic card to the inside surfaces to give me something to press against. It really helped in fitting the lower cowl to the lower wing part, but I'm less convinced it was helpful for the upper cowl.
The nose required a bit of sanding too. On the right side, the nose cone stood proud of the rest of the fuselage by a pretty significant margin... at least as far as models are concerned. If I had it to do again, I would've shaved the interior bulkhead down a bit to allow the nose cone to be flexed and glued. The white crap is Tamiya putty which I tried for the first time and didn't really care for. It seemed to chip quite often rather than sand smooth. So, I more or less had to go over the whole section again with Mr Surfacer 500 and sand again. Oh well. Each build brings new lessons.
Here's how she stands as of this writing. The tail is glued on, but the wings are still dry fit. I'm going to finish the cleanup and paint the wheel wells prior to attaching the wings. Dry fitting looks promising for the wings. There doesn't appear to be much of a gap anywhere except for at the very forward inboard section of each wing right at the leading edge. But, that shouldn't be too hard to clean up.
Looks rather Bf-110ish, doesn't she?
The right nacelle. In general, the right side fit better for some reason. As you can see, some of the cowl panels don't match up perfectly, but I'm not too worried about it. I'm going to knock the high spots down just a bit, then call it good. I've been around enough real airplanes to know that cowls don't always fit perfectly.
Left side.
Tail assembly. Once that milliput dries, I'll get some Mr. Surfacer in there to smooth it out a bit.
The lower wings with bomb racks attached and holes drilled for the drop tanks. I'm am not looking forward to the final fit of those. Their mounting brackets are fiddly as all getout. 1000:1 odds I get thru attaching those without breaking something.
A good look at the enlarged oil(?) cooler intakes. You have to basically remove 3/4 of the lower cowl pieces to fit these, though once you do, they fit pretty well.
These last shots show the most problematic area around the uh... cooler ... thingy... on the left wing. No matter how much I dry fit, adjusted, and tried again, it just would not line up, so I ended up gluing it as best I could, then back filling the area with Mr. Surfacer. In the end it turned out okay. The landing light bezel is one of the parts I'm waiting on to dry, so its seams are still pretty ugly.
Lower wing
Upper wing
All in all, there have been a few challenges, but for the most part the fit has been pretty good. Just a bit more cleanup and masking and I can finally start shooting chemicals at this big dumb thing. There is no way this thing will fit in my paint booth, so that will be an interesting challenge in its own right. Thanks for following along.
-
ChuckD got a reaction from Daniel460 in Messerschmitts of North Africa: Bf-110E-2 and Bf-109F-4 Trop
Once I'm on the build, I'm usually pretty decisive. For me, the long hours of idle staring come when I try to figure out what kit to pull out of the stash next.
Thank you. Progress is slow, but it's coming along. It is eye opening to see how much of a time investment this hobby is.
Thanks! Starting to shape up nicely.
I hear ya. Winter is definitely an up-time for me in terms of modeling. On average, I don't get much time in a week to build, so all of my builds are slow. With a full time job, a 6 year old, and several other hobbies my time is limited. At this rate (~22.5hrs/mo) it would take me 13 months to build your Fury. This two to three month build for the 110 is trying my limited patience, so kudos to you for pushing thru a 300 hour project.
YES! Ugh. The nacelles stink. My order of operations was to:
1. Attach the rear exhaust fairings to the lower wing root. Let dry.
2. Attach the rear upper cowl to the upper wing. Let dry.
3. Attach the lower cowling. Let dry
4. Attach the forward exhaust fairings. Let dry.
5. Attach one side of the upper cowl, hold till dry.
6. Attach the other side of the upper cowl, hold till dry.
7. Repeat the whole god-forsaken process on the other wing.
Somewhere between steps 3 and 4 is where I put the engine in place. Good luck on your conversion! Hope it turns out.
Right! It's a very interesting thing to track. I'm not a statistician by any stretch, but my professional world is built around business process improvement, metrics gathering, and data analysis. I spend most of my days tracking processes to gather data used to improve them. Tracking my time spent on this kit is a natural extension of that professional workflow.
What's *really* interesting is to attach a cost to those times relative to my hourly rate at work.
-
ChuckD got a reaction from sandokan in Messerschmitts of North Africa: Bf-110E-2 and Bf-109F-4 Trop
If anyone's interested, here are my time tallies (in hours) to date:
Plan & Prep Labor: 16.05
Build Labor: 21.55
Paint Labor: 10.95
Weathering Labor: 1.90
Total Time: 45.55
Total Modeling Sessions 24.00
Avg Time per Session 1.90
Interesting to see that I've spent over a full working week or almost two full days of time building this model since starting on 9/16/17. Stats are fun.
-
ChuckD got a reaction from sandokan in Messerschmitts of North Africa: Bf-110E-2 and Bf-109F-4 Trop
Hi, everyone. Back with another update. About 98% of the way through the build. Had today off and have spent almost the entire day today sanding, filling, sanding, filling, and so on ad nauseum. I've still got a few things to clean up, but right now, I'm waiting on some glue and some milliput to set, so I thought I'd take a moment to post a few progress photos. For filling, I've pretty much pulled all the stops. I've used Mr. Surfacer, Tamiya white putty (first time, not a fan), stretched sprue, milliput, and even small flecks of sprue to fill tiny gaps. Been an interesting experience. I loathe rescribing - primarily because I really suck at it - so I've found a good technique of sanding for a few seconds, then sharpening up the panel line with the scriber, then repeating till the join line is gone. I find that allows me to not dink around with dymo tape or whathaveyou to hold straight lines around curved surfaces. Not rocket science I guess, but it helped me. Also, I'm grateful that the 110 doesn't have many panel lines that run around the front of the leading edge.
Anyway, yak yak yak, on with the pics.
This is as of Thursday night. Most of the cowlings are dry fit.
I said early on that the nacelles are supposedly the weakest part of this kit. While they fit reasonably well, they are a textbook example of Dragon's theory of "why use one part when 7 (literally) will do?" Sigh.
Part of my beef here is that a lot of the parts - the main upper and lower cowl - have no positive attach points to the rest of the airframe. You can see the tabs below for mating them to each other, but when mating them to the rest of the aircraft, you're left to dry fit, pray, and/or invent profanity. To help alleviate this a bit, I glued a couple strips of plastic card to the inside surfaces to give me something to press against. It really helped in fitting the lower cowl to the lower wing part, but I'm less convinced it was helpful for the upper cowl.
The nose required a bit of sanding too. On the right side, the nose cone stood proud of the rest of the fuselage by a pretty significant margin... at least as far as models are concerned. If I had it to do again, I would've shaved the interior bulkhead down a bit to allow the nose cone to be flexed and glued. The white crap is Tamiya putty which I tried for the first time and didn't really care for. It seemed to chip quite often rather than sand smooth. So, I more or less had to go over the whole section again with Mr Surfacer 500 and sand again. Oh well. Each build brings new lessons.
Here's how she stands as of this writing. The tail is glued on, but the wings are still dry fit. I'm going to finish the cleanup and paint the wheel wells prior to attaching the wings. Dry fitting looks promising for the wings. There doesn't appear to be much of a gap anywhere except for at the very forward inboard section of each wing right at the leading edge. But, that shouldn't be too hard to clean up.
Looks rather Bf-110ish, doesn't she?
The right nacelle. In general, the right side fit better for some reason. As you can see, some of the cowl panels don't match up perfectly, but I'm not too worried about it. I'm going to knock the high spots down just a bit, then call it good. I've been around enough real airplanes to know that cowls don't always fit perfectly.
Left side.
Tail assembly. Once that milliput dries, I'll get some Mr. Surfacer in there to smooth it out a bit.
The lower wings with bomb racks attached and holes drilled for the drop tanks. I'm am not looking forward to the final fit of those. Their mounting brackets are fiddly as all getout. 1000:1 odds I get thru attaching those without breaking something.
A good look at the enlarged oil(?) cooler intakes. You have to basically remove 3/4 of the lower cowl pieces to fit these, though once you do, they fit pretty well.
These last shots show the most problematic area around the uh... cooler ... thingy... on the left wing. No matter how much I dry fit, adjusted, and tried again, it just would not line up, so I ended up gluing it as best I could, then back filling the area with Mr. Surfacer. In the end it turned out okay. The landing light bezel is one of the parts I'm waiting on to dry, so its seams are still pretty ugly.
Lower wing
Upper wing
All in all, there have been a few challenges, but for the most part the fit has been pretty good. Just a bit more cleanup and masking and I can finally start shooting chemicals at this big dumb thing. There is no way this thing will fit in my paint booth, so that will be an interesting challenge in its own right. Thanks for following along.
-
ChuckD got a reaction from sandokan in Messerschmitts of North Africa: Bf-110E-2 and Bf-109F-4 Trop
Good morning, everyone. Quick questions for those in the know since I'm to the point where I can put together the bombs and drop tanks:
1. Could the 110E-2 carry both bombs and drop tanks at the same time?
2. What colors are the tanks, bomb mounts, and bombs.? The instructions don't have any color call-outs.
-
ChuckD got a reaction from sandokan in Messerschmitts of North Africa: Bf-110E-2 and Bf-109F-4 Trop
Thanks. Base coats were done with Mr Paints shot at about 12 PSI over a black primer base of Mr Surfacer 1500. The detail work was done exclusively with Vallejo paints from their model color and panzer aces lines.
-
ChuckD got a reaction from sandokan in Messerschmitts of North Africa: Bf-110E-2 and Bf-109F-4 Trop
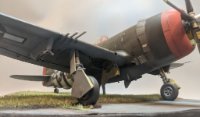
Everything loosely mocked up for effect:
-
ChuckD got a reaction from sandokan in Messerschmitts of North Africa: Bf-110E-2 and Bf-109F-4 Trop
Hi, everyone. Back with an update at last. I should've mentioned in my original post that this will be a somewhat pokey build log. I don't get a ton of free time in my life and what I do get, I balance across several different hobbies. I also like to update when I actually have something substantive to post. That said, I've made some pretty good progress in the last few weeks on the base coating and detailing of the cockpit. I've got everything pretty well tidied up and will be moving on to irrevocably botching the weathering here shortly. I have to admit that I found a really great thread here from 2011 and have been using it as my primary photo reference. So there are some special thanks necessary to poster Ralph Riese for his photos and reference.
As a fun aside, this is the first kit I've actually started tracking time spent on the build. My goal is to get a fun picture of just how much time and labor this build represents. As of this post, I've spent 3.8 hours on building, 8.2 hours on painting, and 2.8 hours on ancillary tasks like prepwork, photos, posting updates here, etc. A total of 14.8 hours across 10 different bench sessions for an average of 1.48 hours per session. What can I say, I'm a stats geek.
Anyhoo, here we go.
Here are the major sub-assemblies laid out. I opted for the RLM02 cockpit with RLM66 panel.
Cockpit sidewalls with wiring:
The radio stack:
Cannon tray and oxygen bottles:
The instrument panel. This is straight out of the box. I finished it with a mix of paints and colored pencils. I believe the latter has some real promise for tight detail work, but the Mr Paint finish I used leaves such a fine, smooth finish, there wasn't much for the pencil to grip on. Due to the fine detail of the molded plastic, this was a joy to paint and detail.
Instruments and ammo counter (and mold seam - damnit) for the gunner/radioman:
Ammo drums that will never see the light of day once everything is buttoned up:
The cockpit. For the amount of detail on the IP, the amount of detail here is a little lacking, in my opinion.
The rear gunner's mount:
-
 ChuckD got a reaction from Bill Cross in Messerschmitts of North Africa: Bf-110E-2 and Bf-109F-4 Trop
If anyone's interested, here are my time tallies (in hours) to date:
Plan & Prep Labor: 16.05
Build Labor: 21.55
Paint Labor: 10.95
Weathering Labor: 1.90
Total Time: 45.55
Total Modeling Sessions 24.00
Avg Time per Session 1.90
Interesting to see that I've spent over a full working week or almost two full days of time building this model since starting on 9/16/17. Stats are fun.
-
ChuckD got a reaction from Bill Cross in Messerschmitts of North Africa: Bf-110E-2 and Bf-109F-4 Trop
Hi, everyone. Back with another update. About 98% of the way through the build. Had today off and have spent almost the entire day today sanding, filling, sanding, filling, and so on ad nauseum. I've still got a few things to clean up, but right now, I'm waiting on some glue and some milliput to set, so I thought I'd take a moment to post a few progress photos. For filling, I've pretty much pulled all the stops. I've used Mr. Surfacer, Tamiya white putty (first time, not a fan), stretched sprue, milliput, and even small flecks of sprue to fill tiny gaps. Been an interesting experience. I loathe rescribing - primarily because I really suck at it - so I've found a good technique of sanding for a few seconds, then sharpening up the panel line with the scriber, then repeating till the join line is gone. I find that allows me to not dink around with dymo tape or whathaveyou to hold straight lines around curved surfaces. Not rocket science I guess, but it helped me. Also, I'm grateful that the 110 doesn't have many panel lines that run around the front of the leading edge.
Anyway, yak yak yak, on with the pics.
This is as of Thursday night. Most of the cowlings are dry fit.
I said early on that the nacelles are supposedly the weakest part of this kit. While they fit reasonably well, they are a textbook example of Dragon's theory of "why use one part when 7 (literally) will do?" Sigh.
Part of my beef here is that a lot of the parts - the main upper and lower cowl - have no positive attach points to the rest of the airframe. You can see the tabs below for mating them to each other, but when mating them to the rest of the aircraft, you're left to dry fit, pray, and/or invent profanity. To help alleviate this a bit, I glued a couple strips of plastic card to the inside surfaces to give me something to press against. It really helped in fitting the lower cowl to the lower wing part, but I'm less convinced it was helpful for the upper cowl.
The nose required a bit of sanding too. On the right side, the nose cone stood proud of the rest of the fuselage by a pretty significant margin... at least as far as models are concerned. If I had it to do again, I would've shaved the interior bulkhead down a bit to allow the nose cone to be flexed and glued. The white crap is Tamiya putty which I tried for the first time and didn't really care for. It seemed to chip quite often rather than sand smooth. So, I more or less had to go over the whole section again with Mr Surfacer 500 and sand again. Oh well. Each build brings new lessons.
Here's how she stands as of this writing. The tail is glued on, but the wings are still dry fit. I'm going to finish the cleanup and paint the wheel wells prior to attaching the wings. Dry fitting looks promising for the wings. There doesn't appear to be much of a gap anywhere except for at the very forward inboard section of each wing right at the leading edge. But, that shouldn't be too hard to clean up.
Looks rather Bf-110ish, doesn't she?
The right nacelle. In general, the right side fit better for some reason. As you can see, some of the cowl panels don't match up perfectly, but I'm not too worried about it. I'm going to knock the high spots down just a bit, then call it good. I've been around enough real airplanes to know that cowls don't always fit perfectly.
Left side.
Tail assembly. Once that milliput dries, I'll get some Mr. Surfacer in there to smooth it out a bit.
The lower wings with bomb racks attached and holes drilled for the drop tanks. I'm am not looking forward to the final fit of those. Their mounting brackets are fiddly as all getout. 1000:1 odds I get thru attaching those without breaking something.
A good look at the enlarged oil(?) cooler intakes. You have to basically remove 3/4 of the lower cowl pieces to fit these, though once you do, they fit pretty well.
These last shots show the most problematic area around the uh... cooler ... thingy... on the left wing. No matter how much I dry fit, adjusted, and tried again, it just would not line up, so I ended up gluing it as best I could, then back filling the area with Mr. Surfacer. In the end it turned out okay. The landing light bezel is one of the parts I'm waiting on to dry, so its seams are still pretty ugly.
Lower wing
Upper wing
All in all, there have been a few challenges, but for the most part the fit has been pretty good. Just a bit more cleanup and masking and I can finally start shooting chemicals at this big dumb thing. There is no way this thing will fit in my paint booth, so that will be an interesting challenge in its own right. Thanks for following along.