
Sepp
-
Posts
412 -
Joined
-
Last visited
-
Days Won
1
Content Type
Profiles
Forums
Events
Everything posted by Sepp
-
Simply gorgeous!
-
 Simply beautiful work!
 -
That is.... nope, I have no words to accurately describe how good it is. I may have to take up knitting
-
Oooh! Missed this one, somehow... welcome aboard And - veeery nice work, there - following, for sure!
-
Thanks muchly! I hope you have a good one, as well
-
Wow! Thank you, it's really kind of you to say so... although I fear you may have been standing a bit close to the sherry trifle, lol!
-
Thanks for the links/info I will read and digest... Sepp
-
Seasons greetings, all! Not so so much an 'on your marks' post, more a letter of intent or possibly even a memorandum of understanding... the next thing I'm going to try to not completely ruin is Eduard's Adlerangriff edition Bf109e. I haven't yet decided what the scheme will be - much will depend on what aftermarket markings are available - but I do know I'd like it to have the 'clean' blue fuselage with no mottling etc. and at least some yellow and/or white bits... not necessarily an entirely yellow nose. Possible candidates are currently: E3, 7/JG26, Lt. Josef Bürschgens, white 7 + I or E4, 8/JG54, Oblt. Erwin Leykauf, black 3 + E?, 5/JG26, pilot unknown (to me), black 2 + is also in the frame, but I'll need to ascertain what mark I should build it as. If I can't find or knock up suitable markings for any of the above, it'll be E4, 9/JG3, Oblt. Egon Troha, yellow 5 + I (one of the provided schemes). Any thoughts/suggestions gratefully received! Back soon(ish), Sepp.
-
F7F-3 Tigercat - BuNo 80405 - VMF 312 MCAS - El Toro, CA 1946
Sepp replied to Out2gtcha's topic in Works in Progress
The awesomeness continues... Love it. -
F7F-3 Tigercat - BuNo 80405 - VMF 312 MCAS - El Toro, CA 1946
Sepp replied to Out2gtcha's topic in Works in Progress
Good to see the Cat is back, Brian! I agree, it's a beautiful aeroplane - I wonder why none of the main stream makers have taken it up? I'd love to see what ZM or Tamiya could do with it :) -
Thanks, all! @Mozart: yes, I agree, the undercarriage is challenging. I doff my cap to the Machiavellian mind that designed the Hunter's gear door arrangement.... and I thumb my nose at the person who decided that a "stick it in a trough" fit was a good idea for [a] getting the geometry right and [b] supporting the weight on the model. Also, it looks very odd, with the trunnions not being supported at all
-
Aaaand.... done! Admittedly, it wasn't until after I'd taken the first few pix that I noticed it wasn't quite done, and quickly added the tail nav light and pitot tube. Usual crappy pictures, apologies. The myriad dust motes tell me I need to do the housework! and finally, with said added pitot tube: I'll have to tidy the hole up later, but I've had enough of this one, now. It's fought me from end to end... I'm not superstitious, but I just noticed that both the serial number and a/c ID number add up to 13. Learned a lot on this one - mainly how not to do stuff. Things I'm happy with? The cockpit and the shark's teeth. The latter were a swine to get on without creasing, folding up or rolling into a ball, but look OK. Things I'm not happy with? Everything else, lol. I ended up not using most of the Revell decals. The ones I did use have silvered up badly. The home made ones went on AOK. Thanks for all the support, and for looking in. Sepp, out.
- 35 replies
-
- 15
-

-
Me again. Very quick post, mainly just to show I'm still here and this one hasn't (completely) stalled. It's very nearly there, as you'll see, just the horizontal stab and a few aerials to go on, and a few cock-ups to sort out... Underside: You can see one of said cock-ups by the underwing roundel this side; and of course, it's the side you'll see when it's on the shelf and top: At least it's not a tail-sitter. Well, at the moment anyway! Also, the dark green sorted itself out; the shiny edges disappeared once the satin coat went on. All for now - should be done by Wednesday, hopefully Cheers! Sepp
-
Me again. Thanks again for the kind words, I'm not sure "flawless" is an entirely accurate description of the paint, but I'll take it... the damned thing is fighting all the way and I need the encouragement! Some progress... definitely two steps forward, one back. White bits on: The sharp eyed will notice that when I masked the whole lot off, I forgot the gap between the fuselage roundel and number masks (middle pic), so a bit of touching up had to be done. Apparently my stencil plan worked, because the black and white portions line up AOK Black bits on, along with the yellow numbers: The whole thing has had a coat of gloss, and I've started on the decals... I'm soooo glad there's such a tiny gap between the gear bay edge and the inner gun troughs. It's going to be no problem at all to sit the decals over the muzzle blast tubes without them folding up into a ball. That's all for now, but at least it's moving along. Cheers! Sepp
-
Well, after Maru's kind words, I suppose I'd better get my lazy arse moving and post an update. Those of a nervous disposition look away now... First the pale brown: Then the pale green: Dark brown: Oh. Oh my. Oh my dear Lord. First three colours went on with no major dramas, bit of paint lifting, but that doesn't matter because there's more to go on and I just needed to lightly feather the edges... The dark green? Well, that went down like I'd used whipped cream and a four-inch house brush. Hopefully you can see (if you can't, get thee to an optician!, lol) the difference between the brown and dark green above. It's not pretty ... and guess which clot forgot to feather the dark brown edge back on the left wing? If you stand in a different room with the door closed, the extra panel line is not so obvious Bum. It seemed to over AND underspray, all at the same time. Huge spatters; my bench looked like I'd thrown a bucket of paint over it. What really galled me is after the "oh, crap" moment, I put a coat on the mule, and it went on good as gold. Oh well. So, after a visit to the pub to drown my sorrows, and a few days to let it go off, I had at the green with sand paper to try to knock the surface back. The intention being: either it works, and a top coat will bring it back, or it doesn't and I bite the bullet and strip the lot off. Well, I'm pleased to report that the second go is a lot better. The pic is blurred, but the texture is a lot closer to what I've come to expect from these paints. It's not perfect, but it is acceptable. You can see I really need to pluck up courage and take the new dark green coat a bit closer to the edges, but given how this particular bottle has behaved so far, I'm disinclined to tempt it. The colour is actually no different, it's just the underlying sanded layer has a sheen to it. I do wonder if that would fade a bit under the gloss and satin top coats? If I place the model on the shelf where it's going to live, the difference disappears. In the pic, it's under two bright lights. Anyhoo. Next up is the white portions of the markings. As for adjusting the green, as my dear old dad would say "we'll see". Cheers, all - wish me luck! Sepp
- 35 replies
-
- 12
-
-
Right, I'm back on this now work has kindly got out of the way... Quick update: Oerlikon rockets all built up They're definitely going to look better than bare rails! Having fun and games with trial fit of masks on the mule - I had a brilliant plan for aligning them, but it's been so long, I've forgotten what it was ... anyhoo, I've found a way that works. Some slight adjustments to be made but nothing show stopping. If the wing roundels look a bit small, it's because [a] they are (I used underside masks by mistake but the square is the same size, so no matter) and [b] they're for the white portion only - the black outline will be a bit wider still. I'm going to have to separate the fuselage numbers from the roundel, as the fuselage taper is sufficient to stop the masks sitting properly. Again, no biggie. Please excuse the big brown box - it's protecting the model under it from dust getting in the underside paint, which is currently curing. Hopefully tomorrow I can start on the upper surfaces and I can then post some more interesting pics. Sepp
-
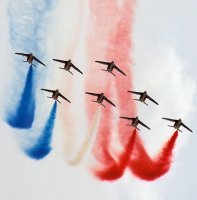
Alpha Jet also has pylons that are normal to the horizontal, rather than the wing. As can be seen here.
-
Done - BUT - admin needs to be compartmentalised by using different PW for each admin function; also rename admin folder so it can't be searched. Yes, even by admins - require a full url type for access, and limit access to known IP addresses. Frankly, should be a full board s/ware delete/restart not just a reload of content as all sorts of, shall we say, add ons can have been inserted.
-
Nice job!
-
Great work - keep it going!
-
Me again. Despite the radio silence, I am making progress - albeit with numerous distractions, the first and most enjoyable of which was a visit to the Royal Armouries site in Leeds. If you've never been - go; there's a wealth of by turns beautiful, awe inspiring and thought provoking material on display. For me, possibly the most poignant items was also one of the smallest: This is the actual pistol that Gavrilo Princip used to kill Archduke Ferdinand, and thus fomented WW I. I am not given to embracing the supernatural, but it does have a certain air about it, when you see it in the flesh. Anyhoo. Back to the subject at hand... Stores and pylons are progressing and I'm pleased with how the teeth have come out on the nose gear doors... I'll admit to being slightly apprehensive about tackling the big, grinny parts as there's a really thin section that's going to be a right swine to get straight. Hopefully you can see that the really lumpy latches on the MATRA pod have been sanded back and the detail replaced with etch parts (actually from an Eduard Bf109 set). Sadly, the kit decals are badly out of register so any placard that involves black and white will not be present. I spent an age umming and ahhing about how to tackle the shell case ejector chutes. The kit parts are just blank nubs; I experimented with various brass and styrene tubes, however the things have subtle curves and the straight tubing replacements didn't look right. As there was no way I was going to use the blank-faced kit parts as-is, I decided there was nothing to lose; out came the David drill and I had a go at hollowing them out: Success! They're a wee bit long, I think, but not too shabby Next up, nav lights. The kit parts were an awful fit. I could have simply filled and sanded them, but as I'm definitely still in 'learning how to' mode, I thought this would be a good opportunity to have a go at making my own, and at the same time making the finished aircraft a wee bit different to the standard thing - it is, after all, supposed to be a locally-built copy, so nav light lenses to local requirements aren't too much of a reach, I think? I squared off the recess and used 2mm styrene board to fill from the back, and clear sprue off cut for the lenes. I then sanded the whole lot to shape. I'll polish everything out, but I'm not fussed about seeing grey plastic through them as they'll be completely tinted. I even managed to get the tip profiles to match! With that done it was, all of a sudden, time to join the wings and fuselage. The fit is really quite good, considering the size of the pieces involved and the age of the kit; any gap will only require a tiny amount of filler. I'll either live with the (probably operator induced) fit imperfections or sand them out - haven't decided which yet. I took a scriber to the inboard aileron edges as the lines on the kit are very faint. Take care if doing this, there's a wedge-shaped fillet just inboard of the aileron and the inboard edge of that is just begging to be scribed as the aileron edge. Ask me how I know... And so, on to the Oerlikon rockets. The kit priovides the rails, but no ordnance to hang on them. Fortunately, Buchon Models provide nice resin and etch examples. Nice, but fiddly. The rocket bodies come in two pieces which need to be aligned without any pins, pegs, lugs or tabs to help. There is, no doubt, an easy way to do this but I found a solution using the two sizes of mitre blocks that I have. When arranged like this, the gap is just big enough to accomodate the rocket body: A length of brass tubing supports the nose; the tube is placed to that the fin braces don't cause misalignment when the body is slid into place. The whole thing is a tight fit and locks into place with no need for straps etc. and, being slide fit, a second piece of tubing inside the first acts as an ejector rod Result! The rocket bodies are beautifully cast and feature slots which are an enormous help in aligning/fitting the fins, which are tiny. One down, seven to go. This may take a while... There will now be another lengthy gap, while I go and do two type rating recurrent/renewal courses back-to-back. I haven't sat in a Gulfstream for over a year, so that's going to be fun, lol. Hopefully I'll still be over the line before the cutoff date. Back in a bit! Sepp
- 35 replies
-
- 12
-
-
Adding my voice to the chorus of "amazing!, awesome!, insanely good!". Not sure how I missed this one, but now following. Mind > blown!
-
Stars of the silver/small screen? Basically, any individual aircraft (rather than type) that has appeared or been depicted in a film or TV prog - could be restricted to one or the other. Might be a bit wide-ranging, but I'm sure appropriate limits could be imposed.
-
Time for another update, I think... Decal sheet is done, with many spares! Masks are ready for the white bases and in case I decide to go that route for the national markings. Again, several spares. A spare F.6 has helped enormously getting the camouflage mask elements right (here WIP, in paper) and these are also now ready In other news... The kit gear bays are in no way accurate; the blank walls ought to feature deep recesses and be festooned with plumbing and cabling. I've taken the easy route and confined myself to a suggestion of a couple of things that definitely should be there. The left main bay is home to the single-point pressure refuelling coupling, so I've hinted at that, and the associated timer switch and valve status panel (Airscale), with spurious placard (Archer; the resolution isn't great in the pic so you can't zoom in and read what the placard says... I only noticed when I viewed the original pic blown up somewhat, and I'm not telling!) and tank capacity notice (home-made decal). I also removed the stumpy kit rendition of the prong (with which anyone who's carelessly stuck their head in a Hunter's gear bay will no doubt be painfully familiar) and made a longer replacement from steel wire, here pained red. After a bit of dirtying up: The right main bay also has a pressure gauge on the forward side, so I suggested that, too. Here pictured before I put the dial face on the gauge and dirtied this bay up, too. The nose gear bay received some attention too - again, it really needs the walls opening up to get anywhere near accurate, but I added the radar test panel and spurious placard to the front wall and added a rear wall with cutout for the nose gear retraction jack. I've seen pics of the large panel in the roof painted in red, black, grey, silver and 'completely missing'; mine is red, to add a bit of interest and comes with another spurious placard. I drilled out the gear leg and fitted a pin made from two sizes of Albion tubing slotted together. This was cut to length, bent over at the other end and epoxied to the bay roof. Hopefully, it will be sturdy enough when the thing is sitting on it's wheels. Trial fit suggests all will be OK... The close-up pic makes the finish look awful. In the flesh, it looks fine. I've pre-painted the various elements of the gear doors, inside and out, and given them a slight grubbying. The small stencils show tyre pressures, the large one with the triangle specifies refuelling pressure/defuelling vacuum limits, all home-spun. Last thing for this update, the Matra pods. The kit pods are OK in profile, but the catches are waaaay over done. These will need seeing to later. The big problem, however lies at the exhaust fairing end: I think we can do better than that! The resin pod, below, has a nice exhaust fairing and comes with an etch plate depicting the individual tube exhausts. I don't really want pods with the blank, unfired nose look though (and I don't really like the detail or lack thereof on the body), sooo... Frankenpod time. The resin pod exhaust fairings are ever so slightly larger in diameter than the kit offerings, and really - I mean really - thin, so some careful sanding is required. You can see where I actually went through on this one. The result is worth the effort though, I think. Side by side for profile comparison. The resin fairing is definitely a better shape. That's all for now! Sepp
- 35 replies
-
- 13
-
-
Tim, Max, thanks for the information!
