

Scale32
-
Posts
582 -
Joined
-
Last visited
-
Days Won
1
Content Type
Profiles
Forums
Events
Everything posted by Scale32
-
1/32 Eduard E1 "White12" 2./JG53 France, August 1940
Scale32 replied to Scale32's topic in Ready for Inspection
Cheers Kev. -
Having a good looking exhaust stain, for me at least, will make or break a build for me and apart from Luftwaffe mottling is one of the hardest things to get right on a build. Big respect for going in and fixing it I'm sure this time around it will turn out even better. Absolutely love the build and this will be the icing on the cake. Unless I've missed it what are you using to produce your exhaust stains? Cheers Bevan
-
1/32 Eduard E1 "White12" 2./JG53 France, August 1940
Scale32 replied to Scale32's topic in Ready for Inspection
Cheers everyone, comments much appreciated..... And to everyone that hasn't seen this scheme before it's from Kagero's "Units 7" Jg53 Pic As. Cheers Bevan -
Nice one Eric.
-
1/32 Eduard E1 "White12" 2./JG53 France, August 1940
Scale32 replied to Scale32's topic in Ready for Inspection
Go for it Kev, thanks -
1/32 Eduard E1 "White12" 2./JG53 France, August 1940
Scale32 replied to Scale32's topic in Ready for Inspection
This is the Aires cockpit painted with Gunze H70 RLM02 over Tamiya Xf85 rubber black. I angled the airbrush from top to bottom to try and create a shadow effect. I added some white to the 02 for some highlights. Washed with oils and dry brushed with Humbrol enamels. Detail painting with Humbrol and Tamiya enamels. The instrument panel is painted with Tamiya Xf24, Cheers and thanks for looking. Getting a taste for these Ed 109's, some pretty wicked scheme choices out there- 20 replies
-
- 10
-

-
Hi guy's, Ed's 32nd scale E1 built for the 1940's Group Build over at LSM Build thread here...... http://forum.largesc...ce-august-1940/
- 20 replies
-
- 13
-
-
Ok now for the weapons..... As you can see the tanks have had an oil wash of sorts (still drying)they will be cleaned up in due course. Missiles have been clear coated awaiting oils and what not. I found after painting the airframe and getting the gear on that she was a tail sitter, no call out in the instructions to add nose weight so I was pretty peeved. Oh well what to do now I said to myself! Ended up adding weight to the front of each fuel tank using fishing sinkers. I did tape the tanks to their pylons then taped to the airframe..... seemed to work. Now I'm a little worried about the wing to pylon join considering the extra weight. Fingers crossed. Cheers Bevan
-
Thanks Rainer
-
Cheers guy's
-
Cheers Ray, the single colour schemes can be a challenge. Thanks Stormer, glad you like her. Thanks F's, your too kind. Kikka, I was going to do that scheme, but I wanted something a little different on the shelf. Glad you like her. Appreciate the comment Zak.
-
And some more! The painting of the top surfaces, as well as the bottom, I've tried to keep random. I tend to use the airbrush very much like a colouring pencil, very close to the surface and in short sharp strokes as well as cross hatching. What you end up with is a really patchy random layer of paint which in essence has already 2/3rds weathered the paint. Add to that some different shades and repair patches and it starts to become interesting and a whole heap of fun especially when its heading in the direction you want it to go! Not quite there yet with some small bits and bobs to do to the airframe. Working on the weapons at the moment so will update with that stuff soon. Thanks for looking in...... Cheers Bevan
- 34 replies
-
- 10
-
-
some more pics All paints used are Tamiya cross refed with Gunze which are called out in the instructions. And where she's at the minute.... I did have the bluing on the exhaust done with a drop of x8 blue in some acrylic clear which worked well but bought Tamiya's weathering set which has "burnt blue" in it and added to it......maybe a little over done?
-
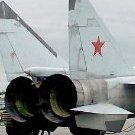
Hey fellow modellers, haven't posted anything in a loooong time but have been lurking nearly everyday so thought I'd get off my lazy backside and take some pics of my most recent work, Trumpeter's 1/32nd Mig 29k. This is the first jet of any kind I've built so after being nagged at the recent Model Expo here in Melbourne to "just build a jet" I went home and did just that! Actually I picked this kit up at the swap n sell at said Expo for $50 after thinking that if I don't like it or it doesn't build well I haven't wasted a whole lot of hard earned. The kit builds beautifully with no real vices that some basic skills wouldn't be able to fix easily, general fit of the kit is excellent. Although the wing fold area is a real bear of a join to contend with! Photos.. Cheers Bevan
-
Tamiya P-51D The Enchantress 1:32 |New Photos|
Scale32 replied to shadowmare's topic in Ready for Inspection
She's a beaut, love the weathering! Great work. Cheers Bevan- 32 replies
-
- 1
-
-
- The Enchantress
- Tamiya
- (and 1 more)
-
Bf109G-12 (two seater) Revell + Alleycat conversion
Scale32 replied to Zero77's topic in Works in Progress
Way cool! Can't wait for some dirtiness, keep on going, certainly not boring. Cheers Bevan -
Gotta hate that! Looking forward to the next round. Cheers Bevan
-
Jeez you don't muck around do ya! Cheers Bevan
-
Your a freak'n modelling machine mate. Another winner for sure! Cheers Bevan
-
Testors Dullcoat is a great alternative. You could also add their clear to the dullcoat to get differant sheens to add that little extra bit of realism. Although what you've acieved with your build is nothing short of excellent. Cheers Bevan
-
Revell 1/32 Bf 109G-14 with A.M.U.R. Reaver add-ons.
Scale32 replied to Fencer-1's topic in Ready for Inspection
Absolutely one of the nicest 109's I've seen. The Revell kit paired with the Amur reaver upgrade really makes for a beautiful result! The paint work is sublime and the exhaust staining exquisite, although some underside shots would've been nice to see. Hat off to you....... cheers. Bevan- 38 replies
-
- 1
-
-
- messerschmitt
- Bf 109
- (and 3 more)
-
No threat coming from my direction, haven't even looked at the Mig 29 yet. In actual fact haven't even done a lot of building of late. Cheers Bevan.
-
I don't know where you find the time Eric. Nice work. You really wouldn't want this in 1/32 lol. Cheers Bevan.
-
Love the colour scheme, you pulled it off nicely. Cheers Bevan.
-
Thanks for the kind comments guys, much appreciated. Cheers Bevan.