
radial
-
Posts
190 -
Joined
-
Last visited
-
Days Won
1
Content Type
Profiles
Forums
Events
Everything posted by radial
-
I always wanted this a/c but intended to keep the kit intact and use it to scale it up to 1/18 scale. Even at that scale the wingspan would be 13"+. Make me cry and build it!
-
It's cool dekenba. I didn't know there was a market for built kits either. But, you made me add up the costs of a no holds barred scratch build and just the materials cost is about $400. And we all know what our labor is worth!!
-
Very cool. You might remember the j-3 conversion I did from the Revell PA-18 kit. I can see many parts from that kit that would be useful to this build. Engine, wing struts, wheels and cabin parts to name a few. Also, it could be helpful to see Revell's assembly process specifically the wing to fuse join. I will watch with great interest!
-
Check out John at UMM-USA. He has packs of small dia.round and flat lead wire.
-
Forget about card model. This is multi-media modeling at its very best!
-
Really good stuff. Thanks for the glue/needle tip!
-
1:32 Diamond DA42 & Enstrom 480B Scratch-Build
radial replied to upor's topic in Ready for Inspection
Sorry......just can't stop looking at the DA. THAT is a masterwork! -
1:32 Diamond DA42 & Enstrom 480B Scratch-Build
radial replied to upor's topic in Ready for Inspection
Wonderful clean and precise scratch builds. -
Thanks for the blueprint site. Having dug thru my stash I think the only HS prop is in the GB R1 kit. Your a long way from a prop. Look forward to seeing your build!
-
I also ordered the Doyusha kit hoping to convert it to a Stearman as I'm burned out on total scratch builds. My source for 30's era Hamilton standard props and radial engines are the old Williams Bros kits particularly both Gee Bee kits. What was the source of the 4 view plans? BTW if you have any upcoming contests in your area, the vendors area usually has the WB kits for $10-$15.
-
How to build a 1/32 NAF N3N? Can't find any kits
radial replied to Joe McDonald's topic in LSP Discussion
Joe, Do you have 4 view plans for the N3N? If not forget about it. -
1:20 Scale completely scratch built Royal Aircraft Factory SE5a
radial replied to fozzy's topic in Ready for Inspection
The SE Looks better than real. It looks authentic! -
Have been following your build with enjoyment and gratitude for your excellent craftsmanship and time it takes to display WIP work. But I think you have to redo the prop. I'm surprised you did it in balsa as it is a difficult wood to stain and finish. Not meant to take away fr om your wonderful build just my IMHO.
-
Thought y'all might be interested in some cool figures. Expensive but very good out of the box. I made the yellow cap. Thinking of using them to just show scale against my current build.
-
Perfect. It looks like an old sepia print in color!
-
No. It's the RTV silicon mold making material that's the expense. The Alumilite kit is really the best value as a starter kit at about $80. It includes every thing needed to start casting including an invaluable instructional booklet. Hobby Lobby and Hobbytown sell this product.
-
Hubert may be right. Looks like the tail is cocked starboard. Wonder if that would be correctable with some hot water and judicious bending. I hate when this happens. As far as filler I've been using 3M glazing compound. It's the usual mess and will take 2 or 3 sanded coats plus brush coats of Mr Surfacer 500. The compound dries extremely fast but I let it set for at least 8hrs.before sanding. To be honest I haven't found any filler I like.
-
Thanks for all your kind comments. Wouldn't it be cool if we could combine all the skills of the LSP members to form one über modellers? I'll sweep the floor!
-
Very nice rendition of a 146. For some reason it makes me want a Lear 24 in 1/32!
-
Cool build. Way to think out of the box!
-
Matt, Yes, the cowl and scoops are vacced. The entire front from the windscreen forward is kit bashed or scratched. The L/G was changed from hydraulic to bungee. Small changes were made in the cabin. Otherwise the airframe measures out pretty close to the Paul Matt drawings. Thanks for looking in. Jeroen, You captured the spirit perfectly! Babe or plane.......uh babe?
-
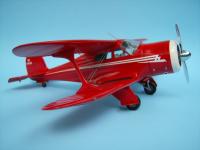
Here's an easy conversion for one wanting to try basic vac forming and building a few parts to get an iconic a/c. Mr. Piper did not change much from 1934-1959 so the Revell kit works This was done 2yrs ago so not recent but it's not been shown anywhere. Put your sunglasses on lots of yellow! The color it's supposed to be!
-
For dougn and all those rigging golden age ac. Have tried the standard rigging methods, sprue, fishing line, etc. with mixed results. I wanted to be able to install rigging at the end of the build to get a cleaner result. In the 30's the ac were rigged with what was called "streamline stainless wire"; essentially flattened stainless cable. To reproduce this in our scale I decided to flatten commonly available .015" round rigid music wire. To do this 8" lengths of wire are cut and vise grips are attached to each end and simply drawn across a drum sander attachment on a hi speed drill. 3 or 4 passes on each "side" is enough as These drums are quite aggressive. The wires are smoothed out with 400 sandpaper. The finished wires are then cut to the lengths required. The fit method is just trial and error. Cut, bend, dry fit and then do it again. I always flatten twice the number of wires needed. During this fitting process i make a location diagram for all the wires and set it aside till final install. Inevitably, there will adjustments necessary during final assembly. Gluing is done With thin ca applied with wire. Not an easy method but it does allow for mistakes. State of the art drum sander Wiring diagram Results
-
Just as an alternative for the rigging wire,I've used flattened .015 steel music wire on my last 3 30's builds and find it very effective. Simply cut to length and bend the ends to match the holes. Since the wire is stiff ther is no tensioning required. Very nice build of a classic!
-
As I mostly scratch build, I do vac form many parts. The criteria for any vac part would be that it be thick walled and rigid so there would be gluing surfaces and no need for internal structure. If this could be done vacced conversion parts would a great idea.