

Erik Lind
-
Posts
458 -
Joined
-
Last visited
Content Type
Profiles
Forums
Events
Everything posted by Erik Lind
-
Gentlemen, The Whats New has been updated with some great pictures, articles and reviews. Please enjoy it at Whats New!
-
Fozzie, That is the most realistic and well executed weathering i have ever seen on an aircraft engine. You managed to capture it extremely well.
-
Welcome to the forum, Porkbits. Luckily the RLM colors are covered by almost all brands of paint. Personally i use either Xtra Color enamel or acrylic (available from Two Bob) or i use the Polly Scale colors. Both brands have great products and the shades are close to what the real colors look like.
-
The Swedish pilot was only saying that because he was flying in a Fiat..... :lol:
-
This is an awesome model. I just love the unorthodox way of modeling you are engaging in. No obstacle to big to climb, no item that cant be of some kind of use. This is what real modeling is and how it should be. I am relieved not to see a single bought resin item anywhere.
-
That is a very nice cockpit. Great detailing and painting.
-
Thats awesome!! I will be following this thread with interest for sure. Seems you used everything but the kitchen sink....
-
This is excellent work, Brian. Where did you get the decals from that are inside the fuselage? I heard about them some time ago, but i forgot about them.
-
Johan, This model is getting better and better. Quick question though, were the landing lights on Me 110 yellow? I thought only french cars had yellow lights.
-
That is a very nice Spitfire. It came out great despite the small problem with the MM.
-
Hi Brian, Yes, i have the color pics from both the CP volumes, as well as from the Radinger/Schick book. Those are the ones that inspired me to start this kit. Time for decals today, guess i will have to scrounge my stash and see what i can use since the Trump decals are somewhat reluctant to any kind of decal softeners.
-
Hi Rick, Thank you for your comments. It was brave, i admit, and i think it was worth the shot to start over. This time it took 6 mocca latte frappochinos with extra sugar....
-
Hi Daniel, Thank you very much for your comments. I dont think i will make them in resin, but if you want, i can vac you a set and send the camera bulges.
-
Repainted! The first layer of RLM 71 has been applied in a random squiggle pattern. RLM 71 squiggles. Then the RLM 70 was applied in a very light random pattern over the RLM 71 Model with both RLM 70 and RLM 71 squiggles. I am a bit more happy with the look of the second version of the squiggles. I also like the colors better than with the old version. This one looks better.


-
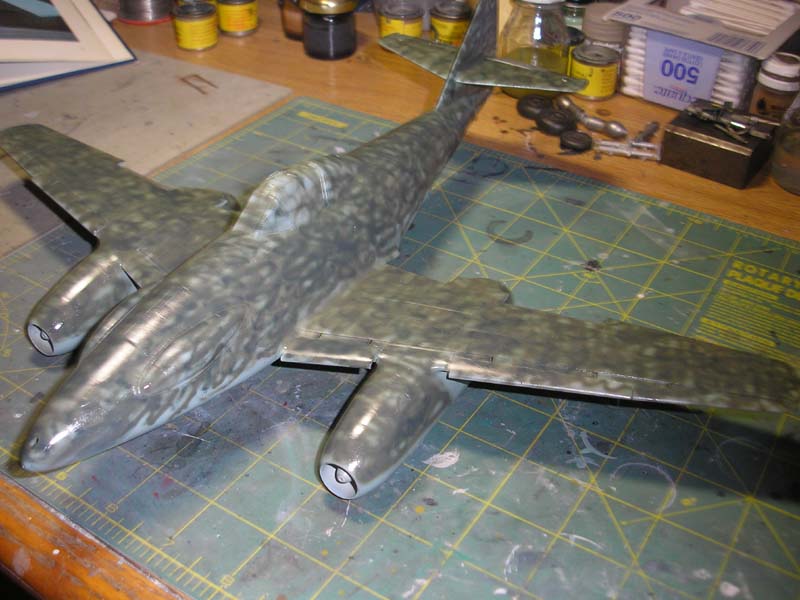
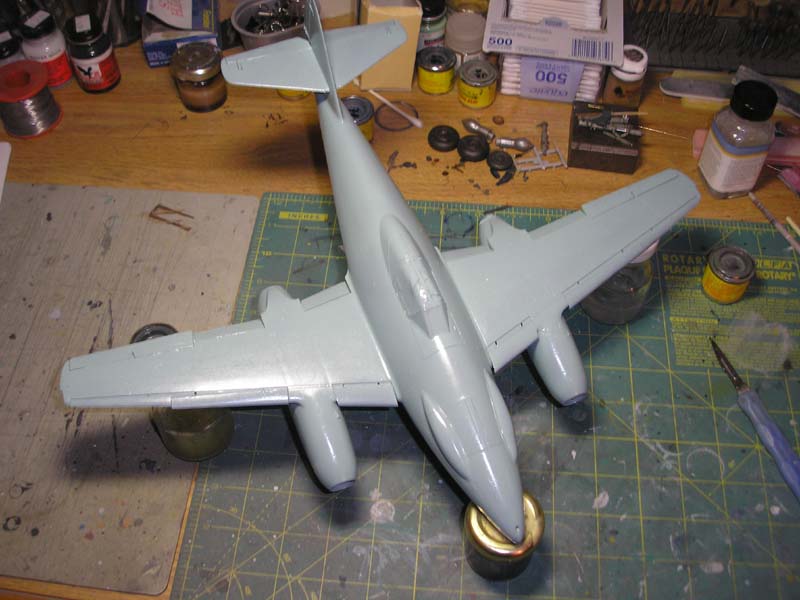
Back to Square 1. After looking at the model several times of the past few days, i have come to the realisation that RLM 74/75 pattern most likely isnt correct for the plane. Somehow it just doesnt look right. I also wasnt that pleased with the squigglings, and therefore i decided to repaint the model. This time i will use the colors David Brown suggested, RLM 70/71. This means to paint the top again, hoping that the xtra color will dry enough to allow me to paint the squiggles. Repainted with RLM 65. I also applied the decals for the underside, and i was not too impressed by their behavior. They did not go down the way i like them to, and i dread the other decals on the top, being more visible, i can live with the ones under, they wont be that visible, but i really want the top ones to look good. Maybe i will use some other white crosses from some other decal sheet.
-
Not more complicated....just requires more coffee........
-
Glad to see i am not the only one who builds Me 262's Love the camo....looks great. Did you have the same problems with the fit on the nose parts as i did or are you going to leave the panels open to display the armament?
-
Hi David, I ran the color pictures through photoshop and the blue came up as a perfect match for RLM 65, but when i ran the squiggles, they came up as almost perfect matches for RLM 74 and RLM 75. The green colors (81/82 and 70/71) came up as being too green in comparison. Since i painted the same aircraft on another model using the 80 series of paints, and those did not look correct in comparison (at the time i only had b/w pictures of the plane), i decided not to use 80/81 on this model. If i should repaint the model with 70/71, but then, knowing that xtra color paints really do not like to be applied in multiple layers, they never dry, i am still not 100% convinced it would look right. As always, RLM colors is an often discussed subject, and there are as many opinions on what is right and wrong as there are people discussing it. Black/White photos are open to interpretation since exact colors can not be derived from them, and color photos usually are faded, tinted and changed in colors, those too are open for interpretation. The color photos i have for this project are heavily tinted towards green/yellow, making all colors look greener and more yellow than they really would be. Since those are the only ones available to me, that is what i have to use to base my interpretation on.
-
Well, the did take me away after i did the same paintjob on a 1/72 scale kit. Heller Me 262 1/72 scale

-
Hi Rick, Thank you. No, some were, some were not. This particular airplane was. I guess the only way to find out is to check your photo references. If you cant find any pictures showing either way, then its up to you, since no one else can say youre wrong.
-
Hi Johan, Yes, it will be special for sure. All that i need to do now is to decalize it. Not too hard...just the crosses, stencils and thats it. No fuselage bands, squadron insignia, nose art, JG numbers or anything....just plain and simple.
-
Hi Matt, Yes, i tried to pick out a few squiggles that were prominent, the rest i made as i went along. Yeah, dont need the men in white to come get me again....
-
Squiggle time! The pattern on the aircraft is a very zigzag, random circle pattern, made up by the random movement of the painters spray gun. It would be an gigantic task to get each brush stroke as it is on the plane, so i am using the method of approximating the squiggles. The colors are RLM 65 base and then squiggles in RLM 74 and RLM 75. Information from David E. Brown who has researched this airplane says that the colors are RLM 70 and RLM 71. Some other sources indicate RLM 81 and RLM 82. The color photos indicate two separate colors for the squiggles. Its almost impossible to deduct what colors are actually used since the photos i have access to, and on which i base my camouflage, are indicating a base of RLM 65 and pattern in RLM 74 and RLM 75. I am sure that there is plenty of room to discuss the correctness of the colors, but i will not indulge in it here. My interpretation is RLM 65 with RLM 74/75 patterns. Starting with the base pattern of RLM 75, the squiggles are applied in a random pattern. The squiggles come down far on the sides of the aircraft, and as was pointed out by Hans, the flaps/slats were extended when the paint was applied. Corrected the RLM 02 areas at the slats with some gentle overspray of RLM 65. The pattern started at the nose and went on along the fuselage, then the wings and elevators were done. Once the main pattern of RLM 75 was done, some light overspray of RLM 75 was applied randomly over the fuselage and wings to give a softer pattern. RLM 75 applied to model. The next coat to be applied was RLLM 74. The pattern of the RLM 74 is not as heavy nor as easy to see on the model. Most likely the RLM 74 was used to cover up areas where the previous squiggles did not cover and also to bring a second color to the camouflage. The RLM 74 was applied in a similar random pattern with squiggles, zig-zags and swirls. RLM 74 applied to model. Front view. The other side of the model. Time to let the paint dry for a while and then its time for decals.


-
Great job so far on the painting. I really like your pre shading.
-
Great idea....i will check into that.