

HobbyZoneUSA
-
Posts
164 -
Joined
-
Last visited


.thumb.png.64af68ce3763f9af8a91e71374ce741e.png)
-
 Derek B reacted to a post in a topic:
Kitty Hawk 1/32 F-5E/F Tiger II / Special Interest Group (SIG) !
Derek B reacted to a post in a topic:
Kitty Hawk 1/32 F-5E/F Tiger II / Special Interest Group (SIG) !
-
LSP_Kevin reacted to a post in a topic:
Latest News for July 2019
-
LSP_Kevin reacted to a post in a topic:
More news for June 2019
-
LSP_Kevin reacted to a post in a topic:
News for June 2019
-
LSP_Ray reacted to a post in a topic:
News for May 2019
-
LSP_Kevin reacted to a post in a topic:
News for May 2019
-
LSP_Kevin reacted to a post in a topic:
More News for January 2019
-
LSP_Kevin reacted to a post in a topic:
News for January 2019
-
LSP_Kevin reacted to a post in a topic:
More news from November 2018
-
LSP_Kevin reacted to a post in a topic:
More News for October 2018
-
HobbyZoneUSA reacted to a post in a topic:
News for October 2018
-
HobbyZoneUSA reacted to a post in a topic:
News for September 2018
-
HobbyZoneUSA reacted to a post in a topic:
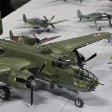
1/32 385th BG(H) B-17G - Fictitious
-
David, keep in mind that you have a great deal of 'poetic license' in and around the B-17. We learned some interesting tid-bits when we started the restoration of the B-17G 'I'll Be Around' in the early 1980s for the 390th Memorial at the Pima Air Museum. Each B-17 was essentially hand-made. While the subassemblies like landing gear struts, engines, mounts, control yokes, guns, etc., were all interchangeable between aircraft, each airframe was hand-built. You couldn't take an airframe panel off of one aircraft and put it on another - none of the rivet holes will line up. The B-24 was the first production line/mass-production aircraft that came close to parts swapping. It was even worse for aircraft produced at different factories. While we were stripping paint off of our Lockheed/Vega-built airframe, another B-17G arrived through Davis-Monthan AFB to be stored temporarity at Pima for the Smithsonian. We watched as the ceremony concluded and everyone left, then we ran over to the new bird and tried to liberate some spare parts. This new arrival had come off the Boeing line, and the radio compartment overhead hatch that I 'acquired' wouldn't even come close to fitting in our aircraft. Ditto on other airframe parts that my colleagues attempted. We put them all back. The point of this is that there are various detail differences between production blocks off of the same factory line, much less between different factories (Boeing, Douglas, Lockheed/Vega). They may all say B-17G, but that's where the similarities diverge. The ammo racks in the rear may be correct for the aircraft that was researched, but it is okay to change that up for your bird. One detail I don't see in any of the kits is the parachute stowage in the nose. As you point out, there is little room in there for the nav and bombadier and that crawlway is barely large enough for a skinny human. You can't go into or out of the nose compartment with a parachute on your back or butt. The bombardier and nav had tethers on their harnesses that they would latch onto the nearest parachute, two (or three) kept in the nose, and several others around the rest of the aircraft. I think the tail gunner had a similar arrangement. Oh yes, the .50 cals all had the same barrel length so they would all have the same ballistic performance when fired. The housings would differ whether they were remote-fired or man-fired, single or twin-mount, etc., but the barrels were the same length. On installations where the barrels could be changed out (like on a tank), they had a handle under the barrel, but since you can't change barrels in-flight (with a few exceptions), the handles were left off. The flash suppressors could be added on the ends when available and needed.
- 71 replies
-
- 2
-
-
- HK Models
- New Modeler
- (and 1 more)
-
And now for something completely different...
HobbyZoneUSA replied to HobbyZoneUSA's topic in Non-LSP Works
In that stance, he's about 6 inches tall. If I stretch him out, perhaps 6.5-7 inches. -
HobbyZoneUSA reacted to a post in a topic:
And now for something completely different...
-
HobbyZoneUSA reacted to a post in a topic:
And now for something completely different...
-
HobbyZoneUSA reacted to a post in a topic:
And now for something completely different...
-
HobbyZoneUSA reacted to a post in a topic:
And now for something completely different...
-
HobbyZoneUSA reacted to a post in a topic:
AM/Revell 1/48 SB2C-4E Helldiver
-
I had the priviledge to attend the airshow at NAS Point Mugu in 1969 while I was still in high school. On display in a hangar was a seeker head from an AIM-9B that was tracking heat going by, primarily folks smoking cigarettes. That was fascinating to see. Out on the flightline was a fantastic array of Navy aircraft, and they didn't limit the show in the air either. The gloss black VX-4 F-4J with the Playboy bunny on the tail made some impressive passes in front of the crowd including one at .999 Mach (which he had built up speed over the water and came over half-covered in condensed shock cloud). An A-4 zoomed in on the deck, pitched up into vertical, released a shape, then zoomed away. The shape dropped to the deck with a simulated nuclear blast. That was followed by a low-level bomb run by other aircraft. Off shore, an S-2 Tracker dropped a parachute flare, and when he was clear, an F-8 Crusader zoomed in and fired an AIM-9 at the flare. While the announcer had everyone looking left, we spotted a lone U-2 hugging the deck coming from the right, and when he got to show center, pushed the throttle to MIL and went vertical. Of course the show concluded with the Blue Angels. They don't do airshows like that any more...
-
HobbyZoneUSA reacted to a post in a topic:
AM/Revell 1/48 SB2C-4E Helldiver
-
HobbyZoneUSA reacted to a post in a topic:
AM/Revell 1/48 SB2C-4E Helldiver
-
Here's another build from a few years ago, the Accurate Miniatures/Revell Pro Modeler 1/48 SB2C-4E Helldiver
-
Kinetic 1/24 P-47D Razorback Thunderbolt
HobbyZoneUSA replied to HobbyZoneUSA's topic in Ready for Inspection
No prop motor. I added a Light Genie to the model which allows for remote control of lighting in the model. When I was first learning to fly with the CAP in the early 1970s, the squadron had a huge wall-mounted training aid for the switches, relays, and lights for cockpit, navigation, identification, etc., for the P-47/P-51 which the Light Genie could mimic. One effect is steady or blinking nav lights which, in the model, are LED and fiberoptic, and two types of cockpit lighting like these: -
This is the Hasegawa 1/20 Ma.K. Grosser Hund
-
The fuselage is finally together!
-
Here was a project on my bucket list that finally got completed.
- 6 replies
-
- 11
-
-

-
A little progress inside the Tiger Moth cockpit. The new panels and interior are coming along, the pilots' restraints will be installed next.
-
Here is a recent build - the 'Barkhorn' release of the Hasegawa 1/32 Dora. I built one of the Hi-Tech Doras years ago and thoroughly enjoyed the build, but it was quickly disected by my local IPMS crew. When I moved over a decade ago, the model didn't survive, so I had a replacement on my 'bucket list' and finally got to this one. The new-tooled Dora is nicer and with the exception of a Yahu instrument panel and Eduard seatbelts/rudder pedals, the kit was built OOB including the decals.
- 4 replies
-
- 12
-
-
-
TF-104G and (R)F-104G Italeri 1/32 on their way...
HobbyZoneUSA replied to timvkampen's topic in LSP Discussion
FYI all, I just received a press release that MRC has become the US importer for Italeri once again. The F-104s are in this initial shipment and according to MRC, the shipment is all but sold out before containers arrive. ETA to MRC is the end of July and hobby stores around the country should see Italeri back on the shelves soon after. -
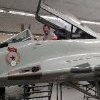
I've wanted to build this kit for years but have been put off by rigging. Since I have two in the stash, I am building this one for experimentation before I go AMS on the next. Above is ths 'stock' fuselage interior and 'floor'. The molded-on details inside have got to go and that floor needs work to be the centerline pedestal for seats and control hardware. Here the interior details have been removed and the holes for the canopy rails (Canadian version) have just been filled with Mr.Surfacer 500. The tube framing process has started inside the fuselage. The molded-on compasses have been removed from the instrument panels, and the new wood floor is finished and ready to mount the centerline pedestal. The instrument panels will get the Airscale treatment next.
-
I pulled the canopy back off the A-4 and removed the armored back and strut/brace. It didn't matter which way I moved the brace, it wasn't anything like the part in the Hasegawa kit, so I reinstalled it and readjusted the armored back to the upright position for takeoff and landing.
-
Kinetic 1/24 P-47D Razorback Thunderbolt
HobbyZoneUSA replied to HobbyZoneUSA's topic in Ready for Inspection
- 19 replies
-
- 17
-
-
-
Here's proof that the old Vintage Fighters Thunderbolt can be tamed, this one being out of the Kinetic box:
- 19 replies
-
- 15
-