RandyB
-
Posts
881 -
Joined
-
Last visited
Content Type
Profiles
Forums
Events
Everything posted by RandyB
-
Looking great Harold! When will they be available? -randy
-
This is excellent news! I'm going to have to add a few to shopping cart as well... Great job Vincent! When is the anticipated release date? (or, did I miss it...) Take care, -randy
-
Now that would be something cool for Trumpeter to jump all over!
-
Hi Harold, I'll take a set! Let me know... Should I just Paypal the $$ straight away? -randy
-
This is from ipmsdeutchland.de... http://www.ipmsdeutschland.de/FirstLook/Re...v_Ju88_A-1.html Wow...
-
Great job Jamie! That looks fabulous. The weathering is dead on - I especially like the chipping and fading of the yellow wing stripes and the wing walk area. Good to hear the decals worked out, I'm always suspicious of those Trumpeter decals. I guess they are getting better... I'll be looking for the article in MAI!
-
Hi WrongWay! Welcome to LSP, and that's quite an introduction. That's a great build - I gotta echo Dave and Chris' sentiments, "Damn, that's your first build after returning to the hobby..." Keep up the great work, we're all looking forward to more of your builds. -randy
-
Hi Jamie! Welcome back... Jeez, that was a quick build. Great job on the kit - those Trumpy P-47's are nice kits. With the exception of the windscreen goof, those are some of the nicest Trumpeter has released. How did the kit decals work out?
-
Hi Gary, I generally use ModelMaster #1764: Euro I Dark Green (FS34092). It's a pretty good match for DDG. -randy
-
That is simply incredible. Absolutely fantastic work Derek! -randy
-
yeah, I've been up waiting... Seriously, though, I don't have this kit, but I've built the 200 and I've just got the paint on my 202. Pay extra attention to the fuselage seams and the wing/fuselage joints. They are very nice kits - the cockpits are awesome.
-
Hi Rocky, Here a link to the color callouts and paints for the SEA camo. Don't mind the Thud camo pattern, the colors are the same. The color lists are at the bottom of the page... I'm working on a good match of Bronze Green... I thought I had a bottle of MM enamel around my shop somewhere... still looking...
-
Jon, that's the truth... I sometimes bring my models in to work to display them on a shelf just above my desk. Well, as I was sitting there, furiously writing some code to finish off a project, one of the QA engineers came over picked up one of the models and proceeded to flick the prop - which forcibly detached itself from the model and flew across the room. Embarrassed, the engineer quickly returned the model to the shelf. However, he returned it to it's resting place too quickly and too forcefully resulting in the port landing gear snapping off. By now, I had been watching the entire scenario with my jaw dropped on the floor. Once these sequence of events had unfolded and I got my jaw off of the floor, I proceeded to tear into the hapless engineer. I read him the riot act about personal space, personal property, asking permission, etc. All the stuff I figured people learn in their toddler years... Rich, I have the kit packed away and haven't looked at it in a couple of years. However, off the top of my head, is it possible to fabricate the hinge mechanism from brass, or even plastic stock, as a single piece eliminating the joint? Not sure if this helps your situation... -randy
-

Date for USAAF/USN introduction of Interior Green?
RandyB replied to EPinniger's topic in Aviation Discussion & Research
Well, obviously D, rotary, Ray, myself, and not to mention EPinniger care - otherwise the question would never have been posed, and we would not have responded... So, when the scotch has worn off show us the images - this stuff is fun. And, some of us care - else we wouldn't be responding to the original post, and there wouldn't be a few hundred of these types of topics on modeling forums all over the world. That's the cool thing about these kinds of open-ended questions - no one knows everything for certain. Half of the fun is the speculation/hypothesis involved in arriving at an answer. Dana Bell has done a lot of research in this area, so has Archer, so have a lot of other people, and yet it's always a fascinating area to explore. -
Hi guys! I don't have my references handy right now, so someone correct me if I'm incorrect... IIRC, the TBF-1 had a bronze green interior in the crew spaces, as Grumman was using up existing stocks. When production moved to General Motors, Eastern to be specific, and the designation became TBM, interior green was used as they had no pre-existing stocks of Bronze Green. -randy EDIT: Taken from "Camouflage & Markings: Interior Colours of US Aircraft, 1941-45, Part III", IPMSStockholm.org: Grumman TBF/TBM Avenger In earlier production models TBF-1 and TBF-1C, the crew compartment was finished in two colours - Bronze Green forward from the bulkhead in front of the turret with Interior Green for the rear crew areas. Grumman Grey was used inside the cowling. In a later set of Erection & Maintenance manuals, Dull Dark Green replaced the Bronze Green in the cockpit. The TBM-1C and TBM-3 series aircraft built by the Eastern Aircraft Division of General Motors had everything from the inside of the cowling all the way back painted Interior Green. In common with the general Navy practice the wheel bays, undercarriage legs, wheel hubs, landing flap bays, etc. were all finished in the lower surface colour throughout the Avenger production.
-
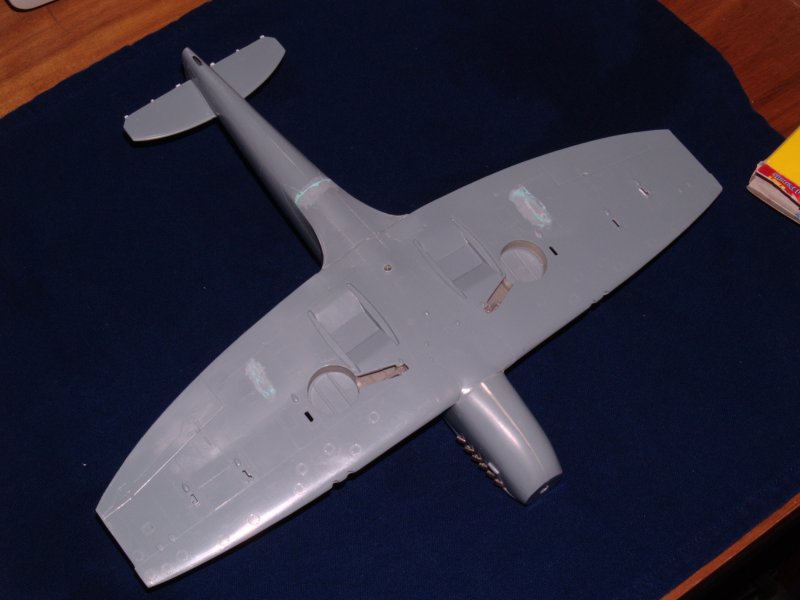
Thanks Azgaron! I, too, need some more filler in various places... Looking at some of my images with the model supported by two bottles under the wings, I realized that I have to make one of those jigs that will support the model by the fuselage. Shouldn't be too hard to construct... I've got some scrap wood in the shop that should work nicely.
-
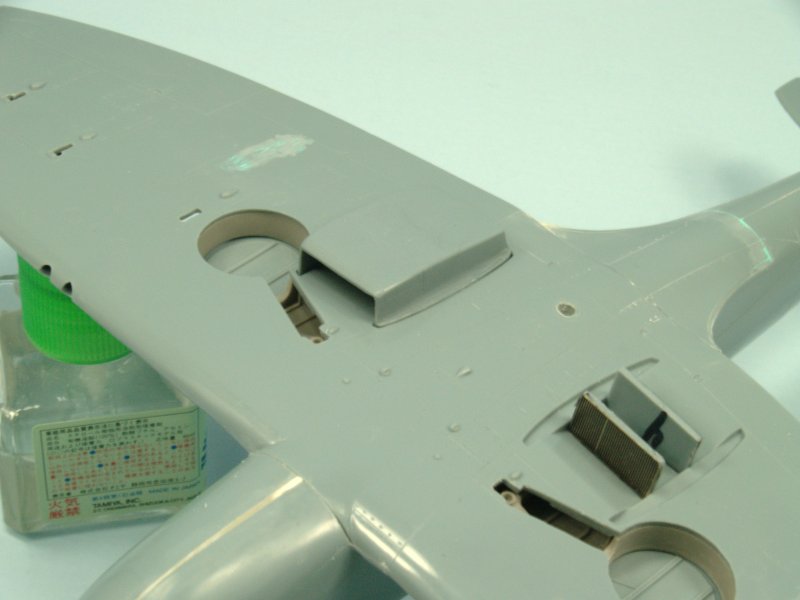
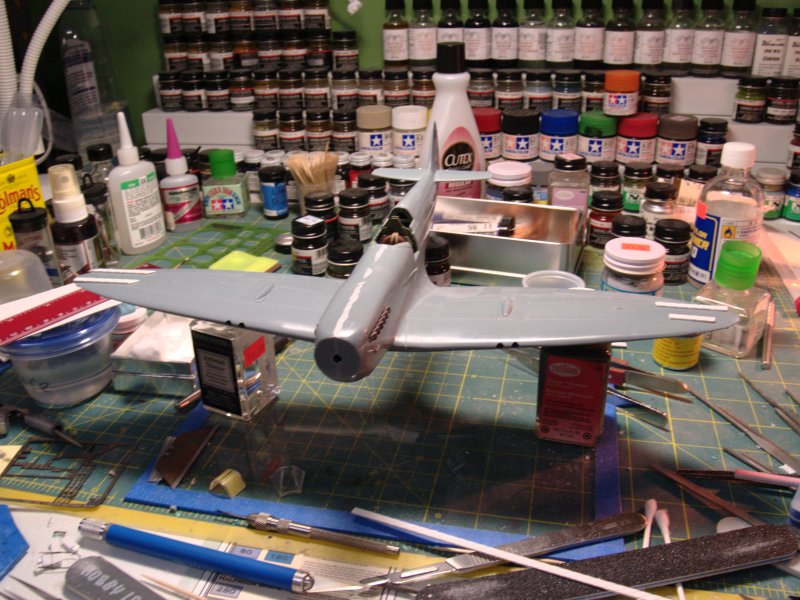
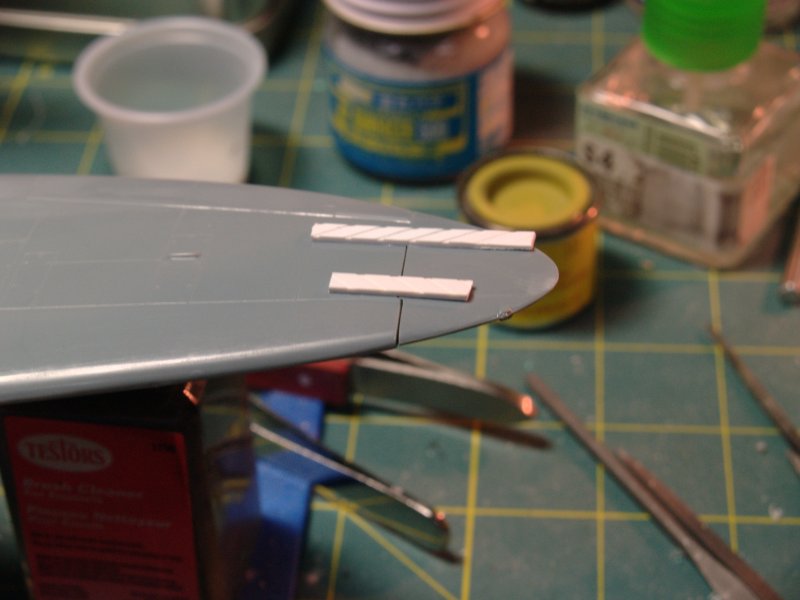
So, sanding the step wasn't that big of a deal... I just got my most abrasive sanding stick and went to work. Once I got most of the material removed, I switched to progressively finer grits to polish it up a bit. I'll be using Mr. Surfacer 1200 (rattle can) to prime it, so I'm not too worried about light scratches... Anyway, here is the progress from yesterday - fighting with the radiators. :angry: The image shows one housing in place and only the radiator faces in place on the other. What it doesn't show you is the amount of sanding and shaping invovled in getting these things to fit... and the grooves I machined into the lower wing surface for the radiator faces to sit in (to reduce the amount of sanding on my part)... And here is tonight's work... Here are both radiator housings in place. There are a few gaps that will be taken care of this weekend... Notice the carburetor intake is also attached. And... the upper wing cannon bulges are fitted as well. The upper wing surfaces have a curvature to them while the gun panels and breech blisters do not - there was a fair amount of clamping involved. The wingtips are also in place. The styrene strips are used to align the upper surface of the wingtip with the upper surface of the wing - they are temporarily tacked into place. ...and I'll have a bit of a gap to clean up once they dry overnight. Squadron White putty and nail polish remover (dilute acetone) are my best friends... That's all for now. Hopefully, tomorrow I'll get the seam cleaned up, and this weekend I can rescribe the panel lines and get some primer on her.

-
Hi Brad, No, not at all, your reply doesn't sound snobish. I knew that and the P-40's assigned to the squadron had RAF serials and were part of the RAF inventory as the RCAF squadrons were attached to the RAF. Yes, 403 did transition to Spitfires in mid-June 1941 and really only flew Tomahawks and Kittyhawks for a short while. I was addressing Grizly's question about the markings and nav lights during that period when the squadron did fly the Tomahawk...
-
Hi Grizly, I've been doing some digging on these Tomahawks for No. 403 Squadron. The fuselage navigation light is hit or miss - I've seen some RAF airframes with it and some without it. The batch of 100 H81-A2 Tomahawk IIB airframes that were diverted to the A.V.G. show this as well. What RAF serial number do you have for this airframe? The only reference to KH*H I could find lists it as AK878 - which corresponds to an H87-A2 Kittyhawk I (P-40D). It's possible that this airframe could have been a replacement for one coded "KH*H" previously lost. -randy
-
Damn, Brian, that is great work. I'm always impressed and inspired by your skills, and your fearlessness working with the older (but certainly not worse) Revell kits.
-
Wow! That is some impressive detail work. Very nice build lefteris!
-
Rick, That turned out great! Excellent job. So that's what it is supposed to look like... Mine is starting to vaguely resemble a Spitfire.
-
Those are colors in the Italian national insignia - after the capitulation in 1943. Those colors are used by other nations - similar to other nations using red, white, and blue (not necessarily in that order). Those are Hungarian markings from the immediate pre-war period, circa 1938 when the Hungarian Air Force was "unveiled" to the world, and the aircraft is the Reggiane Re.2000. In 1941, after the declaration of war with the Soviet Union, Hungary began using the white cross superimposed on a black square.
-
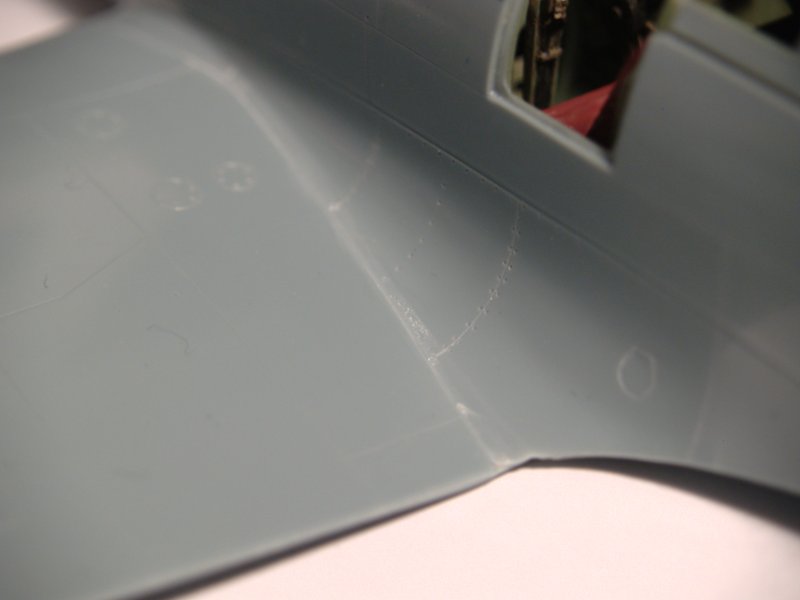
Thanks for the suggestions guys! The step isn't too large - it runs along the seam from approximately mid-chord to the trailing edge and it's 0.2mm tall. Definitely sandable - so I'll give that a shot...
-
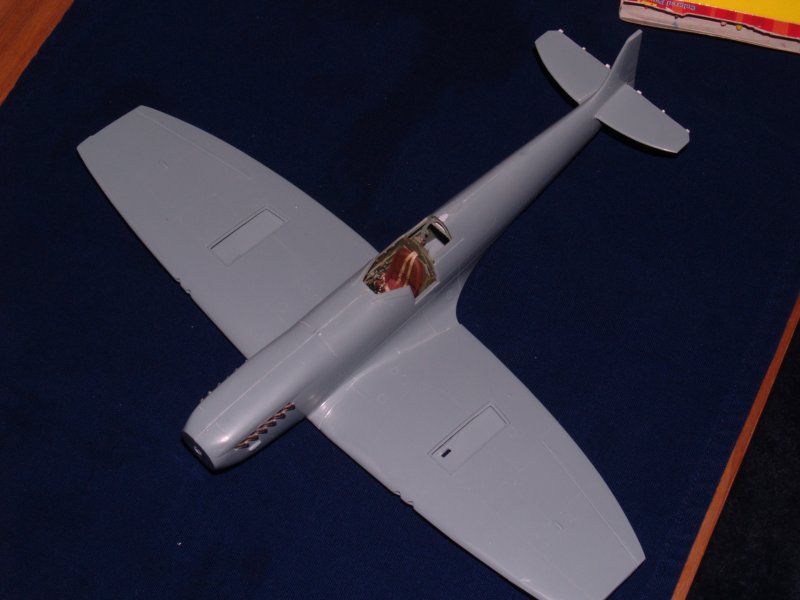
So... I guess it's time to dust this thing off. I managed to get approximately 1/2 hour in the shop last night... so I glued the wings to the fuselage. And... I ran into trouble. I'm not sure if you can see it in the image below, but there is a lip at the joint - the wing is higher than the fillet. So, I figure my two choices are: 1. sand like hell and rescribe the lost panel lines and rivets, or... 2. attempt to "cleanly" crack the join (hopefully along the seam) and reglue the joint. Either way, I'm not too happy about having to do it in the first place... Anybody have any other alternatives...?