
LSP_Kevin
-
Posts
46,714 -
Joined
-
Last visited
-
Days Won
264
Content Type
Profiles
Forums
Events
Everything posted by LSP_Kevin
-
Thanks guys. I guess I'll try the Windex first, as it's likely to be less aggressive than the metho. On the other hand, metho doesn't contain any ammonia, which is the real killer for Future. I'm probably on a hiding to nothing either way, so we'll see what happens. Kev
-
Thanks once again for your advice D. I'll have to see what I can do. I actually inserted a piece of styrene tube into the propeller boss opening, as the whole assembly seemed super sloppy without it. Of course, I've misaligned it slightly as it wasn't a perfect fit, and it seems to sit too far to the rear, and butts up against the larger portion of the engine shaft (I hope that makes sense!). Of course! Makes perfect sense. Thanks D! Products like rubbing or isopropyl alcohol don't seem to be as readily available downunder as they appear to be stateside, so I usually use metho (methylated spirits) as a substitute - I'm guessing it would work well here too, but will it affect the layer of Future on the canopy as well? Kev
-
Unfortunately nowhere near as much work done on it over the weekend as I'd hoped, but I did take a couple of steps forward (combined with one step back). After doing some test painting, I decided to fit all the sub-assemblies together to see if it still looked like a Dora: The macro mode on my digital camera has weirdly foreshortened the rear fuselage. One problem I noticed was that the propeller assembly sits too far out of the cowling, and I'm not sure I can fix it. It's a problem of my own making in that I modified the way the hub sits over the mounting rod, and now it fouls slightly before it can be fully seated. Oh well. A question though if I may. The aircraft I'm modelling has black and white tail bands, which I'll have to paint. Should I apply them now and mask them prior to full camouflage painting, or do the camo first and then mask and spray the bands? I'm guessing either way works, and it comes down to personal preference, but I'd still like to hear your (collective) thoughts. The other fubar is the canopy: I outlined the area to be masked with Tamiya tape, and then filled it in with a liquid masking agent. For whatever reason, coverage wasn't perfect and I've got paint on the effing canopy! To make matters worse, I thought I could fix it with a cotton bud and some toothpaste - which in fact worked quite well on the other side. In the process however I failed to take into account that the Gunze was still relatively soft, and the area that looks like weathering on the sliding portion behind the canopy itself is in fact the result of my trying to smooth out a fingerprint! So I've left it for now to cure properly for a day or so before tackling it again. Kev


-
Wow Dave, that is sensational! I think the weathering looks terrific and I can't wait to see it finished. Kev
-
Thanks Ads - I can certainly understand why you'd choose to do that! After talking with a few people it seems that Windex is the likely cause of the problem with my slow-curing Gunze, so I guess that experiment is over! I'm hoping to do some more work on it over the weekend, so more updates to follow soon. Kev
-

Fisher 1/32 Sea Fury Non Korean war markings!!!!!
LSP_Kevin replied to gunpowder's topic in Works in Progress
That's looking very nice at the moment. Is it just the angle of the photo or does the Typhoon wing really dwarf the Sea Fury's? Looks substantially larger in the shot with the two models together. Kev -
That is stunning Chris! I assume in your opening statement your were referring to 109s in general, rather than the Trumpeter kit? I've never built the Trumpeter kit, but it looks a beauty. Kev
-
Thanks once again D for your kind words. No photos in this update, but my EagleCals from Jerry Crandall's Eagle Editions arrived today, and all I can say is "wow". They are literally too good to use on my humble build, but use them I will. Unfortunately the Gunze RLM 76 I used for the undersides still hasn't yet cured fully after 10 days, and I'm getting a little anxious about it. I'm guessing it'll cure eventually, but I don't want to wait too long, nor do I want to risk damaging the fragile finish by handling it heavily too early. Would using a hair dryer on gentle heat help at all? I think for the other colours (for which I've also got Gunze acrylics) I'll switch back to metho or Tamiya X-20A for thinning. Kev
-
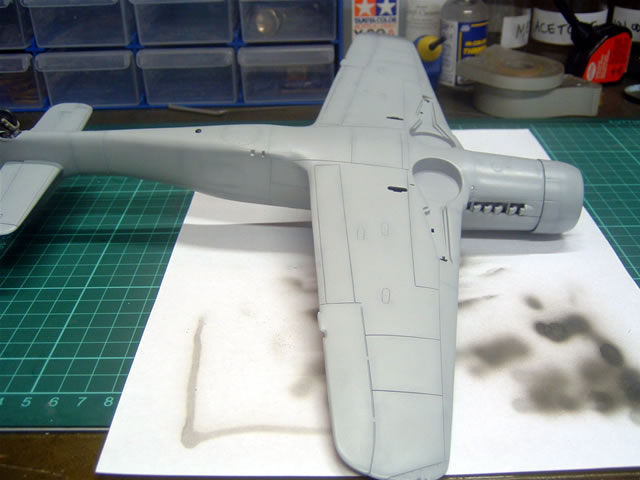
Thanks D. I've already added seatbelts to the cockpit, but I just draped them over the back of the seat. Terribly inaccurate I know, but accuracy isn't the highest priority with this build (I'd go insane if it was!). It should all look OK with the canopy in the closed position, but of course the front and rear canopy profiles really only approximate each other, so you'd have to have it open slightly to avoid that being obvious. I'm looking forward to seeing yours come to fruition D - better than mine I'm sure! I managed to get the underside painted last weekend, but the Gunze RLM 76 has remained slightly soft ever since. I've been experimenting with using Windex (ammonia-based window & glass cleaner) as a thinner for Gunze acrylics, and I suspect that's got something to do with it. It sprays OK, and smells much better than regular thinners, but I'm not quite convinced yet. Any opinions on the preshading post-painting? Am I close? You'll also notice in the shot above that I've not scribed some fairly prominent panels - part poor planning, part cop out. Either way, definitely time to move on. Here's a close shot of the cowling underside, complete with running repairs: You can see I've also bailed on doing anything with the wheel wells, other than remove the spurious moulded cross-bracing. What are you doing in that area D? The definitive direction on the scheme has changed once again, this time for keeps! After discussions with Jerry Crandall, I've ordered Eagle Editions sheet #60, and will be doing Dortenmann's aircraft (at the risk of being compared to Chris Wauchop's impossibly good rendition on the page I linked to). Apologies for the suspense Larry! There'll be more progress when they arrive, hopefully by the end of the week. Given that I've publicly stated that I'm not a rivet counter (eg the cavalier approach to panel lines, wheel wells and seatbelt attachments), I really surprised myself with how strung out I got about the paint scheme. Weird. Kev

-
Yes, that's an excellent article Charles. I've just realised that I've come across it before, and converted it to a PDF, which I still have on my hard drive. Your article on scribing panel lines is also one of the best on the subject. Kev
-
Looking good Dave! I used pastels for the first time on the wheels of my Dora, so my experience is very limited, and I'm sure you'll get better advice from some of the more experienced users here. You can get a cheap pack of chalk pastels from an art supplies store - as far as I can tell they really are just arty-coloured sticks of blackboard chalk. The pack I bought turned out not to have very useful colours with regard to weathering, but if you mix enough of anything together it will eventually become dirt coloured! Anyway, the way I used them was to scrape some 'dust' off a few likely colours, using a hobby knife, into a mixing palette. I mixed them together with a brush, and then using said brush I 'painted' the dust onto the model. They seem to work better on a flat (matte) surface, and probably need to be sealed after application. Here's the result on the tyres of the Dora: Bear in mind that some people seem to use chalk for the basis of their washes, rather than oil paints, so it can be easy to be confused about how exactly they're being referred to sometimes.
-
Well done Dave! The chipping does look a bit much, I agree, but you've done a great job on your first airbrushing effort! The more you do it, the better you get, so just keep going. And I know how hard it is to do the 'sensible' thing and practise on an old model first, when you're dying to get on with the real thing! Kev
-
That's a beautiful model! Kev
-
Congrats Dave on your new airbrush - you won't regret it in the long run, but you might have some frustrations up front. I'm only barely-competent with the airbrush myself, and the best remedy for that (as with many things) is practise. So I guess my best piece of advice would be to practise on something sacrificial (even some card) before you point it at your pride & joy. Get the hang of the feel of the thing, how the trigger responds, even getting the 'right' consistency when thinning the paint. It's definitely all more art than science, so developing a feel for it all is the secret, and that just takes time I think. I'm getting there slowly myself, and something I found quite amazing and revelatory when I watched Floyd Werner's DVD was how little paint he applied with the airbrush with each pass, and how little paint he used overall. Prior to that I was just splatting it on; may as well have been using a rattle can! I'm currently attempting to employ that approach on the Dora. Oh, and don't throw yer rattle cans away either - I still use 'em, and the Tamiya NMF cans are great. Kev
-
Thanks for the info Jim. I'm wondering whether a thickish layer of Future underneath the top coats might also be effective? You'd have to leave it cure for long enough to become impervious to top coats, but it might be an easier method to get the job done than filler, especially if you're happy with a reduction in effect rather than complete elimination. Anyway, just a thought. Kev
-
I've just pulled the 109 box down again, and the copyright date on the side is 1987. It's copyrighted to Revell Inc. in Venice, California, but made and printed in West Germany by Revell Plastics GmbH. Here's a shot of the box: In the box it looks a better kit than the 190, but I'm sure it's not. Kev

-
Looks fantastic Brian, thanks for the update - always inspirational! How's the fit of Radu's canopy to the old Revell kit? I asked Radu if it would fit, but he wasn't sure as he'd never tried it on the old beast. Kev
-
Wow, that cockpit looks great! Kev
-
Interesting D. My current-build Revell Dora is from the Lone Eagles boxing, and the plastic is dark green. My old Revell 109 that I bought around the same time (15-18 years ago) is in the same dark green plastic. However, I've just peeked into the box of the Me 262 B, also purchased at that time, and it's grey. My boxing of the Me 110 G-4 isn't accessible right now, so I'm not sure about that one. Kev EDIT Having actually just looked into my 109 box, it's not exactly the same colour as the 190 - more an olive green, noticeably lighter than the Dora's plastic.
-
Interesting that your example is in a light-coloured plastic. Most of the old Revell 1/32 scale kits that I have or remember building, were moulded in a dark green plastic. I'm not sure when that trend was abandoned, or whether different coloured plastics were used in different markets (I doubt it). It could possibly be used to establish its age though, if someone had information about when the dark green was abandoned. Kev
-
I wasn't going to post another update until I'd made substantial enough progress to warrant it, but I thought I'd comment about a minor hiccup I've had with Gunze and Future. Some of you will be aware that using Future over Gunze can be a dodgy proposition. Here's why: Unfortunately the photo's really poor, but I've highlighted where the problem is. It looked much worse in reality than the blurry photo indicates. This happened within seconds of brush-painting some topical Future in preparation for the warning decal. The paint had been on at least a few days, and should have cured enough to avoid problems. It was definitely the underlying paint that had the problem too, not the overcoat of Future. Since I've used Future over Gunze acrylics once before (my first model back) without any issues, I've come to the following conclusions about using this combination: - The main problem appears to be too thin a coat of paint (impossible to do otherwise if airbrushing), followed by too thick a coat of Future (this second point seems the more critical); - Length of paint curing time seems irrelevant under the above conditions, but may be more relevant if you can get the coat of Future thin enough; - If using the Gunze/Future combination, let the paint dry and cure as long as possible, and then apply the thinnest possible coat of Future over the top, preferably with an airbrush, and then build up multiple coats once the first coat has hardened. The idea is to have the first coat of Future thin enough to dry before reacting with the underlying paint, which then forms a protective barrier between the paint and subsequent coats of Future. Obviously I wouldn't go to all that trouble in this particular case, but it would seem imperative when preparing a model for decalling. Anyway, I managed to salvage the situation. It's still a bit ugly, but I don't think anyone will notice: I'm sure old hands have this little conundrum down pat, but hopefully someone will find my conclusions - untested as they are - useful. Kev PS I've decided on Barkhorn's machine now, after a nice email from Ed Heck clearing some things up about Blue 10 for me.
-
Looks sensational Jim, and you're right, quite different from the 'normal' Mustang. I can't see any excessive rivetting in the photo - did you deal with it, or does the camouflage paint subdue the effect? Kev
-
Thanks for the feedback guys - you're all too kind. I'm really pleased with how it's coming along, and my newfound willingness to do things over is certainly paying off. This build's never going to win any prizes, but I feel it's serving its purpose admirably, allowing me to experiment with new techniques and try a few things on without feeling like I'm risking an expensive kit. Now let's see if I can avoid screwing up the paint job! Brian - your solution for the spinner sounds interesting. I think I'll let it slide for now though, as I've been around the block twice with it already, and I don't want to risk taking a step back in attempting to take a step forward (if you know what I mean!). I'm hoping to get some paint on it this weekend (blue 10...Barkhorn...blue 10...Barkhorn...), so more updates as I progress. Now I've just got to decide if I'm brave enough to try painting (at least some of) the national markings... Kev
-
I reckon that looks absolutely fantastic! Beautiful NM finish. Kev
-
Hansa Brandenburg W20 1/32 resin -Czech Omega Models
LSP_Kevin replied to AEROPOXY's topic in Works in Progress
What an interesting aeroplane! I love your blow-by-blow photo stories and am looking forward to following this one too. Kev