Ironwing
-
Posts
3,872 -
Joined
-
Last visited
-
Days Won
18
Content Type
Profiles
Forums
Events
Everything posted by Ironwing
-
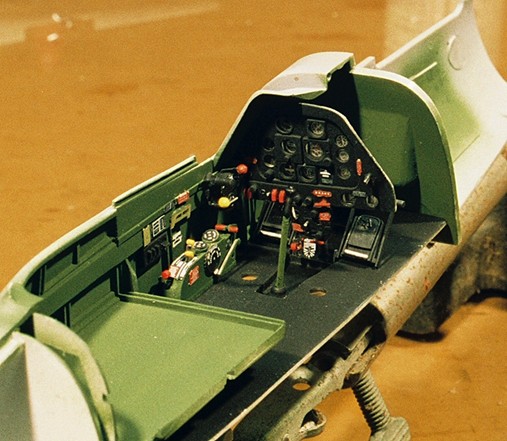
Another shot of the left side...

-
The left side of the pit is the command side. All of the physical controls reside here. In this shot, it is , for the most part complete. Again, everything is scratch built with the exception of the placards which, are from Eduard. The fine details are made mostly of various size solder or evergreen stock. I try to avoid using metals. I dont have any experience with them and I much prefer to weld things with solvent rather than surface glue two non-porous surfaces using CA Adhesives. There are a few more details which need to be added but they come from wire harnessing.

-
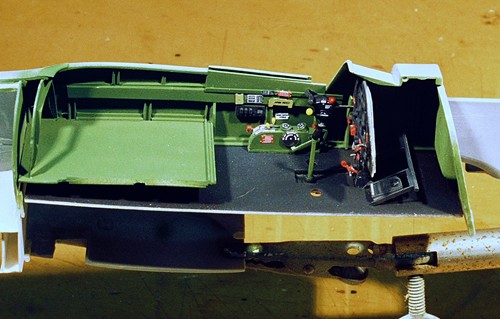
Greetings All, Progress on the Mustang has slowed. The labor intensity in the fight compartment is harsh and alot of pre-planning is required before construction starts. Everything is scratch built with the exception of the placards which are from Eduard. Because everything needs to be built, very careful measurements need to be taken and followed carefully in order to assure alignments once the fuselage begins to go together. Initial construction began with the right side of the fuselage and building the radio boxes that need to be there. There are all sorts of confusing references regarding the radio gear and no two references seem to look alike. The right side is all comm equipment and rather mundane until the boxes are harnessed in. the harnesses, because they are white(common in US Aircraft) were left until last and still need to be built. The boxes are done and awaiting positioning of the fuselage sidewalls.
-
Hi Matt, An ambitious and difficult build you have there but it look slike you have it well under control judging from the results youre getting. Keep up the good work, I look forward to more of your techniques. Great way to learn. Keep her going bud... Geoff
-
Jim, We love to see that white styrene. Good to see your work in here. Thus far it look slike your off to a great start. More , more. Interesting topic you've picked. I look forward to seeing how you finish this one. Keep up the detailing! Hope all is well, Geoff
-
Piet, Looking mighty good there fella. I look forward to your finishing posts. Thus far, your build has been an education in scratch building and detailing. Just a super job. I look forward to more... Be well, Geoff
-
My humble apologies for getting the name wrong. Im still getting to know who people are. Again, i apologize. Having said that, it's still a great piece of work and the detailing on the outside looks great. Terribly sorry to hear of your misfortune. You can rebuild it Im sure. Talent always overcomes misfortune. Dont give up. I look forward to more of the build. Geoff
-
larry and Jeff, Wont be able to make the Nats but would love to see some pics from there. If you guys go (which Im sure you are) shoot some film and share with us. Many thanks, Geoff
-
Thanks Manny, I knew I could count on solid advice from you. In any event. Ive just received three bottles of Mr. Surfacer from Squadron, one of each variety. I'll be giving it a try very soon. Many thanks, Geoff
-
JB, Looking real nice. I have the same question as Pete. What are your impressions of the Tamiya Kit? I have one and it's a strong contender for my next build. Put up some more pics. It looks great! Geoff
-
your success was never in doubt...
-
Hows this big ole girl coming along? Geoff
-
Brian, Ive been quietly watching this thread. Your work and attention to detail is stunning and your skill with paint is just as good. Remarkable job. Just plain remarkable. Looking forward to seeing more of your work... Geoff
-
Pete, Nice piece of engineering work thus far. Your detailing is quite impressive. Would love to see more of your detail work for future reference. Keep up the good work... Geoff
-
Chris, Ive just now caught up with your Cat build. Very nice detailing. I especially enjoyed the gear and look forward to the finished product. I'm very interested to see how you finish it. Keep those pics coming guy. Geoff
-
Hmmmm, an AH-1W. Now theres an interesting idea. Theres on sitting on the shelf at the local hobby shop. Anyone want it? Geoff
-
Mike: Thanks. I ordered some Mr. S from Squadron. All three (500,100,1200) are available in jars. We'll see what happens. Im not convinced its any better than Floquil. Although the 500 may have some applications for light filling. I'll leave notes as I learn more. Sven: Thanks for your reply. Ive read a few articles on Mr. S and all that I have read have said good things about it. The guys here that use it say good things as well. dpogson: Floquil is a series of lacquer based paints (originally it was a Toluol base but may be different now) here in the States which was originally intended for use by model railfans. Many of their colors are a good match for military aircraft applications and they also have a mixing chart that gives a very comprhensive set of mixing formulas to achieve other colors. I have, in the past, used Dupont Automotive Lacquer Primer as a surface prep. It's indestructable and sands to a very smooth surface. Floquil also has a lacquer base primer that that seems to mimic the auto lacquer in that it fills scratches readily and sands to a very clean hard surface. The saving grace with Floquil is that it doesnt require mixing the auto lacquer does. I was just wondering if Mr. Surfacer has any advantage. Im beginning to think it doesnt. I just primed a bunch of parts with Floquil and any scratches that were there just went away. Hope everyone is well... Geoff
-
Frederick, Two dimmers? I would just use one. Get a two plug outlet box. In it, put the dimmer and a recepticle. Feed the dimmer from your current supply and jump the dimmer over to the plug. That should eliminate the need for a second dimmer. Just leave the Dremel (or whatever youre using) at full power all the time and ajust RPM throught the dimmer. Whataya think? Geoff Ango: I dont think there is an electrical hazard. If there is a hazard, it will be in the armature of the motor which might not like having its current choked. It could cause premature bearing failure. Any suggestions anyone? Hope everyone is well... Geoff
-
What, you guys don't have opinions anymore?
-
Hack, Ok old fart, so whats the difference between all these kits? Geoff
-
Klaus, Thank you for your very comrehensive response. It's very good informaton to have. It's also good to hear the opinion of those that have used the parts they are talking about. From what Ive seen of your work, you surely know what your doing and your experience shows. If you think of anything else...I wou;d enjoy learning more. Geoff
-
Guys, I wonder what would happen if you use a light dimmer switch to adjust the current going to the dremel? Set the Dremel on it's highest speed and adjust the speed (or current) throught the dimmer. I agree with the dental bits. Great little things to have. Machine shops also use bits that are very similar to if not exactly the same as Dental burrs for deburring machined parts. Cheaper if you get used ones from the local tooth driller. Im gonna try that dimmer switch in an electrical box and feed an outlet with it to see what happens. I'll let you know what happens. Geoff
-
Hack, Ok young fella, give me the low down on 190's.
-
Pete, Very nice detailing work thus far. I look forward to seeing much more of this. Please continue to post as you progress. if it isnt too much too ask. Please explain how you do things as well. Its a big help. Thanks, Geoff
-
Morning Hack, Thanks for asking. Things have slowed a bit. Scratch build all the details is taking time to get things right. I just finished the rudder pedal assembly. I had a hard time getting it right and trying to keep the aligments straight. It's quite flimsy and bends at the slightest provocation so everything had to just drop into place without rubbing on anything. Building the pedals and their hangers was a real pain. The fuselage tank has been detailed out and waits for final paint. I still have to finish the radio control boxes in the cockpit and the center panel on the instrument panel. Then I can paint everything, final assemble the cockpit and close the fuselage so I can move on to the wings. They are another detail marathon in the wells. i saw the link you left me for that Mustang on Hyperscale. The guy is right about the Hasegawa kit being incorrect in the well area. Another fix that needs attention. Can you say "Are we having fun yet?" We are making progress. Thanks again for asking. I've put a coat of primer on all the components finished to date to check for defects. Fortunately, things look pretty good and will require little touch up. I put a question over in "Discussion" that no one has responded to about primers. Floquil -v- Mr. Surfacer. Have an opinion on this? I used Floquil this time around with a touch of Dupont Automotive Lacquer Thinner added to give it some extra bite into the surface. It went on smoothly and took out any small scratches. I think a rub out with 1200 wet paper and water will leave me with a nice surface. Do you know of any advantage to Mr. surfacer? I would like to hear your opinion and the opinion of anyone else that cares to comment. Hope all is well... Geoff