Search the Community
Showing results for tags 'Vacform'.
Found 14 results
-
Evening all With the waters now settled on my 1/32nd Sunderland build, I thought it about time to start another big vacform... well, to be exact, continue with a long stalled project from a few years ago. I started this Tigger (ex ID Models) vac of the Short Stirling about 5 or 6 years ago and ran out steam, and it had been consigned to the loft since I boxed it up and got distracted with something else. A conversation a few months ago with @Cees Broere about the Stirling led him to offer me his also-stalled project with the promise that I'd continue his excellent start and get it finished - an offer I grabbed with both hands considering the excellent start he's made to the cockpit interior which is my least favourite part of building models such as these. I was in the Netherlands with the family last week, to I popped in to see him and picked the beast up - thanks again, Cees! I've since been for a rummage in the loft and dug my kit out, and now combining the two means I'm confident that I can finally get the job done. So here's where we're at... This is how far Cees had got with his fuselage: And how far I'd got with mine, which as you can see is not very: Cees is a wonderfully talented modeller and scratch-builder and has made some beautiful progress with the cockpit area - a great base for me to continue working on: Here are the wings I'd started a few years back - at the time I decided to open up the wing and reveal some of the interior detail. I like to think I've improved my scratch-building skills since then so instead I'll use the wings from Cees' kit and start again: That's a lot of plastic! Here are the other parts that include the engine nacelles, stabs and fin, etc - pretty basic stuff but perfectly workable: Cees has kindly given me a supply of Bristol Hercules engines as well as various HK Lancaster turret parts which will come in very useful and reduce the amount of scratch-building needed in the future: So... with both my earlier work and Cees' more recent efforts, I certainly have something Stirling shaped which is a great start (or point to continue from) for this project so I'm ready to dive back in! The plan is to do a late MkIII variant with open bomb bays and a full bomb-load - squadron and specific aircraft yet to be decided. I'm really not looking forward to tackling the landing gear, but that's a problem for another day. Updates are likely to sporadic as the new school term starts imminently but I'll do my best to keep those interested updated on my progress. All the best, Tom
-
A new WIP, a rare subject and an even rarer kit. I have always had a thing for this jet. Its unique look has always intrigued me. I built the Collectaire kit in 1/48th scale about 15 years ago and it turned out ok. But hopefully I can do a better job this time around. I bought this 2 years ago off of Ebay. I didn't even know that this kit existed until I saw it online. This is a homemade Vacform made by an LSP member. I wonder how many he made, just how rare this is. Did he made 20, or only 5?? No, I don't know where I will display it when I am done. I am hoping to have this ready for the 2021 IPMS Nationals in Las Vegas. Anyway.... After my recent move I have set up a new workbench and have started cutting plastic. The kit arrived in a loose plastic bag jammed into a box. All of the main pieces had been cut from the carrier sheet. The overall shapes look really good. The plastic is a little on the thin side and I will need to reinforce the wings and fuselage as I get into main construction. Here are some overall shots as I begin construction. New workbench. Still a little cluttered, I have not totally settled in yet. Forward fuselage and 1:32 scale plans. The whole enchilada taped together. I have already cut out the wheel wells. Length of fuselage is 32 inches. Rear fuselage. Thanks for looking. Dan
-
Not strictly a Large Scale Plane I know, but it's certainly large... therefore I thought you folks may be interested in this... Sanger had been promising to release a 1/48th B-52 for a number of years, and kept teasing me whenever I visited the website with a message that stated the model was under construction but nothing more - I must confess I began to question whether it would ever actually be released. However, last year it was finally ready to purchase so I took the plunge and ordered one. Any version of the venerable B-52 can be modelled, ranging from the early tall-tailed versions typified by the D-model, right through to the current-day H version. Sanger also offer a wide array of decals to accompany the kit, with many different schemes that the B-52 has worn over the years being on offer to purchase with your chosen variant. I decided to go for a current B-52H - with 'Memphis Belle IV' nose art - as I vividly remember it displaying at one of the RAF Mildenhall airshows and taking lots of pictures of the it under some very stormy skies. I also had a very good wander around one at last year's airshow at RAF Fairford too, so plenty of resource material is at hand. A few weeks after I placed the order, a rather large box arrived at my work (always the best option with an eagle-eyed wife scrutinising any parcels that arrive at my house!) and inside plenty of protective bubble wrap was the kit was one of the biggest kits I've laid eyes on. Only the 1/32nd B-29 I did a few years ago exceeds it in span: The wings are massive - the 30cm/12" ruler gives a sense of scale here. Each wing is approximately 2ft so the eventual span of the finished model will be around the 4ft mark. Sparring the wings so they remain rigid is going to be quite a challenge I feel, and the thought of rubbing down all those wheel-halves doesn't fill me with joy... I imagine, due to the difficulty in obtaining a vacuumform machine large enough, the fuselage is moulded in four sections, with a lengthwise break just aft of the rear undercarriage bays. This also allows a separate mould of the differently shaped forward fuselage for the D, E, and F versions. Again, the 30cm/12" ruler shows the size of this brute: Here are the stabilisers and engine pylons: This sheet contains the vertical fin, tip-tanks, various sensors as well as the different tail turrets for the G/H versions: These are the pods for the eight Pratt and Whitney JT3D engines - unique to the H variant: A close-up of the parts reveals some lovely fine surface and panel details: Sanger provide a wealth of detailed drawings and plans in order to help with construction, as well as some nice looking decals: And finally, a comprehensive set of white metal parts for the engines, landing gear, interior as well as some further detailing parts. There's a crystal clear canopy too - but only one which means very careful cutting and no room for error! I had promised myself that I wouldn't start this until I'd finished my Shackleton project, but to be honest it's an itch I've got to scratch and I really fancy having a go at it. It'll certainly be a longer-term project as I have other builds (Shackleton included) still going on in the background, so don't hold your breath for regular updates but I'll post my progress as and when there is some. In the meantime, I've got to decide where to start: wings and engines or fuselage... Tom
-
 Evening all, I took advantage of my time away from the classroom last week and finally finished this two-and-a-bit year project: Tigger Models' (the old ID Models' vac kit) of the Short Sunderland in 1/32nd scale. This has been a really rewarding project, and despite a setback when I knocked the completed fuselage with its interior off the table, making a rather messy contact with the kitchen floor, it's been great fun and relatively straightforward - despite its size. Kits like this come as a blank canvass for the builder to work his/her magic - 'bumps in plastic' is quite apt, but the shapes are reasonably accurate if not a bit primitive (picture borrowed from Tigger's webpage): The kit provides a the correct hull shape for a MkI or MkII, but with some mods the more adventurous builder could easily convert it to a MkIII/V, etc. All panel lines and surface details need to be added and the parts are devoid of any real detail, but the plastic is lovely to work with and scribes/sands beautifully. Due to the size of the parts, home-made interior bulkheads are needed, and any visible parts of the interior need to be made from scratch: Strong wing spars are also essential to keep the structure of the model sound - thick plastic card spars were made and added: The flightdeck interior, bomb room and nose section were all made from scratch and detailed with some aftermarket seatbelts: All the aerials were made from sprue and thin wire - markings were mix of home-made masks and decals: The engines were made from spare HK Models' B-17 cylinders coupled with Revell Beaufighter parts to make a reasonable representation of the Bristol Pegasus. The early-style exhausts were made from Evergreen tube bent slowly over the toaster! Landing lights were home made from some of my daughter's diamante play/craft jewellery (for the lights) and the covers were clear acetate once again heated over the toaster. Rigging for the floats came for EasyLine and reminded me why I'll never build a biplane! The kit's transparencies were used throughout - all turret interiors were scratch built. Beaching gear was also made from scratch with a friend helping out with some 3D printed wheels: Bomb racks were again made from scratch with some rather lovely depth charges coming from Tim Perry - thanks, Tim! I used Xtracolor enamels throughout the build - 6 tins were used in total! I don't like to go too mad with weathering on my models so kept it relatively clean - however you can't build a Sunderland without the distinctive water marks on the hull: A bit of exhaust staining and some fading with post-shading completed the upper surfaces: And for some generic pictures: I'm often asked how big a 1/32nd Sunderland is. I'm sorry to inflict my ugly mug on you but you can see that it is a massive model with yours truly holding it! My model represents a Sunderland MkII of 201 Squadron during 1942 in the lovely temperate sea scheme. Painting white gives me nightmares (especially something of this size) so I took the easier option. W4001 (ZM-V) was only on strength between February to October 1942, before hitting an underwater rock and being written off, thankfully with no loss of life. Thanks for those who took an interest along the way - I'm off for a long lay down in a darkened room to contemplate the next project! Best wishes to all, Tom
- 71 replies
-
- 88
-

-

-
- sunderland
- tigger models
- (and 1 more)
-
Well I’ve got a lot going right now however when an opportunity presents itself you’ve gotta pounce on it Ironically I had just started following Dave Culp’s vac form WIP’s when one of the guys at our Cincinnati club volunteered to start teaching how to build a vacuform model. So I’ve got my F-84F out of the box from Tigger Models and have followed along in the 1st 2 classes. There’s alot to this so I don’t expect to be fast. I’d also like to make a real beauty out of her so not going to rush anything. One note that came out of class 1 was kinda standard but way more entailed with a vac, getting all your pieces and extras collected for the build. Geez, i need a cockpit, jet intake and exhaust, wheels wells, wheels, the list goes on. My 1st big score turns out to be a care package from our very own Harold at AMS Resin! He had a cockpit and some main wheels, misc parts, and some drawings he’d started on that he graciously sent my way. Thanks bud! let’s kick it off with the parts. Exciting stuff here i know This will be my 7th Thunderbirds aircraft. Only this and the F-105 to do. I need to figure out if it was NMF or silver paint. If anyone has any insight drop me a note in here. My next task is locating another F-84G for parts. Looks like the wheel wells will work perfect and the engine and possibly the jet intake could be modified to work as well. I posted a looking-for add so if you’ve got anything let me know on this as well. Chris
- 17 replies
-
- 14
-
-
- tigger models
- thunderstreak
- (and 3 more)
-
Hi All - this my build of the old 1/48 Dynavector Supermarine Scimitar vacform kit - took me about a year to complete. Nice vacform kit but the fin chord was too narrow & the tailplane chord too broad so I reshaped them and made a new vacform canopy to correct the windscreen forequarter panels which sat too high in my opinion. Other than that the kit really captures the lines of the Scimitar. RFI on Britmodeller - https://www.britmodeller.com/forums/index.php?/topic/235074267-supermarine-scimitar-rfi-posted/ m
-
Hey everyone. As I get close to finishing my Pirate I shift my efforts to my new build. Next up a Scorpion. But not your ordinary, garden variety Scorpion. Oh no, can't do that. I have always been fascinated by the proposed "Advanced Scorpion". So here goes. You have to start somewhere so I will be starting with the Tigger Models F-89D. The plastic is thick, by Vac standards, and should stand up to all of the changes that I will be making. Here is the vac fuselage next to a 1:32 drawing of the F-89F. Whats different? Among other things the engine nacelles will need to be lengthened as this varient used a different engine than the D model. The tail has a different shape. The horizontal tail has been moved to a lower position on the fuselage. The canopy is different and has been blended into a re-designed spine. The canopy will also be changed. Some drawings show a one piece canopy covering both crew positions, other renderings show 2 separate canopies. Oh...and the wing is different, with mid-span weapons/fuel pods. Here I am working on the wing. I have cut out a lower blank. After cutting out the flaps I have epoxied a wooden stiffener to the lower blank. The upper wing is actually the wings from the original kit cut down to fit. I have also sprayed a grey primer onto the white plastic to make it easier to work on. Thanks for looking. Dan
- 95 replies
-
- 16
-
-
- vacform
- conversion
- (and 1 more)
-
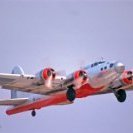
I've been working on this on and off for the last few months and have finished it off this week. I've used the classic Revell 1/48th B-17F kit and coupled it with Koster's vacformed beautiful early Fortress conversion set. This comprises a new rear fuselage with the distinctive 'shark fin', a new early nose and cockpit transparency as well as other various vacformed clear parts, along with some additional air intakes for the early oil cooler set up - all in all a very comprehensive conversion set. You have to undertake other mods to the Revell kit such as shortening the nose (the later Forts had a longer nose due to the heavier rear fuselage needing to be rebalanced), add additional seats to the flightdeck as well as reshaping the later paddle-bladed props to the earlier 'needle' type. The cowl flaps have to go too, as these weren't introduced until the D-model. They say a picture is worth a thousand words so here's a good summary of the work carried out: DSC_0063 by Thomas Probert, on Flickr I started with the Revell F-model kit rather than the Monogram G-model as the nose is far easier to modify - I just needed to blend in the larger cheek windows and then open them up in the shape of the smaller windows seen on the earlier models. Here you can see I have removed the necessary section to shorten the nose, as well as removing the rear fuselage and the Koster rear part is being offered up for size: IMG_E1388 by Thomas Probert, on Flickr I decided to do a later scheme used by the RAF on their Fortress Is which was slate / extra dark sea grey uppers with PRU blue undersides. I used my favourite Xtracolor enamels with generic Xtradecal codes and insignia to cobble together a 90 Squadron machine which was operated out of Polebrook in the Autumn of 1941. DSC_0091 by Thomas Probert, on Flickr DSC_0058 by Thomas Probert, on Flickr DSC_0064 by Thomas Probert, on Flickr DSC_0066 by Thomas Probert, on Flickr DSC_0068 by Thomas Probert, on Flickr DSC_0070 by Thomas Probert, on Flickr DSC_0073 by Thomas Probert, on Flickr DSC_0081 by Thomas Probert, on Flickr DSC_0082 by Thomas Probert, on Flickr DSC_0088 by Thomas Probert, on Flickr The fit of the Koster parts was exceptional - once they were removed from the backing sheet and sanded correctly it was like working with an injection-molded kit. In fact, the Koster parts fitted better than the Revell kit! The only tricky area was the nose transparency - this was a little too large to fit the Revell nose, but some careful trimming and careful blending with Milliput solved the problem. I'm now trying to get hold of the 1/48th Privateer conversion, but now Koster kits are OOP I'll have my work cut out - and they're currently going for silly prices on eBay! Regards to all, Tom
-
Back in the days before the internet , when we had to look at books for refferences , after market was virtually nil , an amazing man produced a quite limited kit of the Lightning in 1/32 scale. OK Yes it was Vacform , but it was superb. I was a teenager and was looking through scale aircraft modelling magazine and saw an ad for said kit. I had to have one. My Dad drove me from Essex to Maidenhead to get one from the Man himself , Frank Brown. He was a very friendly man. He showed me some built up ones and also the most gobsmackingly good solid resin fuselage with white metal inserts. I believe it was a master for the kit. No idea what resin it was but it was glass smooth and dark blue.Fantastic. The kit was built and displayed in my room before finally getting destroyed years later somehow. I have built a few over the years , i even started one using the Aires bits for the Trumpeter kit , but sold it on to a friend before finishing it. I now want to build another one. One came up on the web for a good price and it arrived today. All is good and the kit it as beautiful as the first time i saw it. Unfortunately the canopy is very yellow. Not to worry i will attempt to make a vac form machine and make a new one. I will post photos of the kit this evening.
- 40 replies
-
- 13
-
-
As my Nieuport Sesquiplane is nearing completion and whilst Tamiya's X-22 gloss varnish dries off (what a fantastic product ! Beats hands down any floor polish ), I have decided to start another project. I must be a glutton for punishment, as I have chosen another vac-form kit. But whilst the AirCraft kit was well engineered, this one is from Combat Models and promises to be a more ... manly endeavour . I have chosen a difficult subject, with plenty of struts, a parasol wing, floats, large transparent areas, a landing gear, a visible single P&W R-985 Wasp Jr engine... Plenty of reasons to hit a brickwall during the course of the project, and an absolute certainty that it will not be finished before the end of this GB : the Sikorsky S-39, the small brother of the iconic twin-engined S-38. I just love its unique shape, with the parasol wing, twin-booms, the central float fuselage with side floats. A typical "Art-Deco" creation ! But I would not be contented by just a difficult build. Out of the 21 S-39s built in the 30's, the most famous of all is Martin and Osa Johnson's "Spirit of Africa", c/n 914, registered NC 52V. With a larger S-38, they used it for expeditions to Africa (South Africa and Kenya in 1933/34), and Borneo (1935/36). They then sold it, it was owned by an airline in Tucson, AZ, (G&G Airlines) between 1939 and 1941, and then enlisted in 1941 in the Civil Air Patrol. This is where it met its end, on Armistice Day 1942, when it successfully attempted to rescue the pilots of a downed Fairchild 24, in the middle of 20 to 30 feet high waves raging across the Gulf of Mexico. A lateral float was damaged landing in the rough sea, making a take-off impossible. Towed by a USCG cutter, it sank in the evening, in the middle of the Gulf. To keep the spirit of their expeditions, the Johnsons' Sikorskys wore a special paint scheme, the S-38 being painted with zebras, and the S-39 was painted using the spots layout of a genuine giraffe. Painting these dots will be another challenge in itself More about the S-39, and specifically "Spirit of Africa" here : http://airminded.net/ What makes NC 52 V even more special was that it was engined with the P&W R-985 Wasp Jr #2, which flew successively, before being installed in the "Spirit of Africa", in the Vought O2U-1 Corsair prototype, then the Laird Solution that won the Thompson Trophy race in 1930 (but not in the race specifically) then the Gee Bee Z racer that won the Thompson Trophy in 1931, then the Gee Bee R-2 of the 1932 Thompson. So plenty of reasons to have a go at this one . If you want to see what the kit looks like, let me refer you to the LSP kit database : http://www.largescaleplanes.com/kitdb/details.php?kit=1420. The pic in the database is actually the one I did of my kit. Some vacform sheet, some (rough to very rough) resin details, some resin struts, et voilà ! A quick check has already revealed some potential issues, like the lack of dihedral in the outher wing panels. But I like it rough, don't I ? More soon ... Hubert
- 64 replies
-
- 10
-
-
- Combat Models
- Martin & Osa Johnson
- (and 5 more)
-
 Here is my latest, done as an entry in the "Between the wars" GB. After WWI, France was the leading nation in aeronautics, and this lead was demonstarted by a series of speed world records in the early 20s, by manufacturers such as SPAD, or Nieuport. France was also the place where major international races took place, one of the most famous being the Coupe Deutsch de la Meurthe. After an initial domination by SPAD, Nieuport took the lead with a number of record planes based on their Nieuport 29, which arrived too late for the Great War, but was the main fighter of the French air Force in the early 20s. Then Nieuport arrived with the Sesquiplane, an aircraft designed only for speed, using the famous Hispano V8 engine. The name "Sesquiplan" came from the difference between the two wings, one being significantlt smaller than the other one. In the case of the Sesquiplan, one can wonder whether it had two wings, or was a monoplane with a large faired wheel axle. Anyway, Nieuport used their know-how in producing monocoque wooden fuselages to make an streamlined thoroughbred, with a monocoque fuselage and plywood-covered wings. They hired one of the great pilots of the times, French Sadi Lecointe, to fly their new racer, with the goal of beating the world speed records and winning the 1921 Coupe Deutsch. At times when aviation was still a new technology, less than 20 years old, there were plenty of questions of how far it could go. One of the questions was how fast a man could fly. It was said that 300 km/h was the maximum speed a man could endure. On September 26th 1921, flying one of the two Sesquiplanes, number 6, Sadi Lecointe beat the world speed record and reached 330.275 km/h (200 mph). Already famous, he became in the instant a hero for French crowds. One week later, "6" was destroyed in the Coupe Deutsch, but Kirsch, piloting its twin brother "7" took away the Coupe Deutsch. The Sesquiplan proved to be the swansong of the French Aeronautic industry as far as leading the world was concerned. Major innovations were brewing in the US, with the new wet-sleeve engines (the famous Curtiss D12) and fuel developments that culminated with the discovery of the virtues of lead-tetraethyl in the late 20s. From then (fater the Bernard record plane) on world speed records belonged to the US, the Uk and Germany. I found this vacform kit, produced by a British cottage manufacturer called AirCraft Models on eBay a few years back. The kit is actually extremely well engineered, being molded in female molds, and having been thoroughly researched. Building it was a pleasure, even if the vacform format presented its own challenges. My building thread can be found here : http://forum.largescaleplanes.com/index.php?showtopic=62978 In the course of the build, I was inspired by a pic of Sadi Lecointe standing near its aircraft, and decided to add a figure mimicking Sadi. I also chose to represent the finished aircraft on a base where I tried an electrostatic device to represent grass standing upright. Here are the pics of the kit I finished yesterday, taken today outside, in my garden, starting with 3 that should remind the period pics posted in the WiP
- 13 replies
-
- 9
-
-
- Nieuport Sesquiplan
- AirCraft Models
- (and 4 more)
-
Now this a Group Build I could not avoid participating in, in spite of the fact that I am incredibly poor at delivering anything, whether it is a group build or a "standard" build. But, as this is me era of predilection, and I have been a proponent of the theme, the least I could do was to show my support and participate ... I had to make choices in the (ever-extending) stash, and I went for the esoteric : a vac-formed model of a French racer and record plane : the Nieuport Sesquiplan In the early 20s, this aircraft has beaten a number of speed records, in the hands of the famous (in his time) pilot Sadi Lecointe, and Georges Kirsch. It was the first aircraft to fly above 200 mph, on September 26th, 1921. Highly streamlined, with Lamblin radiators ("lobster pots"), it was influential in its time and inspired other aircrafts looking for ever-higher speeds. I fetched the 1/32 Air Craft vacform kit of this one on ebay some time ago, the kit dating back to 1996. Air Craft was a UK cottage industry producer, and I confess I do not know what they became. First, the pic of the box : And its content : three sheets of nicely done (female-molding) plastic parts, plus some white metal parts for the prop, the Lamblin lobster pots, the prop-boss and the tail skid. Not included in the pics are some Contrail streamlined struts. Finally, a detailed instruction sheet with drawings and explanations, and a mini decal sheet with the numbers for "6" , Lecointe's red-tailed aircraft, or Kirsch's blue-tailed "7". The kit is of really high quality, the sheets having been formed in female molds, i.e. the plastic sheets have been "sucked-in" the molds (rather than formed over a postive master). Thus the details and surface are really sharp and neat, with great definition. The best among vac-form kits IMHO. Vacforms, especially of this quality are less daunting than they look. The dreaded separation of the parts from the backing sheet is fairly straightforward, and does not take that long. First, use a Sharpie pen with a flat head to draw along the countours of the parts : Then, gently score with a knife along the perimeter of the part. Do not try to cut through the plastic : this would just risk cutting through the part. You can then snap the part from the backing sheet. This is where the sharpie black line will help : the backing sheet apears as a thin white line, that needs to be sanded away. When you reach the black line, you have sanded enough ! Then starts a quick sanding on a wet-and-dry sandpaper sheet, (using circular motions to avoid oversanding some areas), like this : In the case of the Sesquiplan, the half-fuselages are molded with a hefty "filling"for the top cowling and front of the fuselage, that you need to keep until the basic sanding is done. You can then cut it away, this time by scoring gently but repeatedly along the lines, to discard the unwanted plastic. The half-fuselahe then looks like this : All in all, it has taken me less than 15 minutes to end up with the ready-to-use left half of the fuselage. TBC Hubert
-
First off, I blame Tom Probert for this... but as you can see I have now started a Combat Models Martin Mars, it's big with a 34" wing span. Lots of bracing was needed for the fuselage structure but sadly I got lost in the moment and never took any photos. It is solid as a rock now though, just two areas you can push the plastic in but it doesn't matter as it should never break. The plastic was wafer thin so I doubled up on the inside with plasticard cut out in various shapes and then glued it in, then added the bracing over the top of that. I am not detailing the inside much as I will copy Tom with how he did the Combat C-17 and cut a fillet off from the cockpit area, build the floor and bulkhead and then add cockpit details, then glazing.. but to be honest I am a little bit wary of doing it. The thought of making it look pretty then taking a saw to it....... Anyway, onto some pics. and then glued together.. and how it is now, even though it's together in the photo above, there was lots of gaps, uneven joins, dimples, holes.. you name it. I'm pretty happy with how it's gone together so far, but as you can see in some photos, air holes from P38 car filler and a very rough surface. Lots more sanding to be done, then once I have it all totally smooth I will start to add detail to the surface.. Quite looking forward to that part! and one bonus shot for anyone interested. I was asked 'how big is it' so I took this, it's next to the newish Mach2 Argosy that's nearly ready for paint and a can of Tamiya primer, that's 5 ½ inches long. Hopefully this is of interest to someone.... I wonder who will be the first to say "we need a Mars in 1/32nd scale" Thanks for looking, Radders
-
Spotted a link to this on Britmodeller - scroll down and on the right under "Latest News". http://combatmodels.us/home I'm trying to imagine the size - I've done the Testors 1:48 and that's big enough.