

sillymodeler
-
Posts
55 -
Joined
-
Last visited
Content Type
Profiles
Forums
Events
Everything posted by sillymodeler
-
DH.9a Ninak (Post War), Wingnut Wings 1/32
sillymodeler replied to AngryJazz_Models's topic in Ready for Inspection
Great work! -
Thank you for the comments!
-
Thank you!!
-
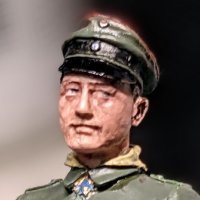
Hello, everyone. Here is my latest build, Albatros D.III “Le Petit Rouge”. About the aircraft Manfred von Richthofen, famously known as the "Red Baron," is one of the most renowned fighter aces of World War I. Before becoming a legend, he first painted his aircraft red—a machine known as Le Petit Rouge ("The Little Red"). This aircraft was an Albatros D.III, which Richthofen flew in early 1917. By this time, he had already distinguished himself as a top fighter ace, achieving his 16th aerial victory in January 1917. In recognition of his success, he was awarded the Pour le Mérite, Germany’s highest military honor, on January 12, 1917. Shortly after receiving this honor, Richthofen was given command of Jasta 11, a German fighter squadron. With Le Petit Rouge, he refined his aerial combat tactics and led his squadron to numerous victories, further cementing his reputation. Le Petit Rouge played a crucial role in developing Richthofen’s legendary status, marking the beginning of an era where his red-painted aircraft became an unmistakable symbol of dominance in the skies known as “Bloody April”. The build I used Roden's Albatros D.III kit as the base and applied the bonus decals included in Wingnut Wings' limited edition kit, Albatros D.V "Manfred von Richthofen.". I also used the HGW seatbelt and PE parts of RODEN’s Mercedes D.III engine kit. The figure of von Richthofen and his dog Moritz is from the Model Celler. I first painted the fuselage in factory finish condition, then overpainted it with red oil paint to reproduce the “field-applied” effect of red color. Roden's kit can be a bit challenging to assemble in some areas, but if built carefully, it looks great when completed. I hope you all like it. P.S. I built “non-red” von Richthofen’s Albatros D.II before, so if you'd like, feel free to take a look at that as well.
- 6 replies
-
- 22
-

-
Looks great! The blurred painting of the fuselage looks perfect to me!
-
1:32nd scale Airco De-Havilland DH.2
sillymodeler replied to sandbagger's topic in Ready for Inspection
Outstanding work! Thank you for sharing! -
Thank you for your comments!!
-
Wow! What an honor! Thanks!
-
Hello, everyone. This is my latest build Ki-43II Hayabusa 隼 Oscar, Hasegawa 1/32 scale. The marking is a plane of the Manchukuo Imperial Air Force, a puppet state of imperial Japan. Hayabusa was produced under licence in the country. This is an old kit, so the panel lines are convex molded. I re-carved the panel lines and also riveted them. Then, aluminum foil was pasted to the fuselage and wings to reproduce its bare metal body. The decal was damaged, so I had to paint the markings. I made stencils for these markings by using a cutting machine. I hope you all enjoy it.
- 6 replies
-
- 24
-
-
WNW Rumpler Civ early, Rexx exhaust, Gaspatch MGs.
sillymodeler replied to DrDave's topic in Ready for Inspection
Looks so gorgeous! -
Nieuport 11 Bebe (Special Hobby 1/32)
sillymodeler replied to sillymodeler's topic in Ready for Inspection
Thank you for the comments!! -
Nieuport 11 Bebe (Special Hobby 1/32)
sillymodeler replied to sillymodeler's topic in Ready for Inspection
Thank you! Of course!! -
Wow! So cool!
-
Hello, everyone. Here is my Nieuport 11 bebe. Copper State Models is developing on Nieuport 11, so I needed to build my Special Hobby one before CSM releases it. While CSM Nieuport 11 is promising, I found Special Hobby one is a good kit. Some parts, such as the wings, are challenging to assemble, but it looks good once finished. Basically, It’s an OOB build, but I got a Luwis Gun and the gun mount from excess parts of CSM, and the tachometer is derived from the Eduard WWI instruments set. Fortunately, I also got Le Rhone 9C engine kit from Williams Brothers (1/8 scale), so I built it as well. I chose a French patriotic marking flown by Jean Navarre, an early French ace in WW1. CSM kit will be fantastic with great details, but this one was fun to build. I hope you all enjoy my build.
- 7 replies
-
- 19
-
-
Lovely build!
-
Fokker E.V/D.VIII (MikroMir 1/32)
sillymodeler replied to sillymodeler's topic in Ready for Inspection
Thank you everyone for your kind comments!! -
Fokker E.V/D.VIII (MikroMir 1/32)
sillymodeler replied to sillymodeler's topic in Ready for Inspection
Thank you. Placing the wing might become easier if you use the Aerocraft struts, because the truss structure help you to determine the position of the wing. I can share digital copy of a template of the jig with you if you tell me your email adress via message. The jig also help you placing a landing gear as well. -
Fokker E.V/D.VIII (MikroMir 1/32)
sillymodeler replied to sillymodeler's topic in Ready for Inspection
Of course! I am honored!! -
Fokker E.V/D.VIII (MikroMir 1/32)
sillymodeler replied to sillymodeler's topic in Ready for Inspection
Thank you very much! I really appreciate all the comments! -
Hello, everyone This is my Fokker E.V., I built almost a year ago. I forgot to post this. This kit was tough to build. I needed to clean up all the parts and repeat test fitting many times. The most difficult part was assembling the landing gear and wing, but I was fortunate I got a template of jig for assembling the wings and landing gear, which came with a Pheon Decal sheet. Aviattic lozenge decals were used on the fuselage. Aviattic PE are also used. Furthermore, the wheels, horizontal stabilizer, control stick, machine gun, etc. are used from the excess parts of Fokker Dr. I of MENG MODEL. For painting the wing, I used oil paint because the wing of the actual plane seems to be painted with brush so I wanted to replicate this. The building was tough, but I am satisfied with the result. I hope you all enjoy watching it.
- 22 replies
-
- 35
-
-

-
Beautiful!! I have the same kit; your work would be a reference for my build!
-
I'm very impressed with that night scene!
-
P-38L-5-LO, s/n 44-26412, "Shady's Lady", August 1945
sillymodeler replied to Miloslav1956's topic in Ready for Inspection
This is magnificent!! -
SPAD XIII C.1, Frank Luke Jr. (RODEN 1/32)
sillymodeler replied to sillymodeler's topic in Ready for Inspection
Thank you. Of course! I am very honored! -
SPAD XIII C.1, Frank Luke Jr. (RODEN 1/32)
sillymodeler replied to sillymodeler's topic in Ready for Inspection
Thank you for the comments!!