
ChuckD
-
Posts
914 -
Joined
-
Last visited
-
Days Won
9
Content Type
Profiles
Forums
Events
Everything posted by ChuckD
-
Yuck, best wishes, Mike. Here's to a speedy recovery, friend. <3 I was once told that if you're stuck waiting at the ER, it's probably a good thing. It's when they rush you in immediately that you need to be worried.
-
I'm on the fence regarding the material that has been released so far. I don't have AppleTV so I'm not sure if or when I'll watch it. That said, anything that can bring the memory of these guys and what they did back into the popular mainstage is something I support. Say what you want about the recent Midway film, but it was enough of a hit to get some people talking and thinking about WWII. We, as a civilization, should never forget the sacrifices that were made by all during those dark times, yet I'm afraid we are doing just that. And there is an ominous truth to the saying about those who forget history. My son now lists Dick Best as one of his heroes because of the Midway movie. He has already heard his classmates dismiss the Holocaust as a hoax. He's 12. So, again, anything that can bring some shard of memory of WWII to the popular forefront is fine by me. </soapbox>
-
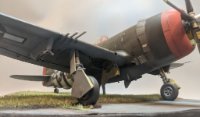
Thank you. I more or less followed Luke Towan's tutorial here: https://www.youtube.com/watch?v=SSKG9rcb_Y4 I varied in that I wrapped the trunks in layers of 1.5" wide masking tape to help give them texture and strength. This is a much larger scale than what Luke works in, so I had to add some heft to them. Cutting the fronds was the most annoying part. To get them to come cleanly off the cutting mat, I had to set them to run suuuuuuuuuuper slow and do 2 passes through the cutter. A set of 12 fronds - all that would fit on one sheet of paper - took 65 minutes. Each tree has 38 fronds, so you do the math. That was just to cut them, then I still had to super glue a wire to the back of them and paint them. They turned out really really nice and I'm very happy with them, but I shan't be doing another one again for some time if I can help it. Interestingly, whatever materials Luke uses behaved the opposite of mine. He put a sheet of laminate on a sheet of paper then ran it through his cutter. I used oramask 813 on a sheet of paper. He then glued the stem to the laminate as he specifically said the leaves would bend towards the laminate side over time. On the first, taller tree, that's what I did, but my leaves bent towards the paper, so that tree has leaves that are bent upwards from the stem. On the second, shorter tree, I glued the stem to the paper side and got the result I was after. They both look great, and I think it adds a little visual interest anyway, so whatever. Lesson learned. Anyway... Today was a good, long day at the bench. I bopped back and forth between working on the figures and the base. The figures are still very much a work in progress (only the flesh tones are done), but the base is finished! Though not present in the photos, I added a little grass for visual interest. I did it in such a way that maybe the SeaBees missed a swatch or two as they were grading the runways and taxiways. I don't intend to glue down the Corsair so that I can use this base for as a photo base for any single engine engine Pacific warrior. Yes, I've tried squeezing the A-20G and Lightning in... they fit, but only just barely. Anyway, here you go. And a couple placeholders... If all goes well, I should be able to finish up the figures this week and turn my attention to the Corsair proper next weekend.
- 143 replies
-
- 19
-

-
 Thank you very much, Earnest. I really appreciate that.
 -
HpH news - 1/32 Kate, Marauder, Ventura and 1/48 B-47
ChuckD replied to Kagemusha's topic in LSP Discussion
Meh. I'll buy another HKM A-20 for that price. Much better value. -
Couldn't agree more. <3 And with palm tree #2 complete... The vegetation is done! Next to move on to tidying up the base and getting some texturing and painting done.
- 143 replies
-
- 16
-
-
Success! Left hand sculpted successfully! It really wasn't as bad as I thought it would be and now I really want to try my hand at more challenging sculpts. As if I need another skill to build. Inspiration is a hell of a thing. In any case, you can now see that Lt. Ray is using his left hand's fingertips to steady himself as he jumps down onto the wing from the cockpit. He fits the scene perfectly now. While not a perfect match for the reference photo, I think this is pretty darn good. Guys, I gotta admit, I'm really happy with these results and I expected the hand work to be much more difficult. I know they're not perfect, but as a beginner, I'm about as happy as can be. Now on to the other palm tree.
- 143 replies
-
- 19
-
-
Hello, all. Back with another small update. After watching some tutorials on YouTube and doing a few practice pieces, I was able to sculpt a right hand in the pose I needed. It looks a little rough in close up photos, but I think with a coat of paint it'll look great. For a first "production" effort, I'm really happy with it and I've found myself consumed with videos of how to sculpt figures from scratch. God help me... As you can see, he's now grasping the canopy rail naturally as you would as you're heaving yourself down to the wing. So with that tackled, now it's just a matter of posing the left arm and sculpting another hand. As the above photos show (at least to some degree) the left arm is now far too bent. It needs to be straightened out so that the left hand will fall naturally on the fuselage just forward of the canopy. So, I took out a razor saw and cut a small slit in the crook of the left elbow, held the figure under a hair dryer for ~20 seconds, bent the arm to where I needed it, and let it cool. Much better. A little filling with magic sculpt and it looks quite nice. With the foot on the fuselage canopy rail, the right hand on the canopy itself, I believe the left hand will be open with fingers splayed a bit just to help him guide himself as he drops from the cockpit to the wing. I'm hoping that I can finish up the other hand tomorrow morning, then, once the putty cures, get it mounted and get the figures primed, cleaned up, and ready for paint.
- 143 replies
-
- 22
-
-
Wow, awesome work! First one of these I've seen built and it turned out absolutely great!
-
Let's be honest here, after the holidays that forearm (and everything it's attached to) is a little over scale.
-
I still have plenty of time to screw up both, so let's not get too far ahead of ourselves here.
-
Same. It's rare that someone can achieve both quantity *and* quality, but Tolga delivers every time. Beautiful work, Tolga. A wonderful accomplishment.
-
Years ago, I was on a road trip with some buddies of mine when we got stuck in an hours-long traffic jam in Chicago. We crept forward, inch by inch, baking in the hot July sun. Inevitably, we started bitching and complaining when one guy, the driver, piped up and said something that stuck with me all these years later. "Hey, as long as we're moving, we're making progress." And so it is. We are moving and, thus, are making progress. Though, I'll admit, we're not exactly headed the direction I was thinking we were. I guess I should know better than to say things like "I'm just about done with the figures!" (to paraphrase) As I started to get serious about placing the figures, I realized that I'd originally placed the pilot too far aft when roughing him in. I think the general consensus here is that these photos were taken just after Lt. Ray returned from a flight, not as he's boarding up to leave. He taxied up, popped off his chute harness, and - probably to the benefit of the camera men - clambered down left side of the aircraft. You can see his right foot is almost directly behind the forward canopy and his left hand is on the weirdly-painted patch on the fuselage. While my resin figure isn't bent over at quite the angle Lt. Ray was, it still actually fits pretty closely in the more correct position... ... all except for the hands. The hands will make or break a figure, in my opinion. So, off they go. I chopped them off with a fine razor saw and recessed the area inside the cuff with a rotary tool. This will hopefully allow me to sculpt fairly realistic hands that appear to be coming out of a sleeve, rather than butting up against it. I drilled out a small hole and added some wire. I'll use this to rough in the angle I need for proper hand placement, then as a base for the putty to grab on to. I've never tried to sculpt hands before so this could get really interesting. I'll work on that slowly over the course of the week. I'm back to work now (boo), so modeling time is catch-as-catch-can. I also got annoyed with the fact that the angle of the feet on the crew chief wouldn't allow for him to stand upright on the wing roughly where the chief was in the photo. Given the angle of the wing while on the ground, the figure kept falling over and to place him such that he stayed put required me to put him in weird places. Sure, in the end, I could probably have super glued him to the wing and wiped my hands of it, but he would have likely had a perpetual Michael Jackson-esque forward lean to him and that would have looked bad. So, out came the trusty sword of exact zero and off went the feet. Same deal here, holes, wire, proper angles aaaand... Ta-da! He stays nicely in place on his own two feet (no super glue required) and he's more or less where the crew chief was in the reference photo. What I haven't mentioned yet is that I burned an entire new year's eve day (and a blade on my cutter) building a couple palm trees and prepping the base. Here's a teaser shot of the work in progress. I've got more work to do on the pictured tree and whole second tree in the works too. That's it for now, but stay tuned for all the fun and excitement of the adventures to come. Join us as we explore: Irrevocable f-ups in hand sculpting! "Did the Marines really accept pilots with 11 fingers?" Figure painting from your nightmares! "His eye appears to be running down his cheek. " Palm trees that apparently can't support their own weight! "It fell on the plane again." And more!
- 143 replies
-
- 23
-

-
-
1/32 Douglas TBD-1 Devastator by Trumpeter - TBD-1A in October 2023!
ChuckD replied to Kagemusha's topic in LSP Discussion
Hey, I just wanted to give a quick plug for the new TBD Devastator In Action book (10271). I just received it and it is an awesome reference. There are enough photos of the interior to give a plumbing nerd like me fits. Way to go, Dana! -
Seconding.
-
Back with another minor update. Priming the guys showed things turned out pretty well. Just gotta fix Lt. Ray's hands and pick out a head for the crew chief and I can start getting some paint going. These pics are pre-cleanup on the seams and to illustrate how things look under primer. Barring the seam on the pilot's legs, it's rough to tell what's sculpted and what was original. More to follow tomorrow. I had a couple sharp edges to clean up on the crew chief, but overall he was pretty clean.
-
Thanks, Thierry. It looks like the most of the Airfix and Verlinden stuff is out of production. Not rare necessarily, but catch-as-catch-can on ebay and the sorts. Thank you to you and @mc65 for the lead. Regarding the academic figure and posable mannequins, in David Parker's book "Crew School," which is all about sculpting figures in our scales, he has exactly the thing I'm looking for. (Great book, by the way. Highly recommend.) However, it's a custom creation of his and I believe is/was 3D printed. I haven't pulled the trigger on a 3D printer yet (yet another skill for my brain to try to build and keep sharp), but stuff like this pushes me ever closer. Ugh. I can't find any references on Preiser's site regarding the multipose figures (google is coming up short too). Do you have any links? Anyway, today was a productive day at the bench, and I'm more or less done with the sculpting, I think. First, an unexpected detour back to the pilot as I decided to address what, to my eyes, was the most glaring inaccuracy... his boots. As mentioned above, the figure was intended for the ETO and would be considered a bit overdressed for the PTO. So, I started by shaving off most of the lower legs. This was to allow room to sculpt straight pant legs over the remaining material. Without removing that material, I suspect he would've looked like a man who never skipped leg day. The general process for me is pretty straight forward. Wet down some Green Stuff and roll it fairly flat, then stick in position. \ Then, using silicone brushes, spatulas, toothpicks, and just about anything else, start shaping folds and creases into the material. Lastly, I use a sharpened toothpick to add a gap between the cuff and the figure. I had to pop the figure off the wine cork that I'd attached it to for painting and a bit got left over. So, that's not in-scale dog poo on his foot. There will be a little bit of filling and sanding required at the meeting of the putty and the figure, but I think it'll turn out well. In the end, I'm pretty pleased with these results. The rest of the inaccuracies of this figure will have to be addressed via squinting. And I finished up the crew chief as well. I added pockets to the front of his jacket, as in the source material, he's got something big and heavy in his right front pocket. I also added collar and the patch for his rank insignia. It's out of scale, sure, but I feel it gives it some visual interest. Once these cure overnight, I'll prime them and clean up any rough spots, then get them with a coat of paint. I cleaned up the collar near the neck well a bit after this shot, so it's a lot cleaner now.
- 143 replies
-
- 14
-
-
Beautiful model and excellent sculpting work. I think your post is very much on topic. Like you, I have done a lot of tweaking of existing figures (as in this case here) and have found it infinitely easier than trying to create something from scratch. The few bespoke figures I've tried have ended up looking like Sta-Puft Marshmallow men because without an existing scale item like an arm, leg, or torso, it's difficult to judge the size of the finished product until it's actually finished. And, by then, it's too late.
-
Thank you, all. Much appreciated. @mc65, I wasn't aware of that Airfix set and will look into it. Figures add so much to a model and are almost a necessity for any diorama. However, it gets really frustrating trying to find ones that will fit the scenes in my head, so that's why I started sculpting a few things here and there. The problem for me is compounded by the fact that I tend to do a lot of Pacific settings which makes it that much harder to find figures that both physically fit and are clad in theater-correct attire. Take, for example, the figure I had to use for our intrepid pilot, Lt. Ray. The figure is designed for the ETO and thus, if you're really looking, you'll see he's wearing heavier gear than what would be found in the SW Pacific theater. So, sadly, I'm left to either eschew perfection and accept a little artistic license, or sculpt the entire figure, clothes, headgear, harnesses, straps, equipment, and all from scratch. Maybe some day I'll have the wherewithal to do that, but not yet, so sanity dictates I choose the former option and not the latter. I offer my sincerest apologies to those who are offended by my lack of accuracy. What I'd love - and might push me to start sculpting more - is a posable mannequin in 1/32 scale that I could use as the base frame for the figure. I've tried doing a base frame from wire before and it went poorly. So, if any of you out there have any leads for something like that, I'm all ears. Anyway, I spent a little time at the bench today getting the arms done for the crew chief. I'm very happy with how they turned out. Tomorrow, I'll add pockets, arm patches, and take a swipe at the collar. This is my first time using Green Stuff vs ApoxieSculpt or Magic Sculpt. I am enjoying working with it as it is stickier (thus it doesn't slough off the wire frame if I push too hard) and it's a harder material once mixed, meaning that I can push hard while sculpting and already-completed details aren't destroyed elsewhere. As with any epoxy putty though, the build process is agonizingly long as it typically has to cure for many hours before you can progress to the next section.
- 143 replies
-
- 10
-
-
Tom, I'm sorry I missed this post! I really enjoy your work and your thorough breakdown of the process. This will come in handy when I decide to tackle the ZM Butcher Bird.
-
Thank you! I'm glad to know it wasn't operator error. Anyway, good progress today. After sifting through my spares bins, these were the two best candidates for the lower half of the crew chief. The left is the standing pilot figure from this Corsair kit. The right is a 1/35 scale Wehrmacht Nashorn gunner figure also from Tamiya. Curiously, they're identical in dimensions despite the difference in scale. In the end, I opted for the standing pilot figure and began scraping off details that I wouldn't need. This is after getting the torso down to almost nothing and adding the wires for the arms. Front: Back: Here is the basic jacket sculpted with Green Stuff. The hands are from a 1/35 set of heads and hands from Hornet. Again, despite the "smaller" scale, they look a little large, but I'm hoping that will become less obvious after the arms are fully sculpted. I'll also be adding some pockets and such to the jacket once the base material cures. The back is okay. After this photo, I went back and did a little more detailing, so it looks a little better. I'll bend the arms into the proper position before adding the sleeves and such. I also filled the gaps in the pilot figure, including the gaps between the parachute and the figure itself. I suspect I'll have some cleanup to do once I can get some primer down, but so far, I'm happy with the results. While waiting for the epoxy putty to cure, I decided to build the Anyz Models canopy rail. Unfortunately, I hacked off the mounting brackets for the mirrors while I was removing the frame from the 3D printing supports, so I had to fabricate absolutely tiny new ones from wire. Not perfect, but if they all hold together until final assembly, I'll be very happy. Lastly, I took the time to mask all the clear parts as well, so I'm getting close. I hope to finish up the figure sculpting tomorrow, then start the final prep for painting on those. After that, I'll start focusing on the groundwork.
- 143 replies
-
- 20
-
-
I could, sure. But look at the source images on the first page of this thread. The pilot is entering from the left side.
-
Ha! Yeah, Mike. It pretty much builds itself from here. Thank you! I wasn't aware of that. I'll stick with him getting in from the left so it lines up better with the source material.
-
Hi, all. Back with an update after making good progress today. First, our gallant protagonist has been roughed in. Surprisingly, the Black Dog resin figure fit the scene pretty well. I will only have to do some minor shaping and filling behind the left shoulder to clean him up. I'll need to fix his fingers as they broke when I tried to straighten them a bit, but that shouldn't be too big of a problem. I'm going to have to deviate from the source photo just a bit here as the parachute is going to cause a bit of an issue. In the reference photo, I believe Lt. Ray had his parachute pack on the seat pan with the straps splayed out the cockpit and down the side of the fuselage. On the figure set, the parachute pack (not attached) is integral to the figure and all the associate straps and harnesses are already molded onto the figure. I don't think I've got it in me to remove all the molded detail then sculpt in other detail that would inevitably be needed after such a task. So, in our version of history, Lt. Ray will be entering the a/c with his pack on his rear. Artistic license, etc, etc, etc. When I got to looking at the second figure - the one that I need to sculpt from the waist up - I realized he was standing on the section of wing outboard of the fold line. So, I needed to build the wings. After that, I was so close to being done, I decided to finish it up. So, aside from some clear bits, antennae, a pitot tube, and the Anyz Model canopy rail, the build is more or less done. All the gear stuff is dry fit, including the doors. Same for the prop. As others have said, this is a wonderful kit. The engineering on it is just superb and it really went together well. The only fit issues I have are near the top of the cowling, so, I'll need to do a little filling there. But, outside of that, it was a good clean build and I'm glad I've got another in the stash. That's not to say I missed any opportunities to shoot myself in the foot... I forgot to add the little clear windows on the leading edges for the gun cams and such. I didn't realize it until I'd almost closed up the small panels on the top of the wing above them. Fortunately, by reaching into the small panel on the top of the wing, I was able to finagle the two clear pieces in place without too much trouble. Story of my life. Anyhoo, I hope to make some progress on the figures and the base now. The build work will be halted until those have been addressed. Again, I don't want to paint and finish the airplane, as I just know I will run out of steam if I save the figures for last.
- 143 replies
-
- 18
-
-
Tamiya F4U-1 in flight, VMF 213 Guadalcanal
ChuckD replied to Bstarr3's topic in Ready for Inspection
Wonderful result! Nice work!
