
Warbird
-
Posts
382 -
Joined
-
Last visited
-
Days Won
3
Content Type
Profiles
Forums
Events
Everything posted by Warbird
-
Hi, I thin Alclad with 30-40 % nitrocellulose thinnner. It gives a better finish and I've never experienced any problem with masking (using Tamiya tape). Make sure the plastic is perfectly clean before applying the paint. Cheers
-
Hi all, I have built this little P-47 for the Christmas challenge of our small group of modellers of the Geneva area. From the box except for the 4 longest blast tubes and part of the gunsight. Eagle Cals decals. Now let's complete his 1/32 big brother! Cheers,
-
Hello, I've built my 109 G6 presented on this forum with a MDC cockpit and am currently building a P-47 with a MDC office as well and in both cases fit was top notch. Of course it's not as straightforward as plastic since some sanding/cleaning, etc. is needed but final result is well worth the extra effort. Cheers
-
Hi, Superb! Great painting and wheathering. The subtle variations of panels shade and the used NMF look are very nicely reproduced. Cheers
-
Hi Pete, I understand what you mean about details and controversies, I'm building Gabresky's plane and it's even worse! Regarding the belly tank hoses, they are included in the Haseg kit (parts R6). I'm not going to put any progress pictures of my kit but will post some once completed. Cheers
-
Hi Pete Congrats for this P-47! Painting is subtle and overall aspect is very convincing. Actually I'm currently building the very same kit, except that it will be with Gabresky's plane. To be picky, I just noticed the following: - the drop tank support seems incomplete (there should be 4 additional kind of "tubes" in diagonal position) - I think Hairless Joe had NMF wing undersurfaces and wheels wells doors and the area under the canopy in closed postion was NMF too - the wheel covers were mounted and painted grey and then red (later in the war) Cheers
-
Thanks a lot Rich
-
Hi all, I've got a question for those who already received their Corsair kit. Could someone tell me which paint mix does Tamiya indicate for matching dull dark green (one of the 2 cockpit colors)? Thanks a lot
-
Hi, Congrats for this superb Me-262. Paint job is beautiful, weathering is subtle and very appropriate. Good job really. Cheers
-
Just spotted that on Hyperscale (CAD pictures): http://tamiyamodelmagazine.com/blog/2013/04/17/tamiya-132-vought-f4u-1-corsair-birdcage-canopy/ Cheers
-
Hi Daywalker, Another great model to your credit! I like the top notch painting and subtle wheathering. Wing root chipping and exhaust staining are very appropriate. To be picky, I have a couple of remarks: I find the wheathering of the wheels a bit too "flashy" (I guess a sandy color was airbrushed - I would have used pigments instead). Instinctively, I would have placed the sand/brown and blue camo hard separation line at the natural limits of the side/lower cowling panels. If not at the panel limits, as you did, I would have prefer a soft demarcation. Well, I haven't seen any picture of the actual aircraft so I might be wrong... Cheers
-
Hi Daywalker Congrats for this Zero! Perfectly build, nicely painted and subtly wheathered. Cheers
-

The last of the many - RF-8G Crusader, Trumpeter/Scratch
Warbird replied to Starfighter's topic in Ready for Inspection
Clean and nice Crusader. I like the subtle wheathering and the good pictures. Congrats! -
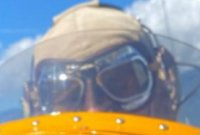
Hi Frank, Your F-16 is amazing. Neat build, present but restrained wheathering. Good job. I especially like the picture which shows a close-up of the pilot through the canopy. Cheers
-
Thanks guys! The wing root chipping was achieved using a chipping fluid (AK Interactive "Worn Effects"). Basically this is the hairspray technique, but using an airbrush instead of the hairspray. I recommand this product for any kind of chipping, very effective and easy to use. The exhaust stains are a mix of approx 80% of black and 20% of red brown (actually several different mixes were used, although not obvious on the pictures). Cheers
-
Hi Kevin, Thanks and yes, really no problem for using the pictures for the main site. As I'm not used to it, please let me know if/how I can help. Cheers
-
Hi there! Here are some pictures of my freshly completed Messerschmitt. She is a Bf-109 G6/R6, flown by chief sergeant O. Länsivaara and delivered to the Ilmavoimat (Finnish air forces) on June 1944. She flew until October 1951 and was then stored with 300 hours logged and 5 kills. The model includes a good amount of aftermarkets as well as a full riveting applied with the 1mm Rosie. The black background for the pictures is new to me and I must admit it's not so easy to work with. Well I let you be the judge. The first steps of the build are here http://forum.largesc...topic=41271&hl=. Sorry I've been a bit lazy... Cheers from Switzerland
- 18 replies
-
- 12
-

-
Hi all While the cockpit paint was curing I performed some surgical procedures... 1) The Eagle Parts Supercharger intake is nice, however it needs to be fully hollowed out. The original plastic base of the supercharger intake must be removed and carefully sanded down to match the resin supercharger shape. With good care the fit is perfect The wheel bays are also hollowed out... These small air intakes are thinned down using a hobby knife. This picture shows the original kit spinner (left - shape is not pointy enough), the Eagle Parts one (center) and the MDC. I originally ordered only the MDC spinner but mine turned out to be quite oval (I think an issue already encountered by other modellers) so I chosed the Eagle Parts instead.
-
Hello Thanks for your comments. She will be MT-453 as seen below on the only picture of this aircraft, on July 1944. (source: http://www.luftwaffephotos.com)
-
Hi all, Here are some pics of my current build. This 109G is going to wear Finnish marking. The model will include MDC resin cockpit and decals, Quickboost guns and exhausts, Eagle parts supercharger intake and spinner and Master Details elevators. Cheers