Peter O Posted November 18, 2008 Share Posted November 18, 2008 I've just discovered this group build, and it's exactly what I need. I'm partway through a Special Hobby X-15, and I need something to get me going again. I have several X-1s in the stash, so that's perfect. One is slated for all-white NACA markings, one for the CE X-1E conversion, and the third for the usual pumpkin-colored Glamorous Glennis. I'm not a big fan of G.G., just because it's been done to death, but it'll make a perfect quick OOB build. The kit's cockpit and landing gears are quite nicely detailed. I'll even use the pilot figure, just for fun. One question though... would adding instrument panel wires be considered within bounds? I'm afraid the absence of them would be too visible. Peter Link to comment Share on other sites More sharing options...
DaveJ Posted November 18, 2008 Share Posted November 18, 2008 I've just discovered this group build, and it's exactly what I need. I'm partway through a Special Hobby X-15, and I need something to get me going again. I have several X-1s in the stash, so that's perfect. One is slated for all-white NACA markings, one for the CE X-1E conversion, and the third for the usual pumpkin-colored Glamorous Glennis. I'm not a big fan of G.G., just because it's been done to death, but it'll make a perfect quick OOB build. The kit's cockpit and landing gears are quite nicely detailed. I'll even use the pilot figure, just for fun. One question though... would adding instrument panel wires be considered within bounds? I'm afraid the absence of them would be too visible. Peter Hi Peter, and welcome to the GB! The overall intent is to remind people that Box Stock builds can be fun, and to hopefully unclog some AMS symptoms that we all get from time to time. That said, I don't think that adding a few wires would be too far off the mark. Just don't let the 'need to detail' take over! Link to comment Share on other sites More sharing options...
Peter O Posted November 18, 2008 Author Share Posted November 18, 2008 You're probably right about that, Dave... once I start, I won't be able to stop. I'll plan on not doing them, and see how much willpower I have. Peter Link to comment Share on other sites More sharing options...
LSP_Kevin Posted November 18, 2008 Share Posted November 18, 2008 Welcome to the GB Peter! I'm with Dave - add the wires if you feel the build needs them. But try to stop there! Kev Link to comment Share on other sites More sharing options...
Peter O Posted November 18, 2008 Author Share Posted November 18, 2008 Thanks, Kevin. Here's my progress so far. Considering I only decided to do it this morning, I've gotten a lot done. It's more than I've gotten done on the X-15 in the last couple of weeks! The interior green is a mix that a fellow modeler taught me. About 50% stock interior green and 50% OD. Peter Link to comment Share on other sites More sharing options...
ruzlkampf Posted November 19, 2008 Share Posted November 19, 2008 Alright Peter! What a cool subject. REALLY like that pilot! I've never had/or built this kit before, looks sweet. Can't wait to see more. Russ PS, Welcome to LSP! Link to comment Share on other sites More sharing options...
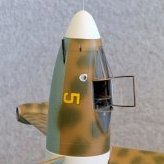
Peter O Posted November 19, 2008 Author Share Posted November 19, 2008 Here's today's progress. The cockpit bits are ready to install. I'm still painting Chuck. I think I'll have to install him in pieces... first the head/torso/legs piece, to get his feet onto the pedals correctly, then do the yoke and both arms at the same time so his hands are on the yoke. That ought to be fun to do! So far the glue and paint are the only things that haven't come out of the box, but I don't know how long I can keep it up Peter Link to comment Share on other sites More sharing options...
big matt Posted November 19, 2008 Share Posted November 19, 2008 Those instruments look great Peter. See if you can get an exemption and install the sawed off broom handle Yeager used to "whang" the door closed due to his "busted up" ribs! Keep up the good work. Matt Link to comment Share on other sites More sharing options...
Peter O Posted November 19, 2008 Author Share Posted November 19, 2008 Thanks, Matt! I won't need an exemption, since the broom handle is included in the kit It'll be invisible though, since it's shown to Chuck's left side. Peter Link to comment Share on other sites More sharing options...
Texas Posted November 20, 2008 Share Posted November 20, 2008 Great Start That looks like a pretty good kit. Texas Link to comment Share on other sites More sharing options...
Peter O Posted November 21, 2008 Author Share Posted November 21, 2008 Here's my latest progress. Getting Chuck's arms and the yoke to meet was a real fiddle. The yellow stuff is 3M's verson of Blu Tack, and works very nicely. It held Chuck and the yoke in place so I could fiddle them and the arms into place. Once everything was tacked, I CA'd each arm on. The visor is my feeble attempt at a reflection... at least it looks better than a plain dark blue visor. Once the canopy is in place, he'll look fine. Peter Link to comment Share on other sites More sharing options...
DaveJ Posted November 21, 2008 Share Posted November 21, 2008 Shaping up nicely, Peter! I think the reflected sky in the visor is a clever solution myself. I'm sure it looks even more clever in 'real-eye' magnification. Your technique to bring out the instruments worked very well, too. Nice job! (Is a pity the poor pilot had that Attack of the Putty People from Pluto to contend with though...) Link to comment Share on other sites More sharing options...
Peter O Posted November 23, 2008 Author Share Posted November 23, 2008 I'm almost ready to close the fuselage. First, I had to add and secure the nose weight. I have a phobia about nose weights going adrift, so it's well boxed in with solvent-glued scrap. Even if the CA on the weight itself comes loose, it won't be able to get away. The cockpit will be glued in with solvent, then reinforced with CA. The rocket exhaust is much too small for the end of the fuselage... there's a large gap all the way around. I shaped a new back plate to the right size and shape, and glued the kit's piece in the middle. I then shimmed it with Evergreen strip to avoid having to fill the huge gap later. There will still be some filling, but not too bad. Hopefully this won't kick me out of the stock category... I'm just fixing the kit's error. I throw myself on the mercy of the court! Peter Link to comment Share on other sites More sharing options...
Peter O Posted November 24, 2008 Author Share Posted November 24, 2008 Here's a pic of the rocket nozzles, showing just how undersized that piece was. I've got the fuselage closed, and the wings are on. Here it is being hung out to dry. I haven't glued the vertical fin halves yet. Once the wings are dry, I'll use them to make sure the fin ends up perfectly normal to them. It's only taken a week to get to this point... breakneck speed for me! Peter Link to comment Share on other sites More sharing options...
DaveJ Posted November 24, 2008 Share Posted November 24, 2008 Wow, that nozzle was really undersized! And you're making breakneck speed for any of us! (OK, maybe not Russ...) Link to comment Share on other sites More sharing options...
Recommended Posts