

Impatient Pete
-
Posts
231 -
Joined
-
Last visited
Content Type
Profiles
Forums
Events
Everything posted by Impatient Pete
-
Heyyyy looking good man! More! More! Pete
-
Hej guys.... getting back to the new P-51
Impatient Pete replied to alaninaustria's topic in LSP Discussion
Hi Guys, Indeed...happy days! The Dragon kit must be new. Based on my experience, 3D CAD models are expensive and time consuming to generate, very expensive (ask me how I know). Any company interested in staying in business would never go to the trouble of generating a CAD model for a pre-existing tool. This is awesome news! What's next? Dragons new armor stuff is absolutely incredible. Isn't it amazing the models that companies are producing these days? Even kits that have problems are light years ahead of the old kits we used to build. Great time to be a modeller... Pete Hamann -
How about sharing the address... Never mind...Google is a wonderful thing http://www.albentley-drawings.com/ Cheers and good day all, Pete
-
Nice work Menalaos! I always like to see your work... Pete
-
Thanks guys, Yah Mike, I read your other post on the subject. Geeesh, quite a lot of work to bring it in line. I won't be worrying about any of that though, so thanks for the heads up on the build issues, as those will help. Canopy closed, gear up! On with the show! Pete
-
Hi guys, pretty straight forward. Anyone built Testors F-117? I guess it's just a scaled up version of their 1/48th kit, but someone out there might know better. I'm not looking for a deep crit of the kit, just a kind of overview. Any serious assembly issues to look out for that might spell disaster? Thanks, Pete
-
Hi Daniel, Looks like alot of fun. Guys, what he is talking about is an awesome concept that we don't have here in the States. I saw it in Spain and I thought it was the greatest thing since resin! What they do is: every week, you go to the newstand and buy a weekly instalment. It has some subassembly in it. They do this with RC cars, Scalextric stuff, wooden boats, dollhouses, dioramas, etc. One of the ones I saw when I was there, was diorama of a workshop. The kit was just a workbench and that week contained a small photo-etched fret, some wood pieces, some white metal castings, and directions, along with a small magazine which may have had the directions in it. It is a great idea. They will take a kit and break it into sub-assemblies and sell a project week by week. I think it is a great idea. Imagine, every Friday, you get off work and head to the newsstand with your pocket money. You pick up the new mini kit and head home. Then you sit down and unwind with a small project. Then, at the end of the project, you have a project that is better than the sum of its parts, and one that you might not have been able to tackle financially, psychologicaly, and time-wise. I would love it. Every week, you would look forward to knowing that you will have a project to work on, that it wouldn''t be too big a project, and that you would be focused on only that one part. Imagine buying that 1/32 Tamiya F-16 one week and one sub-assembly at a time. It's self pacing, you would actualy finish a project, and it would spread out the cost. Even though I am sure that it makes the kit more expensive, I think it would be worth it. It seems like it would really help to enhance the enjoyment of the hobby. Think about sitting down with your 1/8th scale stabilizor project (like Daniel) and relaxing over a few hours of work. Again, I can't hide my enthusiasm for this concept, and I wish they would do it here in the States. Looks good Daniel and have fun! Pete
-
Holy Crap!!! Thanks for posting the pics. I had seen a pic of that kit in the D&S book on the F-8 and it looked really bad. That is why I decided to bite the bullet and do mine. Did you finish that project? It looks like a nightmare. I bought some of the Roberts Model parts for it and they were just as bad. So hence the project you have seen on these boards. Thanks again for posting the pics. Pete
-
Awesome skeleton idea! And some nice work gettin it done too. This is just what vac forms call out for. A central skeleton for rigidity and feature indexing. Great work, Pete
-
Looks great Gene!
-
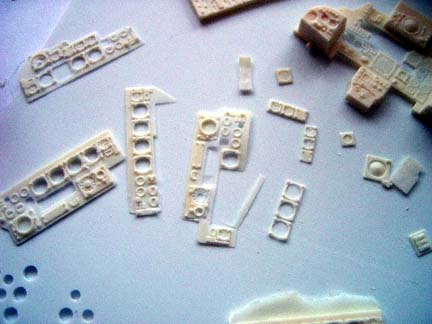
And some of the instruments. Thanks for the nice words everyone. I can't wait to get back in full swing on this bird when school gets out. Pete
-
Here are some of the console castings. These will come in handy. The only problem is, with so many cool panels and consoles, I am going to have to come up with more jet projects!

-
Hi Guys, First let me say big thanks to Larry and Ray for helping me out with my search for intruments. Thanks Guys! Well work is slow on this project since school is back in session. Not much to report but I did make some progress in the cockpit. I made a mold of panels and consoles from a few different 1/32nd kits and some of the parts Larry sent. Then, I cast into the mold, but just enough to cover the bottom ( where the detail is ). Then, after the resin cured and I popped the part out, I flat sanded it on a piece of 320 until it was real thin. Then I just cut out the instrument. That's all. Here are some pics. Next is to cut out the panel and arrange the intruments and add some other detail. Probably have to wait until school lets out. For now the only modeling I am doing is an eyeware project.

-
Hi Saso, Looking good man. More inspiration for us. Question: You said that you use white glue for checking the fit and alignment. Does it dry fast enough to allow you to continue working? Can you maybe tell me a little about your method? Keep the inspiration coming. Pete
-
Welcome aboard Phil, I have been following your progress over on HS. Marvellous job you are doing. Keep it up. More pics! Pete
-
Thanks for the offer Larry, but I am going to carve one out of MDF. I want to try some things, sort of...a learning experience. Thanks, Pete
-
Looks great King Menelaos, That Starfighter is such a beautiful bird. I like your cockpit work. Keep it up. Pete
-
Ooooo...nice, Hi Saso, Looking good there. I like the detail in the wheel wells. How did you make the thick but contoured ribs? They look pretty thick, and yet you got them to conform well. I really like the uniform thickness of the vac plastic. My resin parts are pretty lumpy inside. Pete
-
That sounds like it should work. One thing I would be concerned with is the fact that the outer surface of the foam would have to be really nice, since it becomes the inner surface of the intake. I guess that the white glue could do the trick. You just have to make sure that it is smooth, since the outer surface of the foam intake core becomes the inner surface of the intake itself. Then after you use thinner to dissolve the foam, you could disolve the glue with water. The tape is blue low task masking tape. It is pretty thick stuff. Pete
-
Thanks for all of the positive feedback guys, Brian, The idea for the canopy framing came to me after much thought about how to raise the area around the plexi a little bit. The alternative was to make a vac-form sandwhich, but I really wanted to do all of the framing work on the master with all of the lines laid out in pencil beforehand. That way, I could make sure it looked right first, and fix it and redo it if I had to, then add the framing and finaly make a mold with everything in place. Pete
-
No Larry, I have never done body work. But I do use alot of Bondo at school. That and polyester primer and automotive paints. The halls at school often reek of Bondo. Pete
-
Then you pull the tape and...voila!

-
Here the sanding is almost done...

-
Hi Guys, Here are some pics of the work on the canopy. I wanted to add a little relief to the canopy frame, so here is what I did. First, I masked the canopy just as if I was going to paint it. Then, I spread a thin layer of bondo onto the frame area. Next, after the bondo cured, I sanded it back down until the tape began to show again. Now I had to be careful. I carefuly sanded all around the perimeter of the tape to reveal the sharp edges of the tape. Then when I had reached the tape all the way around, I pulled of the masking tape and gave it a few final passes with some 600 paper.

-
Here is another. The front edge of the center panel needs to be brought back (aft) a little for the IRST ball. Also, I think I will widen the frame out into the quarter panels a little. The next step is to add thin framing detail and then make a female mold for a vac-formed canopy.
