
ChuckD
-
Posts
914 -
Joined
-
Last visited
-
Days Won
9
Content Type
Profiles
Forums
Events
Everything posted by ChuckD
-
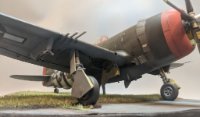
 Hello, everyone. If you've been following along the build thread, you're well aware that I was nearing the finish line on Hong Kong Models' new A-20G Havoc kit after starting it the day it arrived in June. If you haven't been following the build thread, but want a painfully verbose treatise on the inner workings of this brand new kit, feel free to dive into it and its ~350 photos. If you'd just like to see the photos, here's the gallery. Anyhoo, as I've stated in a number of other threads, I'm fascinated by the SW Pacific campaigns in the early-mid war years. I'm also a fan of big twins in attack configurations. Thus, when I heard that HKM was coming out with an all new A-20G Havoc in gunship configuration, I was excited to say the least. Unfortunately for me, their boxing was strictly marked and built for the European theater. Not to be deterred, I decided to embark on a bit of a journey. For this build, I'd be doing several firsts. To make a Pacific bird, I'd have to scratch build wing bomb racks and teach myself the art of printing my own decals. I'd also push the idea of masking farther than I had ever done before, so that was fun too. In the end, I'm very happy with the results and they feel pretty close to the original. The photos turned out a little weird, unfortunately; I suspect that's due to my camera trying to compensate for the failing evening light. So, things like the speckling on the nacelles and the dust pigments on the wings are much more pronounced than they are in real life. I found a few close up pictures of A-20s with extensive oil spatter all along their fuselage and nacelles aft of the engine, so that was the inspiration there. Anyway, here's "STINKY" of the 3rd BG, 12th BS in New Guinea. According to Michael Claringbould in Pacific Profiles vol. 3, this aircraft survived hostilities and was scrapped in situ after the war. The photo below is one of two taken of her supposedly while she was in Sydney, Australia. The squadron insignia and serial number were the first decals I ever printed for myself. The nose art was done with a mask. I painted the dark drop shadow, then moved the mask to the 10 o'clock position and painted the yellow. Turned out pretty sharp. For grins, I got my SW Pacific fleet out for a photo op, largely because I wanted to see exactly how the B-25 and A-20 compare in size.
- 43 replies
-
- 65
-

-

-
The filter work is done now and will dry while I'm running errands today. The effect is, intentionally, very subtle, but I love how it helps tie everything together. Bonus points for being a stupid simple technique too. Super thin burnt umber oil paint brushes all over the model. Here the two elevators have been filtered, the rudder has not. Notice the depth and richness of the base coat brought out by the filter. Here, you can see the difference on the rudder after the filter. The overall look as the thinner dries. The decals are faded and tied together tonally. Another bonus is that it starts the very beginnings of a panel line wash too. I'll clean up any puddling with thinner later tonight, then do some weathering, dry pigments, and she's done. If all goes to plan, I'm hoping to wrap it up by Monday!
- 163 replies
-
- 22
-
-
Chipping is done. Ended up using a brush exclusively as my silver pencil is a different color from the sponge chipping. Again, shooting for a subtler chipping result than some of my previous efforts.
- 163 replies
-
- 21
-
-
Thanks! To save you some effort, here's the link to the full gallery. https://postimg.cc/gallery/FJmDRnt The canopy fit is really nice, though I did add a little filler between the fuselage and the windscreen piece. And yes, I did paint the wing walk outlines and non-slip section. The kit includes decals for the red outline, but I have a pretty bad track record with getting long, spindly decals like that in place. So, I cut masks for them and painted them instead.
-
And now back to our regularly scheduled program. I actually had to replace the squadron insignia as well. I masked it with a highly de-tacked piece of vinyl mask, and it still peeled off in places. So, off it went too, and now we are back to square two, as it were. The s/n stencil has been corrected and reapplied as well. I also decided to start chipping. This is the first round with the sponge method. Next, I'll use a brush or silver pencil (likely both) and do some more deliberate hand chipping. None of the reference pics show heavy chipping, so I'll keep it to a subtle minimum.
- 163 replies
-
- 16
-
-
Thanks, all. I was able to get all the touch up painting done last night, so we are back to a blank canvas for the second round of decals. No harm, no foul. I'll get to those later this week as I likely won't have any bench time today.
-
That moment of pride when apply your very first home made decal... ...and realize it has a typo. Lolz, story of my life. Well, nothing a little careful sanding can't fix. As you can see, I had a couple decal issues that needed to be cleaned up. I tried using the crew name decal from the kit just aft of the squadron insignia (which, happily turned out beautifully), but it smeared when I went to paint a bit of Future over it. Apparently it hadn't fully set, so off it went too. I'll reprint the s/n decal and give it another go this week.
- 163 replies
-
- 12
-
-
Good day at the bench. It doesn't look like I accomplished much, but I really did. In the end and after a lot of testing, I decided to mask the nose art. I found a font that was closer to the original than what Mr. Claringbould used in his drawing of this a/c. It's not perfect, but no font will recreate the hand drawn art of the original. First I masked and painted the drop shadow layer. Then move the mask to the 10 o'clock position of the drop shadow and painted the yellow. I couldn't be happier with the results. Here is where things stand right now. All airbrush painting is done. All insignias, the wing walk, the guns, the props. Next is decals, filtering, then on to weathering this beast. Admittedly, her right side is kinda boring. Insofar as I can tell, no photos exist of this side of the aircraft. Maybe some bomb markings, or somesuch like that would give it some interest. Hmmm.
- 163 replies
-
- 20
-
-
Cool! I do love the warbirds of the SW Pacific! Glad to see this moving, and welcome back. Great looking progress so far.
-
Oh man, this is awesome. I just ordered everything I need from Airscale to do a Midway bird, so once I'm through with the A-20, this might be my next project. I'll let you hash out the tough parts with the build, then shamelessly learn from your lessons. I'm following this one closely and I'm really impressed with the work so far. What references are you using? In any case, lovely stuff. Keep up the good work!
-
Man, I sure do love your work, Tolga. When doing multiples of the same kit, it's easy to get into a stylistic rut where they all come out looking like the same thing just with a different coat of paint. These are simply beautiful and each has its own unique character.
-
Ah ha! I think you've pointed me in the right direction. I will test out cutting a mask, spraying white, and dropping a decal on it tomorrow.
-
A little preview of what I should be able to get to tomorrow. This is a test of my first go at designing and printing decals. Used clear paper for this experiment and am happy with the results so far. On the right, you can see what the squadron decal looks like alone. On the one next to it, I cut a mask for the background, painted a white egg/oval shape, then laid down the decal. I'm super happy with those results. Similarly, the s/n stencil went down just fine. I'm a little less pleased with the nameplate, however. Over the OD green, the yellow loses most of its register. My thought is to go back into Photoshop and make the yellow a little brighter, then reprint. I'm kinda thinking that won't help much though, as the problem is likely not the tone of the yellow I used, but just the fact that yellow doesn't have much pigment. I could also conceivably make masks to paint the word in yellow, then try to line a decal up directly over that. Maybe put two decals on top of each other? Mask and paint the drop shadow, then mask and paint the yellow lettering? hmmm. If anyone has some brilliant ideas I'm all ears.
- 163 replies
-
- 16
-
-
Very nice. Did you find drawings to help with the placement of the exhaust ports? Are you going to reroute the exhaust pipes too or just leave them off?
-
Blasphemy.
-
Thanks! Straight up, run of the mill countertop organizer. Like $12 at staples. Anyhoo... More progress. The squadron markings on the tail are done, and I've got half of the insignias in place too. I also added the "meh, why bother" camo color to the tail. Hopefully I can get the tail numbers and remaining insignias in place tomorrow, then work on printing the remaining decals.
- 163 replies
-
- 23
-
-
1/32 Douglas TBD-1 Devastator by Trumpeter - TBD-1A in October 2023!
ChuckD replied to Kagemusha's topic in LSP Discussion
Guys. Guys! Guys, listen! I've got a great idea. GUYS! You know the Devastator? Remember how it can barely fly under its own weight and was obsolete practically before it rolled off the line? Guys! Know what it needs?? Floats.- 376 replies
-
- 11
-
-

-
Real, actual progress! The faded OD has been applied, along with the beginnings of the squadron markings. I also finished painting the Eduard wheel set, which turned out great. From here on out, I don't expect to do painting outside of masks and varnishes, so the big masks can come off, but the window masks will stay. A few filters, washes, and other weathering will help tone the overall finish and tie it together, but I'm happy with where things are going.
- 163 replies
-
- 28
-
-
I've transitioned to postimg.cc. super straightforward to use, no fancy features that bog down the interface, free, simple. For posting photos to a forum like this, it's perfect.
-
HpH news - 1/32 Kate, Marauder, Ventura and 1/48 B-47
ChuckD replied to Kagemusha's topic in LSP Discussion
So, should we assume that all these will be resin models then? I get the part about the Kate being mixed media, but what about the other, new kits? -
Thank you. It's doubly tough for me as I'm actually colorblind in the range of browns and greens. So, color matching is a huge PITA for me for many of my most commonly used colors.
-
Paint, at last! Starting with a little preshading. I know a lot of people have dropped this in favor of "black basing," but I have found that I prefer these results far better. Just my eye, I guess. I'm ultimately shooting for a faded OD green similar to this: Here it is in its current, very much work in progress, state. It started with an undercoat of sand yellow, then a first round of base coating with MRP OD green cut with sand yellow and dark yellow. Bear in mind, there's a lot more work to do, but this is a good start, anyway. At this point, I only have the first layer of the OD green down. I've clearly got a long way to go, but it's progress!
- 163 replies
-
- 33
-
-
Thanks! Any bets on how many times I'll knock them off before I finish the build?
-
Yeah, yeah, I know I said I was done building (er... several times), but the bomb rack thing was annoying me. All the reference pictures of my chosen subject show at least one small bomb rack under each wing. So, not having one wouldn't do... ...and buying one wasn't really an option as there's nothing really close enough out there in the aftermarket world... ...so, we're going old school today. Let's scratch these suckers. After studying some reference photos posted in the thread I linked above, I decided to take my best stab at it. I don't have drawings, so it's a scale approximation, but I'm pleased with the results. First the paper template sketch. And the base units themselves cut from plastic card stock. Gussying them up a bit with PE bolt heads from the spares bin, some stretched sprue gussets for strength, and some holes. I found some sprue gate nubbies on a Rye Field sprue in the spares bin that were exactly the diameter I was looking for, so I cut them to length and glued them on. A little tab of spare PE serves nicely for the connection points. After punching the mounting pads out from more plastic card, I glued the whole thing to the wing. Once secured to the wing, I drilled a hole in the access panel just aft the rack and added the release wiring from stretched sprue. The other side... Again, it's not perfect, but I'm very happy with the results and I think it'll add quite a bit to the finished result. Next update will be paint. I promise.
- 163 replies
-
- 17
-
-
-
Psst! Hey! Psst! Hey, guys! Don't tell anyone, but I sneaked a few minutes at the bench when no one was looking. I hear the Fun Police have an APB out on me. I knocked down the treads on the tires just a bit and I think they look quite a bit better. Upper tire shows aging, bottom shows out of the box. The 3d hub looks great and assembles easily. The hub separates from the base plate easily and cleans up nicely with a little scraping with the back of an xacto blade. Make a bit of a mess tho. The PE goes on well too. The gap on the hub needed a little filler, so epoxy putty to the rescue. Left shows the gap, right shows the filled gap. I opted to dry fit the canopy as it's really a snug fit. Doing so will let me pop it on and off whenever I want to display the cockpit. I painted the back of the recognition lights, stuck em in and masked them. Despite saying it a few times already, these truly were the last pieces before priming. And today, she's primed! Next comes pre-shading, then real, actual paint! I know I can't believe it either. Now, back into hiding!
- 163 replies
-
- 32
-