
Cheetah11
-
Posts
1,122 -
Joined
-
Last visited
-
Days Won
2
Content Type
Profiles
Forums
Events
Everything posted by Cheetah11
-
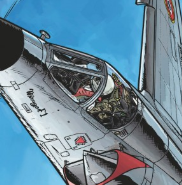
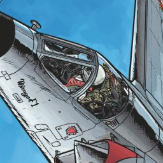
Winter has arrived with a bang so a bit more modelling time. I started to detail the inside of the cockpit using some of the kit parts cut from the inner wall and pasting them onto the outer skin. Then I hit two obstacles. The photos of the museum PR ix shows a different layout to the kit and to the bomber versions in other museums. I decided to use the photos I have and print some of the details. Easier said than done. The PR ix cockpit shows more flare racks and fire extinguishers than the bomber versions, so I drew up some parts in Tinkercad . The kit parts for these will also need replacement as they are a little basic. The printing was done with a filament printer and a .3mm nozzle. I could not get a .2mm nozzle to print reliably. The results were not as great as I wanted it to be, so I will have to draw all the parts I need and ask some modeler with a resin printer to do them for me. Here are the filament prints, looking good from a distance but bothersome at closer inspection. In the mean time I fixed the wheels by using a combination of the Reskit hubs and the Revell tyres. The kit wheels are ok but I needed a bit more detail. OCD A backing plate installed on the exhaust cover should hide a hole behind the exhaust. The Tamiya kit has this part. Overall the HK engines are not bad at all bur I will not detail them further as they will be closed up on my build. All for now, Cheers Nick
-
Hi Winnie, yes the undercarriage is difficult. I modified my for that reason with a brass tube and pin so I could fit the legs after the model was build. With my clumsiness I would break the undercarriage legs a few times before finishing the model. First onto the nose section. I measured the kit side windows and they are close to the size in Martin's build where he could measure the real aircraft, so only the angle needed adjustment. I digitised the windows with the Silhouette software and cut two vinal sections. These were then positioned onto the nose sections and the sections were painted black. After removal I had a perfect guide to cut the openings. One can see the angle that needs to be corrected on the original grey plastic. After a bit of cutting and filing the windows now have a more realistic look. I will glue the sections in once all the detailing on the nose is done. I also removed all the detail on the inside of the nose section so tat I could try and add the correct detail of the Mk Pr IX. As I have mentioned the Mossie in the Johannesburg museum is a great reference as the internal config is very different to the later and restored aircraft. Cheers Nick
- 29 replies
-
- 10
-

-
Hi Thierry I hope Tamiya is correct since I made the HK kit the same length. The easier way to fix this is to get the rear fuselage sprue from Tamiya and fit it onto the HK kit since the joint is in exactly the same place. That s if Tamiya is correct. Cheers Nick
-
Hi Thierry, I picked up this discrepancy by casually comparing the old Revell kit to the newly acquired HK kit. Then the search started. The first problem was the length of the fuselage as I found at least three different lengths in various sources. I scaled up the supposed original de Haviland plans on the internet. Since I did not have a definite fuselage length it only gave a comparison between the kits. The next step was to look at different other kits. The measurement I used to compare the kit was from the rear of of the fuselage strap to the front bottom edge of the fin as this is the area in question. So how do the different kits corrected to 1/32 compare. Airfix 1/72 : 153mm Tamiya 1/48 : 156mm Revell 1/32 : 153mm Tamiya 1/32 : 154mm HK Models 1/32 : 160.5mm Unfortunately I cannot measure the real one as it is hanging in the roof of the local museum and the staff is not helpful at all. If any member is willing to check the 1/24 Mossie it might add another angle. Bottom line : If HK is correct, Tamiya is wrong Cheers Nick
-
dH Mosquito FB VI schemes
Cheetah11 replied to geedubelyer's topic in Aviation Discussion & Research
Hi Guy, here is a photo of four FB VI Mossies from 60 Sqn SAAF in July 1943 at Sorman, Libya just before the Squadron converted to PR Mk IX aircraft. Two are in PRU blue and two in midnight blue. Roundels have orange centres. You can even add ground crew with Pith Helmets . Cheers Nick -
Hi Martin, thanks for the offer. I had a look at your build and could get most of the measurements from there. I cut thru the nose section length wise since I thought it will be easier to work in the cockpit. ( I can't and never will be able to build a ship in a bottle ) The result is the fuselage is thinner by the width of the razor saw. Upon a first order inspection the canopy width now seems very close. When I am ready to join the two fuselage sides I will do a final adjustment by thinning or shimming the two sides. Or that is the plan for now anyway. A pity the FLAK got hold of your model Cheers Nick
-
Thanks Guy, I had a look at as many wartime photos as I could and I think there might have been different sizes of tyres fitted to the Mosquitoes. Tamiya seems to have chosen the slightly smaller one and the Eduard, Barracuda and Reskit is sized accordingly. This leaves me with the kit wheels as the photo of the subject I am doing have the larger (or closer to the kit) tyres. If I compare the PR Mk IX in the Johannesburg Museum to the kit undercarriage leg it seems HK wheels are correct for the PR. I wonder if any other Mosquitoes had the right brake painted red. The Reskit tyre does not have a flat spot and the HK tyre flat spot is so small as to be almost unnoticeable. (Just visible in the photo.) Andy I looked at the u/c and the different components. I also wanted to assemble it after the kit was build so I replaced the thin plastic part with a brass tube. I lined all the parts up with a steel pin and tacked the brass in place with superglue, then removed the pin and secured it with more glue. At the end of the build I will insert a .8mm steel pin and everything should hopefully line-up. Cheers Nick
-
One or two more things to do and then all the basic corrections are done. This took less than a week and is thot difficult. Despite these little fixes this is still a terrific kit to build. To convert the B Mk ix to a PR config the camera ports need to be added. The rear one here is not in the right position and will be moved 3 mm to the rear. Much has been written about the nose transparency being too small and I have a Tasman one for the Revell kit. I was about to cut the nose and try and size the Tasman transparency onto the kit. Then I came across this picture. Here the nose does look rather small compared to the rest of the aircraft. I think what happened is that I looked at close up pictures where the nose section appears larger to the mind. Stepping back and seeing the aircraft from a distance gave me a different perspective. But still I needed a bit more certainty. I upscaled two plans to 1/32 and looked at the Revell nose and the HK nose compared to the plans. The plans I used were the Tamiya 1/48 (must be perfect) and an original de Haviland drawing. Revell on the Tamiya drawing. Revell kit on the de Haviland drawing. HK Models on the Tamiya drawing And HK models on the de Haviland drawing. Not perfect but very close. The result for me is to use the kit part. It is close enough and adding the Revell part will actually make it too large according to the plans. I have covered the small side windows and will soon cut the openings for them. I had a look at Martin's build and fortunately he measured them on a Canadian restoration project. Some more trouble in paradise HK Models, Reskit and Revell So which one is correct. I would like to hear opinions before making a decision which to use. Cheers Nick
-
Thanks for the info. I read that one of the de Haviland brothers did the initial investigation and concluded water seeped into the upper wing joints, hence the strips. The MOD enquiry later found a problem with the manufacturing, probably the water soluble glue being used as you pointed out. Hi Andy, thanks for the heads up. I had a look at the undercarriage and think I know how to make it stronger and easier to build. I will see a little later on in the build. With the two stage engines and wing strips HK Models have actually given modelers a lot of options eg a PR Mk 34 or B35 can be done almost OOB. Cross kitting with the Tamiya opens many more. The thing I realized researching this build is that most of the generally available history of the Mosquito is written on the first few years and not much is readily available on the later operations, such as the overall Silver PR 34 aircraft during the Malayan Crisis. Thanks Sean. The kit does not have a lot of errors and actually builds well with good fit so far. Just my OCD . I will see where I can take this inside the funds, patience and questionable skill triangle. My model building is like Little Bill's carpentry (Gene Hackman in Unforgiven). My skill lie elsewhere. In the mean time I am fixing the rear fuselage. All the plans I could find as well as a comparison with other kits showed the same result, the rear fuselage being 6mm too long. If I had to do this again I would do the cut on the rear of the bomb bay, resulting in a little less sanding to even out the two parts. Done, quite an easy fix. Cheers Nick
- 29 replies
-
- 13
-
-
So I am slowly eating deeper into the can of works.😁 The first part I am going to correct or rather adjust is the wing. The plywood strips on the upper wing surface has been criticised as overscale and the wing should be smooth. So HK Models messed this up totally. Or did they? Smooth wing B Mk XVI Wing Strips on a B Mk 35 So it would seem that the later marks of Mosquitoes had the strips. Or perhaps from different factories. This actually opens up more options for the Mosquito enthusiast. A B Mk 35 from the HK kit with 3D printed 100 Gal tanks. Or with cross kitting with the Tamiya kit a NF Mk XXX? I would like to hear what the Mossie boffins have to say. The only reference I could find on the net stated plywood strips were fitted to some aircraft in tropical areas after wing failures. It was thought at the time that water seeped into the joints on the top surface. In the mean time I am pretty sure the PR Mk IX had a smooth wing. After 5 min of scraping and sanding the front strip is smooth. A little elbow grease and the wing is done. I also corrected the inboard leading edge by scribing a line on the bottom and bending it up. The line was then reinforced with a plastic strip. The top was then smoothed with a sanding stick. A small triangle added to the fuselage to match the wing. Was the leading edge correction worth it. Looking at the photo it seems not as bad as some modelers make it out to be. How correct is the Tamiya kit to which the HK kit is compared to. You decide. All for now. Cheers Nick
- 29 replies
-
- 18
-
-
I had a look at some of the previous builds on various sites and noted all the complaints levelled at this kit. Some are easily fixable and some not. The most common complaints were: The nose glass section being too small. The nose side windows were angled incorrectly. The wheels were poorly detailed. The wing leading edge inboard of the engines sloped too much. Strips on the wing upper surface that should not be present. There were a few complaints about the spinners and props as well. The most serious problem for me is the fuselage length. I compared the old Revell kit to the HK fuselage and the rear fuselage of the HK kit is around 6 mm longer. A quick comparison to the Tamiya 1/48 an a call to a modelling friend with a Tamiya 1/32 kit showed them to be the same as the old Revell kit. Looking at all the side on photos seem to confirm the error( Yes photos can be problematic but a good side on photo is sometimes useful to me just as a double check). So this will have to be fixed. I will endeavour to fix some of the other errors and just ignore some of the smaller errors. Getting to grips with the kit opened a small can of worms. There are approx. 30 surviving Mosquitos of different marks in existence today and four are airworthy. The trouble as with many models probably was the research done on restored examples which are not always in the correct config for the model depicted. Here it seems no different but more a little later. Added to this is the relatively long service, many different models and different factories from Canada to Australia and it becomes difficult to pin down all the differences between various marks. Then some aircraft in museums are not the right model such as the PR MkXVI depicted in the US Air Force Museum which is actually a B Mk 35. The model I want to do was the first PR Mk IX used by 60 Sqn SAAF. Not as colourful as the later PR Mk XVI aircraft of the unit but historically more interesting. Serial no LR 411. There is only one surviving PR Mk IX Mosquito today. The only other Mk PR is a PR Mk XVI in Australia and in storage at the RAAF museum in Victoria. By some great fortune the PR Mk IX is 30 min drive away from me at the Saxonwold Museum and it is unrestored, still wearing paint from 1943. It was also in a hanger away from the sun since 1946. Only trouble is it is mounted in a flying position and the innards are not readily accessible. Still a goldmine of information. Some more soon Nick
- 29 replies
-
- 13
-
-
I recently received two great presents from my son in Australia. One was a HK Models Mosquito which was on a sale at BNA for less than half the price of the one in a local hobby shop. The second and priceless present was a two week visit by my three year old grandson. So I will see how to tackle this one as I have always wanted to do a SAAF Mosquito. The history of the Mosquito in the Western Desert campaign is not well known today, so I will do one of the only unit to operate the Mossie in that campaign, namely 60 Sqn SAAF. More a bit later. Nick
- 29 replies
-
- 15
-
-
No Problem. Thanks for the interesting facts about the Cutlass !!
-
Hi Hubert, maybe just s typo but the standard modern aircraft hydraulic pressure is around 3000 psi. 300 psi would make the components too large and heavy. Cheers Nick
-
I am soon starting to build the HK Models Mosquito as a PR IX but I have trouble finding photos of the PR IX camera config. I could only find photos of the PR II and PR XVI configs. Any help will be greatly appreciated. Thanks Nick
-
I had a look at the HK and Revell kits. The rear fuselage of the HK kit is 6mm longer than Revell. A friend with the Tamiya kit measured the same as the Revell kit. I am thinking of cutting a 6mm section from the HK kit but would like to be more sure of the correct length . Any 1/32 decent plans or someone with easy access to a real Mossie?
-
Another route if you do not want to fix the HK kit is to buy the Tamiya and Revel kits and splice the fuselage in front of the cockpit. Revel kit is relatively cheap. No rivets or panel lines, so not the most difficult conversion. Nothing gained from using the Tamiya and HK kits as the corrections need to be done anyway and an expensive kit is going to be binned. I am going to fix my HK Mossie, after fixing all the errors on the Italeri Mir III it should be child's play. BTW if I was HK models a correction of two very small sprues would solve the biggest problem.
-
Hi Matt, The most realistic fix would be splicing the Revell nose onto the Tamiya kit if you can live with the Revell transparencies( easier with the Tasman canopy). You would still have to fix the side windows and detail the inside. But for me there are still the two stage engines for a PR IX, so I will try and fix the HK kit. I fortunately have an old Revell kit and Tasman canopy. If the plan I could get hold of is correct, the Revell kit seems pretty accurate dimensionally. Comparing the HK kit with the plan and Revell kit the fuselage depth is close. There only seems to be the extra 6mm just behind the bomb bay. The detail towards the rear is proportionally correct, so the fuselage correction should be relatively easy. There is a PR XVI about an hours drive from me but it is hanging in the museum roof, so getting accurate measurements won't be easy. Cheers Nick
-
More trouble in paradise The mis aligned side windows seem to be the least of the problems. Just a quick check against plans and the old Revell kit shows a the nose glass section is too small and needs to be cut back about 6 mm The way Kent did it in the above post. (If an old Revell kit is available or the Tasman vac form parts.) The other surprise is a 6 mm section needs to be cut from the rear fuselage behind the bomb bay. I will just need to confirm this before building the this one. Nick
-
I see there is approx. a 10 mm difference in fuselage length between the Revell and HK kit. The wings are dimensionally very close. Has anyone compared the Revell or HK kit against the Tamiya or "accurate plans"?
-
How time flies, a total of 19 since I joined Dec 2017 Nick
-
Hi Andy, unfortunately the Falcon set fits the Revell kit and tapers way too much to be of any use on the HK kit. Even the Revell kit is not correct in this area. I have had a look at my HK kit and the only solution it seems is to fill the openings with plastic card and cut new openings for the HK glass, but at the correct angle. Cheers Nick
-
Very nice Jug Malcolm, I like the super realistic finish. Cheers Nick
-
1/32 Hasegawa Ju87D-8 Night Stuka (finished)
Cheetah11 replied to IainM's topic in Works in Progress
Looking goo nice work Iain.

