Search the Community
Showing results for tags 'gwh'.
Found 8 results
-
Finally managed to take photos for the gallery, I know photos taken quickly but you can see something on them. I invite you to view the gallery of the Northrop P-61 A "Black Widow" model. - "Lady Gen", Florennes, Belgium, december 1944.
-
After my long absence I'm back with another workshop thread, this time I have a Northrop P-61A "Black Widow" from GWH and in 1:48 scale. The model straight out of the box I think, because I don't plan any additions to it. Unless something goes wrong. The model is familiar so I won't be taking photos of all the frames and will limit myself to just these photos. There are two camouflage paints, an all black Burma aircraft and a European theatre of operations grey/olive with invasion stripes and this is what I will be building. So much for the introduction.
- 26 replies
-
- 11
-

-
I'd like to join this little party with a GWH Curtiss Hawk model 81-A2, or P-40 to many of us. It looks like a really good kit, from what I've seen from people's postings. I'll be adding a little after market with this build, in terms of a Quinta Studios 3D decal set, which I hope will add a little more to the model. As I only started to look at this yesterday, I haven't got much done yet. I've added a few of the parts that go inside the rear fuselage, put the pilot's pew together as well as the fuselage fuel tank. I like to add what parts I can before paint goes on, so long as they don't create shadows behind. There's a few more parts to go in, as well as ejector pin marks to sort out, but some already seem to be where they won't be seen, so less work. And some thought by the kit designers. Once I've finished this stage, I'll slop some paint about. As I understand it, most of the inner surfaces should be yellow zinc chromate, and I think the the cockpit should be some shade of interior green. Photos I've seen suggest this should be a darker colour than green ZC and with a slight bronze tint. I do know that Curtiss were a little cavalier with their paint colours and didn't stick exactly to the specified paint. If stock ran low, they'd get something close at the local hardware. Whatever works, I guess. Cheers, Michael
-
Hi all, Some say that a modeller‘s life is like city buses. One can wait for a bus for hours, and when one finally comes along, they come in 3 or 4 I’ve been anticipating for the GWH P-40 B/C since it was announced last year. I thought that given the enthusiastic reception, there would sooner or later be a WIP thread dedicated to the subject on this here forum. I waited and waited …until three weeks ago, I took the plunge and ordered my kit from a Czech shop. Five days later, it arrived. I ripped open the box and started right away… only to find that @Tolga ULGUR beat me to it. To tell you the truth, I’m not entirely unfamilar with the early Hawk. I scoured the internet for my build of the 1/48 Airfix kit, and learned a lot from the various Curtiss experts. Furthermore I’m currently building a 1/32 French H75, the forefather of the H81. So I felt I was somewhat ready for the GWH. My intention is to build a 112 sqn RAF Tomahawk in early temperate camouflage and sporting one of the original sharkmouths. I’ve studied this scheme for my 1/48 model and will take the opportunity to implement it to the larger scale. Since no decals exist, the markings will be hand-painted à la old-school (no Silhouette). Some views of my 1/48 Airfix. I’ll use the same color scheme for the GWH. Hopefully, with cleaner teeth This thread is not meant to be a step-by-step WIP per se but rather a log where I’d be gathering notes and impressions (and rants) during the building of this promising kit! I hope some of you will find it at least entertaining and I also welcome your comments and input. The more the merrier. A VERY brief preview of the kit as all of you know already about it. THE PROS: very clean mouldings, realistic surface textures with intricate, accurate details, very precise fit with super-tight tolerance. Very comprehensive decals, thin and well-printed. THE CONS: the photo-etchings are useless and primitive at best. Paper-thin, easily deformed, devoid of noticeable details. Some etched parts would better be in moulded plastic. The etched radiator grills are commendably thin and subtle if only they can be seen once the kit is completed. Furthermore the special edition ‘bonus’ -apart from the 3d-printed .303 barrels- are completely useless: a bogus patch (if only had they use a genuine Flying Tigers breast patch), a ‘collector’s card (tell me how many collect 150euro kits), and 2 posters profiles(meh). I would prefer GWH replace these ‘bonus’ with some etched seat belts and optional US seats and windscreens. Rants aside. Let’s cut plastic. Starting with the cockpit. I prefer to do it the ‘normal’ way. Instead of building a pilot’s cage as GWH proposed, I’d be gluing the right and left sides to their respective fuselage halves. This method would give me a complete view of what’s in store, especially giving the adequate contrast when detailing and painting the cockpit. I added an armour plate ( plasticard) to the bulkhead behind the seat The original cockpit was painted in an equivalent of RAF Grey-green. I used AK grey-green slightly modified with a touch of blue. The aft fuselage is painted in a yellow Zinc Chromate. This part is not visible on the completed airframe. I only painted it to give some contrast to the cockpit color. Cockpit floor (in fact, the top of the wing) painted. Note ‘halo’ effect. Supposed to give some depth to the cockpit. Hopefully Seat is painted in a slightly darker green than the rest. As this is a RAF bird, I added a Sutton harness (Eduard p.e.) Instrument panel waiting for bezel decals. That’s it, folks. Questions and comments are heartily welcome! Cheers, Quang
- 156 replies
-
- 35
-
-
 1 enormous box: …full of nice plastic stuff (beautiful clear parts), and… …more PE stuff than I will ever use, plus… …printed gun barrels (my first experience with parts made this way)… …all for building 1 of 5 different AVG subjects, and lastly… …a big-ass commemorative patch to sew on something. I can hardly wait to get started, but I’m going to be disciplined and finish the Revell P-51D first. No, really, I am. Seriously. Not kidding. Disciplined.
 -
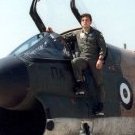
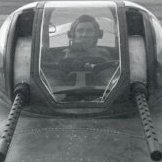
Good morning lads, I finally finished my new summer project GWH's 1/48th scale T-33A. My time was limited to present you an in progress work, but i will try to give you an idea !! The kit and some aftermarkets...also used some custom masks for the ''USAF'' and ''TR-411'' codes from my friend Alexis And the scheme i am for is the second one TR-411, here is the only photo i managed to find.. A few words about the kit....AWESOME!!! (my humble opinion!)....nothing more A few words about Caracal decals...the same!!! Awesome!! I started dealing with the cockpit as a usual...here i used Eduard PE for the cockpit and the pilot's seat! Cockpit... Seats... All together and weatherd... Wheel wells and flaps... I also used Eduard PE flaps, i decided to pose them down.. ....
-
Hello the next kit i will start the mosquito Yes another one im still working on the corsair but im at the point for decals so everything is slowing down and i whant to build So this wil be a slow build and try to do better than my corsair After looking at all the mosquito builds over here i hope i can meet the finnish standard For the markings i have no idee at the moment So the kit. the aftermarket for this one i hope i can make a small start this weekend Mark
-
Build #6 for the year, the Great Wall Hobbies TBD-1 Devastator in 1/48. This is Ensign George Gay's aircraft that he flew with Torpedo Squadron 8 at the Battle of Midway in 1942. Of the 15 Devastators of VT-8 that attacked the Japanese fleet at Midway, all were shot down with Gay being the only survivor. Torpedo Squadron 6 and 3 followed, losing 10 of 14 and 11 or 13 Devastators respectively. It would end the combat career of the Devastator, but Gay would go on to report the destruction of the 3 Japanese carriers to Admiral Nimitz, then fight at Guadalcanal with VT-11. After WW2, he flew for TWA for over 30 years, often signing his book 'Sole Survivor' with the words; "May you be as lucky as I was at Midway". The GWH's kit is nice in the box, it's not until you start to put it together that you find some problems. The interior, especially the instrument panels are tricky to fit, I didn't succeed with the lower half, but it cannot be seen anyway. The separate canopy sections are too thick to be positioned open, meaning you either have to buy the Squadron replacement, or use the full canopy supplied. The instructions depict two style of under carriage leg, loaded and unloaded, however only the unloaded leg is supplied in the kit. The decals are awful, with virtually no glue on them and they were almost impervious to decal softner. I had to soak the wing insignia in Mr Mark for AN HOUR!! before they would conform to the surface detail and even then, they started to crack. The paper masks supplied are also useless. That said, it's still the best TBD in 1/48 available. I've also decided to keep the aircraft cleanish. As far as I'm aware, VT-8 did not see much, if any action before their fateful mission at Midway. Thus their aircraft looked to be in rather good condition.