

Butler
-
Posts
680 -
Joined
-
Last visited
Content Type
Profiles
Forums
Events
Everything posted by Butler
-
Hi all. Here's my imaginery Macchi Veltro air racer from the Trip to Russville group build. In the spirit of Russ (but without the skill) i've done this over a weekend, hopefully he would've approved
-
Thanks everyone I' m all finished so i've posted some pictures in the inspection area
-
Erich Hartmann, Ace of Aces, Bf109G-14, Double Chevron
Butler replied to dodgem37's topic in A Trip to Russville
Mate that looks brilliant -
I feel i should be off for a chocolate milkshake now but idon't have any in stock I don't think Russ would mind though!
-
Thanks for the kind comments guys I've stuck on various spares-box decals to jazz this up a little and added a huge exhaust stain! Very nearly finished and hopefully i can post some decently framed photos tomorrow!
-
I've gone for some bright colours here! I used random selections from the kit's decal sheet. These really are the best decals i've ever used, they go on and the carrier film just disappears completely The look i'm aiming for is a very well kept plane that has just completed a hard run, hence it will have heavy exhaust staining and some fairly decent oil leaks
-
I sat and masked this while watching the exciting Grand Prix final race. The scheme is totally fictional (obviously!) and i've just tried to follow the plane's natural lines.
-
Last night i sprayed the whole thing with a layer of white enamel from a rattlecan. It still has a strange feeling to the touch today - dry but still slightly 'plastic' to the touch if that makes sense! Anyway, it takes masking without any problem so onwards...
-
Cheers guys! Vaughn I'm loving your Miles build, possibly the best thread on the site at the moment and definitely the closest model to the 'Russ ethos' Certainly do - want one?
-
Hi all I've purposely waited for the last weekend of this group build to complete a superfast 2 day build Russ-style! I only build RAF subjects but, like many of our British members, i have a stack of the 21st C kits from when they were sold off cheap here. I thought it might be quite fun to build a Veltro air racer with suitably lairy paintjob. I've seen a few of Russ's racers so i hope he would've approved This will be stictly out of the box, so here's a quick photo of half an hours work. Build today, paint tomorroww
-
Perhaps someone in the know might be able to tell me - the outside gun bays are not used for guns but would they still show wear on the panels? (i.e. are they frequently opened for their other purpose?) Also, would these bays still have holes in the wing leading edge covered with dope patches, or are these filled in? Thanks!

-
Pic of the underside, still need to start weathering this bit

-
Cheers Ron I'm back in business with the camera now, here's some more legible photos of the same

-
I painted on the sky coloured letters with masking tape masks but used decals for the other markings. I've tried a new technique to try and get a bit of weathering on the decals. first i've sprayed a very fine and thin mist of grey over the decals while still on the backing sheet. Once they're on the model i then use a super-fine sanding sponge to sand off most of the grey colour. Where the decal has settled over the rivets the grey colour tends to stay put givng an effect i quite like Sorry about the rubbish photos, my proper camera is having battery problems

-
Done a bit of work on this one and splashed some paint on. I used Tamiyas new colours for the green and grey.

-
There's a couple of pics in my ancient Typhoon build here: (post 59) You can see pretty much everything in the photos, just takes a little time to get your head around the layout! http://forum.largescaleplanes.com/index.ph...phoon&st=45
-
Flaps added to the starboard side. These were made from thick sheet styrene laminated together to force the curve shape, then ground down to a triangularish cross-section. I tried using the kit flaps cut off the model but they just looked too chunky

-
I've sprayed the delivery number onto the cowling. i understand that these markings were temporary but remained visible to some extent for a long time after delivery (the plane is blue not black, mobile phone camera flash is quite stark!

-
A bit more slow progress on this. The port wing will be folded so i'm making it separate for the minute. i've added the gun bay panels from beer can alumnium, which gives a nice raised look that i quite like

-
I don't have the camo painting instructions but here's a photo of the actual plane. Note that the kits 'W' decal is too big, although you can modify it quite easily as i did here: http://forum.largescaleplanes.com/index.php?showtopic=29177
-
To set your mind at rest - i just rubbed the 'hobbydecal' logo onto my bedroom mirror and spent the next 5 minutes scratching the bloomin' thing off I conclude it sticks to shiny surfaces perfectly
-
The envelope is probably being chucked into the belly of a 747 as I type this Brian I've included the dry transfer and 2 copies of the waterslide so you should have all bases covered. The dry transfer sheet has a couple of other transfers i didn't use for you to have a practice with. The trick is to use a ball-point pen and very lightly rub the rear of the sheet. Use light pressure and resist the temptation to press harder as they won't come off!
-
Master Casters F4U cowl flaps - Will it fit the Revell kit?
Butler replied to Dave Roof's topic in LSP Discussion
I found it fits fine, provided you're willing to widen the panel on top of the fuselage that the cowl joins to. This panel on the Revell kit is very thin. Here's the Mastercasters resin flap arrangement attached to the Revell cowl on my current build: (i've chopped the cowl up a bit )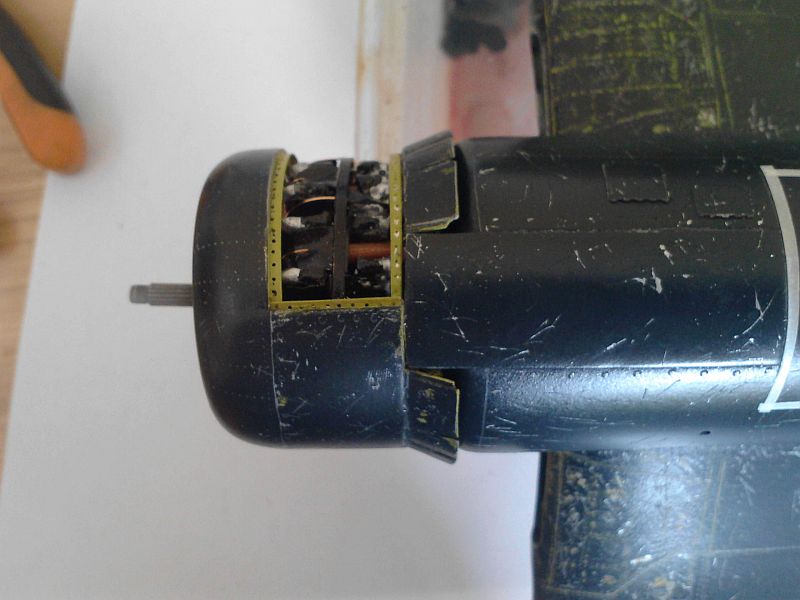
-
Just read this begining to end - amazing! Is the canopy on this plane the same as the typhoon's? it looks very similar
-
Brian I have that stencil you've circled in both dry transfer (hobbydecal) form and in waterslide decal form. You're welcome to both if you want them as i only do RAF subjects