
ChuckD
-
Posts
914 -
Joined
-
Last visited
-
Days Won
9
Content Type
Profiles
Forums
Events
Everything posted by ChuckD
-
 Thanks, Craig. Maybe I can return just a little bit of the inspiration your B-17 build has given me over the years. Thanks, Kev. I like the field quite a bit, actually. It's just that piss-poor leadership will ruin any good position. The old saying - "You work for the company, you leave for the boss." Cross your fingers for me that I can find something else soon. I'll take any good vibes you can spare. Anyway, time for an update. I finally got around to getting the turbos sorted out. As yet, nothing of this build has been done within the realm of subtlety, so why would the turbos be any different? I first started out by gluing in some supports for the turbo panels. These would provide some strength instead of the butt joint that would result otherwise. Once I cleaned up the panels well enough to dry fit cleanly, I turned my attention to the turbos proper. Hooray. When you tuck the little lip of the turbo pipe into its forward position (towards the bottom of this pic), the turbo body itself is a good 2-3mm short of where it needs to be. So, with the lightest touch of the finest razor saw, I cut a small, subtle 3mm gap in the turbo pipe. See? Subtle. That said, after gluing them in place, everything is starting to take shape. Over the last couple days, I filled some of the more obvious gaps with styrene strip and epoxy putty. Today, I shot everything with primer to pick out the less-obvious flaws and got to work sanding and filling again. Clearly, there's lots more work ahead, but this is where we stand now. Liquid sprue is drying in some of the more egregious spots and I'll continue the theme of filling, priming, and sanding until I'm happy with the finish. So, now that most of the major surgery is done, we're back to the drudgery of most model builds: the filling & sanding dance. After that, I'll start the scribing and getting the intake scoops around. Initial fitting of those looks promising, but time will tell.
- 65 replies
-
- 20
-

-

-
Turning Japanese Group Build - Ki-45 Toryu "Nick"
ChuckD replied to ChuckD's topic in Ready for Inspection
Thanks, Gents. Honored to have my first article here at LSP. <3 -
Awesome work, Mike. I think this is the first time I've ever seen anyone praise the Trumpeter Tomcat. Whatever the case, your build and finish are really top notch!
-
All fair points, Dave. Truly, I'm not worried about it either. I've built both the B-25 and the B-17E from HKM and have been very happy with the detail, fit, and finish. I'm just still smarting from the stupid Helldiver debacle.
-
My hope is that for whatever the cost of the kit is, we get a good, accurate model. While, by all accounts, that seems like what we're going to get here, I'm still chafing from the Infinity Models Helldiver that was $toomuch and required 2x that in aftermarket PE to be presentable. :/
-
A Spanish Adventure - Around the world in Microsoft FS2020
ChuckD replied to ChuckD's topic in General Discussion
Welcome back and thanks for joining me. Screenshot galleries: https://postimg.cc/gallery/6WdXTpx https://postimg.cc/gallery/PfthvvH I'm back after a couple weeks' break. Life has thrown a few curveballs at me over the last few weeks that have limited my hobby time. Between a couple midwest ice storms knocking out power and deciding to leave my job, I've not been able to do much other than look for new employment. Fun times. Today, however, we'll be doing two legs to get us back up to current. When last we'd left, we were in Bilbao, Spain. Today's two legs will see us head south to Madrid, the capital of Spain and in the heart of the Iberian Peninsula, then east to island of Menorca in the Mediterranean. Leaving Bilbao was a fairly routine affair, excepting that the field was shrouded in low fog and overcast. Also, the goofy layout of the runways there meant we had to taxi for 15 minutes just to get to the departure runway. Hang a right at the first stop light... Go about five miles down Route 22... Take a left turn at Albuquerque... And you're there... Given the low visibility and knowing that there were mountains in the area, we found and followed a SID (Standard Instrument Departure) at Airmate.aero for the given runway. Climbing through the murk, we popped out on top to a beautiful, clear sky. We flew east over the coast to our first waypoint, the landmark of El Flysch de Zumaia - a towering rocky beach. Looking at the pictures of it in real life, the game doesn't really do it justice. We turned inland from there and as we trekked further south, the coastal clouds began to break up. We passed over a wide range of mountains. These lakes at the top of a mountain cauldron were pretty neat. Then the mountains gave way to a large, sweeping plain. Our next waypoint was the City of Segovia, the capital of Castile and Leon, and home to several historic buildings including a roman aqueduct and the Alcázar of Segovia. From there we turned south, hopped over another mountain range and made our decent into Madrid. The suburbs of Madrid sprawled out below us as we prepared for landing. Fortunately, the AI ATC didn't pull any of its usual chicanery and the approach & landing were uneventful. We did get cleared to taxi to a gate, so there's that. I don't think the jetway will come down that far. A few days later, we departed Madrid in a rain shower and headed east towards the Med. We scuttled below the deck until the weather cleared, then climbed to enjoy the beautiful Spanish countryside. We passed over Almansa, Spain and its majestic castle. Then headed east and out to sea. Soon Eivissa (or Ibiza) island passed beneath us. Including some inbound traffic into the local airport. The next island, Mallorca, was almost totally obscured by a cloud deck, so we plodded on to our destination of Menorca. Approaching the island, the weather was clear and the winds stiff, but cooperative. We made our descent into the smaller, uncontrolled field on the island as we wanted to avoid the hustle and bustle of the main commercial airport. The runway was nestled in a small woods. Thanks for following along. Next stop: A short hop to Barcelona. -
Hello, everyone. Back at the bench after something of a hiatus. Life has thrown a few curveballs at me that have kept me from getting much time to work on my hobbies. First, power and internet outages in the face of a few heavy midwestern winter storms. Then, I've been spending most of my free time looking for a new job. I recently took a promotion into a key leadership spot in my company, and as it turns out, it was akin to stepping into an abusive relationship. So, I put in my two weeks' notice yesterday. Anyone looking for a highly experienced IT leader, lemme know. In what time I've had at the bench lately, I've been working on getting the cockpit around. I have the eduard detail sets, so I used some of those, and scratch built a few things as well to make it look more like a P-38G. That said, I didn't find a pic of the radio deck for a G model until after I'd more or less finished, so the radio stack may or may not be correct. Meh. No one will really know. These pictures are before any washing or weathering. Though it looks kinda crappy under the super zoom of my phone, the charging handle for the guns was the primary scratch build item for the IP. The layout of the instruments between the G and the J/L changed quite a bit, but I didn't have it in me to scratch build an entirely different panel. So, we'll go with what we've got here. The eduard seatbelt set. I strongly prefer the HGW sets. I always find that the PE of the eduard sets doesn't conform to the shape of the seat without popping pieces loose or kinking unnaturally. But, still, better than nothing and, when weathered a bit, it looks the part. The yoke was the most obvious visual change from the G to the J/L models. I cut the original yoke off and scratched up this one. Again, when in situ, it looks quite nice. When I started fitting the cockpit tub (which I forgot to take pictures of, naturally) into the wing halves, I found that the radio deck sagged. That left a gap between the rear bulkhead and the upper wing half. So, I glued in a piece of sprue to help force it upwards and it took up the gap nicely. After quite a bit of cementing, super gluing, leaving traces of my thumbprint on plastic, taping, hoping, praying, and so on, this is where I'm at today. The turbo decks are dry fit and will be my next target. Once I get those smoothed in, I'll start the process of filling, sanding, scribing, and riveting. The completed cockpit tub. Looking pretty nice if I do say so myself. The under side with all control surfaces attached. Fortunately, I learned from Other Chuck's build log and labeled each flap section as to its placement. They are all nearly identical, but nooooooot quite. As others have seen, here is the expected canyon that needs to be filled. I'll be following Other Chuck's method on this to fill and sand. At least the wing dihedral is correct. Here's what the bottom of the intake sections look like after being filled with Magic Sculpt and sanded. Much better. So that's where we are today, folks. Making good progress in getting this ol' bird done. Now that it's all together, it actually feels pretty solid, so that's encouraging.
- 65 replies
-
- 14
-
-
Good morning, all. As some of you are following along, I'm working on backdating the Trumpeter P-38L to a P-38G using the Rutman/Gray Matter Figures conversion set. The last major conversion challenge I have to tackle will be the vacuform canopy. I've never worked with these before so I'm curious if anyone would be willing to share their tips, tricks, and hard-learned lessons. Thank you!
-
Unless I'm looking at the wrong thing, Uhu glue appears to be readily available in the US on Amazon.
-
1/32 Douglas TBD-1 Devastator by Trumpeter - TBD-1A in October 2023!
ChuckD replied to Kagemusha's topic in LSP Discussion
Without question. At least you don't have to pay to sign up for the pre-pre-order. -
1/32 Douglas TBD-1 Devastator by Trumpeter - TBD-1A in October 2023!
ChuckD replied to Kagemusha's topic in LSP Discussion
I got that email too. Color me interested. Between this and the Havoc coming out soon, this is shaping up to be an interesting year. -
Well, get on it, Tim. These things won't build themselves. Lord knows this one sure hasn't. I had the day off today, so after a round at the gym and a shower, I got to work at the bench. I was really happy with the alignment of the booms and tail assembly, so I decided to cement the tail together. With this nice and solid, I figured it would help guide and keep in alignment the next, and most treacherous part of the conversion. I glued the booms together at the tail and held them in place with tape till they set nicely. Nothing on this kit has been a product of subtlety and the tail was no exception. While that was drying, I took copious measurements with digital calipers. The most helpful was to measure a reference line from the aft of the turbo deck cutout and a panel line juuuust behind the tape in the pic above, right near the root of the vertical stabs. That was my reference for how long the tail assembly had to be. Here's the resin part compared to the boom in the kit. The plan was to cut the booms off then sand them down to the panel lines that roughly line up with the panel lines in the resin parts. The doctor is in. Let's begin the procedure. Incision number 1 Incision number 2. We now have a travel-size P-38. Incision number 3 And the final cut. I then took my tamiya cutters and roughed in the cut closer to the target panel line. I finished carefully with a sanding stick. This is during the work with the cutters. Mating the two resin halves together showed that the fit was hilariously bad. I think it's quite likely that this resin was originally designed for the Revell P-38, so its fit here was awful. As I hemmed and hawed on how to line everything up properly, I had one of my (unfortunately rare) moments of sheer brilliance. Super gluing a couple balsa rods to the inside of the booms brought structural integrity and ensured the the length would be exactly right. From here, it would just be a matter of shaping the resin pieces to fit the now rigid open space. After much fiddling, I determined that the best approach would be to mate the two resin pieces at the top center then fill the canyon on the bottom of the boom. Here you can see that in doing so, the fit on the tops and sides of the booms wasn't so bad. See? Not too shabby. Not too shabby. Shabby. After some more filling with CA and an initial round of sanding, I'm pretty pleased with the rough results. I back filled the gap with styrene so that I could more effectively fill it with epoxy putty. I think the patient just may pull through! While I'm waiting for the epoxy putty on the bottom of the booms to harden, I turned my attention to cleaning up the underside of the wings where the dive flap equipment was removed. I also made a rough pass at creating the in-wing landing light. It got a little messy and will need a little cleanup, but it turned out well. Somehow, I was able to make a perfect lens using melted clear sprue on the first try. After heating the end of a rod of sprue, I squished it vertically on my workbench. To my utter amazement, it turned out to be the perfect size and the perfect depth to fill the hole. If I'm not mistaken, I'm now done with the major conversion work. From here out, it's just putting stuff together, filling holes, lines, and seams, scribing and riveting.
- 65 replies
-
- 17
-
-
A Spanish Adventure - Around the world in Microsoft FS2020
ChuckD replied to ChuckD's topic in General Discussion
Welcome back and thanks for joining me. Screenshot galleries: https://postimg.cc/gallery/BqqN2ps https://postimg.cc/gallery/jK2WLFw Well, after a covid-induced break, we're back on track. Thankfully it was a mild case, and while I had the energy to fly a leg last weekend, I didn't have it in my to do a write up. So, today, we'll do two legs to get us caught back up to the present. For the first leg, we'll follow the western coast of the Iberian Peninsula northward from Lisbon, Portugal to A Coruna, Spain. Naturally, I forgot to take a proper screenshot of the route, so here is one taken at the last minute with great haste and at enormous expense. It was a busy day in Lisbon, but we were able to get out without too much trouble; the faithful Beech rumbling happily into the clear, calm air. We plodded northward at 3500 feet, leaving the bustling city of Lisbon behind us. A nuclear power plant is situated just north of the city itself. As someone who's been playing flight simulators since the 90s, I continue to be amazed by the scenery in this game. I can very easily recall the two-color screens with nothing more than polygons. I was wowed then, but even the "mundane" in this game is beautiful. We passed over the town of Coimbra, Portugal to see a number of unique and interesting bridges across the Rio Mondego. And, of course, the ubiquitous futbol stadium. A patchwork of fields unfolded out below us as we traveled further up the coast. Soon, we passed over the Dom Luis I bridge between the cities of Vila Nova de Gaia and Porto in Portugal. And the House of Music... Then it was back to the rural countryside again. The next sight on our trip was the cathedral Santiago de Compostela in Galicia, Spain. My pics don't do it justice, so here it is: https://en.wikipedia.org/wiki/Santiago_de_Compostela_Cathedral Not long after, we began to prepare for landing in A Coruna, Spain. I alluded in my last post to this being something of an unorthodox approach. Well, here's why: This is the elevation profile for the descent. There's an enormous plateau which has to be cleared, then you drop down past it to get to the runway. The yellow line represents a normal descent path. The black dotted line shows my actual descent. Those of you more familiar with aircraft operations probably noted the little hop up right towards the end of my flight path. That's not normal, but we'll get to that. Though it's kinda hard to pick out, A Coruna's airfield is just above the crook of the windshield wiper arm here. The edge of the plateau is the line of trees that intersects the wiper arm. Prepping the aircraft, we dropped our gear and prepared for the descent. Clearing the edge of the plateau with only a single notch of flaps, we chopped power and held about 90 knots dropped like a stone. Now, what you can't really see - and I certainly didn't - is that dark patch of trees and foliage just this side of the runway is *actually* a pretty tall hill. With high tension power towers on it. This shows it a little more clearly, but I didn't really catch it at the time. It was riiiiight about here where I realized I was on course to intercept the *hill* and not the runway. So, I punched full power. And with Sweetpea II's engines screaming, we cleared the hill and its power towers. Note that according to the approach path lighting, I've got 4 white lights... so according to the game (probably not in real life though), I'm well above the prescribed glide path. Unfortunately, that put us pretty high on short final. But I knew the Beech doesn't require much room to stop, so we continued the approach. And crossed the numbers right on speed and height. While the approach itself may have been a bit akin to an anvil being dropped from a building, the touchdown and rollout were smooth. The next week, we left A Coruna for Bilbao on the northern coast of Spain. Firing up and taxiing out, I found the tower amusing. Our first sight was just north of the airport itself: the Torre de Hercules, the oldest known lighthouse in the world. https://en.wikipedia.org/wiki/Tower_of_Hercules Its form cast long shadows in the afternoon sunlight. As we trekked east, it became clear that this are was a huge center of power production. The sheer number of wind power turbines was mind boggling. Next was the Playa de las Catedrales, a dramatic shoreline. We continued east, following the beautiful Atlantic coast of northern Spain. Next was the Oscar Niemeyer International Cultural Center. https://en.wikipedia.org/wiki/Oscar_Niemeyer_International_Cultural_Centre Then it was on to El Capricho villa. https://en.wikipedia.org/wiki/El_Capricho As we passed, the sun sank lower in the sky and a light fog began to shroud the hills below us. Further east, we passed the Palacio de Deportes de Santander which is a huge and interestingly-shaped arena situated at the end of a long urban park in Cantabria, Spain. https://en.wikipedia.org/wiki/Palacio_de_Deportes_de_Santander From there, it was a brief hop to Bilbao, Spain, our destination for this leg. With calm winds and the sun at our back, the approach and landing were smooth and easy. Thanks for following along. Next stop: Madrid! -
Thanks for the kind words. No, I'm not overly concerned about the bond coming loose. I've not had that problem too often with CA. In my case here, for all the CA you see on the outside of the kit, there's 3x the amount on the inside. I gooped it on in the inside of the nacelles to really help hold everything tight. With all the manipulating I did today as I was working on it, I think it would have popped loose if it was going to.
-
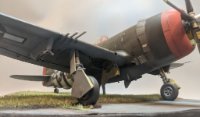
Hello, all! After an unexpected, covid-induced break from... well... everything, I'm back at the bench. Thankfully it was an exceptionally mild case and I'm more or less back to 100% after about 5 days of illness. Since the updates above, I've only had a couple working sessions on this project. Fortunately, after checking the boxes on my honey-do list this morning, I've had most of the day to pick away at the Lightning, so I've made some good progress. When last we left, I'd done the right nacelle conversion as it would be the easiest. It was time to start the left nacelle. This would prove a lot more challenging since the resin piece was for the other side. The process was much the same, however. I marked the cuts, following panel lines where it made sense. And began the gruesome task. Respirator on. I basically cut in from the top and from the side at 90* angles to lop off the top corner of the resin nacelle piece. After a lot of finagling on both halves the boom, I was able to tack the pieces in place with thin super glue. I then filled the gaps with thick superglue. My intent had been to let the superglue set for a little while then sand it before it turned rock solid. But, it took too long to cure, so I just went to bed instead. ... Then I got covid. So, by the time I got to it, the CA had, in fact, turned to stone and it took me quite a long time with an 80 grit sanding stick to knock it all down and smooth it out. But, in the end, it didn't turn out so bad. I'm going to have to fill most of the remaining panel lines on this and rescribe them in mirror on the other side. Super neat. Rescribing is my *least* favorite part of building. The top of the cowl didn't meet all that well and was slightly stepped at the fore and aft end, so I elected to fill it heavily with magic sculpt, sand it down, and rescribe it. Both sides of the nacelle turned out pretty well. While the magic sculpt was curing, I set about converting a few other items. The molded on hinges and housings for the dive/compressibility flaps had to go. Checking my sources showed that the bulge was not present on the G and H model, so I have to surmise that it was a fairing for something to do with the dive flaps. In any case, off it all went. I filled the backs of the holes here with plastic card and filled the holes themselves with more magic sculpt. The landing light fairing has since been removed as well as the G/H models had the landing light in the bottom of the left wing. As has been mentioned in several places, the wings tend to droop on this kit unless they're properly buttressed with internal supports. I opted to thin down the end of some balsa sticks I had epoxy them to the upper wing section. This is doubly important with the backdating I'm doing as the turbocharger deck, which forms a bridge between the inboard and outboard wing sections needs to be cut out. Here, you can see how little material is left holding the wing together once that bridge is removed. The fairing for the landing light has been removed on top and bottom, and I've marked the approximate location of the landing light. I'm still pondering how to tackle that exactly, but I'll figure something out. I'm going to use the landing light from a P-40 as a reference as I figure they'd likely be pretty similar. The two holes for the rocket trees will need to be filled as well. Here, you can see the cutting required for the turbocharger deck. Quite a bit of material has to be removed. Roughed in, the fit isn't too bad. The same, of course, cannot be said for the dry fit of the under wing. As others have found, there's pretty extensive gaps that will need to be shimmed and filled. Hey, at least it won't be natural metal finish anymore. :| Kinda starting to look like a P-38 if you ask me. Though you can't really see much of it, I did get the control surfaces built and dry fit. Both turbo decks are in place and will require a bit of filling. I'm going to hold on on permanently affixing them until I tackle the next big milestone. The nacelle sanded pretty nicely and is ready to be rescribed. I'll probably hit it with some primer before I go too nuts on rescribing just to make sure the edges of the filler are feathered properly. So, that is how things stand now. The next major milestone I mentioned is to saw the booms off and splice in the resin replacements for the intakes. All without knocking the alignment of the tail out of whack. I mean, what could go wrong?
- 65 replies
-
- 19
-
-
A Spanish Adventure - Around the world in Microsoft FS2020
ChuckD replied to ChuckD's topic in General Discussion
Welcome back and thanks for joining me. Screenshot gallery: https://postimg.cc/gallery/xLVqQmB Today we're going to do something a little special. The city of Lisbon is the first city we've come across so far that has a lot of unique sights to see. Unfortunately, with its big, honking engine nacelles just outside the cockpit, the Beech 18 is *not* the best aircraft to take in said sights. So, after doing a checkout flight at the local flight school a short drive away, my kiddo and I loaded up in the school's Cessna 152 and went out to see everything that (the FS2020 rendering of Lisbon has) to offer. Ma went shopping and Fatpuppy slept in the Beech. Our route would take us first south to the coast, then northeast, then west again before returning to Cascais Municipal Aerodrome (LPCS). The hashed lines coming in from the right denote our approach into Lisbon proper. We taxied out around sunset and climbed into an azure sky. Banking left after takeoff, we worked our way south to the coast of the river Trejo as it exits the continent into the Atlantic. Many sandy beaches dot the coast line. Here is Praia de Paço de Arcos which is apparently a very nice beach situated on a very nasty stretch of water. So sayeth here anyway: https://www.travel-in-portugal.com/beaches/praia-de-paco-de-arcos.htm The local soccer/futbol field. And the Parque Aventura de Jamor, an outdoor adventure park. https://www.tripadvisor.com/Attraction_Review-g189158-d3869758-Reviews-Adventure_Park-Lisbon_Lisbon_District_Central_Portugal.html After passing one of the harbor facilities, the next site was the Belem Tower, a 16th century fortification that served as an embarkation point for Portuguese explorers. https://en.wikipedia.org/wiki/Bel%C3%A9m_Tower The trusty little Cessna is a magnificent sight-seeing platform. Here we see the Museum of Art Architecture and Technology. https://en.wikipedia.org/wiki/Museum_of_Art,_Architecture_and_Technology And the statue of Christ the King off to our right. https://en.wikipedia.org/wiki/Christ_the_King_(Almada) Lisbon in the sunset was a beautiful experience. Turning northeast to follow the coastline brought us closer to Lisbon's international airport. We requested and were cleared through their airspace. Near the main bridge across the river Trejo is the Torre Vasco da Gama. https://en.wikipedia.org/wiki/Vasco_da_Gama_Tower Over the tower we turned left, back towards the west and into the setting sun. Just west of the airport is the Estadio Jose Alvalade, the main futbol stadium in Lisbon and home of the Sporting Club de Portugal. https://en.wikipedia.org/wiki/Est%C3%A1dio_Jos%C3%A9_Alvalade https://en.wikipedia.org/wiki/Sporting_CP . Looking left along the coast we had just been following. Nearby is the Estadio Da Luz. https://en.wikipedia.org/wiki/Est%C3%A1dio_da_Luz The suburbs of Lisbon. We trekked further west as the sun sank lower in the sky. Meanwhile the skies behind us turned a subtle, pastel pink. Soon, we were over the Pena Palace, a castle on top of the Sintra Mountains that can trace its origins back to the 1400s. https://en.wikipedia.org/wiki/Pena_Palace With the sun now below the horizon, it was time to return to Cascais. We passed it off our right to enter right traffic to runway 35. After flying the Beech for so long, the slow little Cessna felt like a toy. The wind kicked up a bit on short final, forcing a stiff correction. But in the end, we touched down with a soft chirp from the main wheels. I think from here on out, when I come to an area that has a lot of sights to see, I'll try to do something like this. It's tough to see anything in the Beech, so "renting" a small airplane from the local flight school seems like a good way to actually get to experience the views. Thanks for following along. Next up: The anvil landing technique. -
A Spanish Adventure - Around the world in Microsoft FS2020
ChuckD replied to ChuckD's topic in General Discussion
What @Dpgsbody55 said. I haven't flown since around 2004 too, so I feel your frustration. While it's not ever exactly the same as the real thing, flight sims are a pretty close second. And, to me, they come with some added benefits of being cheaper, easier, more accessible, and you get to fly fun things you'll never get to fly in real life. I recently picked up the P-40 and P-38 modules for FS2020 (hilariously, this means that there will be random Warhawks and Lightnings scattered around the world as AI generated aircraft) and, despite not having usable weapons or any combat capabilities to speak of, they're actually pretty satisfying to fly. Again... something I'll never get to do in real life. Just like this whole round-the-world adventure too. Anyhoo... Welcome back and thanks for joining me. Screenshot gallery: https://postimg.cc/gallery/3DTgYHK Today, we begin our first leg of the tour of the Iberian Peninsula. The nice thing about the next few months of this journey is that we'll be covering much shorter legs per flight. That allows me to fly a little lower, a little faster, and hopefully see things a little more up close. You'll notice that in a lot of these shots, I've left the points of interest (POI) markers on to help aid with the sightseeing. The route for today... Note that this shot was taken midflight past the first waypoint, so it looks a little wonky, but rest assured, we did leave from Gibraltar. This first leg will take us across a few interesting sites in southern Spain then into Lisbon, Portugal. The mega-yacht is still in town. Lining up on runway 09, we roared down the runway into broken clouds. Banking left, we climbed and turned north which offered us a splendid view of the town of La Linea de la Concepcion. As we departed the area, the clouds briefly closed in around us, and not wanting to smack a mountain in the murk, we climbed. We quickly broke out on top, then the clouds dissipated altogether. For the first leg, had to climb to 6500' to clear a small series of ridges, but once past them, we dropped down to 3500' to get a better view of the surrounding countryside. Here we passed over an old stone bridge in the town of Ronda, Spain. The Spanish countryside was beautiful. Next, we passed over the city of Seville and its sights. Passing the city on the way to Lisbon, we found a mining operation of somesort. And the Barragem de Alqueva hydroelectric power plant. We soon neared Lisbon, whose urban center sprawled out across the nearby hills. Busy day in Lisbon. Our lights are on for safety. The runway at Lisbon is 02/20. The winds were heavy out of the north and there was a steady line of traffic coming and going from runway 02. So, naturally, the AI cleared me to land runway 20. Why wouldn't it? Promptly ignoring it, I slotted myself into a gap in the landing traffic and hoped for the best. Gear coming down, ready to go! Lined up on final, on speed, and looking good. A nice three-point landing, and we're on the ground. The tower controller whined about me not being cleared to land, but whatever. In real life, I'd be in it deep, but then again, in real life, I'd have options to push back on such a craptacular landing clearance. Thanks for following along. Next up: Something a little special. -
To heck with it. I'm going for it. I'll figure out the paint scheme I want to do later, but I'm favoring something from the 339th FG to go with my growing cavalcade of Guadalcanal warriors. A huge thanks to @BiggTim who not only confirmed for me that I did get two right nacelle pieces by mistake, but whose kind words of encouragement were the push I needed to try tackling the GMF backdate set. Fortune favors the bold, as they say. If worse comes to worst and the parts just don't fit, well, at least I tried. It's better than this kit sitting untouched on the shelf for eternity. I figured I'd start with the right nacelle as it would be the "easier" of the two and would give me a feel for what I was up against. First I identified the cut area. In the end, the main horizontal line will be one long, straight cut, but I wanted to err on the side of caution for the first cut. After the cut, this is what I had left. This seems promising. After cutting, sanding, test fitting, and repeating ad nauseum, I was able to anchor the nacelle in place with super glue. Not too shabby. I repeated on the other side as well, but couldn't take pictures as I'd left my phone at my dad's house by accident. The process was much the same for the inboard side. The only kicker was that I found when I tried to mate the two halves of the boom with the landing gear bay assembly in place, the rear of the resin nacelle interfered badly. So, I had to hack away at the rear of the nacelle and sanded the forward end of the gear bay down to nothing to get everything to fit. Lesson learned there. After much fussing, sanding, and gluing my damn fingers to the model kit (facepalm), I have this roughed in for the right boom. Clearly there's some more cleanup to do along with rescribing and riveting, but so far I'm pretty happy with the results. Next, I'll tackle the left nacelle, followed by hacking the booms themselves off to splice in the resin supercharger intake bits. As challenging as this is, I'm happy because I'm motivated. I was kinda ho-hum on this kit and was afraid it would either linger on the bench in perpetuity or worse, get banished to the shelf of doom. But, this surgery is a good challenge and I'm pretty excited now. For those of you who are P-38 fanatics. These are the major items I'm aware of for backdating that I need to address. Resin bits like supercharger intakes, superchargers, block tread tires, etc. Landing light gets moved to bottom of left wing. Holes for rocket trees need to be filled. Rounded windscreen from resin kit needs to be used Remove the gun camera bulge from the drop tank pylon Instrument panel is different. This I'm not sure if I can address or not. Maybe it'll be a good excuse to buy a 3D printer and print one up. Anything else I'm missing for a G model conversion? I know there were thousands of changes to the 38 line during its run, but I think those are the major visible ones.
- 65 replies
-
- 18
-
-
Ugh. The more I look at it, the more I'm fairly certain I'm out of luck. Looking at the rear profile of the resin nacelles shows that there's a difference in the curves and contours of where the nacelle would meet with the plastic boom. They wouldn't mate up correctly as far as I can tell. Back to plan A.
-
Good morning, Gents. Back at the bench and I'm strongly considering a change of direction for this build. Years ago, before they went out of business, I bought the Rutman-based backdate resin set for this kit from Grey Matter Figures. Pretty much everything you need to convert the J/L model to a G-H model '38. As I'm looking through the instructions however, something's not lining up in my brain and I can't find an image online that confirms or denies my suspicion. The large nacell plugs... shouldn't they be handed? They have panel lines for the nose gear viewing mirror, but both parts have that on the same side. My suspicion is that GMF sent me two of the same pieces by accident, when I should have gotten parts that are specific to each side. It looks like I have two right hand nacelles. While I can probably rescribe panel lines without *too* much headache (can't be worse than grafting the resin into the build in the first place...), I'm concerned that there may be other contours that are out of shape that will not line up correctly on the left side. I wouldn't know until I'm long past the point of no return with cutting, so I'm hesitant to start with that until I dig deeper on this. Anyone who's used the GMF/Rutman backdate set have any info on whether or not these pieces should be handed?
- 65 replies
-
- 10
-
-
A Spanish Adventure - Around the world in Microsoft FS2020
ChuckD replied to ChuckD's topic in General Discussion
Awesome! Depending on your time zone, it might be fun to do a formation flight. I'm UTC -5 (EST). -
For those interested: https://spruebrothers.com/hkm01e29-1-32-hk-models-b-17f-flying-fortress/ One go of that kit was enough for me.
-
A Spanish Adventure - Around the world in Microsoft FS2020
ChuckD replied to ChuckD's topic in General Discussion
Welcome back and thanks for joining me. Today, we complete our African adventure! This flight will more or less complete the journey we tried to make last week, but which was stymied due to heavy winds. We'll leave the Spanish exclave of Melilla and follow the coast as it turns north towards the Straits of Gibraltar before alighting at Gibraltar itself. This would end up being a relatively short flight as we really didn't have that much ground to cover. In the end, we were in the air for just over an hour - one of the shortest hops of this entire journey. Dark, but broken, clouds gathered as we back taxied down the runway to the departure end, but fortunately, the winds were much more cooperative than they were on our arrival. Back taxiing is a common practice of taxiing down the runway to reach the departure end in absence of any appreciable taxiways. Most larger airports have sufficient taxiway infrastructures such that back taxiing is unnecessary, but smaller fields, or those built in cramped areas often don't. With only a slight crosswind, the takeoff from runway 15 was smooth and uneventful. We banked left to make a roughly 270 degree turn to bring us to our on course heading. A more direct right turn would have put us dangerously close to terrain as we climbed out. Sweetpea II climbed like a champ, as always. As we climbed to our planned cruising altitude of 7500 ft, however, it became clear that we would be in the soup at that altitude. I checked the terrain profile for the flight and saw that the minimum safe altitude (MSA) was 3500 ft throughout, so back down we went... After ducking under the coastal cloud bank, the sky opened up to a brilliant blue. We followed the coastline as planned. At 3500 ft, the craggy hills and valleys glided by just beneath us. Here and there, towns and cities dotted the landscape. Off to our right, we saw a first for this adventure: a ship! While we didn't get much closer, we could see a large container ship making her way towards the Straits of Gibraltar and the middle Atlantic. In this game, large shipping traffic is tracked and plotted the same as real-time aircraft traffic. Pretty neat. After the short over water jaunt, we returned to the coast and banked north towards Gibraltar. This was the original destination of our flight from last week. In the far distance, out of a light afternoon haze, the Rock of Gibraltar emerged like a monolith. And with that, these are the last photographs we will take of Africa on this voyage. Farewell, Africa. Thank you for the adventure! As we approached Gibraltar, I wanted to fly around the town a little bit to take in the sights. As it happened, a lazy, looping left turn was a good, if not circuitous way to get us lined up for a straight-in approach to runway 09. (Stupidly, the game's AI ATC cleared me to land runway 27 which would have put me in a 20kt tail wind. So, I ignored them and landed 09 instead. Thank God for this GPS and its wind reporting feature.) Some cruise liners have called port. Gear down! The runway here is just to the left of the Rock and runs perpendicular to the Rock's long axis. With a strong but steady headwind rifling straight down the runway, final approach was long, slow, and smooth. Pretty much right on the money on short final. Check out the super yachts. Touchdown was smooth and uneventful. We taxied to the general aviation ramp and shutdown in the shadow of the Rock of Gibraltar. With that, our journey through the heart and coastal countries of Africa has come to an end. I wanted to tally some stats, so I went through the logbook (a Google spreadsheet, really) and totaled out some interesting - to me anyway - information. Though not perfect, this is roughly our travel log so far. It's not perfect because it doesn't include all the waypoints along the way; it only includes our actual stops. As we work our way north into Europe in the coming weeks, I suspect we'll start to see some nastier weather and colder temperatures. I'm also hyped that the flight legs will start becoming shorter which will allow for me to do a little more sight seeing rather than just high-altitude cruising. Also, with less distance to cover, I can maintain a slightly higher power setting and therefore keep the speeds up a bit. I'm really looking forward to the European portion of this tour, so please tune in as we explore the sights together. Thanks for following along. Next up: A Spanish (and Portuguese!) vacation. -
A Spanish Adventure - Around the world in Microsoft FS2020
ChuckD replied to ChuckD's topic in General Discussion
Welcome back and thanks for joining me. We are, after a long while, finally nearing the end of our African adventure. All that remains now, after having looped around the southern end of the continent and back, is to make the trek along the northern Mediterranean coast before turning north to cross the Straits of Gibraltar. Today's flight will take us most of the way there! Here's the intended route map for today. We would leave Carthage and follow the coastline westward until we hit Sania Ramel airport in northern Morocco. At least, that was the plan. Early on a clear, cool morning in Carthage, we fired up Sweetpea II's twin radials and taxied to the runway. Winds on the ground were strong and out of the west, but fortunately, they were rifling right down one of the runways, so a crosswind was not a factor. Carthage itself is a suburb of Tunis, the capital of Tunisia. As you can see, the city sprawled out in every direction. As we climbed, the winds aloft began to pick up. At 7500 ft, our cruising altitude, we began bucking a 35kt headwind. This unpleasant little surprise would present a significant challenge. Where we normally make about 145 knots across the ground, this flight saw us averaging around 110, so we needed to keep a very close eye on our fuel situation. If the wind held steady throughout the flight, we would be at the end of the Beech's endurance by the time we made it to Sania Ramel. Being out of fuel and out of options is not a great place to be in aviation. So, with little else to do, we set the autopilot, sat back, and watched the beautiful world go by (keeping one eye on the fuel gauge at all times, of course). Here and there, a cloud bank would pop up and quickly march past us. But, for the most part, it was smooth - if not slow - sailing. Occasionally, a low fog bank would roll in. As the sun set, we had a decision to make. With fuel dwindling and the wind still howling at our nose, we could try to make it to Sania Ramel, or we could divert. A little "back of the sectional chart" math (known in the non-aviation world as "cocktail napkin" math), showed that if we held out for our planned destinations, we would be arriving on fumes. No bueno. Fortunately, we were only a few miles north of Melilla (ICAO: GEML). Confusingly, this area is actually an exclave of Spain, so despite being on the African continent, it's actually Spanish territory. Weird. https://en.wikipedia.org/wiki/Melilla_Airport We banked left and began a rapid descent, keeping a close eye on our cylinder head temperatures. Too rapid a descent would overcool them and could potentially cause damage to the engines. Lining up on the pattern entry, the wind was still howling in from the west, forcing us to crab the aircraft into the wind. We swung around to enter base and final. Committed to the landing, we crabbed hard to keep the aircraft flying towards the runway. This would be close... I was already jockeying differential power and crossing the controls trying to keep her on centerline, but the wind was relentless. Closer... Closer... Almost there - notice the asymmetric power settings. Oof... touchdown was hard and abrupt, but survivable. At the very last second a gust lifted the left wing, so I may have scraped the right wingtip in the dirt just a bit. But again, survivable. Bathed in sweat, we taxied clear of the runway and shutdown as the sun began to set. Any landing you can walk away from is a good one, and today was no exception. Thanks for following along. Up next - Like a rock: Farewell, Africa. -
A Spanish Adventure - Around the world in Microsoft FS2020
ChuckD replied to ChuckD's topic in General Discussion
Welcome back and thanks for joining me. Over the Christmas break, I got a little out of the rhythm of my previous posting schedule. Typically, I do the write up for the previous week's flight while cruising on this week's flight. Posting two narratives in short order over the holidays meant I didn't have anything to post last week during the flight. So, here we are, back on track so to speak. When last we left, we had landed at Benghazi after visiting the crash site of the Lady Be Good. Today's flight would see us continuing our trek westward across the Mediterranean coast of the African continent from Benina in Benghazi to Carthage. We'll leave Benina, cross the gulf of Sidra, then fly over Tripoli before finally turning north towards Carthage in Tunisia. I briefly thought about bopping up to Malta, but I figure I'll save that for my tour of Italy. Firing up in Benina, we soon lifted off into a clear blue sky. The deep reds and browns of the local landscape wove a rich tapestry. I was surprised by the overall size of Benghazi. I'm not sure why - I guess I just thought it was a small town. By the time we reached our cruising altitude of 7500 ft, we were already well over the Gulf of Sidra. The air smoothed out nicely and we cruised peacefully through a cloudless sky. Returning to the coast, a few puffy clouds dotted the skies. The Libyan landscape slid quietly beneath us... ...until we reached the metropolis of Tripoli; the city sprawled in all directions. We continued westward, following the coast until we hit the town of Gabes, where we turned north towards Carthage. The airport at Carthage sits just north of the Lake of Tunis, which, bisected by a highway, served as an excellent visual aid as we made our descent. Gear down! And locked! With calm winds, we were cleared for the left base pattern entry for runway 29. A little high on short final, but speeds are on point and we've got a lot of runway to work with, so I'm not too worried. A little better, but I overcorrected low. 4 red PAPI lights on very short final isn't entirely out of the norm, though I think I habitually aimed my approach at the end of the concrete, whereas the usable runway doesn't start until the white hashmarks. In any case, touchdown was reasonably good with only a little lateral instability on rollout as per usual. Thanks for following along. We are nearing the end of our African journey. Only another leg or two to go, then it's off to the Iberian peninsula and Europe proper. If you have any recommended sights to see, feel free to mention them!


