
ChuckD
-
Posts
914 -
Joined
-
Last visited
-
Days Won
9
Content Type
Profiles
Forums
Events
Everything posted by ChuckD
-
Someone on Reddit just got theirs from Artscale.eu, so it looks like some of the retail shops are starting to get supply.
-
 Does anyone have any good figure recommendations for the ground crewman lounging in the shade? My searches are coming up bust.
 -
Same. Big fan of everything to do with that whole campaign. Well, as promised, I spent a good chunk of the day at the bench and made good progress. First, I had to fill and sand the Res-Kit wheels to replicate the bald tires on the subject kit. Tamiya putty to the rescue! Repeat the filling and sanding a couple times and you have a set of wheels that closely mimic the picture. I spent a bit of time masking the panel lines on the nose for the sealant residue. I then sprayed a super thinned mix of Tamiya X19 Smoke mixed with a touch of XF1 black. Here it is after the application. Once I unmasked it, I felt it looked a little stark, so I dulled it down a bit with more OD green (in this case, I've used MRP's OD green for the top coat). I felt that achieved the look I was after without being too over the top. I then stenciled on Lockheed's constructor number on the nose. And installed the gear doors. You can't see it in this pic, but I scratched up a very quick and dirty actuator for the nose gear door as the kit doesn't account for it in the slightest. It's not much but it'll add some visual interest when it's done. The serial number was added to the tail. And I spent a considerable amount of time working on chipping. As with my Ki-45 from a few months ago, this is a mix of masking fluid and hand-applied chipping. It's a little bit stark at this point, but I think further weathering will blend it a little better. In all, she's starting to look like the subject image! Next, I'll gloss the whole thing, get some decals down and start with weathering proper. Still hoping to knock this out by the end of the weekend!
- 65 replies
-
- 23
-

-
Okay... After much deliberation, I've landed on this aircraft, P-38G 43-2339. It would later be named "Old Ironsides" when it was resurrected from the scrap heap and put back into service. It doesn't have the shark mouth motif I originally wanted, but it was a 339th FS bird based at Guadalcanal, which fits better with my other builds thematically. It's interesting and will present a few challenges in that it's got bald tires (a thing with Guadalcanal aircraft, apparently), heavy oil streaking, and quite a bit of residue left over on the nose from the sealing tape. That alone will be an interesting thing to tackle. I'm taking the day off tomorrow, so I'm hoping to make some really solid progress on it and hope to have a good update soon.
-
Great news, Woody!
-
Thanks, gents. I'm currently hemming and hawing on which paint scheme to do. As if didn't have enough time to figure that out already... I realized the one I'd kinda settled on was an F model and I'd already build the G model's intakes and canopy setup. Soooo, back to the drawing board. I'd really like to do something with the shark's mouth motif on the nacelles, but I'm still working through exactly how ill tackle that.
-
Thanks, Mike. I didn't mention the other reason I'm pushing to get this done - I just pre-ordered the HKM A-20 Havoc and I want to be ready when it arrives. It's an insta-build for me.
-
Hey, thanks, Craig! I am flattered by comments from any of the guys here, but you in particular have been an inspiration over the years.
-
Words cannot express how good it feels to start laying down paint on this project. It's not perfect. I could have done more sanding, scribing, filling, riveting, etc, etc, etc. But at the end of the day, this is for fun and not for profit, so at some point I had to recognize the balance between perfection and progress. After cleaning up the last of the divots around the windscreen, I primed, pre-shaded, laid down a silver under coat on certain areas, and added a chipping medium. Then, I laid down the first light coat of MRP OD green. They were followed by a thinner coat that was tinted w/Tamiya yellow-green and white to add a fading layer. Next is base coating the underbelly - but by this point today, I'd been wearing the respirator mask for too damn long and the bridge of my nose was just aching. More to follow - hopefully tomorrow!
- 65 replies
-
- 18
-
-
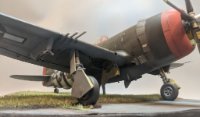
And we're back with progress. The GMF props are now complete. Here you can see the wildly out of shape propellers from the kit along side the more correct GMF props. I'm pretty happy with how they turned out, especially in light of not having a specific jig for them. Only one of the blades for each hub is molded onto the hub itself, so the other two have to be installed and pitched consistently. I forgot to take pictures, but I worked my way through the hole in the nose cone for the cannon and got the nose closed up. I also added scratch made strakes next to the turbos. A set was included with the resin but they were too short in length based on my reference photos, so I cut some out of styrene. Overall shots showing the nose. The canopy glued in fairly well with liquid super glue. After sitting overnight, I didn't see any fogging, so that's good news. I filled the voids around the sides and forward edges with tamiya putty and let it set overnight. The first round of sanding went pretty well. Using interior green as the detective primer (since the insides of the canopy aren't masked and will not be painted, I was pretty pleased with the first round of sanding of the tamiya putty. Only a few voids to fill on either side, all of which should clean up pretty nicely. A little more light sanding and she should be just about ready for the paint booth. Test fitting things like gear doors and what not seems very promising and outside of those, there's not much else to add outside of a pitot tube and nose antenna. You may have noticed that she's got a set of kicks under her now (though dry fit they are). I was able to rework the GMF tires and wheels a bit to get them to work. They're still a little wonky, but they won't be too noticeable once everything is together. So, clean up the last of the tamiya putty on the canopy and she's off to painting! I hope to make some great progress this weekend and next week.
- 65 replies
-
- 14
-
-
Hi, all. I'm back at last with a meaningful update. After much fiddling and such, I have rescribed and re-riveted the majority of this aircraft. As you can imagine, getting riveting and scribing tools into all the nooks and crannies created by two booms and a pod was a significant challenge. The work isn't perfect, but I'm happy enough with it to move on. I didn't take any photos of that work as it was pretty tedious, but I'll share some overall shots at the end. Once Dances-with-Riveters ended, I moved on to the nose section as I knew the next major challenge would be the vacuform canopy. I first replaced the kit gun barrels with a set from (I think) Quickboost. They turned out nicely. Next, I wanted to tackle the oversized hole in the nose for the cannon. This was attempt #1. I backed the hole with a piece of card stock, then filled the hole with my trusty epoxy putty. Later, when I tried to drill it out, it just crumbled. So... on to attempt #2 which is still curing. Good old fashioned liquid sprue. Some more light rescribing and riveting work will be required. While that's been drying, I decided to tackle the nose panels as they would give me a reference point for the vacuform canopy. As with much of this kit, the fit sucks and I'm really glad I didn't follow the directions as they would've really burned me. With the center piece cemented to the bulkhead, the panels were both offset 1/16" or so from where they needed to be. So, I subtly broke out my most subtle razor saw and subtly cut the center piece off the bulkhead plate. I then glued the two panels directly to the center piece and worked them till they dry fit nicely. Results were good and will be shown in the overall shot below. Once those were in place, I could start looking at the vac canopy. After much fiddling, sanding, and finagling, I got it to roughly resemble the contour of the kit part. I've no idea how I'm going to mask the vac canopy as the panel lines are almost non-existent. It'll be a very subtle job, I'm sure. Here it is dry fit: It doesn't sit perfectly when dry fit, but there's enough flex and wiggle room that I should be able to get glued into place well enough. I'm going to model the kit with the canopy open and the side windows rolled down, so that's helpful in this case. Some dry fitting showed the sides and upper canopies to fit reasonably well, but I'd like the cockpit to be open. I'll also have to re-rivet the sides of the pod once I get the canopy situated properly. As I'm waiting for the future on the canopy to cure completely, I've turned my attention to the wheels. I'd like to use the block tread tires that came with the GMF conversion kit but they're... not great. The mains are out of round and the block tread is chunky, heavy, and inconsistently sculpted, so I'm not super interested in using them. I bought a set of res-kit crosshatch tires a while back, and I found at least one picture of a P-38G running them, so they should work. They are *much* nicer. I'll fiddle with those next and get the bird on her feet. After that, I'll get the canopy and nose cone squared away, then there's not much left until the paint booth. (!!!) As much as I've enjoyed this challenge, the scribing and riveting have sucked some of the wind from my sails and I'm ready to get this beast off the bench and on the display shelf. That said, she's coming along pretty nicely. Hopefully the updates will pick up a bit as we move towards the finish line. Thanks for following along.
- 65 replies
-
- 16
-
-
That's news to me. My E/F kit definitely did not include those bits.
-
Hi, everyone. Just a quick update to say that I'm through the first of probably two or three rounds of scribing panel lines. Once I'm happy with those, then it'll be on to riveting. Not much fun stuff to post because it's pretty tedious work, but I wanted to update to show it hadn't been relegated to the shelf of doom.
-
1/32 Douglas TBD-1 Devastator by Trumpeter - TBD-1A in October 2023!
ChuckD replied to Kagemusha's topic in LSP Discussion
Truth. Who hurt you, Dean? -
1/32 Douglas TBD-1 Devastator by Trumpeter - TBD-1A in October 2023!
ChuckD replied to Kagemusha's topic in LSP Discussion
A 7 part wing... That oughta be fun to join and sand. Bring it on though. There is a shortage of Devastators in the world these days. -
Hi, all. Back with another update. For the last... many... weeks, I've been periodically filling, sanding, and cleaning up the model. The kit itself would have required quite a bit of cleanup, but it was magnified exponentially by the resin work. The good news is, I'm about 99% done with the sanding and filling. Tomorrow, my wife is going to blow up some 1/48 scale drawings for me and after that I should be able to start making a good showing of scribing panel lines and rivets. The intake scoops went on pretty well with minimal fuss, so that's a major milestone. I've also taken care of the lead weights in the nacelles and the nose to keep it sitting on its nose wheel. So, progress! Overall view - some primer is still drying on the left wing and nacelle, thus the glossy finish. Left intakes. Notice how badly the panel lines have been damaged. Re-scribing will be an extensive task. The right boom. Because of this picture, I realized I have another sanding scratch to fill... thus the "99% done" part. The Mr Surfacer 500 is drying now. The bottom. I didn't realize I had to remove the small blisters on either side of the cockpit nacelle until I stumbled across a random forum post while looking for drawings. So, those had to be cut off, sanded, filled, and cleaned up. With the gear having to be in place, it's kinda tricky getting to the inner lower wing. So, next will be fixing the landing light, scribing and riveting, then installing the nose. My hope is to put the finishing touches on this by mid-May or so. Crossing my fingers.
- 65 replies
-
- 15
-
-
Just bumping to add another thanks for this recommendation. I grabbed the book off Amazon as I had some points to spend and it's exactly what I'm looking for. I'm going to have my wife blow up the 1/48 drawings to 1/32 scale at work and I should be off and running.
-
That's about in line with what I expected. For a high-quality kit, with good engineering and solid fit that's as large as this, that price lines up. Truly, at the end of the day, for the amount of money that some of us throw at this hobby, $300 after shipping isn't a huge investment.
-
You guys are great! Thank you so much for the help!
-
Thank you, Dave! That helps tremendously.
-
Hi, all. After weeks of filling, sanding, priming, and repeating, I think I'm finally at the point where I can start to consider rescribing panel lines on my P-38G backdating project. Any chance any of you have a good lead on a set of drawings for the G model Lightning? My google fu is apparently weak as all I'm finding is J/L drawings. Thank you!
-
A Spanish Adventure - Around the world in Microsoft FS2020
ChuckD replied to ChuckD's topic in General Discussion
Specifically, the highlighted section here: Basically, you use different power settings to help with additional control around the vertical/yaw axis. On the left is the RPM gauge which shows how fast the propeller is turning and on the right is the Manifold Absolute Pressure (MAP) gauge which essentially indicates engine power output. Each gauge has 2 needles - one for each engine and marked "L" and "R" respectively. In the scenario above, there was a stiff crosswind from the left that exceeded the maximum crosswind abilities of the Beech 18's controls, meaning that with controls alone, the aircraft would be unable to maintain directional control. Somewhere buried in one of the a/c manuals I'd read, it discussed the use of differential power to maintain directional control in a heavy crosswind. So, I tried that here. The wind struck the tail and fuselage from the left, weathervaning the tail to the right and forcing the nose left. To counteract this, I reduced power on the right engine while giving the left full power. This difference in power resulted in a nose-right tendency which, combined with heavy rudder use, was enough to maintain (roughly) centerline until we achieved flying speed. It was essentially the same on that windy approach into that Spanish province in north Africa. That wasn't a pretty landing, but any landing you can walk away from is a good one. -
Absolutely awesome! Congrats and happy new plane/business day!
-
A Spanish Adventure - Around the world in Microsoft FS2020
ChuckD replied to ChuckD's topic in General Discussion
Welcome back and thanks for joining me. Screenshot galleries: https://postimg.cc/gallery/N2BspWW https://postimg.cc/gallery/77sxWNG Hello, everyone. We're back on the continent today after our brief tour of the Balearic Islands off the eastern coast of Spain. Today's flights will bring us from the island of Menorca to Barcelona, with a further sight-seeing tour of the city itself. The route back is a pretty straight shot over the Balearic Sea back to Barcelona. The weather was decent, with just some low-lying cumulus clouds and favorable winds. After a short back-taxi, we were on our way. Climbing out, we punched through a few clouds. But, we were soon over the smooth, clear air over the Balearic. Without much fanfare or ATC chicanery, we were vectored in for the visual approach to runway 24R. With just over an hour of flight time, I still had it in me to do a little sight-seeing. So, we drove to a nearby rural airfield and rented a Cessna 170B, the taildragger version of the venerable Cessna 172. The plan was to head southeast, climbing over the hills just west of Barcelona, then follow the coastline northeast to overfly the city proper, then return. Winds were a little tricky for the little taildragger, but we got off the ground in one piece and began our climb out. First thing we noticed was a radar station perched on top of a hill south of town. Barcelona was busy, but the controllers were kind enough to clear us through their airspace. We turned north to parallel the coast and stay clear of the busiest of Barcelona's airspace. The sea lanes were thick with container ships and other cargo vessels. A number of cruise ships were docked in port. As we continued north, I tried to grab a number of screenshots that gave the name of each of the major sites in the city. In all, the photogrammetry used in this game for larger, more populous areas is a bit of a mixed bag. It definitely gives a more organic, natural feel to the buildings (vs procedurally generated buildings), but it can get weird with things like dock cranes and other vertical items. Getting back to the rural field was tricky as well - the winds were just as difficult as they had been on the way out. From ~3000' to ground level, their direction changed almost 180 degrees. Crabbing the little taildragger into the wind, we made our approach. We *might* have put a wheel into the grass on the side of the runway as directional control was extremely difficult with the winds. But, any landing you can walk away from... Thanks for following along. Next up: Vive le France!

