
ChuckD
-
Posts
914 -
Joined
-
Last visited
-
Days Won
9
Content Type
Profiles
Forums
Events
Everything posted by ChuckD
-

*** Finished *** 1/32 Revell Hawker Hurricane Mk.IIb
ChuckD replied to Tolga ULGUR's topic in Works in Progress
Not to derail, but since we're on the topic - how do pin wash solutions flow over X22? I've found that with some gloss varnishes, the wash won't flow from its touch point. -
Agreed. All that monotone green is a bit boring. I've started blocking in small bits and it's helping. I think some good detail painting and weathering will really be the key to making it all more visually interesting. ... Before I close it up nothing will be seen of it.
-
Nice! Mind if I shamelessly steal your fantastic idea?
-
Okay, just a quick update for today. I got the interior primed, pre-shaded, and sprayed with a zinc chromate primer today. Nothing too exciting, but progress nonetheless. My son has a tendency to pick up whatever water bottle he sees and mindlessly slam water from it without thinking... There's lacquer thinner mixed in with the water in the blue bottle as I use it to clean the syringes I use to mix paint, thus the rather ominous label. Pretty much every paint callout in the manual is zinc chromate. I painted the ammo can and bomb racks in aluminum for some visual interest and am in the process now of masking the bombs so I can retain a yellow line when paint them overall OD green. So, this idea looks promising. Once everything dries, I'll probably run a new #11 blade around the tape lines and peel them up. Hopefully I can do that without pulling the masking fluid up too. If all goes to plan, I'll be left with the windows masked and the frame unmasked. Next up is painting the bombs, detail painting _everything_ and trying my hand with the IP decal. More to come!
- 163 replies
-
- 21
-

-
I think I might be able to use the errant taping on the frame to flow in some masking fluid. That may be easier than trying to mask around the super subtle molded frame work.
-
You give me far too much credit. As Steve said, annealing the seatbelts is a must. I did that as well, but forgot to mention it. Thanks, Steve. I had another idle thought. Having done HKM's B-17E and their B-25J, I wonder if it would be smarter to glue the nose halves to the fuse halves before joining the whole shebang. I did that on the B-17 and it was a really good choice as the nose would've been a huge PITA had I not. I don't recall what I did for the B-25, but I think I did the same thing. Hmmm.
-
Heh... whoops. This is never gonna work. Glad I noticed it before I started laying down paint. 10 years of modeling under my belt, you think I'd have it down by now.
-
In case any of you missed it, I'm doing a build thread here. I've got the interior built and am getting ready to do the interior painting. So far, the build has been really nice with only a few issues. The instructions would benefit from being a few pages longer to accommodate larger photos, but that's a minor complaint.
-
You bet. Yes, the rear ammo can's placement is super awkward and not obvious in the instructions. And, I agree, the nose gear does seem kinda fragile. Here's to hoping it holds up under the factory weights. Brass gear legs would be a boon. Here's the last update before I start laying down paint. Unfortunately, I did hit a few fit issues during testing this morning, but nothing that was insurmountable. My advice is, when fitting the fuse halves together, go slowly, test fit, and look closely for interference. The tolerances of this kit are very very tight, so misalignment somewhere can bite you in big ways that are difficult to see as you're trying to close things up. We'll start a bit of a journey. The instructions have you fit the internals to the left fuse half then add the right fuse. Immediately I came upon the issue that the bulkhead behind the pilot's seat wouldn't fit between the locating tab and the rear of the throttle quadrant arm rest. I don't believe I placed the armrest too far aft, but again, tight tolerances. To clear, I shaved down the rear of the arm rest just slightly and now the bulkhead snaps into place. With the cockpit and bomb bay fit into the left fuse (they have very strong locator pins and stay in place nicely), the deck behind the cockpit bulkhead was nowhere near fitting. Notice how it's stepped up and sitting on top of the bulkhead. The two corresponding grooves on the pieces should have them dovetail together. I sanded the rear edge of the deck (and added the armor plating) and, boom! Problem solved. Happy with this progress, I moved on and fit the right side of the fuse. Aaaaaaand, the rear deck didn't fit again. <facepalm> More sanding got it to where it needs to be and it fits nicely, clicking into place. Again, go slowly, test fit, and adjust as necessary. I was initially pretty frustrated with the fuse fit because it required a significant amount of force to get the two to line up correctly. It was like the right side of the fuse wanted to sit a half mm forward of the left half. After test fitting cockpit and bomb bay sections into each half independently, I was able to find the culprit. The turret framing (holed part inside the turret ring) was pushing the bomb bay assembly forward just enough to cause the bomb bay to exert a flex on the fuse piece, thus it would not line up with the other half. Note below that there is zero clearance between the two parts. Recall that this is the part I had to pry loose and relocate as I had originally installed it incorrectly, so I claim ownership of this problem area. After sanding down both sides of the mating surface, the bomb bay clicks into place and the fuse half fit is much better. It will still require some muscle to get it all closed up, but it's not nearly as bad as I first saw. Note the small bit of clearance on this side of the turret frame. Test fitting the halves allowed me to also test fit the turret which, happily, dropped into place. Most parts of the fuse joins can be fit nicely without too much trouble. This small join requires the most manual pressure to close, but I think some cement and heavy taping ought to hold it. The belly fits well. The gap here is just an artifact of the taping job. There was discussion earlier in this thread about how much of the cockpit would be seen after everything is closed up. The answer is, emphatically, not much. The IP sits way forward and is almost invisible under the glareshield. I suspect it will be even moreso once the canopy is all in place, so I think the kit decal will be more than sufficient. It's the sidewall doodads that will be the stars of the show here. They will be quite visible and HKM has done a nice job modeling them. I'll probably gussy them up a bit with a cockpit placards decal set I have floating around somewhere. Again, I'm not bothered by ejector pin marks, but the ones on this bulkhead will be cleaned up as they might be visible from the lower gun hatch. HKM did the modeler like me a solid and placed the EP marks on the sides of those bulkheads that face away from the upper window, so they will not be visible through that. I moved on next to the canopy. To get the framing piece to sit correctly, I had to thin down the inner faces of the two end flanges. The piece is keyed, so it's impossible to assemble incorrectly, so that's nice. I've left it unattached from the clear upper canopy so that I can paint everything without worrying about interference from the assembled components. Sprue Brothers sent me the ASK mask kit as promised ( <3 SB) and I spent some time getting those in place this morning. The masks for the rear upper window simply cover the whole piece and ignore the interior framing, so I made my own mask easily by cutting and placing very thin strips of tape on the inside. The EP marks on the upper canopy part are on the inside and will be invisible once the framing piece (above) is installed. Okay... Here we come to one of the most baffling engineering decisions of this build: the gunsight. On the left is part H66, the gunsight base. No problem. On the right is part H62... the gunsight reflector glass. Gunsight reflector glass. Glass. Yes, for whatever reason, HKM decided to mold the glass reflector out of solid grey plastic. <facepalm> Clear plastic film to the rescue. A few minutes with some fine scissors and an exacto blade, and we're up and running with a clear gunsight piece that's closer to scale thickness anyway. A drop of superglue will have that sitting nicely once the gunsight is ready to go on. Still... what a super super strange design decision when the clear pieces are all molded so flawlessly. Anyway, that's it for now. I'm moving everything to the paint booth shortly to get the interior bits going and hope to make some good progress over the weekend.
- 163 replies
-
- 22
-
-
Hello, and welcome back! Happy to report that there has been significant progress since the last update. I am super happy with this kit so far. I desperately hoping I'm not jinxing things, but so far, it's going together with Tamiya-like quality. The only issues I've encountered so far have more or less been of my own doing. My only complaints - very minor though they are - are that sometimes the instructions are so small, it's hard to see how parts go together. Again, very small complaint (pun fully intended). After completing the nose gear, you move on to the nose gear well. I've only glued a few pieces together here. Again, dry fit. This, however, allowed me to glue the supporting strut on the nose gear now that I was able to fully establish the proper angle. Once the nose gear bay is done, the instructions have you install the cockpit section on top of it. I held off for now to ease painting. After that, you move on to the upper turret. This went together nicely and without any major surprises. I did find that when I tried to install the turret glass, it wouldn't fit. With the forward portion positioned properly, there was interference that precented the rear portion from dropping onto the turret ring. Sanding the two frame arms here and a little on the front of the turret ring allowed the glass to pop into place perfectly. Perfection. The rest of the turret went together flawlessly. Instructions have you install the gun barrels at the end of the turret build. This is, so far, the one place I can say I'm disappointed with the kit. HKM has had a history of underwhelming detail on their MG barrels and this kit is no exception as you'll see later. Suffice to say, I placed an order from Sprue Brothers today for the Quickboos B-17 .50 cal barrel kit. Once the turret is done, you move on to building the bombs and racks. The PE here is nice and in the pics below the bombs are dry fit to the racks. Again, everything went together very very nicely. From there, you move on to the bomb bay. The build itself is straight forward, but getting the left and right halves together is very challenging due to the number of attachment points. My recommendation here is to fit all the parts onto one side piece, fit an end piece, fit the other side piece (aligning all the locating pins carefully), then doing the other end and top piece. Once you get everything lined up, it more or less snaps into place. With the bombs in place. This is always a fun part of any a/c build - cutting the fuse halves off and getting them around. As some reviews have noted, there are a decent number of ejector pins throughout. This is to be expected for pieces this big and for those of you triggered by EP marks, you may want to skip this thread for a while. I'm not going to address most of these as they'll be completely invisible once the final assembly is done. I included these photos for those of you who will address them and want to be prepared for what you'll be up against. Most of the pin marks up front are obscured or covered by other parts, as you'll see. On to the build... The cockpit is nicely detailed and the fit is flawless. Pretty much everything has a unique pin or recess that marks its location. After completing the sidewall build, you move onto the rear fuselage. Instructions aren't super clear on where to install the framing for the turret (the holed piece in the top left of this photo), so I ended up installing it incorrectly. There are also three ejector pins that interfere with the fit of the sidewall piece, so I scraped them off and... ... viola! The sidewall piece is now installed correctly. And here, I've fixed the turret framing. Make sure it sits directly on top of the three vertical ribs as shown below. With the right fuse done, we move onto the left. Some of the instructional drawings could use a revision as - at 1:1 scale - some of the lines overlap to the point of being very unclear. Just for the record H70 goes in the middle slot, H67 goes on the outboard slot. Here's the left side of the fuse fully detailed and with included nose weight installed. Moving onto the rear fuse, you repeat the turret framing and the and the lower side pieces. You add a few bulkheads and ancillary bits, then you're pretty much done. Most everything here is dry fit to aid in painting. The last step before gluing the two fuse halves together is to build the lower gun. Again, this is one place where HKM is a bit underwhelming. You can see here the .50 for the belly and its barrel. If you're super concerned about details here, you might want to look into an aftermarket .50 and barrel. This will likely be invisible once the kit is fully realized, so I will settle for replacing the barrel with the QB set I ordered. But yeah... not HKM's finest work. That said, the main fuse is complete and will be moved to the paint booth. I've pointed out a few week spots and negative points here and there, but I can't stress how nice this build has been so far. Everything fits cleanly and with a solid, positive, nearly click-together fit. The typical problem areas like wing roots, fuse halves, and cowlings are still on the horizon, so I'll reserve final judgment until I tackle those areas, but I'm cautiously optimistic. Bottom line, if you're on the fence about this kit, just snag one. It's pretty phenomenal.
- 163 replies
-
- 19
-
-
Yes, that's the one! The name escaped me last night and I was too tired to go poking around to find it. I've still got a ways to go before I pass the point of no return for the IP, so we will see how things play out. My concern is that the recessed for the gauges in the kit IP are very deep and getting any decal to sit properly will be... problematic at best. So, my other option is to punch out and place dials individually - something I've also had mixed luck with. I may order the airscale part and try for the best with the kit pieces and see what happens.
-
Hi, everyone! Because I just can't stop building big twins for which I have precisely zero room, it's time to add the HKM A-20G Havoc to the display shelf! My SprueBrothers pre-order just arrived today (sans the promised mask set, which SB is already fixing) after several months' waiting. To say I'm excited for this kit is an understatement. I have a soft spot for SW Pacific gunships and when I heard that HKM was doing an A-20G, I vowed that it would be a bench clearer... and here we are. My aim for this is to build the kit out of the box with the exception of the paint scheme and markings which will likely be custom done via my mask cutter. I will be doing something from the SW Pacific, but exactly what is yet to be decided. My super awesome wife bought me the Pacific Profiles A-20 volume for Father's day, so that should be here soon and will help me decide which aircraft I want to model. I'm going to try to document pretty much every step as I go along so that those who follow in my footsteps may learn from my (admittedly often self-induced) mistakes. Here's the box. Everything is nicely packed and arrived unharmed. Note the nose weights in the small bag stapled to the inner box (far left, just barely visible). I like the way HKM seals their bags. The adhesive strip on a flap makes it easy to get at the sprues without having to cut everything out. Everything is out, organized and ready to go. I'm not going to dive into detail on the sprue layout or molding quality as that's been covered in quite a few places in the run up to release. Steps 1 and 2 have you build the cockpit. Here is the factory seat and PE seatbelt. The PE is nice and thin and, after annealing, sat nicely. Note that I think the lap belts are illustrated backwards in the instruction manual. I believe I have them placed correctly here with the square tip across the seat and the triangular anchor at the side of the seat. The instructions are a little small for the seatbelt PE, so take your time and test fit. It's not overly complex like an HGW set, so it's fairly straight forward, but for some reason, the way the instructions were laid out for the PE was hard for my brain to visualize. Basic dry fit. I tend not to glue bulkheads together until I can see how they slot into the fuselage halves. Nothing like getting all the way through an interior build just to find that you glued them together incorrectly and now the interior parts don't fit into the attachment points of the fuselage. The armor plate aft of the pilot. This part contained the only ejector pin marks that I've thus far felt compelled to cleanup. Ejector marks don't bother me too much if they're in an area that won't be seen after construction, so I don't bother cleaning them up. There are a few on the aft bulkhead behind the seat, but they'll be invisible, so there they shall stay. And the doodads and whatsits behind the pilot's rear bulkhead. Step three has you move on to the nose landing gear. It goes together well without any major fuss, though the fit of part H54 (the little knob sticking up off the side of the strut isn't super well illustrated in the instructions. You can see it more clearly in these shots. On H54, there is a small cutout for a corresponding knob on the gear strut which wasn't obvious in the instructions until I got out my magnifying glass. Here you can see it in the proper position. The nose landing gear fully assembled (but mostly dry fit). The nose tire has very nice molding detail for the treads and sidewalls. The hub is keyed to the yoke so that the tire's flat spot (presumably) sits right where it'll need to. You can just see the flat spot on the bottom of the "axle" which provides the key in the photo below. Here we have the instrument panel. A decal is provided for the instruments, so we'll see how that turns out. I've had mixed luck with decals over IPs in the past. If I were patient (I'm not), I would have waited on building this kit till I could get the aftermarket IP that... someone... (I forget) is coming out with soon. Outside of that, the molded detail is very nice and crisp and should paint up splendidly. I've left everything dry fit here so just in case the decal IP goes to hell in a handbasket, I can replace with aftermarket as necessary. This pic also shows some of the detail molded onto the back of the seat... which will absolutely never be seen once the cockpit is together. That's it for tonight. I'm pretty jazzed on this one, so I intend to move pretty quickly on it. Be sure to follow along!
- 163 replies
-
- 40
-
-
Welcome, Jetmech. I can't help on the question as over never built the kit, so just wanted to say welcome aboard.
-
A man after my own heart. Mine shipped today too!
-
1:32 HK Models A-20G Havoc Pre-Order Special Offer
ChuckD replied to spruebrothers's topic in LSP Discussion
Same! Now it's a race to beat the postman to get my current build off the bench. -
Well, I caved and preordered. The Havoc still takes precedent, but this won't be far behind.
-
Takom Apache Aftermarket Detail Parts - The Future is Here
ChuckD replied to John1's topic in LSP Discussion
I think you hit the nail on the head. 3D printing is poised to change the world of scale modeling as we know it. There's a new 3D printing company that's doing 1/350 scale ships that no one has ever tackled in that scale. It won't be too long before some of the less common subjects in LSPs switch from resin to 3D printing. 3D Wild is the company I was mentioning. -
perfection
-
Atta boys. Now we're talkin!
-
Guys, guys, guys... this video has been out for almost a full 24hrs and there's not yet been one single call for it to be fatally flawed and unbuildable? Come on, guys. I expect better of us. :p
- 37 replies
-
- 14
-
-

-

-
P-38G Old Ironsides in Guadalcanal: The patient has pulled through!
ChuckD replied to ChuckD's topic in Ready for Inspection
Yes, absolutely, Ray. I'm flattered and honored. -
P-38G Old Ironsides in Guadalcanal: The patient has pulled through!
ChuckD replied to ChuckD's topic in Ready for Inspection
You're absolutely right. The kit itself just isn't well engineered and that reared its ugly head plenty of times throughout the build. My adventure made it exponentially worse, obviously, but even then, it's still not Trumpeter's best effort by any stretch. Thanks, everyone! I'm glad the project is done and now I'm on to other things. Learned a lot on this one for sure. p.s. I fixed the right tire not sitting flat since taking the photos. (facepalm) -
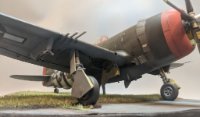
At long last! (This thread could be subtitled: The lengths I'll go to to avoid a natural metal finish) Here is my rendition of P-38G s/n 43-2239 as it served in the 339th Fighter Squadron on Guadalcanal in early spring of 1943. According to Michael Claringbould in his book "Pacific Profiles, Volume 9," this aircraft was badly damaged after a forced-landing following an attack against a floatplane base at Faisi. The 339th ground crews towed it to the scrapyard where engineers from the 44th Fighter Squadron snatched it, brought it back to airworthy condition, and christened it "Old Ironsides." Apparently there was something of a kerfluffle between the two units as the 339th later tried to reclaim the aircraft - no word as to who came out on top, but the aircraft was used as a hack at least until mid-1944. From there, it fell off the radar and its final fate is ultimately unknown. Claringbould's book features a picture of the aircraft after it was named by the 44th FS, but I don't want to post it as I don't want to run afoul of copyright issues. In all my searches, I never found the second picture online anywhere and I suspect the original is in his personal collection. In any case, if you were following the build thread for this, you know what an adventure it has been. Most of that was due to my repeated, and uncharacteristic indecision. This started life as the Trumpeter P-38L kit and it was my intent to build an ETO bird in natural finish. But, I'd been sitting on the Grey Matter Figures backdate resin set forever and I knew if I didn't use it now, it'd go to waste. Aaaand, I like the looks of the pre-J models better anyway. So, with a little encouragement from @BiggTim, I decided to take the plunge and do the necessary surgery. I've never attempted anything so dramatic before and it was one heck of a project that involved quite a bit of surgery. You can check out the build thread for most of the details, but as you can see, this was no easy feat. While I'm very happy with the final results, I admit it is far from perfect. Some components, particularly in the cockpit, I just couldn't backdate as I didn't have it in me to scratch build complex parts like instrument panels, gunsights, and other sundries. That said, I'm quite pleased as this is as close as anyone is going to get to a pre-J model P-38 in 1/32 scale until Tamiya gets off their collective butts and upscales their kits (Dear Tamiya, I would buy several. Just saying.) Anyway, with this one done, I can now say I've done a heavy conversion (check that off the bucket list), and now I can focus on deep cleaning my model room to prepare for the arrival of the HKM A-20G. Enjoy the photos!
- 25 replies
-
- 39
-
-
SAME. Holy crap. That thought was going through my head the whole time I was working on this. Come on, Tamiya!