
Thunderbolt
-
Posts
389 -
Joined
-
Last visited
-
Days Won
1
Content Type
Profiles
Forums
Events
Everything posted by Thunderbolt
-
#1 LSP on your Shelf of Doom - post pix and cheer on
Thunderbolt replied to seiran01's topic in LSP Discussion
My Fw 190D-9 that I started in 2008 probably belongs on here... -
HK's B-17F - 21/9 the photon steps up
Thunderbolt replied to brahman104's topic in Works in Progress
A man with a 3D printer, technical drawings, and a pure love for the aircraft, is a very capable man... -
HK's B-17F - 21/9 the photon steps up
Thunderbolt replied to brahman104's topic in Works in Progress
Thank you! -
HK's B-17F - 21/9 the photon steps up
Thunderbolt replied to brahman104's topic in Works in Progress
Is it just me, or do the Memphis belle restoration and the sentimental journey B-17G have different windscreens? SJ’s appears a great deal larger and more square when viewed from the front? -
HK's B-17F - 21/9 the photon steps up
Thunderbolt replied to brahman104's topic in Works in Progress
What about seeing how things compare if you make sure the very front vertical lines associated with where the clear plexiglass nose attaches are parallel? -
Revell Fw190 A-8 Sturmbock - any reviews / what's inside etc
Thunderbolt replied to nmayhew's topic in LSP Discussion
Right, for 2004, it’s epic -
Any definitive corrections to the HK B-17 nose in sight?
Thunderbolt replied to Thunderbolt's topic in LSP Discussion
So am I. -
Revell Fw190 A-8 Sturmbock - any reviews / what's inside etc
Thunderbolt replied to nmayhew's topic in LSP Discussion
Reimund wonderful build -
It appears to be the bulged type 100 cowling if you really zoom in and study the lower lines of the front cowling.
-
Any definitive corrections to the HK B-17 nose in sight?
Thunderbolt replied to Thunderbolt's topic in LSP Discussion
Thanks Craig. Would you be able to share your factory drawings with me? -
Any definitive corrections to the HK B-17 nose in sight?
Thunderbolt replied to Thunderbolt's topic in LSP Discussion
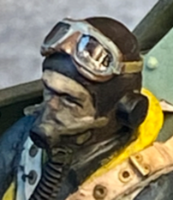
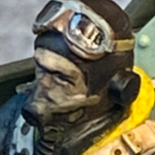
The basic problem has been talked about for years already: exaggerated convexity from the 10 to 2 o'clock positions looking at the model head on shifts the HK windscreen up what looks to be at least 1 and as many as 2 mm. It isn't a direct shift upward either; the window proportions are off due to changes in aspect ratio made to accommodate the convexity of the kit nose. Thus, windscreen correction must address (1) relative height of windscreen to windows and (2) absolute windscreen shape relative to reality. Here is my juxtapositional analysis of the differences between the kit and the reality. Caption: LOWER: in reality the lower edge of the windscreen is nearly flush with the side windows UPPER: in reality the upper edge of windscreen is slightly lower than the windows and the roof is thicker HOOD: the hood is noticeably thicker in reality. If I had the kit, I think I would know what to do. (I suspect), an effective correction accepts the location of the side windows as truth and uses their location as a reference point to shift the windscreen downward. - Shifting the windscreen downward would require special attention to both the upper and lower sides. - On the upper side, the gap created will need to be filled with plastic card which will thicken the roof more in line with reality. Because thickness is being added to a slope, the windscreen will shift forward by some small amount, which would need to be reconciled with the fuselage join later. - On the lower side, the framing to which the clear plastic joins (I.e., the very front, lower part of the turtledeck piece) will need to be flattened (via thinning and bending) to more accurately reflect reality. In all likelihood, the very lower edge of the frame will need to be cut free from the rest of the turtledeck to permit its proper positioning and bending: - The clear plastic would be sacrificed, painted over and glued with the polystyrene hood to permit accurate shaping of the windows, which would be drawn with a sharpie using good photographs, drilled out, and glassed with a clear acetate backing from the inside. At that point, the windscreen would have been corrected, and the major remaining task would be (1) flattening the fuselage and (2) ensuring a clean, accurate join between the fuselage and windscreen. Regarding how I think the fuselage should be approached, the essential aim would be to remove the entire upper section of the nose, making a flexible "hood" that is very thin to promote flexibility, and shorter on the sides to promote flattening when the sides are re-approximated. If I did try this, I would assemble the sections outlined in red below, and then cut them out as one unit. Before cutting, I would drill a series of parallel holes on the hood and on the lower 2/3 of the fuselage directly opposed from one another, with the ultimate goal of using a pursestring suture to perfectly reapproximate the edges. As the suture tension is dialed in, the piece flattens to meet the windscreen as desired. Flattening can only occur using a tensing technique if the sides get shorter. Thus, I would remove about 0.5 to 1 mm from the lateral edges and then reduce the thickness of the "hood" to near paper to make it as flexible as possible. The point of removing plastic from the edges it to reduces the height of the hood as the edges are reapproximated once again. The fuselage shape is adjusted to accommodate the reduction in windscreen height and the flatness of the lower frame. It may result in a perfect level of flatness, it may not. The correction obeys the windscreen and not the fuselage. the bet is that if the windscreen shape is corrected, the fuselage will follow naturally. Does this make sense? One day, I will try it and share my work -
Any definitive corrections to the HK B-17 nose in sight?
Thunderbolt replied to Thunderbolt's topic in LSP Discussion
I didn't mean WNW, I meant Zoukei-Mura. I had created the post about WNW potentially following suit of their Lancaster with a B-17, which, I do indeed understand, will never happen. -
Any definitive corrections to the HK B-17 nose in sight?
Thunderbolt replied to Thunderbolt's topic in LSP Discussion
Yes, I meant Zoukei-Mura. -
#1 LSP on your Shelf of Doom - post pix and cheer on
Thunderbolt replied to seiran01's topic in LSP Discussion
Amazing NMF though! How'd you do it? -
1/32 Hasegawa/MDC Bf 109G-14 Hartmann - Built in 2007
Thunderbolt replied to Thunderbolt's topic in Works in Progress
thank you!! -
bring it back
-
ah, got it.
-
Any definitive corrections to the HK B-17 nose in sight?
Thunderbolt replied to Thunderbolt's topic in LSP Discussion
Thank you for your reply. What are these other very subtle lines you speak of? -
Any definitive corrections to the HK B-17 nose in sight?
Thunderbolt replied to Thunderbolt's topic in LSP Discussion
I saw. Looks unfinished and unclear if surgery was involved or if he sanded it down and used putty to re-contour the nose -
1/32 Hasegawa/MDC Bf 109G-14 Hartmann - Built in 2007
Thunderbolt replied to Thunderbolt's topic in Works in Progress
Got it! Are you not also affiliated with MDC? -
Any definitive corrections to the HK B-17 nose in sight?
Thunderbolt replied to Thunderbolt's topic in LSP Discussion
and the context remains so no hijacking of thread plz -
Any definitive corrections to the HK B-17 nose in sight?
Thunderbolt replied to Thunderbolt's topic in LSP Discussion
a Zoukei-Mura SWS B-17 would probably be 450 bucks and worth every penny. They seem to have both the enthusiasm and capabilities to do it right. I think I'll shoot them an email and see what they say. -
Any definitive corrections to the HK B-17 nose in sight?
Thunderbolt replied to Thunderbolt's topic in LSP Discussion
that whole cold fusion thing sounds easier -
Any definitive corrections to the HK B-17 nose in sight?
Thunderbolt replied to Thunderbolt's topic in LSP Discussion
"I award you no points, and may God have mercy on your soul." -
Any definitive corrections to the HK B-17 nose in sight?
Thunderbolt replied to Thunderbolt's topic in LSP Discussion
Your imagination and skill are quite incredible! Good luck with the rest of your project...how much longer do you think you'll need? I wonder what your thoughts are on my own proposed approach to correcting the nose (for a late-war B-17G) 1. Fix nose to the fuselage 2. remove upper third of nose just aft of bubble as one unit (section should be neatly inline with turtleneck) 3. with obstructing round nose plastic now clear, modify windscreen until achieved result is desired, fixing everything to cockpit roof (or maybe fix windscreen after nose has been rebuilt, would have to trial this in vivo; I do not yet own a kit) 4. thin excised upper third of nose from underneath until it is flexible enough to be flexible and therefore flattenable 5. remove 1 mm plastic along the full length of the both lateral aspects of the excised upper third section (so that when one reattaches this section to the lower 2/3 of the nose, it can only sit flush if it loses significant curvature) 6. gradually refit the removed third to fit the corrected windscreen, then attach 7. plasticcard/putty/sand/rescribe/etc. thoughts?


